System Restore: Complete Guide for Windows 11
Introduction:
Your Windows 11 PC can run into problems at any time. A bad update, a new app, or a wrong setting can break things fast. When that happens, you need a quick fix. System Restore is one of the best built-in tools Windows offers for these moments. It helps you roll back your PC to a time when everything worked fine.
Many users don’t know how powerful this tool really is. Whether your PC is running slow or crashing often, this guide will walk you through everything. You will learn how to system restore to an earlier date, create restore points, find your restore list, and use the feature smartly.
What Is System Restore?

System Restore is a Windows feature that saves snapshots of your system settings and files. These snapshots are called restore points. When something goes wrong, you can use a restore point to take your PC back to a better state. It does not delete your personal files. It only changes system files, drivers, and registry settings.
Think of it like an undo button for your whole computer. Windows 11 creates restore points automatically at key moments. These moments include Windows updates, driver installs, and app changes. You can also create one manually whenever you want. It is a simple but smart way to keep your PC safe.
Precautions to Take When Using System Restore
Stay Safe Before You Hit Restore: What You Must Know First
Before you use System Restore, it is important to take a few steps. Rushing into a restore without planning can sometimes cause more trouble. The good news is that these precautions are easy to follow. Taking a few minutes now can save you hours of headache later.
- Back up your personal files first: System Restore does not touch your documents, photos, or videos. But it is always smart to back up anyway. Use an external drive or cloud storage before you begin.
- Check if System Restore is turned on: Some PCs have this feature turned off by default. Go to your system settings and confirm it is enabled before you need it. You don’t want to find out it’s off during a crisis.
- Know what the restore will change: A restore will roll back drivers, system files, and app installs. Any app you installed after the restore point was made will be removed. Make a note of recent installs before you proceed.
- Make sure your PC has power: Never start a restore on a laptop with low battery. If the power cuts off mid-restore, it can cause serious problems. Plug in your charger before you begin.
- Close all open apps: Before starting the process, save your work and close every open program. This prevents data loss and makes the restore process smoother.
- Do not interrupt the process: Once the restore begins, let it finish on its own. Do not turn off the PC or press any keys during the process. Patience here is very important.
- Create a new restore point before restoring: This sounds funny, but it is wise. If the restore makes things worse, you can use the new point to undo the undo. It gives you a safety net.
How to Create A Restore Point On This Computer
Creating a restore point is something you should do regularly. It is like saving your game before a tough level. If something goes wrong later, you can come back to this saved state. Windows 11 lets you create a restore point in just a few clicks. It takes less than a minute and can save you a lot of trouble later.
You should create a restore point before making any big changes to your PC. This includes installing new software, updating drivers, or changing system settings. It is a simple habit that pays off when things go wrong.
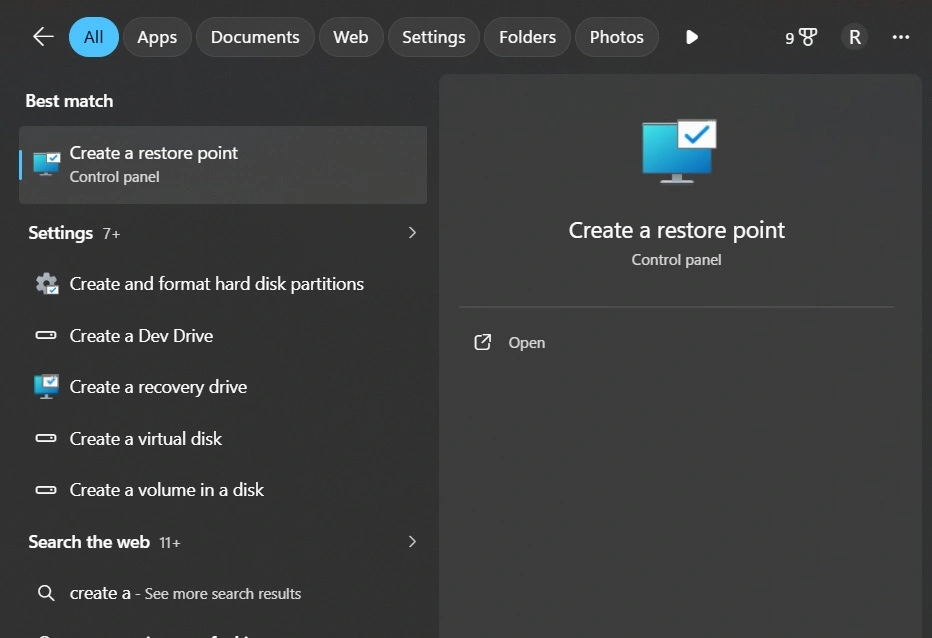
Step 1: Press the Windows key and type “Create a restore point.” Click on the result that appears.
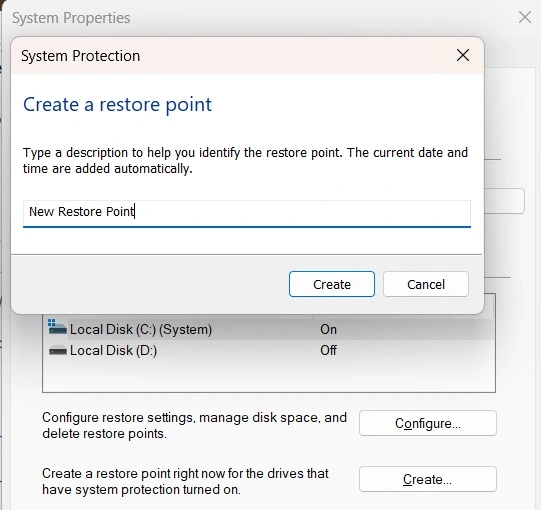
Step 2: A window will open. Under the “System Protection” tab, select your main drive (usually C:) and click “Create.” Give the restore point a name you will remember.
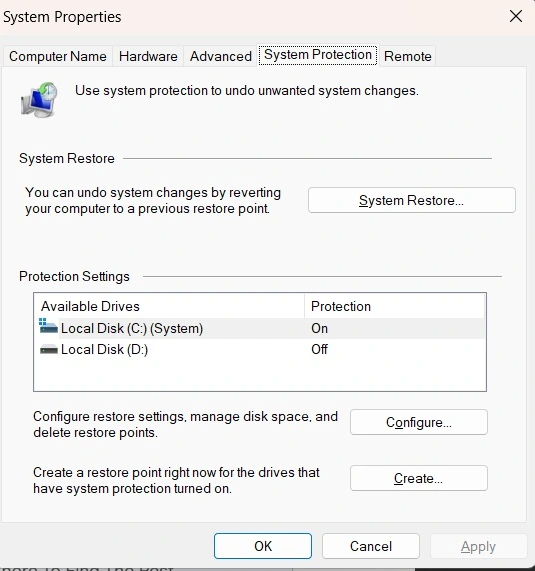
Step 3: Click “Create” again and wait for Windows to finish. You will see a message saying the restore point was created successfully. Click “Close” to finish. Your restore point is now saved and ready to use.
How To System Restore To An Earlier Date
Knowing how to system restore to an earlier date is one of the most useful skills for any Windows user. It helps you undo changes that caused problems on your PC. The whole process takes only a few minutes. Windows 11 guides you through each step clearly. You just need to pick the right restore point and confirm your choice.
If your PC is misbehaving after a recent change, this is the first thing to try. It is faster than reinstalling Windows and safer than guessing what went wrong. Learning how to system restore to earlier date can save your PC from many common issues.
Step 1: Press the Windows key and search for “Create a restore point.” Open it and go to the “System Protection” tab. Click on “System Restore.” A new window will open. Click “Next” to see a list of available restore points.
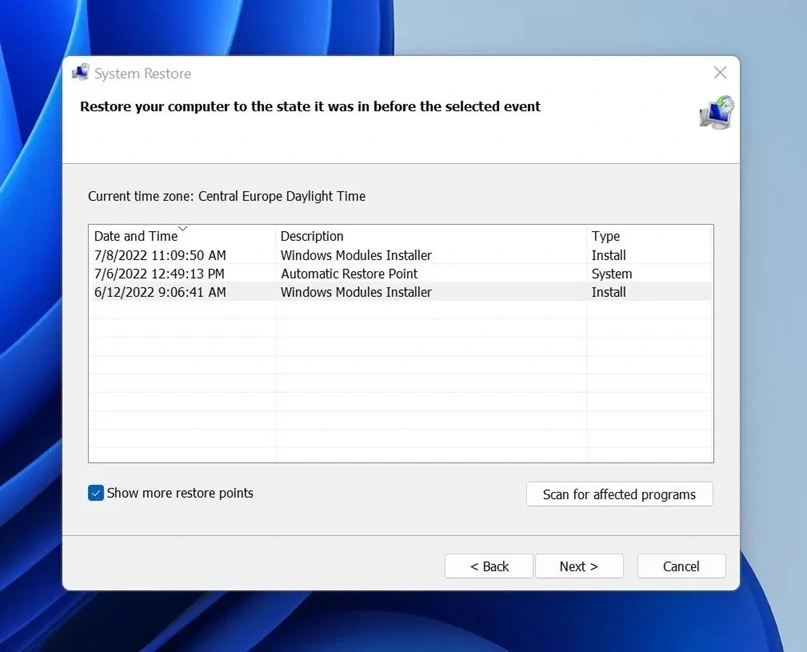
Step 2: Choose a restore point from before the problem started. Click “Next” and then “Finish.” Your PC will restart and begin the restore. Once done, Windows will tell you if it was successful. The PC will feel just like it did on the date of that restore point.
System Restore Points For This PC
Your PC stores several restore points at any given time. These are created automatically by Windows or manually by you. Each one has a date, time, and a short description. Knowing how these restore points work helps you use the feature better. Windows 11 manages the storage space used by these points on its own.
If you want to know what restore points exist for your PC, you can view them easily. This is helpful when picking the right point to restore to. Understanding how to system restore to earlier date starts with knowing which restore points are available on your system.
Step 1: Press the Windows key and type “Create a restore point.” Open the result and click on the “System Protection” tab. Click “System Restore” and then hit “Next.” You will now see a list of restore points saved on your PC.
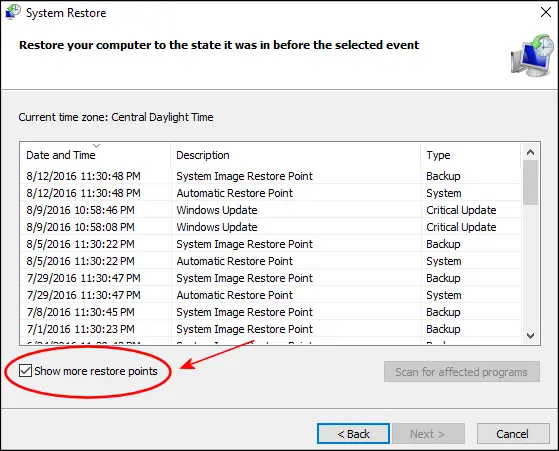
Step 2: Each entry shows a date, time, and description. Look for one that was created before your problem began. If you don’t see one, check the box that says “Show more restore points.” This will display older entries you might have missed.
BONUS: Where To Find The Restore Points List?
The restore points list is easy to find once you know where to look. Many users don’t realize it is just a few clicks away. This list shows all the saved states of your PC. It is your roadmap when something goes wrong, and you need to go back in time.
You can view this list through the System Restore wizard in Windows 11. The list is organized by date, so it is easy to scan. Once you know how to system restore to an earlier date, using this list becomes second nature.
Step 1: Open the Start menu and search for “Create a restore point.” Click the top result. In the window that opens, click the “System Restore” button. Click “Next” on the first screen.
Step 2: The list of restore points will appear. It shows the date, time, and type of each point. The type will say either “Manual” or “System” depending on how it was created. Pick the one that suits your needs and follow the prompts to restore.
Tips to Make the Most of the System Restore Feature on Windows
Smart Habits That Help You Get the Best Out of System Restore
System Restore is a great tool, but using it wisely makes it even better. A few simple habits can make a big difference. These tips help you stay prepared and avoid common mistakes. Whether you are a beginner or an experienced user, these are worth following.
- Create restore points before every big change: Always make one before installing a new app or driver. This way, you always have a recent fallback point. It takes less than a minute but saves hours of fixing.
- Label your restore points clearly: When you create a manual restore point, give it a useful name. For example, “Before installing the XYZ app.” This makes it easy to pick the right one later.
- Check that System Protection is on: Go to system settings and make sure protection is enabled for your C: drive. If it is off, restore points will not be saved.
- Do not rely on it as your only backup: System Restore is not a full backup tool. It doesn’t save your files. Use a separate backup tool like File History or an external drive for full protection.
- Use it early, not as a last resort: Many users wait too long before trying System Restore. Use it as soon as a problem appears. The sooner you restore, the less damage there is to undo.
- Schedule regular manual restore points: Windows creates automatic points, but adding your own gives you more control. Do it once a week or before any major activity.
- Keep enough disk space free: System Restore needs disk space to save its points. If your drive is almost full, old restore points get deleted. Keep at least 10–15% of your drive free.
- Test it when things are working fine: Try doing a restore on a healthy PC so you understand the process. This way, you won’t feel lost when you actually need it during a crisis.
Conclusion
System Restore is one of the most underused tools in Windows 11. It is simple, safe, and free. When your PC runs into trouble, it can bring things back to normal without the need for expert help. You now know how to create restore points, find the restore list, and how to system restore to an earlier date the right way.
Make it a habit to create restore points regularly. Don’t wait for a problem to start using this feature. The more you use it, the more control you have over your PC’s health. With the tips and steps in this guide, you are ready to handle most Windows problems with confidence.
FAQs
1. Does System Restore delete my personal files?
No, System Restore does not delete your personal files. It only affects system files, installed apps, and registry settings. Your documents, photos, videos, and other personal data stay untouched. However, if you installed an app after the restore point date, that app will be removed. It is still a good idea to back up important files before running a restore, just to be safe.
2. How often should I create a restore point?
You should create a restore point before making any major changes to your PC. This includes installing new software, updating drivers, or changing system settings. Beyond that, once a week is a good habit to follow. Windows also creates restore points automatically during updates. But having your own manual points gives you more control and peace of mind.
3. What should I do if System Restore fails?
If System Restore fails or doesn’t fix the problem, don’t panic. First, try a different restore point from an earlier date. If that doesn’t work, you can try running System Restore in Safe Mode. Boot your PC into Safe Mode and then follow the same steps. If nothing works, consider using Windows Reset or contacting Microsoft support for further help.
Author Bio:
Dinesh Lakhwani 

Dinesh Lakhwani, the entrepreneurial brain behind “TechCommuters,” achieved big things in the tech world. He started the company to make smart and user-friendly tech solutions. Thanks to his sharp thinking, focus on quality and the motto of never giving up, TechCommuters became a top player in the industry. His commitment to excellence has propelled the company to a leading position in the industry.
Popular Post


Recent Post

What is Microsoft Autopilot Everything You Need To Know
Technology has changed the way companies manage computers. Well, yes! Employees now work from offices, homes, and remote locations. Setting up devices manually for every worker takes time and effort. It can also create mistakes that slow down productivity. This is where Microsoft Autopilot becomes useful. It helps businesses prepare and deploy Windows devices with […]

Enable Automatic Device Locking Feature Windows: Complete Guide
Introduction: Your computer stores important information such as emails, documents, passwords, and personal photos. Leaving it unlocked can put that data at risk. Thankfully, Windows includes built-in features that can automatically lock your device when you are away. Setting up automatic device locking is quick and does not require any extra software. In this guide, […]

How to Update Wireless Network Driver in Windows 11 and 10
Your Wi-Fi keeps dropping. Pages load slowly. The connection feels unstable? Well, you are not alone. Most of the time, the problem is not with your internet plan. It is with your wireless network driver. A driver is a small piece of software that helps your computer talk to its hardware. When it gets outdated, […]

Common Windows 11 Problems and Solutions (2026 Version)
Windows 11 has become more polished over the years, but it is still not completely free from problems. Even after regular updates from Microsoft, many users continue to face issues like lagging performance, failed updates, audio troubles, random crashes, and network errors. Some problems appear after installing new features, while others develop gradually as the […]

Fortect Driver Updater Review: Features, Steps, Pros, and Cons.
A new PC usually feels quick and responsive. Applications open instantly, games run smoothly, and everything works as expected. As time passes, however, you may notice slower performance, system crashes, hardware glitches, or devices that stop working properly. While many people assume malware or low storage space is to blame, outdated drivers are often the […]

New Features Coming in Windows 11 This Year [2026]
Microsoft is always working to make Windows better. This year is no exception. The company has announced and rolled out several exciting updates for its users. These updates touch almost every part of the operating system. From the Start menu to system settings, changes are arriving fast. If you use Windows daily, you will want […]

Top 14 Duplicate Photo Finder and Remover For Windows [2026]
Introduction: Photos pile up fast. Well, yes! You take ten shots of the same moment. You download the same image twice. You back up your folder and forget you already did it. Before you know it, your storage is packed with copies. A good duplicate photo finder helps you take back that space without losing […]

Advanced System Settings on Windows 11: Complete Guide
Windows 11 is a powerful operating system. It comes with many features that most users never explore. One of the most useful areas is the System Properties panel. This is where you can control how your computer performs, starts up, and handles memory. Many users only change basic settings like wallpaper or display options. But […]

21 Advanced Windows Security Settings: Latest Updates
Introduction: Your computer holds a lot of important data. From personal photos to work files, everything sits on your Windows system. That is why protecting it properly matters more than ever. Windows security settings have come a long way. Microsoft keeps adding stronger layers of protection with every update. Most users never go beyond the […]

Security Upgrades of Microsoft Windows in This Decade [Complete Guide]
Introduction Microsoft has been working hard to make Windows safer every year. Cyberattacks are growing fast. Hackers are smarter now. They target millions of Windows users every single day. That is why Microsoft has added many powerful new security upgrades of Microsoft Windows since 2020. These upgrades protect your data, your identity, and your device […]

