Here’s How to Reduce RAM Usage on Windows PC — 13 Solutions
Random Access Memory is the lifeline of your PC. Your Windows computer can lag, crash, and freeze on you without sufficient RAM.
Since all tasks require memory, a PC cannot process effectively during excessive RAM usage. Therefore, you require significant free RAM on your PC to perform day to day operations.
And it is easy to reduce RAM usage on Windows PCs. All you have to do is follow the simple 13 preventive steps, and your RAM will never give you any trouble.
Let’s see easy preventative measures to reduce RAM usage on Windows.
What Happens If Your PC Runs on Low RAM?
Every task you perform on your PC takes up some space. Even right-clicking on an icon takes up a small space from the RAM.
Thus, if your computer’s RAM is being overused, it will lag and be unable to perform the basic tasks. In addition, overused RAM can create several Windows errors, like:
- Application or system crashes
- Slow loading
- Poor web browsing speed
- Decreased PC performance
How to Ensure Your RAM Is Overused?
Your computer can lag, crash or freeze due to other operational reasons too. Thus, if your PC is working slow, it is not a sure shot sign that your RAM is being overused.
So, before coming to a conclusion, first, check your RAM usage. Here’s how to do that:
Step 1. Press the Ctrl + Alt + Delete key combination and select Task Manager.
Step 2. From the Task Manager, click on More Details if it only shows the list of running programs.
Step 3. Go to the Performance tab > Memory.
Step 4. You can check your PC’s RAM usage and how much memory is free and in use on the screen.
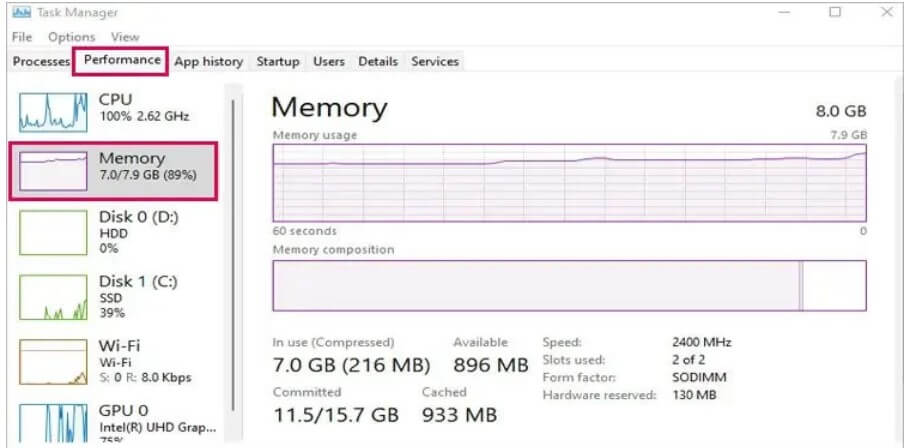
Usually, RAM consumes 3-5 GB when idle. It may vary on operating systems. But, it is recommended to have at least 5 GB of RAM free to perform your tasks smoothly.
Besides this, you can also check the RAM usage for the Task Manager, following these steps:
Step 1. Go to the Task Manager > Process tab > Memory.
Step 2. You can now see every running application’s memory usage.
13 Solutions to Reduce RAM Usage on Your Windows PC
Once it is established that your PC is running on low RAM, don’t rush to replace your RAM. Before investing in a new RAM, you can take the following preventive measures:
Solution 1. Turn Off Background
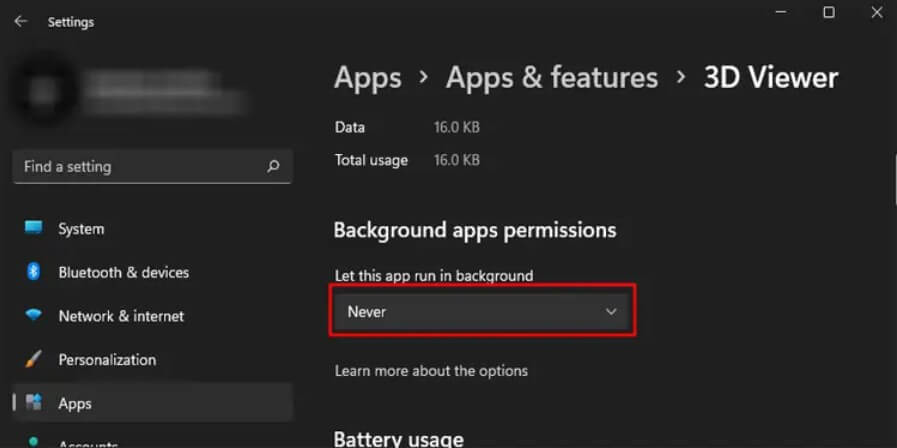
You might not realize it, but several programs are running in the background when you are working on your PC. Game launchers, chat programs or antivirus software often run in the background and consume your RAM.
Thus, you can turn off unwanted background programs and free up your RAM space like this:
Step 1. Click on the up arrow icon on the Taskbar. A box saying Show hidden icons will come up on your screen when you hover over it.
Step 2. Right-click on the application you want to stop running in the background.
Step 3. Press Quit or Exit and repeat the process on all unused programs.
Solution 2. Turn Off Programs With High Usage
If you want to turn off background programs that are taking up a large space on your computer, use these steps:
Step 1. Launch the Task Manager by pressing Ctrl + Shift + Esc keys.
Step 2. Expand the More details on the Task Manager pop up.
Step 3. Under the Details tab, left-click on Memory to sort all processes based on the memory usage.
Step 4. Scroll down and check which app is consuming more memory.
Step 5. Select the programs with high memory consumption and press End Task to turn them off.
Solution 3. Disable Startup Application
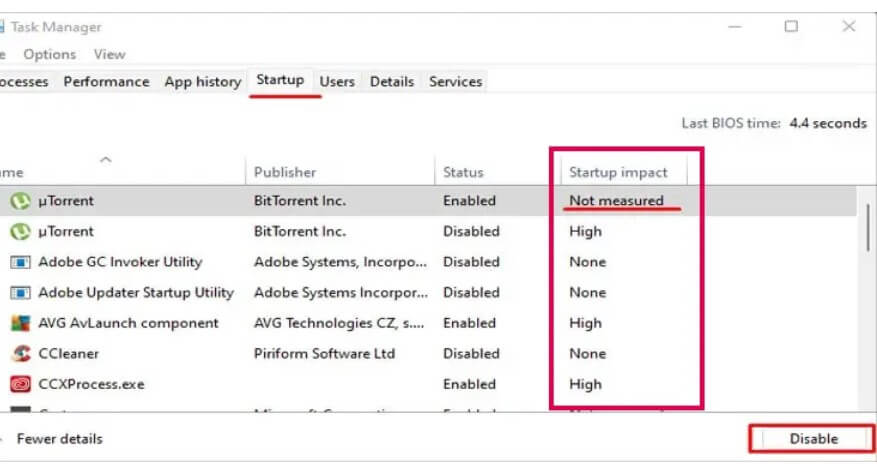
Programs that startup with your computer is also the reason behind reduced RAM usage on your PC. The startup programs can take up a large space on your RAM and slow down the PC boot up. So, you can disable certain apps from the startup as:
Step 1. Open the Task Manager > Startup tab.
Step 2. From there, you can see all the startup applications.
Step 3. Right-click on the programs that have Low, None or Not measured impact on startup and click on the Disable.
Solution 4. Adjust Virtual Memory
Due to the shortage of memory, your Windows PC will automatically use memory from your storage devices to expand the RAM. This is known as Virtual memory.
When a computer uses virtual memory, it uses a page file that provides storage from your hard drives. This can take up the excess data from the RAM. So, in order to increase virtual memory, you have to increase the page file size.
But, this doesn’t mean that you can adjust the virtual memory to a great extent. You can set virtual RAM minimum up to 1.5 times and maximum to three times the actual computer’s RAM. Here’s how to increase the virtual memory:
Step 1. Open the Windows Settings using the Windows + I keys.
Step 2. Go to System > About > Advanced system settings.
Step 3. Under the Advanced tab, click on the Settings beneath the Performance section.
Step 4. Next, go to the Advanced tab, and click on Change under Virtual memory.
Step 5. Uncheck the Automatically managed paging file size for all drives. After that, check the Custom size.
Step 6. Choose the Initial and Minimum size for your virtual memory and click on OK.
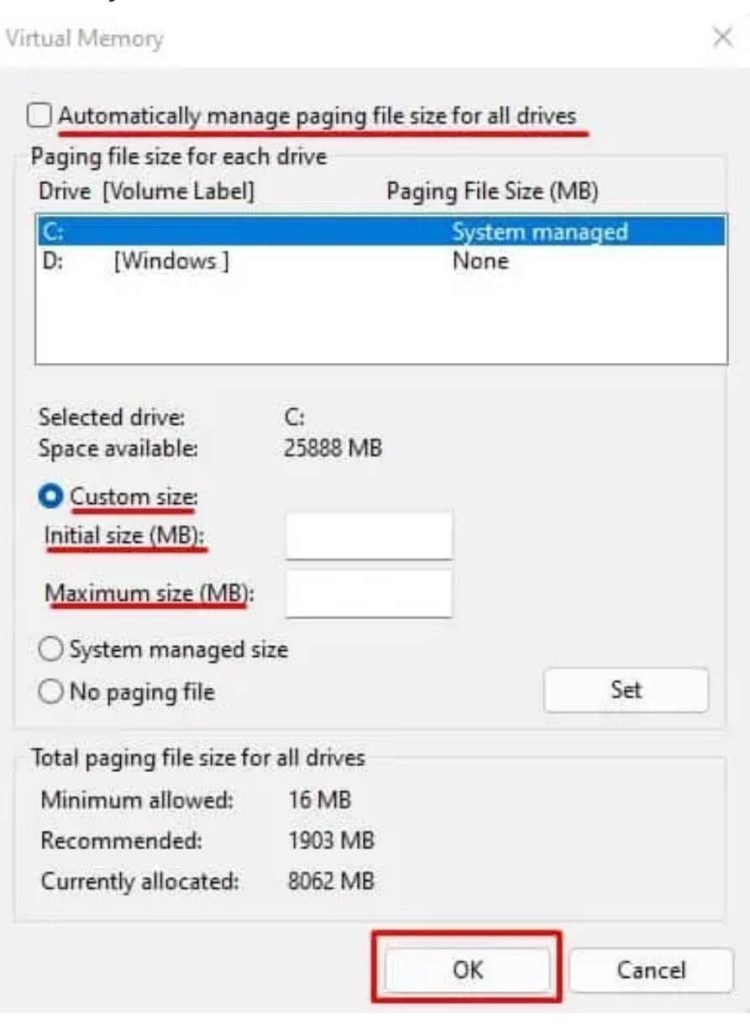
Step 7. Click on Apply > OK. Then, restart your PC to save changes.
Solution 5. Change NDU Value
Many Microsoft users encounter an error that displays 99% memory usage. Even though the device has significant free RAM, you might still get an error message saying, “Computer low on memory”.
This error is triggered due to some unknown bugs in the Network Diagnostic Usage (NDU). But thankfully, you can fix NDU errors by changing Registry values. Before tweaking with the Registry Editor, ensure to back up your system. This way, you will not lose your data if something goes wrong.
After backing up your system, follow these steps to change the NDU value:
Step 1. Open the Run dialogue box by pressing the Windows + R keys.
Step 2. Enter the regedit and hit Enter.
Step 3. Go to this location—
Computer\HKEY_LOCAL_MACHINE\SYSTEM\ControlSet001\Services\Ndu
Step 4. Double-click on Start from the right panel.
Step 5. Under Value data, replace the value with 4.
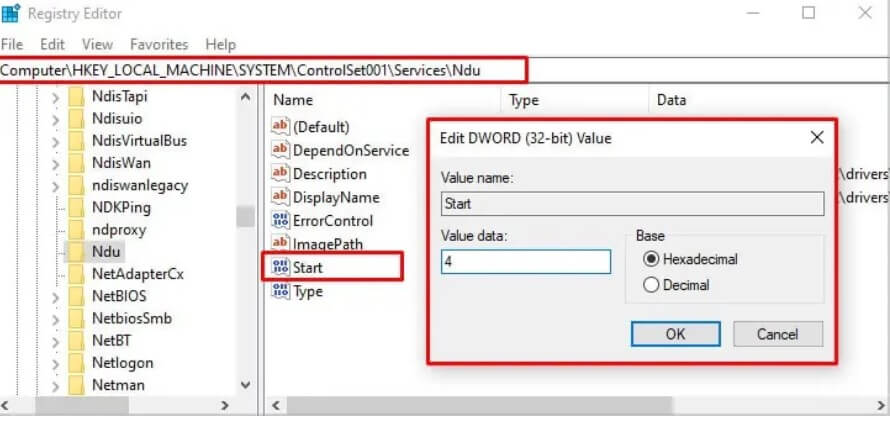
Step 6. Click on OK.
Step 7. Restart your computer to apply the changes to reduce RAM usage on your Windows PC.
Solution 6. Remove Browser Extensions
If your web browser speed is low, this might be happening due to multiple browser extensions running in the background. So, you should remove unwanted browser extensions to reduce RAM usage.
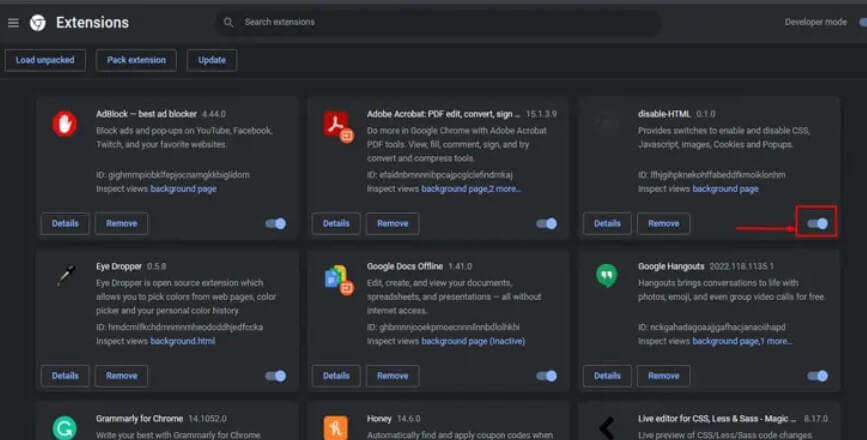
Every web browser has a different process to deactivate extensions. For this guide, we will show how to disable extensions in Chrome:
Step 1. Launch the Chrome app and click on the three vertical dots from the top.
Step 2. Click on Settings > Extensions.
Step 3. Toggle the button next to the extension that you want to turn off.
Solution 7. Run Virus Scans
If your computer is infected with malware, it can consume space in the memory and reduce the device’s overall performance. So, if you see an application taking up a large space in your memory, it is better to run an antivirus scan.
Today, you can find many great antivirus software for Windows like McAfee, Norton, etc. Besides third-party tools, you can use the Windows default utility called Windows Defender to scan your computer for viruses. Here is a step to use the Windows Defender:
Step 1. Press the Windows + I key to open Settings.
Step 2. Head over to Privacy & Security > Windows Security > Open Windows Security.
Step 3. Select Virus & Threat Protection.
Step 4. Go to the Current threats and click on Scan options.
Step 5. Check the Full scan and click on Scan now.
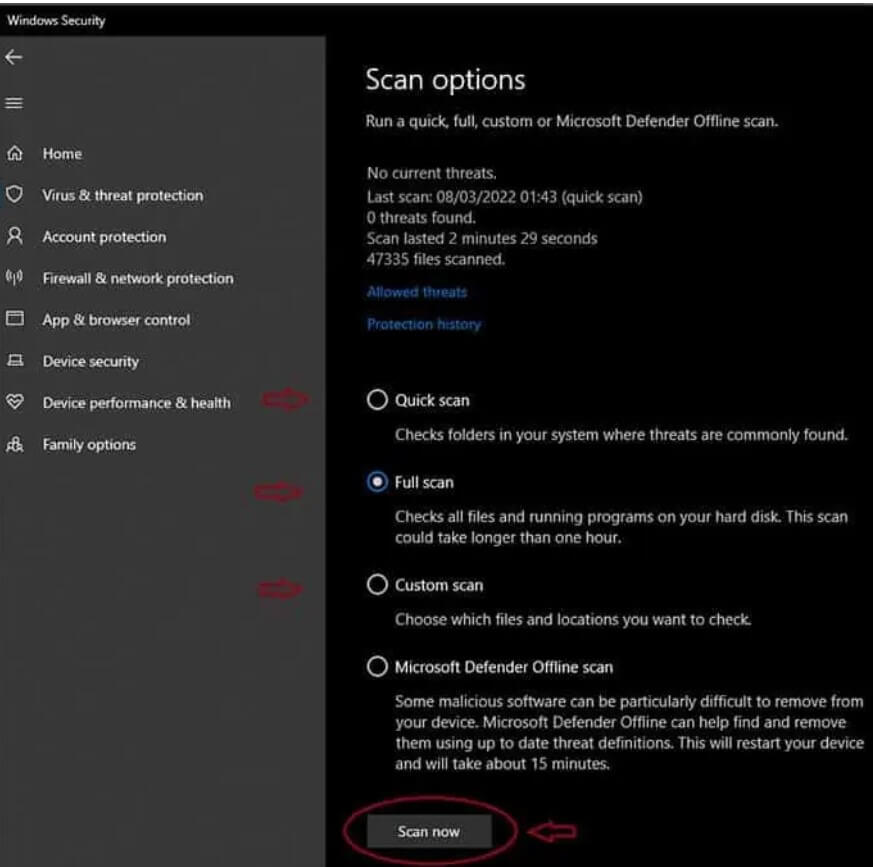
Step 6. If there are any threats, Windows Defender will remove them.
Solution 8. Get a Dedicated Graphics Card
Your PC will share physical memory with graphical memory without a dedicated GPU. That means if your system only runs on integrated graphics, it will use RAM to perform graphics-related tasks. This can lead to high RAM usage during games and make your system lag.
Thus, the system doesn’t need to share RAM memory when using a shared graphics card. The GPU can manage all tasks related to graphics.
Solution 9. Disable the Superfetch Services
Superfetch or SysMain is a service that runs in the background to analyze your frequently used programs and preloads them into RAM. This will reduce the application startup time, but it can increase RAM usage.
Thus, you can try to disable SysMain services to reduce RAM usage on your PC. To do so:
Step 1. Launch the Run dialogue box using the Windows + R keys.
Step 2. Enter “services.msc” and press Enter.
Step 3. On the Services window, look for SysMain or Superfetch and double-click on it.
Step 4. Change the Startup type to the manual and click on Stop under Service status.

Step 5. Click on Apply > OK.
Solution 10. Disable Site Isolation
Chrome users have the Site Isolation feature enabled by default. This feature provides a defense mechanism against malicious websites that can breach browser security to access its data.
However, this setting can lead to high memory usage. We don’t recommend disabling this setting, but if your PC is super slow, you can try this solution to reduce RAM usage. Follow these steps to disable Site Isolation:
Step 1. Open Chrome and search for chrome://flags/ in the address bar.
Step 2. Up next, search for Site Isolation.
Step 3. Expand the dropdown menu Site Isolation and select Disabled.

Solution 11. Disable Animations
Windows 10 and 11 have modern and stunning animations to bring various interface elements to life. However, the animations are loaded in RAM and always stay there.
So, it is best to disable most or all animations to reduce pressure from your RAM. Especially if you are already running on low memory. This is how to disable Windows animations:
Step 1. Click on the Start menu and type “View advanced system settings “.
Step 2. Go to the Advanced tab > Performance tab > Settings.
Step 3. Choose Adjust for best performance. Alternatively, set it to Custom. This way, animations will work only when they get sufficient free space.
Solution 12. Close Web Browser Tabs
If your internet browser is running at a bullock cart speed, it could be because you have too many tabs opened simultaneously. If you are using Chrome and it consumes all-time high memory. Each tab in Chrome runs a separate process and takes up high RAM usage.
Thus, to stop web browsers from hogging your memory, close all the tabs once you are done. In fact, close web browsers while playing or performing other heavy tasks on your computer.
Solution 13. Upgrade Your RAM
When nothing works to reduce RAM usage on your Windows PC, you have only one option left — upgrade your RAM. This way, you don’t have to turn off background programs and remove applications. And, you can enjoy all Windows graphics on your device.
Plus, you can never have too much RAM. If your computer only has one stick RAM, get one more to run sticks in Dual-channel mode. Dual-channel can increase your PC’s performance by 20-30%.
In addition, it is recommended to get at least 16 GB of RAM to ensure your system runs smoothly.
Parting Remarks
High pressure on the RAM is never good. It makes your PC slow, sluggish, and buggy. Thus, always follow the preventive measures to reduce RAM usage from your Windows PC.
We have shared the best 13 solutions to free up your RAM. We hope these methods will help to improve your PC’s performance. Meanwhile, don’t forget to check other Windows guides on this website.
FAQs
FAQ 1: Is high RAM usage always a problem on Windows
Not always. Windows uses RAM to speed things up. Free RAM sitting idle is wasted. High usage becomes a problem only when the system slows down. Signs include lag, freezing, and slow app switching. If your PC stays responsive, usage is normal. Problems start when RAM hits limits often.
FAQ 2: Will adding more RAM fix high RAM usage
Adding RAM helps in many cases. It gives Windows more room to work. Apps stop fighting for memory. Multitasking becomes smoother. But it does not fix bad habits. Heavy startup apps still load. Memory leaks still exist. Software cleanup still matters.
FAQ 3: Can Windows updates increase RAM usage
Yes, sometimes. New features use more memory. Background services may increase. Security tools also grow heavier. Updates also improve memory handling in many cases. Usage may rise, but performance can still improve. Always judge by system speed, not numbers alone.
FAQ 4: Why does RAM usage stay high even when no apps are open
Background processes keep running. Windows services stay active. Startup apps load silently. Browser helpers may stay alive. Cached data fills unused RAM. This improves speed later. High idle usage is normal to a point. It becomes an issue only if performance drops.
FAQ 5: Does closing apps really reduce RAM usage
Yes, but only active apps. Closed apps free up memory immediately. Some apps leave background processes behind. These still consume RAM. Task Manager helps identify them. Proper exits matter. Restarting clears everything at once. That resets RAM usage fully.
FAQ 6: Is high RAM usage linked to slow gaming performance
Often yes. Games need free RAM. If memory is full, Windows uses the disk instead. This causes stutter. Frame drops become common. Background apps worsen this. Freeing RAM before gaming helps a lot. More RAM also improves stability
Author Bio:
Dinesh Lakhwani 

Dinesh Lakhwani, the entrepreneurial brain behind “TechCommuters,” achieved big things in the tech world. He started the company to make smart and user-friendly tech solutions. Thanks to his sharp thinking, focus on quality and the motto of never giving up, TechCommuters became a top player in the industry. His commitment to excellence has propelled the company to a leading position in the industry.
Popular Post


Recent Post

Monitor Screen Calibration Guide: Everything You Should Know
Your monitor shows colors every single day. But are those colors actually correct? Most people never stop to check this. They just use the screen as it comes out of the box. This habit can lead to wrong colors in photos, videos, and work files. Colors may look too warm or too cold without you […]

How To Check Installed RAM and RAM Slots [Complete Guide]
RAM plays an important role in how smoothly a computer runs. Short for Random Access Memory, it stores the data and instructions that Windows and active applications need at any given moment. From opening multiple browser tabs to running games and productivity software, RAM helps keep everything responsive. A system with limited memory may experience […]

What is Microsoft Autopilot Everything You Need To Know
Technology has changed the way companies manage computers. Well, yes! Employees now work from offices, homes, and remote locations. Setting up devices manually for every worker takes time and effort. It can also create mistakes that slow down productivity. This is where Microsoft Autopilot becomes useful. It helps businesses prepare and deploy Windows devices with […]

Enable Automatic Device Locking Feature Windows: Complete Guide
Introduction: Your computer stores important information such as emails, documents, passwords, and personal photos. Leaving it unlocked can put that data at risk. Thankfully, Windows includes built-in features that can automatically lock your device when you are away. Setting up automatic device locking is quick and does not require any extra software. In this guide, […]

How to Update Wireless Network Driver in Windows 11 and 10
Your Wi-Fi keeps dropping. Pages load slowly. The connection feels unstable? Well, you are not alone. Most of the time, the problem is not with your internet plan. It is with your wireless network driver. A driver is a small piece of software that helps your computer talk to its hardware. When it gets outdated, […]

Common Windows 11 Problems and Solutions (2026 Version)
Windows 11 has become more polished over the years, but it is still not completely free from problems. Even after regular updates from Microsoft, many users continue to face issues like lagging performance, failed updates, audio troubles, random crashes, and network errors. Some problems appear after installing new features, while others develop gradually as the […]

Fortect Driver Updater Review: Features, Steps, Pros, and Cons.
A new PC usually feels quick and responsive. Applications open instantly, games run smoothly, and everything works as expected. As time passes, however, you may notice slower performance, system crashes, hardware glitches, or devices that stop working properly. While many people assume malware or low storage space is to blame, outdated drivers are often the […]

New Features Coming in Windows 11 This Year [2026]
Microsoft is always working to make Windows better. This year is no exception. The company has announced and rolled out several exciting updates for its users. These updates touch almost every part of the operating system. From the Start menu to system settings, changes are arriving fast. If you use Windows daily, you will want […]

Top 14 Duplicate Photo Finder and Remover For Windows [2026]
Introduction: Photos pile up fast. Well, yes! You take ten shots of the same moment. You download the same image twice. You back up your folder and forget you already did it. Before you know it, your storage is packed with copies. A good duplicate photo finder helps you take back that space without losing […]

Advanced System Settings on Windows 11: Complete Guide
Windows 11 is a powerful operating system. It comes with many features that most users never explore. One of the most useful areas is the System Properties panel. This is where you can control how your computer performs, starts up, and handles memory. Many users only change basic settings like wallpaper or display options. But […]

