Emptying the Recycle Bin In Windows: Complete Guide
Introduction:
When a file is deleted in Windows, it is not erased immediately. It is first sent to the Recycle Bin, where it stays until it is removed permanently. Clearing the Recycle Bin is a quick way to regain storage space. Many users do this often to keep their system clean and working properly.
Knowing how to empty the Recycle Bin is a basic but important skill for every Windows user. If you never clear it, the Bin can fill up with hundreds of files and take up gigabytes of space. Some files may also contain sensitive information that you want gone for good. When you permanently delete files from the Recycle Bin, those files are removed from your drive and cannot be recovered without special software.
This guide walks you through everything, from precautions to methods to frequently asked questions.
Stop Before You Delete: Precautions You Should Know
Emptying the Recycle Bin is permanent. Once done, you cannot undo it through normal means. Before you go ahead with emptying the Recycle Bin in Windows, take a moment to review these important precautions. They will help you avoid losing something you may need later.
• Check what is inside first: Open the Recycle Bin and look through the files before you empty it. You may find something you deleted by accident. Scroll through the list and make sure nothing important is sitting there.
• Recover files if needed: If you spot a file you want to keep, right-click on it and choose Restore. This sends the file back to its original location. Do this before you proceed to permanently delete files from the Recycle Bin.
• Do not empty during system tasks: Avoid emptying the Recycle Bin while Windows is updating or running a disk scan. Doing so can sometimes cause minor errors or slow down the process.
• Backup important data regularly: Get into the habit of backing up your files to an external drive or cloud storage. This way, even if you accidentally delete something and empty the bin, you have a copy saved elsewhere.
• Be careful with shared computers: If you share a computer with others, check with them before emptying the Recycle Bin. Someone else may have deleted a file they still need and planned to restore it.
• Know that recovery is difficult after emptying: Once you choose how to empty the Recycle Bin and confirm the action, those files are gone from standard view. Recovery tools can sometimes bring files back, but it is never guaranteed and can be costly.
Both Sides of the Coin: Advantages and Disadvantages
Like most actions on a computer, there are good reasons to clear your Recycle Bin and a few reasons to be careful. Here is a balanced look at what happens when you go ahead with emptying Recycle Bin in Windows. Understanding both sides helps you make smarter decisions.
Advantages
- Frees up disk space: Files in the Recycle Bin still use storage. Clearing them can recover space instantly.
- Keeps the system tidy: An empty bin helps maintain a cleaner and more organized system.
- Removes sensitive data: Permanently deleting files reduces easy access to private information.
- Improves performance in some cases: A full bin can affect certain disk tasks, so clearing it may help things run smoothly.
Disadvantages
- No easy undo: Once emptied, files are permanently removed and cannot be restored easily.
- Risk of losing important files: Skipping a quick check may lead to accidental deletion of useful data.
- Recovery is uncertain: Data recovery tools do not always work, especially if files are overwritten.
- Issues on shared systems: One user clearing the bin can remove files that another user still needs.
Answers to Questions You Might Still Have
Q1: Does emptying the Recycle Bin actually free up space?
Yes, it does. Files in the Recycle Bin still occupy space on your hard drive or SSD. Emptying Recycle Bin in Windows removes those files from your storage and gives that space back to the system. If your drive is nearly full, clearing the bin is one of the quickest ways to gain free space without buying new hardware.
Q2: Can I recover files after I permanently delete files from Recycle Bin?
It is very difficult but not impossible. Once you permanently delete files from Recycle Bin, the operating system marks that storage space as available. Until new data is written over it, a recovery tool like Recuva or Disk Drill may be able to retrieve the file. However, the longer you wait and the more you use the computer afterward, the lower your chances of a successful recovery.
Q3: How often should I empty the Recycle Bin in Windows?
There is no strict rule, but doing it once a week or once a month is a healthy habit for most users. If you work with large files like videos or design assets, you may want to clear it more often. Windows also lets you set a storage limit on the Recycle Bin so it clears automatically when it gets too full. Adjust this in the Recycle Bin Properties settings.
Q4: What happens if I skip how to empty Recycle Bin for a long time?
If you never clear the Recycle Bin, deleted files pile up and eat into your available storage. Over time, this can slow down your system, especially if you have a small drive. You might notice programs taking longer to load or your PC running sluggishly. While the bin itself does not cause major damage, keeping it clean is part of good system maintenance.
3 Methods to Empty the Recycle Bin on Windows
There is more than one way to go about emptying the Recycle Bin in Windows. Whether you like using the mouse, keyboard shortcuts, or built-in tools, Windows has an option for you. Below are three clear, easy-to-follow methods that work on Windows 10 and Windows 11.
Method 1: Empty the Recycle Bin Directly from the Desktop
This is the most common and straightforward way to empty the Recycle Bin. It takes just a few seconds and does not require opening any extra settings or menus. If you can see the Recycle Bin icon on your desktop, you are ready to go.
Step 1: Right-click the Recycle Bin on your desktop and select “Empty Recycle Bin.”
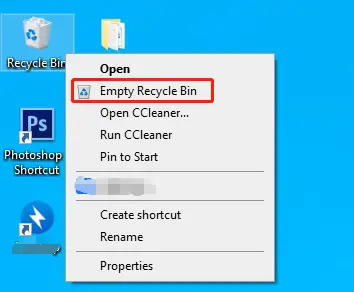
Step 2: Click “Yes” to confirm. Files will be deleted, and the icon will appear empty.
Method 2: Empty the Recycle Bin from Inside the Folder
This method is great if you want to review your deleted files before clearing them. Opening the Recycle Bin as a folder gives you full visibility into everything waiting to be deleted. It is the safest way to go about how to empty Recycle Bin if you are not sure what is stored inside.
Step 1: Open the Recycle Bin and review the files. Restore anything you need.

Step 2: Click “Empty Recycle Bin,” then confirm with “Yes.” Files will be permanently deleted.
Method 3: Use Windows Storage Sense or Settings to Auto-Empty
Windows 10 and 11 include a built-in feature called Storage Sense that can automatically manage your disk space. This tool can be set to handle how to empty the Recycle Bin on a schedule, no manual action needed. It is perfect for users who want a hands-off approach to permanently delete files from Recycle Bin over time.
Step 1: Open Settings > System > Storage and turn on Storage Sense.
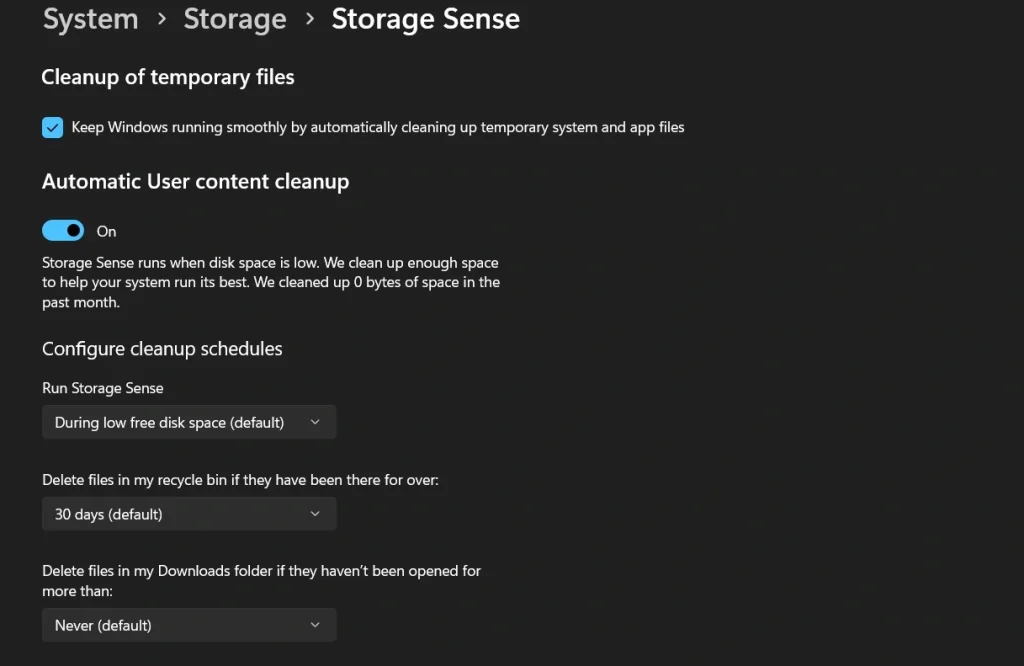
Step 2: Set how long files stay in the Recycle Bin. It will clean them automatically.
Author’s Tip
A useful habit is to check the Recycle Bin before clearing it. Open the folder and sort files by Date Deleted. This places the most recent items at the top, making it easier to catch anything removed by mistake. It only takes a few seconds and can help avoid losing important files.
For a hands-off approach, enable Storage Sense and set it to clear the Recycle Bin every 30 days. This gives enough time to restore files if needed while keeping storage free from old data. It runs automatically in the background.
For quicker access, pin the Recycle Bin to the Start menu or taskbar. Simple steps like these make regular system upkeep easier and more consistent.
Conclusion
The Recycle Bin is one of the most used yet least thought-about features in Windows. It catches all your deleted files and gives you a safety net before they are gone for good. Knowing the right way of emptying Recycle Bin in Windows means you are in full control of your storage and your data. You never have to worry about your drive filling up with old, unwanted files again.
All three methods covered in this guide are easy and work across Windows 10 and Windows 11. Whether you prefer a quick right-click on the desktop, a careful manual review inside the folder, or an automatic schedule through Storage Sense, there is a method that fits your style. Learning how to empty Recycle Bin in just a few clicks is a small skill with a big impact on system performance and privacy.
Take a moment today to open your Recycle Bin and see what is in there. You might be surprised by how much space is just sitting there unused. Once you permanently delete files from Recycle Bin that you no longer need, your computer will feel cleaner, faster, and more organized. Make it a regular part of your PC maintenance routine, and your Windows experience will be much better for it.
FAQs:
FAQ 1: Is there a keyboard shortcut for emptying the Recycle Bin in Windows?
There is no single universal keyboard shortcut that directly empties the Recycle Bin in one press. However, you can press Windows key + D to go to the desktop, then use the arrow keys to select the Recycle Bin icon, press the Application key (or Shift+F10) to open the context menu, and finally press ‘E’ to select Empty Recycle Bin. It takes a few keystrokes but works completely without a mouse once you get the hang of it.
FAQ 2: Can I set the Recycle Bin to automatically empty after a certain time?
Yes, and it is quite easy to do. Windows has a built-in feature called Storage Sense that can automatically handle how to empty the Recycle Bin on a schedule. Go to Settings, then System, then Storage, and turn on Storage Sense. From there, you can set the Recycle Bin to auto-clear after 1, 14, 30, or 60 days. Once configured, Windows takes care of it without you needing to remember.
FAQ 3: Does the Recycle Bin store files from all drives on my PC?
Yes, by default, Windows creates a hidden Recycle Bin folder on every drive connected to your PC. So if you delete files from your C: drive and your D: drive, both sets of files end up in what appears to be one Recycle Bin on your desktop. When you permanently delete files from the Recycle Bin, files from all drives are cleared together. Each drive maintains its own hidden folder, but they are all shown to you in a single unified view through the desktop icon.
Author Bio:
Dinesh Lakhwani 

Dinesh Lakhwani, the entrepreneurial brain behind “TechCommuters,” achieved big things in the tech world. He started the company to make smart and user-friendly tech solutions. Thanks to his sharp thinking, focus on quality and the motto of never giving up, TechCommuters became a top player in the industry. His commitment to excellence has propelled the company to a leading position in the industry.
Popular Post


Recent Post

How to Update Wireless Network Driver in Windows 11 and 10
Your Wi-Fi keeps dropping. Pages load slowly. The connection feels unstable? Well, you are not alone. Most of the time, the problem is not with your internet plan. It is with your wireless network driver. A driver is a small piece of software that helps your computer talk to its hardware. When it gets outdated, […]

Common Windows 11 Problems and Solutions (2026 Version)
Windows 11 has become more polished over the years, but it is still not completely free from problems. Even after regular updates from Microsoft, many users continue to face issues like lagging performance, failed updates, audio troubles, random crashes, and network errors. Some problems appear after installing new features, while others develop gradually as the […]

Fortect Driver Updater Review: Features, Steps, Pros, and Cons.
A new PC usually feels quick and responsive. Applications open instantly, games run smoothly, and everything works as expected. As time passes, however, you may notice slower performance, system crashes, hardware glitches, or devices that stop working properly. While many people assume malware or low storage space is to blame, outdated drivers are often the […]

New Features Coming in Windows 11 This Year [2026]
Microsoft is always working to make Windows better. This year is no exception. The company has announced and rolled out several exciting updates for its users. These updates touch almost every part of the operating system. From the Start menu to system settings, changes are arriving fast. If you use Windows daily, you will want […]

Top 14 Duplicate Photo Finder and Remover For Windows [2026]
Introduction: Photos pile up fast. Well, yes! You take ten shots of the same moment. You download the same image twice. You back up your folder and forget you already did it. Before you know it, your storage is packed with copies. A good duplicate photo finder helps you take back that space without losing […]

Advanced System Settings on Windows 11: Complete Guide
Windows 11 is a powerful operating system. It comes with many features that most users never explore. One of the most useful areas is the System Properties panel. This is where you can control how your computer performs, starts up, and handles memory. Many users only change basic settings like wallpaper or display options. But […]
21 Advanced Windows Security Settings: Latest Updates
Introduction: Your computer holds a lot of important data. From personal photos to work files, everything sits on your Windows system. That is why protecting it properly matters more than ever. Windows security settings have come a long way. Microsoft keeps adding stronger layers of protection with every update. Most users never go beyond the […]
Security Upgrades of Microsoft Windows in This Decade [Complete Guide]
Introduction Microsoft has been working hard to make Windows safer every year. Cyberattacks are growing fast. Hackers are smarter now. They target millions of Windows users every single day. That is why Microsoft has added many powerful new security upgrades of Microsoft Windows since 2020. These upgrades protect your data, your identity, and your device […]
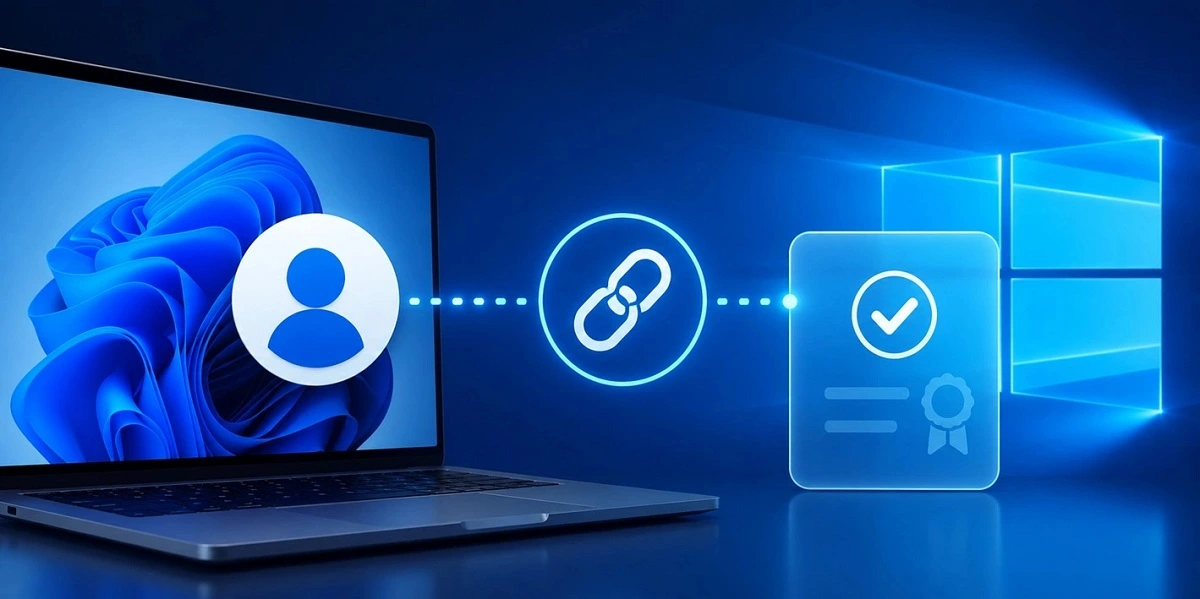
How To Link a Microsoft Account to a Digital License on Windows [2026]
Most people never think about Windows activation until it suddenly stops working. Something as simple as replacing hardware or reinstalling Windows can cause the system to lose its activated status. Linking your Microsoft account to your digital license beforehand helps prevent unnecessary trouble and makes activation recovery much easier later on. Many people using Windows […]
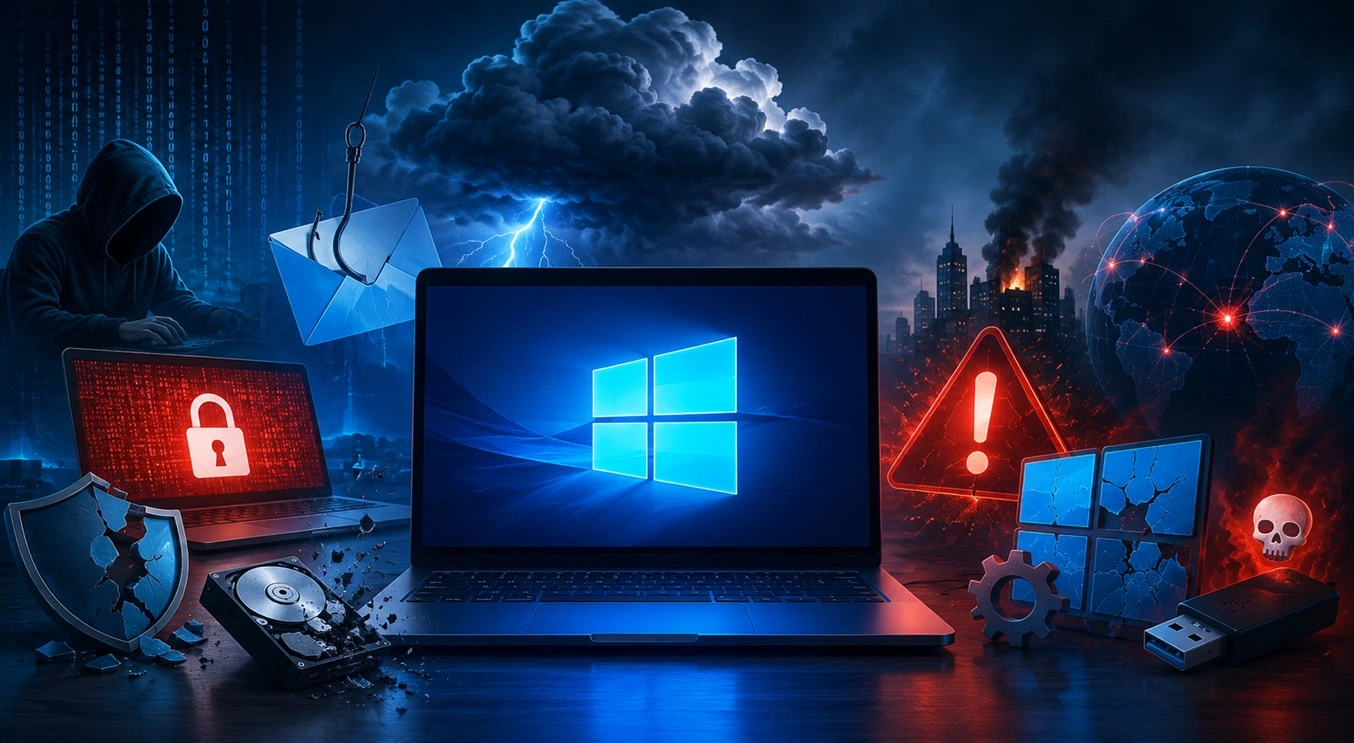
Monthly Round Up: All Big Incidents Happened for Windows Users in The Month of April 2026
Windows users had a turbulent April 2026. On April 14, Microsoft rolled out its scheduled Patch Tuesday security updates, a routine release meant to close vulnerabilities and resolve known issues. What followed was anything but routine. Rather than strengthening systems, the updates triggered a cascade of fresh problems across Windows 10, Windows 11, and Windows […]

