


If your computer has started to feel slow, you are not alone. Most Windows PCs slow down over time. Junk files pile up. The registry gets messy. Too many apps open when you start your PC. All this adds up and makes even a good machine feel tired. This is where a PC cleaner tool […]
Advanced System Settings on Windows 11: Complete Guide
Windows 11 is a powerful operating system. It comes with many features that most users never explore. One of the most useful areas is the System Properties panel. This is where you can control how your computer performs, starts up, and handles memory.
Many users only change basic settings like wallpaper or display options. But if you want real control over your PC, you need to go deeper. The advanced system settings let you do exactly that. They give you access to tools that affect speed, stability, and overall performance.
Whether you are a student, a professional, or a power user, knowing how to use these settings is valuable. This guide will walk you through everything in a simple and clear way. By the end, you will know how to view advanced system settings, use them smartly, and even create a shortcut for quick access.
What Are the Advanced System Settings?
Advanced system settings are a set of controls built into Windows 11. They are not shown on the main Settings page. Instead, they live inside a special panel called System Properties. This panel has been part of Windows for many years. It gives you access to things that regular settings do not cover.
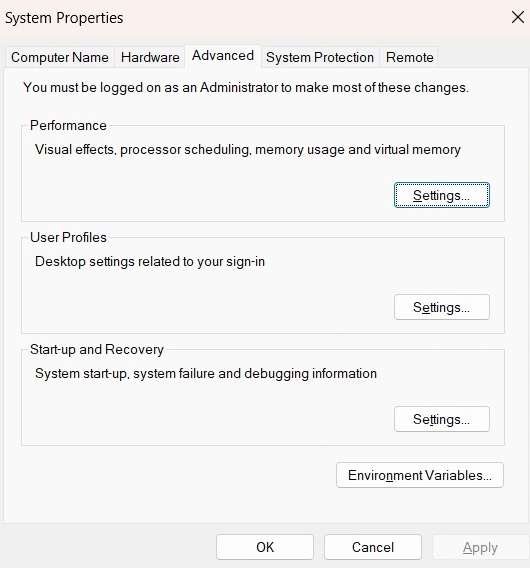
These settings are divided into several tabs. Each tab handles a different part of your system. The Advanced tab is the most important one. It includes three key sections: Performance, User Profiles, and Startup and Recovery. Each section has its own set of options. You can change how Windows handles visual effects, manage virtual memory, and decide what happens when your computer starts or crashes.
Understanding these settings can have a noticeable impact on how your computer performs. Tweaking performance options may help improve the speed of an aging system. Adjusting virtual memory can provide extra support when physical RAM is running low. Startup and recovery settings can also play a key role in maintaining system reliability. Once you become familiar with their purpose and location, these features are straightforward to manage.
How to View/Open Advanced System Settings
To view advanced system settings on Windows 11, you need to know where to look. These settings are not found in the regular Settings app. They are hidden inside the Control Panel area of Windows. Most users do not come across them unless they search for them directly. The good news is that Windows gives you several ways to reach this panel.
One of the easiest ways to open advanced system settings is through the search bar. Another way is through the Run dialog box or directly from the Control Panel. Both methods work well. Below are two simple steps to help you get there right away.
Method 1: Use the Windows Search Bar
Step 1: Click on the search icon on the taskbar. Type “View advanced system settings” in the search box.
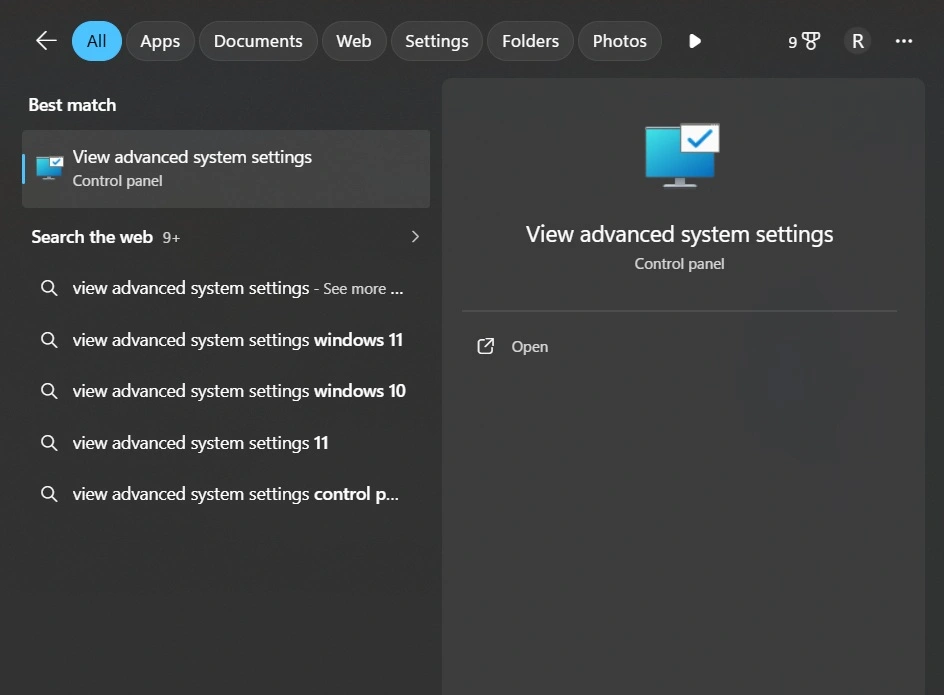
Step 2: You will see a result appear at the top. Click on it. The System Properties window will open right away.
Method 2: Use the Run Box
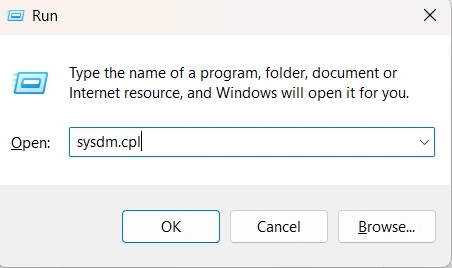
Step 1: Press the Windows key and R at the same time. The Run dialog box will open. Type “sysdm.cpl”. Press Enter. The System Properties window will be on the screen.
Step 2: Switch to the Advanced tab at the top. You are now inside the advanced system settings panel.
How to Optimize/View Advanced System Settings
Once you know how to open advanced system settings, the next step is learning how to use them well. Optimizing these settings can improve your PC’s speed and stability. Many users find that their computer runs faster after making a few simple changes here. You do not need to be a tech expert to do this.
The Performance section is a great place to start. It lets you adjust visual effects. You can choose settings that favor performance over looks. This is very helpful on older machines or laptops with limited RAM.
Below are two methods to help you optimize your settings quickly.
Method 1: Adjust Visual Effects for Better Performance
Step 1: Open the Advanced System Settings window using the method described earlier. In the Performance section, click Settings to launch the Performance Options window. Then choose Adjust for best performance to disable visual effects and animations, which can help improve system responsiveness.
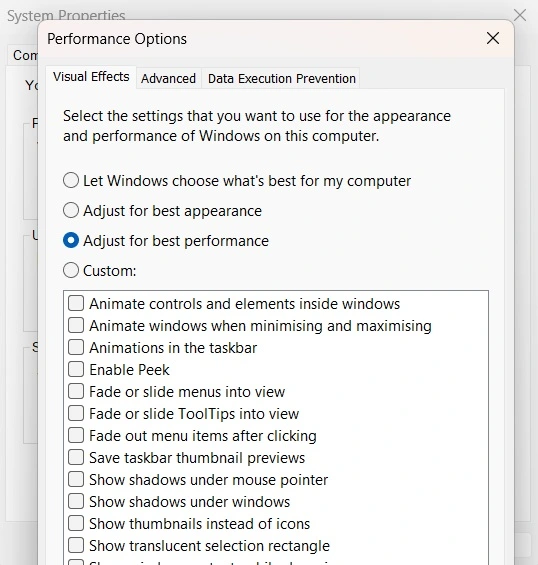
Step 2: Or choose “Custom” and uncheck only the effects you do not need. Click Apply and then OK. Your PC may feel noticeably faster after this.
Method 2: Change Virtual Memory Settings
Step 1: Inside the Performance Options window, click on the Advanced tab. You will see the Virtual Memory section at the bottom. Click the Change button. Uncheck the box that says “Automatically manage paging file size for all drives.” Select your main drive (usually C:).
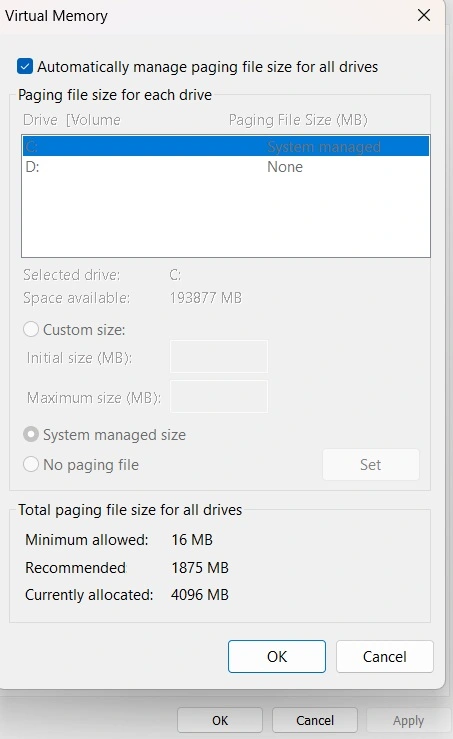
Step 2: Select Custom size and enter values for both the Initial size and Maximum size fields. A widely used guideline is to set the initial size to 1.5 times the amount of installed RAM and the maximum size to 3 times the RAM. After entering the values, click Set, then OK. Restart your computer to apply the new virtual memory settings.
Create a Shortcut for Advanced System Settings
If you use these settings often, creating a shortcut makes a lot of sense. Opening them through search or Run every time can feel slow. A desktop shortcut lets you get there with just one double-click. It is a small change that saves time in the long run.
Windows 11 makes it easy to create shortcuts for system tools. You can place the shortcut right on your desktop or pin it to the taskbar. Either way, you will always have fast access.
Here are two simple steps to set one up.
Steps to Create a Desktop Shortcut
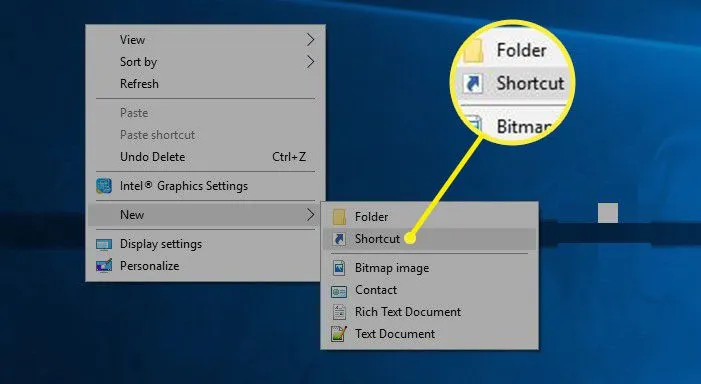
Step 1: Right-click on an empty area of your desktop. Move your cursor to New and then click Shortcut. A window will appear asking for the location of the item.
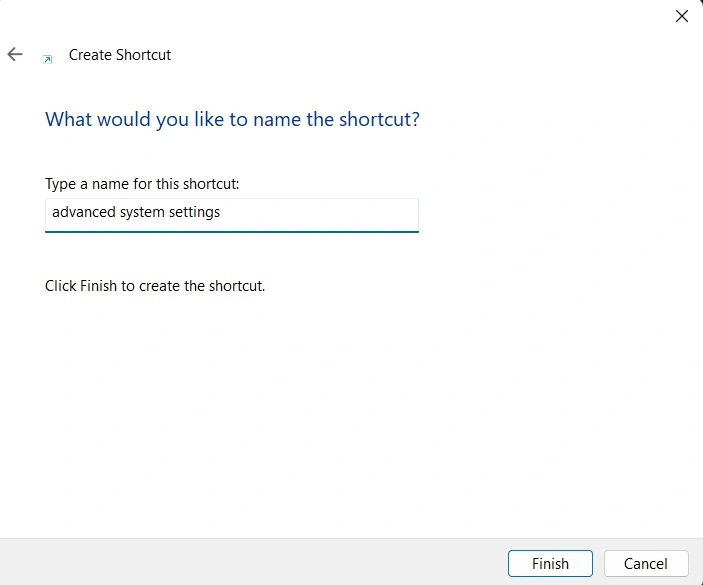
Step 2: Type “control sysdm.cpl” in the box and click Next. Give your shortcut a name, like “Advanced System Settings.” Click Finish. The shortcut will now appear on your desktop.
Smart Ways to Use Advanced System Settings on Windows 11
Knowing where the settings are is just the beginning. Using them correctly is what really matters. Here are eight practical tips to help you get the most out of this powerful panel.
These tips are suitable for most Windows 11 users. They cover performance, safety, and convenience. Each one is easy to apply and can make a real difference in how your computer runs.
- Back up before making changes: Before you adjust any settings in the advanced panel, create a restore point. Go to the System Protection tab in System Properties. Click Create and follow the steps. This gives you a safety net if something goes wrong.
- Do not change settings you do not understand: Some options in the advanced panel can affect system stability. If you are not sure what a setting does, leave it alone or look it up first. It is better to be safe than to fix a broken system later.
- Use the Performance tab for older PCs: If your computer feels slow, the Performance section is your best friend. Turning off unnecessary visual effects can free up resources. Even on a budget laptop, this simple tweak can improve speed.
- Set a proper paging file size: Windows manages virtual memory automatically, but manual settings can be better in some cases. If you run heavy software or video editing tools, setting a custom paging file can prevent slowdowns.
- Check your startup and recovery options: The Startup and Recovery section lets you choose what happens when Windows fails. You can set the default operating system, choose how long to display the boot menu, and decide whether Windows writes a dump file after a crash.
- Manage user profiles carefully: The User Profiles section shows all profiles stored on your PC. If there are old or unused profiles, you can delete them to free up disk space. Be careful not to delete any active or important profiles.
- Review environment variables: The Environment Variables button is found at the bottom of the Advanced tab. These variables are used by software and the command line. Advanced users can add or edit them, but beginners should avoid changing them unless guided by a tutorial.
- Keep your system updated: Some advanced settings work best when Windows is fully updated. An outdated system may behave differently after changes. Always check for updates in the Windows Settings app before making adjustments to system properties.
Conclusion
Advanced system settings on Windows 11 are more useful than most people realize. They give you control over performance, memory, and startup behavior. With just a few changes, you can make your PC run faster and more reliably. The steps in this guide are straightforward and safe for most users to follow.
Now that you know how to view advanced system settings, how to open advanced system settings, and how to use them wisely, you are better equipped to manage your computer. Whether you are fixing a slow PC or just exploring what Windows 11 has to offer, this panel is worth knowing. Take your time, apply changes carefully, and enjoy a better computing experience.
Frequently Asked Questions
1. Is it safe to change advanced system settings on Windows 11?
Yes, it is generally safe as long as you know what each option does. Most changes in the Performance and User Profiles sections are reversible. Before making any changes, it is a good idea to create a system restore point. This way, if anything goes wrong, you can undo the changes and return to the previous state without losing any data or causing long-term damage to your system.
2. Why can’t I find the advanced system settings in the Windows 11 Settings app?
The advanced system settings are part of the older Control Panel interface, not the modern Settings app. Microsoft has kept these tools separate because they are more technical in nature. To reach them, you need to search for “view advanced system settings” in the taskbar search bar or use the Run command with “sysdm.cpl.” They are not listed under System in the Settings app.
3. Can I open advanced system settings without administrator rights?
You can open the System Properties panel without admin rights, but you will not be able to make changes. Most of the options inside the Advanced tab require administrator access to edit. If you click on a setting and nothing happens, Windows may be asking for permission. Make sure you are logged in with an administrator account before you try to open advanced system settings and apply any modifications.
Author Bio:
Dinesh Lakhwani 

Dinesh Lakhwani, the entrepreneurial brain behind “TechCommuters,” achieved big things in the tech world. He started the company to make smart and user-friendly tech solutions. Thanks to his sharp thinking, focus on quality and the motto of never giving up, TechCommuters became a top player in the industry. His commitment to excellence has propelled the company to a leading position in the industry.
Popular Post
Recent Post

Auslogics Duplicate File Finder: Full Review and User Guide
A computer quietly gathers clutter over time. This includes duplicate photos, repeated downloads, and forgotten backups hiding in random folders. This buildup slowly eats away at storage and can make even a fast PC feel sluggish. Manually finding and deleting duplicates is tedious. It means checking every folder, comparing file names, and guessing which copies […]

CCleaner Duplicate File Finder: Key Features, Pricing, Step-by-Step Guide and More
Every computer collects junk over time. Right? Well, yes! Photos often get copied twice. Documents get saved in two folders by mistake. Old downloads pile up and never get deleted. This slowly eats up your storage space, and most people do not even notice until their drive is almost full. That is where a duplicate […]

Duplicate File Finder Pro: A Complete Review, Everything You Should Know
Computers collect thousands of files over time. Well, yes! Many of them end up being duplicates created by backups, downloads, or accidental copies. These extra files take up valuable storage space and make it harder to keep everything organized. Finding and removing them manually can take hours. Right? Duplicate File Finder Pro is a tool […]

Monitor Screen Calibration Guide: Everything You Should Know
Your monitor shows colors every single day. But are those colors actually correct? Most people never stop to check this. They just use the screen as it comes out of the box. This habit can lead to wrong colors in photos, videos, and work files. Colors may look too warm or too cold without you […]

How To Check Installed RAM and RAM Slots [Complete Guide]
RAM plays an important role in how smoothly a computer runs. Short for Random Access Memory, it stores the data and instructions that Windows and active applications need at any given moment. From opening multiple browser tabs to running games and productivity software, RAM helps keep everything responsive. A system with limited memory may experience […]

What is Microsoft Autopilot Everything You Need To Know
Technology has changed the way companies manage computers. Well, yes! Employees now work from offices, homes, and remote locations. Setting up devices manually for every worker takes time and effort. It can also create mistakes that slow down productivity. This is where Microsoft Autopilot becomes useful. It helps businesses prepare and deploy Windows devices with […]

Enable Automatic Device Locking Feature Windows: Complete Guide
Introduction: Your computer stores important information such as emails, documents, passwords, and personal photos. Leaving it unlocked can put that data at risk. Thankfully, Windows includes built-in features that can automatically lock your device when you are away. Setting up automatic device locking is quick and does not require any extra software. In this guide, […]

How to Update Wireless Network Driver in Windows 11 and 10
Your Wi-Fi keeps dropping. Pages load slowly. The connection feels unstable? Well, you are not alone. Most of the time, the problem is not with your internet plan. It is with your wireless network driver. A driver is a small piece of software that helps your computer talk to its hardware. When it gets outdated, […]

Common Windows 11 Problems and Solutions (2026 Version)
Windows 11 has become more polished over the years, but it is still not completely free from problems. Even after regular updates from Microsoft, many users continue to face issues like lagging performance, failed updates, audio troubles, random crashes, and network errors. Some problems appear after installing new features, while others develop gradually as the […]

