










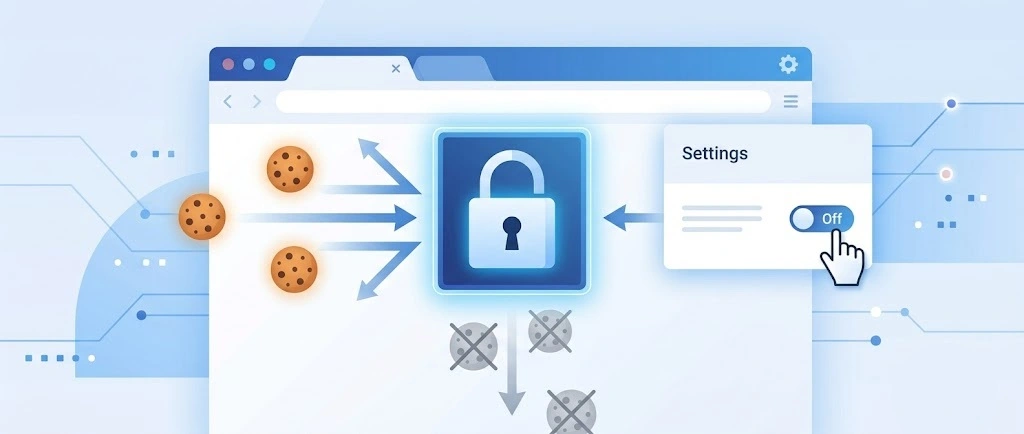
So, search for a pair of shoes once online. Close the tab. By evening, those same shoes are sitting on your news site, your video app, and even your recipe blog. Nobody placed them there by chance. A cookie did. Well, yes! Cookies are small files that websites place on your device while you browse. […]
CCleaner Duplicate File Finder: Key Features, Pricing, Step-by-Step Guide and More
Every computer collects junk over time. Right? Well, yes! Photos often get copied twice. Documents get saved in two folders by mistake. Old downloads pile up and never get deleted. This slowly eats up your storage space, and most people do not even notice until their drive is almost full.
That is where a duplicate finder tool comes in handy. CCleaner Duplicate File Finder is part of the CCleaner suite, a well-known name in the PC cleanup space. It is built to scan your computer, find copies of the same file, and help you remove them in a few clicks. Since it comes bundled inside CCleaner, you do not need to install anything extra.
In this review, we will walk you through what the tool does, its main features, pricing, how to use it, and our honest thoughts after testing it myself. If you are thinking about using it to clean up your PC, this guide should help you decide.
Let’s get started.
Part 1: What is CCleaner Duplicate Finder?
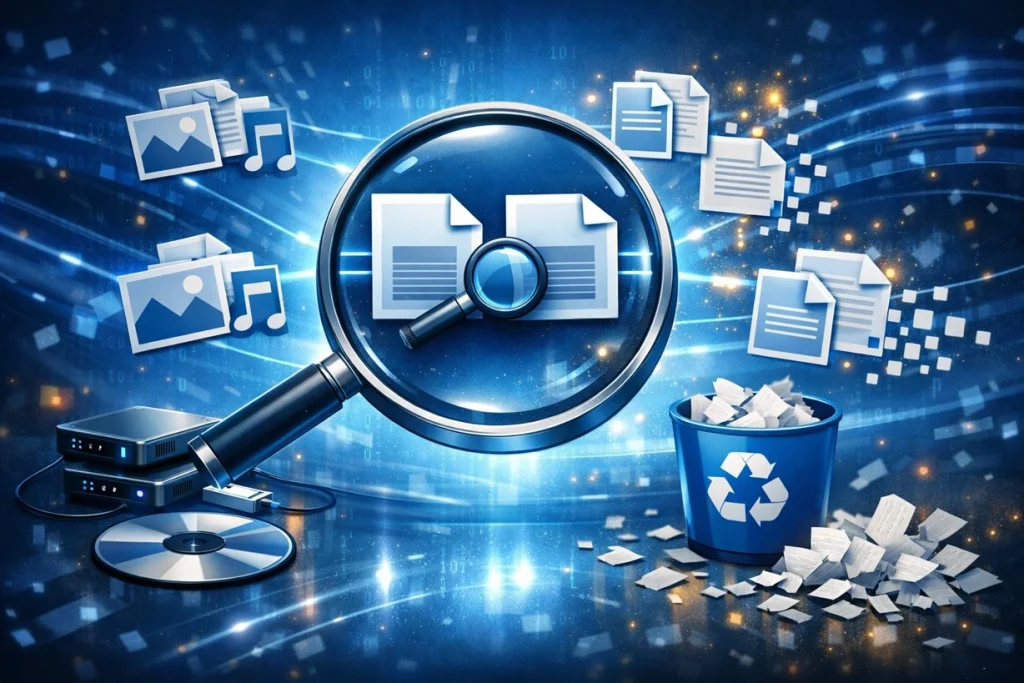
CCleaner Duplicate File Finder is a built-in tool inside the CCleaner app. It is not a separate program you download on its own. Once you open CCleaner and go to the Tools section, you will find the Duplicate Finder option waiting for you. It scans your drives and folders to look for files that match based on name, size, date, or content.
This tool was made for people who do not want to dig through hundreds of folders by hand. Instead of manually comparing files, you let the software do the heavy lifting. It checks your chosen locations, lists out matching files, and lets you pick what to delete. It works on both Windows and Mac, though the layout looks slightly different on each.
The tool is simple by design. It does not try to be a heavy-duty file management suite. It just focuses on one job, finding duplicates, and does it in a fairly clean interface.
Here is a quick look at its main features.
- Scans documents, photos, videos, music, and other file types
- Lets you include or exclude specific folders and drives
- Matches files by name, size, modified date, or content
- Skips system files and hidden files automatically
- Shows file details like name, size, and location before deletion
- Offers an option to select all duplicates at once for quick removal
Part 2: How CCleaner Duplicate File Finder Helps You Reclaim Storage Space
Most people do not realize how much space duplicate files take up until they run a scan. Between downloaded photos, backed up documents, and copied media files, duplicates build up quietly in the background. This part covers how the tool actually helps you deal with that clutter.
- Frees up storage instantly. Once you delete duplicate files, you get that space back right away. This is useful if your drive is nearly full and you need quick relief.
- Saves time compared to manual search. Looking through folders one by one takes hours. This tool scans everything in minutes and gives you a clear list.
- Reduces folder clutter. Fewer duplicate files means your folders look neater and are easier to browse through.
- Helps organize media libraries. If you have years of photos or music saved in different places, this tool helps you spot repeated files across those locations.
- Improves backup efficiency. When you back up your PC, duplicate files get backed up too. Removing them means smaller, faster backups.
- Supports better system performance. A cluttered drive can slow things down over time. Clearing out unneeded copies helps your system run a bit smoother.
- Works across multiple file types. Whether it is Word documents, JPEG images, or MP3 files, the scan covers a wide range of formats.
Yes, it can search different drives connected to your PC, including external ones, as long as you add them to the scan.
Part 3: Key Features Explained: CCleaner Duplicate File Finder
We tested CCleaner Duplicate File Finder on our own PC before writing this section. These notes come from actual use, not just reading the manual. The tool has several features that make a difference in daily cleanup. Here is what we noticed:
Match by options
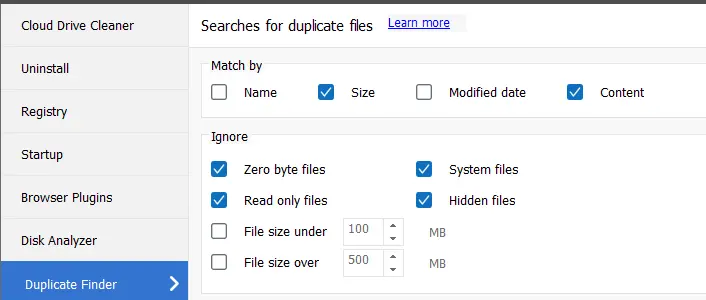
You can choose how the tool decides if two files are duplicates. Options include name, size, and content. I used name and content together, and it found copies I had completely forgotten about in my old downloads folder. This makes it easier to catch files that look the same but are stored in different places.
Include and exclude folders
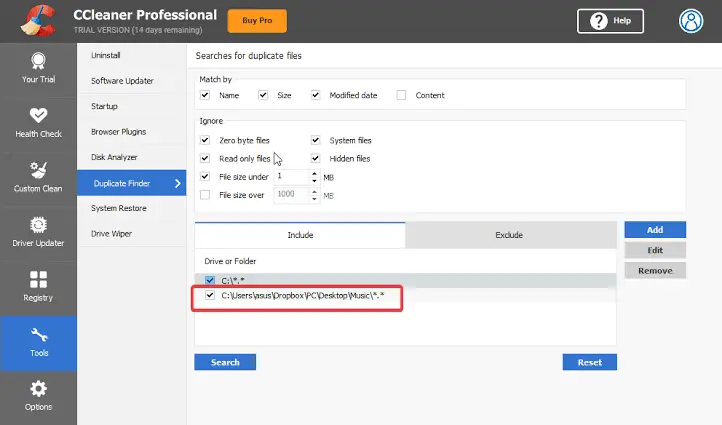
This feature helps you control where the scan runs. I excluded my Program Files folder before scanning, since deleting files there could break installed software. Setting this up took less than a minute, and it gave me confidence that the scan would not touch important system folders.
Content-based matching
Instead of only checking file names, the tool can look inside the files themselves. I used this to catch two photos that had different names but were actually the same image. This is especially useful for pictures, music, or documents that may have been renamed.
Automatic selection rules
You can let the tool auto-select duplicates using rules such as keeping the newest file. I found this helpful when I had ten copies of the same document and did not want to click through each one. It saves time while still giving you control.
Skip hidden and system files
By default, the tool ignores hidden and system files. This is a smart safety step, since deleting those files can cause problems for your operating system. It means you can scan without worrying about breaking something important.
Clear results display
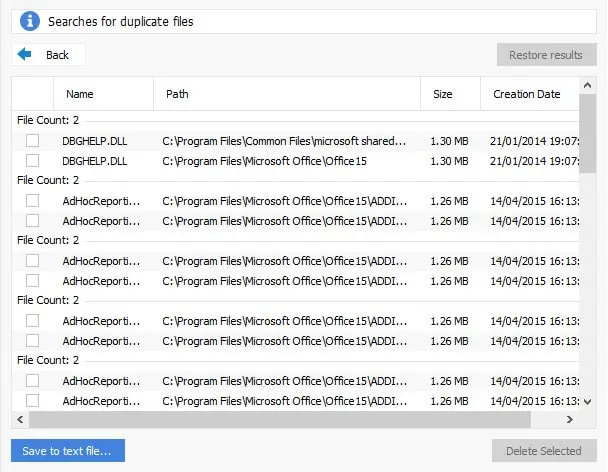
After the scan finishes, you see a list with file names, paths, and sizes. I liked being able to check exactly where each file was stored before deciding to delete it. The layout is simple and easy to read.
Manual selection control
Even if you use auto-select, you can still go through the list and tick or untick files yourself. I did this with a folder of important documents just to be extra careful. It gives you full control over what gets removed.
Multi-drive scanning
I connected an external hard drive and added it to the scan along with my main drive. The tool found duplicates across both drives, which was very useful. If you use multiple storage devices, this feature helps keep everything clean and organized.
Part 4: How to Use CCleaner Duplicate File Finder: Step-by-Step Guide
Using this tool is not complicated, even if you have never used a duplicate finder before. Below are the three main steps I followed when testing it on my own system.
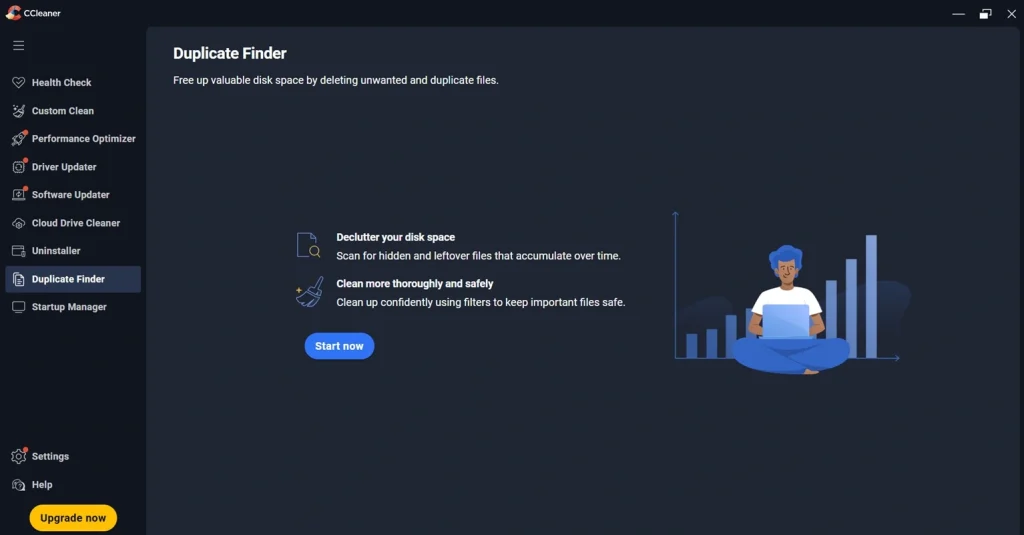
Step 1: Launch CCleaner on your PC. Click on Duplicate Finder from the left menu pane. Click “Start Now” to begin scanning.
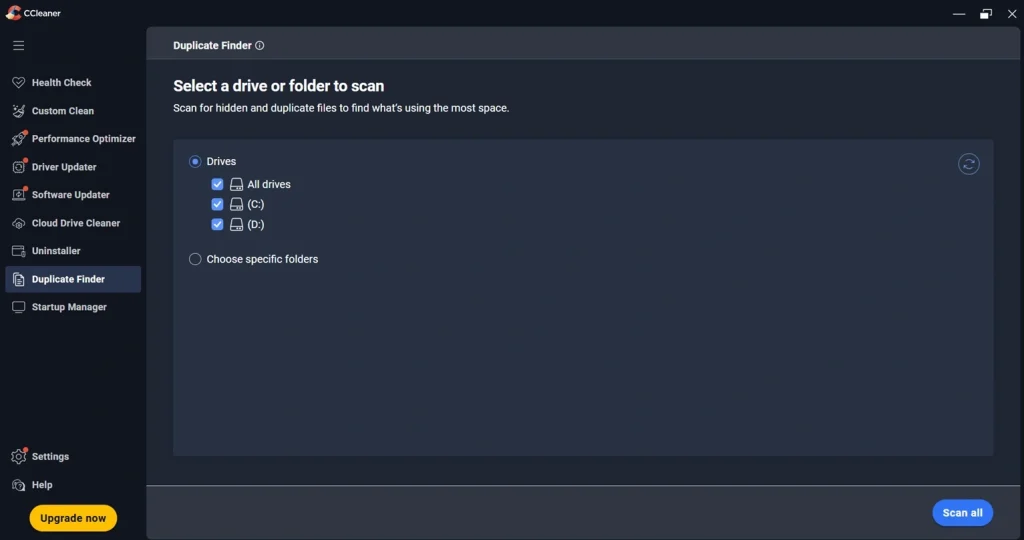
Step 2: Pick which drives and folders you want checked, like C: Drive, D: drive, etc. Use the Include tab to add specific locations, and the Exclude tab to leave out folders you do not want touched, like system folders. This step protects important files from being scanned by mistake. Click Scan All to proceed.
Step 3: Wait for the scanning process.
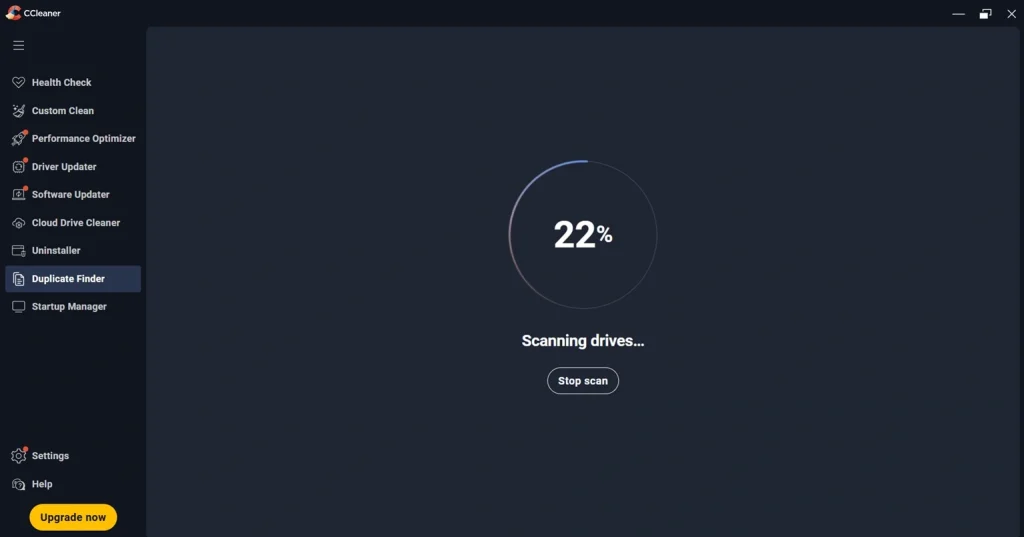
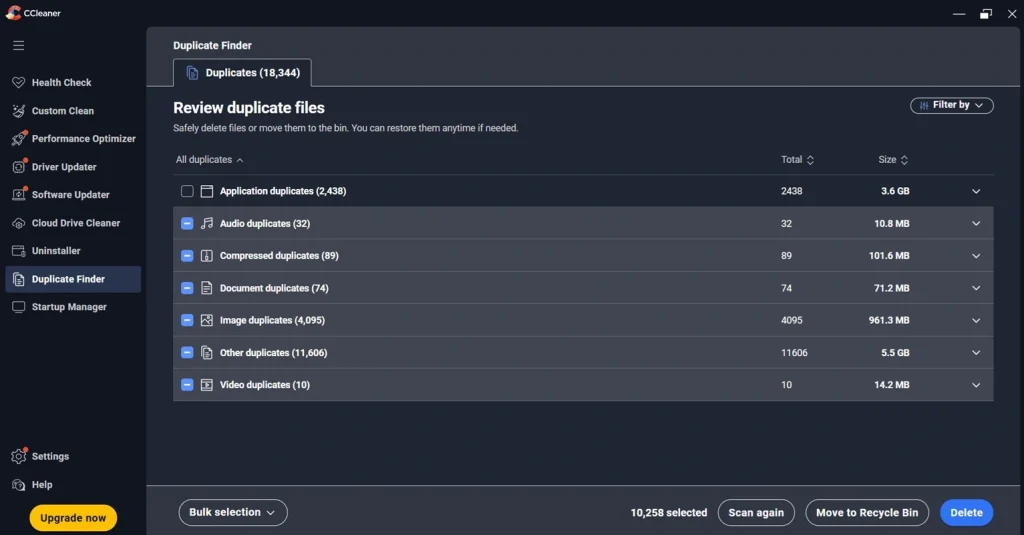
Step 4: Once done, you will see a full list of duplicate files. Go through the list, check file paths if you are unsure, and select the files you want to remove. Click Delete Selected to finish the process.
Part 5: Pros and Cons: CCleaner Duplicate File Finder
No tool is perfect, and this one has its fair share of strengths and weak points. This part breaks down what I liked and what left me wanting more after using it.
Pros
- The interface stays simple from start to finish. Opening Tools and clicking Duplicate Finder brings up everything needed on one screen. No hunting through menus or guessing what a button does.
- It comes bundled inside CCleaner at no extra cost. There is no separate download or account needed just to scan for duplicates.
- Scan results show up grouped by file type, like Audio Files, Documents, and Image Files. This keeps the list from feeling like one long messy pile. Deleting duplicates within a single group is much easier than scrolling through everything mixed together.
- Scanning speed holds up well on larger folders. A folder with around six hundred files finished scanning in under two minutes, without slowing down the rest of the system.
- System and hidden files stay untouched by default. Even during a full drive scan, nothing in protected folders like Windows got flagged or removed.
Cons
- There is no way to open a file directly from the results screen. Checking an unfamiliar file means right-clicking, opening its folder location, and viewing it separately. That extra step gets tedious after the first few files.
- There is no built in preview option. Images, documents, and other files cannot be viewed inside the tool itself before deciding what to delete. This makes it harder to confirm a file is truly safe to remove without leaving the app.
- The full CCleaner app has to be installed just for this one feature. For anyone who only wants duplicate scanning and nothing else, that means more software sitting on the PC than necessary.
Part 6: Best Alternatives to CCleaner Duplicate File Finder
If this tool does not fully match what you need, there are other duplicate finders worth a look. Each one has a different focus, from advanced filtering to image comparison. Here are five options I would suggest checking out.
- Duplicate Cleaner Pro. Built for power users, with features like duplicate folder detection and support for scanning inside zip files.
- Auslogics Duplicate File Finder. A straightforward tool that is great for beginners who want quick results without much setup.
- 4DDiG Duplicate File Deleter. Offers a preview option before deletion and can also detect similar images, not just exact duplicates.
- SearchMyFiles. A lightweight and portable tool that needs no installation, aimed at technical users who want detailed control.
- CloneSpy. A free tool that detects exact and similar files, including empty files, with a simple and dated but functional interface.
Part 7: Honest Feedback of CCleaner Duplicate File Finder When I Used It On My PC
I decided to test this tool on my own laptop after noticing my storage was running low. My first scan covered my Documents and Pictures folders, and within a couple of minutes, I had a list of over two hundred duplicate files. The scan itself felt quick, and I did not experience any lag while it ran in the background.
What I appreciated most was the option to match files by content, not just name. I had a few photos that were renamed differently but were actually the same image, and this feature caught them without any trouble. Another useful aspect was that the tool offers an option to filter search results by type — such as images, documents, or audio files — which made it easier to hunt for specific duplicate files.
On the other hand, I did miss having a preview option. A couple of times, I had to open the file location separately just to confirm a file was safe to delete, which added an extra step to the process.
Overall, my experience was mostly positive. It did what it promised, and I managed to free up storage space after cleaning up my Downloads and old backup folders. I would not call it the most advanced duplicate finder out there, but for someone who already uses CCleaner for general cleanup, it is a convenient addition that gets the basic job done without extra cost or hassle.
Part 8: Tips for Getting the Best Results
A few small habits can make your scanning experience smoother and safer. Based on my own testing, here are some tips that helped me avoid mistakes and get better results.
- Always exclude system folders. This protects files your operating system needs to run properly.
- Start with a small folder first. Test the tool on one folder before scanning your entire drive.
- Use multiple match criteria. Combining name and content matching gives more reliable results.
- Review file paths carefully. Always check where a file is stored before deleting it.
- Back up important files first. Since deletions are permanent, a backup adds a safety net.
- Scan external drives separately. This helps you spot duplicates without overwhelming one big scan.
- Run scans regularly. Doing this monthly keeps your storage clean instead of letting duplicates build up again.
- Avoid auto-delete on shared folders. Manually review shared or work-related folders instead of using auto-select.
Why Trust This Review?
This review is based on real hands-on testing. I installed CCleaner on my own computer, ran several scans across different folders and drives, and carefully noted what worked well and what did not while using the interface.
Every point here comes from direct use, not from a product page or marketing material.
I also compared my experience with information from official support pages and independent reviews. This helped confirm that the details are accurate and balanced, and that I was not missing anything important.
Nothing in this article is copied from another source. All opinions reflect my personal use of the tool, so you can be sure the review is both genuine and practical.
Conclusion
CCleaner Duplicate File Finder is a solid basic tool for anyone who already uses CCleaner and wants a simple way to clean up storage space. It is not packed with advanced features, but it covers the essentials well, from flexible match settings to safe default scanning behavior.
If you need something more advanced, with preview options or similar image detection, one of the alternatives mentioned earlier might suit you better. But for casual users who just want to clear out old copies of files without spending extra money, this tool gets the job done.
Based on my own testing, I would recommend it as a starting point, especially if storage space is tight and you want quick results. Just remember to back up important files first, since deletions here are permanent and cannot be undone.
FAQs:
Is it safe to delete all duplicate files found by CCleaner Duplicate File Finder?
Not always. The tool is good at matching files based on your chosen criteria, but it cannot tell which copies you actually need. It is best to review file paths before deleting anything, especially in folders tied to installed programs or important documents.
Does CCleaner Duplicate File Finder work on external drives?
Yes. You can add external hard drives, USB drives, or other connected storage to your scan by including them in the Include tab before starting the search.
Do I need to pay extra to use CCleaner Duplicate File Finder?
No. The duplicate finder is included in the free version of CCleaner, so you do not need a paid plan just to access this feature. However, other tools in the CCleaner suite may require a Pro subscription.
Author Bio:
Dinesh Lakhwani 

Dinesh Lakhwani, the entrepreneurial brain behind “TechCommuters,” achieved big things in the tech world. He started the company to make smart and user-friendly tech solutions. Thanks to his sharp thinking, focus on quality and the motto of never giving up, TechCommuters became a top player in the industry. His commitment to excellence has propelled the company to a leading position in the industry.
Popular Post
Recent Post
How To Disable Background Apps In Windows: 4 Quick Methods
A slow PC rarely gives a warning. One day, it simply takes longer to start. Apps open late. The fan runs loud, even when the screen is almost empty. Most people blame old hardware. Often, that is not the real reason. The real reason is hiding in plain sight. Windows keeps many apps active in […]
How to Activate Windows with a Product Key for Windows 11 & Windows 10
It always shows up at the worst time. You are halfway through a report, or about to join a video call. Then you spot it in the bottom right corner of the screen. Activate Windows. Go to Settings to activate Windows. Initially, an unactivated copy of Windows may seem like a minor inconvenience. Over time, […]
Is Easy Duplicate Finder Worth It? Honest Review
The photos folder looked normal at first glance. Then the storage warning popped up. One trip photo appeared four times. A tax PDF sat in three different folders. Two old setup files were still in Downloads, and each one was over 500 MB. Nobody plans this mess. Copies pile up slowly. A download runs twice. […]
Wise Duplicate Finder Review: Real Results from Wise Duplicate Finder
Read my honest Wise Duplicate Finder review. See features, pricing, pros and cons, and real PC test results. Find out if this free duplicate cleaner can free up your Windows storage.
How to Recover Deleted Files from Pen drive, USB Drive, SD Card
Introduction: On tech forums, you’ll often see posts like this: “I connected my pen drive to my laptop this morning, but the folder was empty. All my college project files had vanished. I don’t have a backup. Can someone help me?” Stories like this are very common. Pen drives, USB drives and SD cards are […]

How To Recover Files Deleted from the Recycle Bin [Windows 11]
Losing a file can happen in seconds. You clear your desktop, hit Delete, and empty the Recycle Bin. Then, just when you need that file again, it seems to have vanished. This guide will walk you through ways to restore files removed from the Recycle Bin. We will begin with simple fixes, then look at […]

Disk Drill Data Recovery Tool Explained: Full Review and Guide
It happens in a split second. You delete a folder by mistake. Your drive stops showing up. A photo album from your last trip just vanishes. And your stomach drops. Lost files feel personal. They are not just data. They are memories, work hours, and sometimes years of effort packed into a few gigabytes. When […]
Recover Deleted Files In Windows 11 With Software & Without
Introduction What is the first thing that goes through your mind the second an important file vanishes from a Windows 11 PC? For most people, it is a mix of panic and disbelief, followed by a frantic click through every folder that file could possibly be hiding in. It happens in a split second: one […]
EaseUS Data Recovery Wizard: Everything To Know
Data loss does not always come from a big disaster either. Most cases start small and boring. A drive gets formatted by mistake. A laptop freezes mid-save and restarts on its own. A memory card stops showing up after being pulled out too fast. None of these feel like emergencies at first, until you realize […]

