Change Time Format On Windows: Complete Guide
Windows show time in different ways. Some people prefer the 12-hour clock with AM and PM. Others like the 24-hour format, also called military time. Knowing how to change time format on your Windows PC is a simple but useful skill. It helps you stay comfortable with your display and avoid confusion.
Many users never touch their time settings. They just live with whatever format Windows picked during setup. But changing it takes only a few minutes. Whether you use Windows 10 or Windows 11, the steps are easy to follow. This guide will walk you through everything clearly.
By the end of this article, you will know the official ways to change time format, some extra tools that can help, and answers to common questions. Even if you are not a tech expert, you can do this.
Let us get started.
Before You Begin: Smart Precautions to Keep in Mind
It is always good to be careful before making changes to system settings. Even something as simple as adjusting the time display can cause small issues if done wrong. Here are eight things to keep in mind before you change the time format on your Windows computer.
- Check your Windows version first. The steps to change the time format are slightly different on Windows 10 and Windows 11. Know which version you have before you start. You can check this in Settings under System and then About.
- Make sure you have admin rights. Some time settings require administrator access. If you are on a shared or work computer, you may need to ask your IT team for permission before making any changes.
- Do not mix up time zone and time format. These are two different settings. Time zone controls where in the world your clock is set. Time format controls how the clock looks, such as 12-hour or 24-hour. Changing one does not change the other.
- Note down your current settings. Before you make any changes, take a screenshot or write down your current time format. This way, you can go back to it easily if something does not look right.
- Restart apps after changing settings. Some applications do not pick up the new time format right away. After you change the time format, close and reopen any apps that display time, like Outlook or the taskbar clock.
- Be careful with third-party software. Some apps have their own time display settings. Changing Windows settings may not affect those apps. You may need to update the time format inside each app separately.
- Avoid making changes during work hours. If you use your PC for work, it is better to make changes during a break or after hours. This way, you do not disrupt ongoing tasks or meetings.
- Keep Windows updated. Some settings and options may look different on older versions of Windows. Keeping your system updated makes sure you have the latest and most stable settings interface.
Questions That Usually Go Unanswered:
What is the difference between 12-hour and 24-hour time formats on Windows?
The 12-hour format shows time from 1 to 12 and uses AM or PM to tell morning from evening. For example, 3:00 PM means three in the afternoon. The 24-hour format runs from 0 to 23. So 3:00 PM becomes 15:00. Many countries use the 24-hour format in official settings. Windows lets you pick whichever feels natural to you. The choice is purely personal or based on regional habits.
Will changing the time format affect other apps and programs?
In most cases, yes. When you change the time format in Windows settings, the system applies it across the taskbar, calendar, and many built-in apps. However, some third-party apps like browsers or productivity tools may use their own internal settings. Those apps might still show the old format. You would need to update them separately. Always check your most-used apps after making any change to confirm everything looks right.
Can I use a custom time format that is not 12 or 24 hours?
Yes, Windows allows custom time formats. You can go into Region settings and manually type a format string. For example, you can remove the AM/PM label, add seconds, or change separators. This is useful for people who want a very specific display. However, custom formats require a bit of trial and error. Stick to standard formats if you are not sure, and always test after applying a custom one.
Does changing the time format change how files are timestamped?
Not exactly. File timestamps in Windows are stored in a universal format behind the scenes. What changes is only how that time is displayed to you. The actual data stored in the file system does not change. So if you share a file with someone using a different format, the timestamp will still be correct on their end. This is good news for anyone worried about breaking file records or logs.
How to Change Time Format on Windows: 3 Official Ways
Windows gives you more than one way to change time format on your PC. You do not need to install anything extra for these methods. They are all built right into the operating system. Whether you are on Windows 10 or Windows 11, at least one of these will work perfectly for you.
Pick the one that feels most comfortable and follow the steps.
Method 1: Using the Settings App
The Settings app is the most modern and user-friendly option available on Windows. It is clean, easy to navigate, and works well on both Windows 10 and Windows 11. If you are not sure where to start, this is the best place to change the time format without any confusion. Everything is laid out simply, with dropdowns that let you pick your preferred format in seconds.
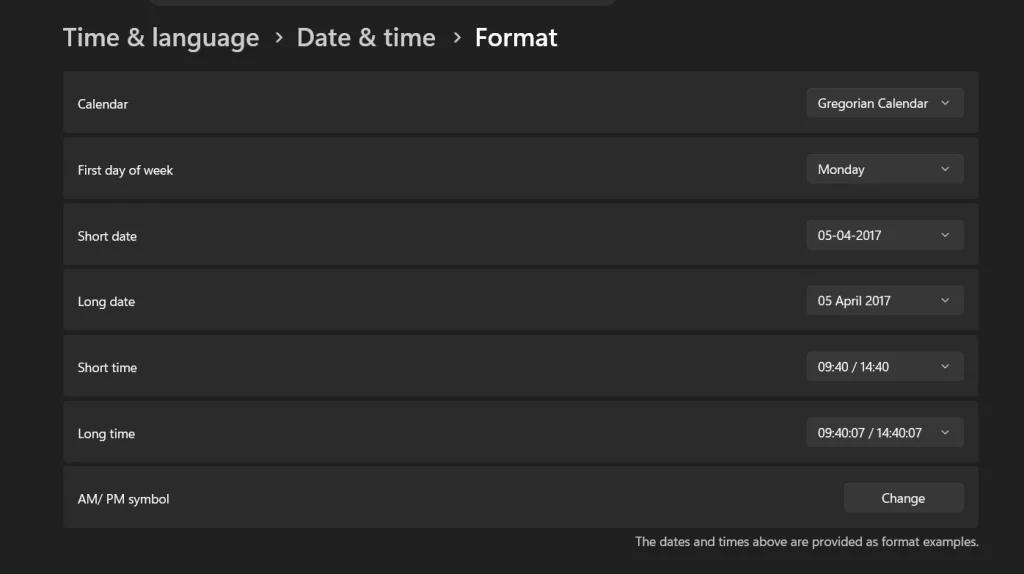
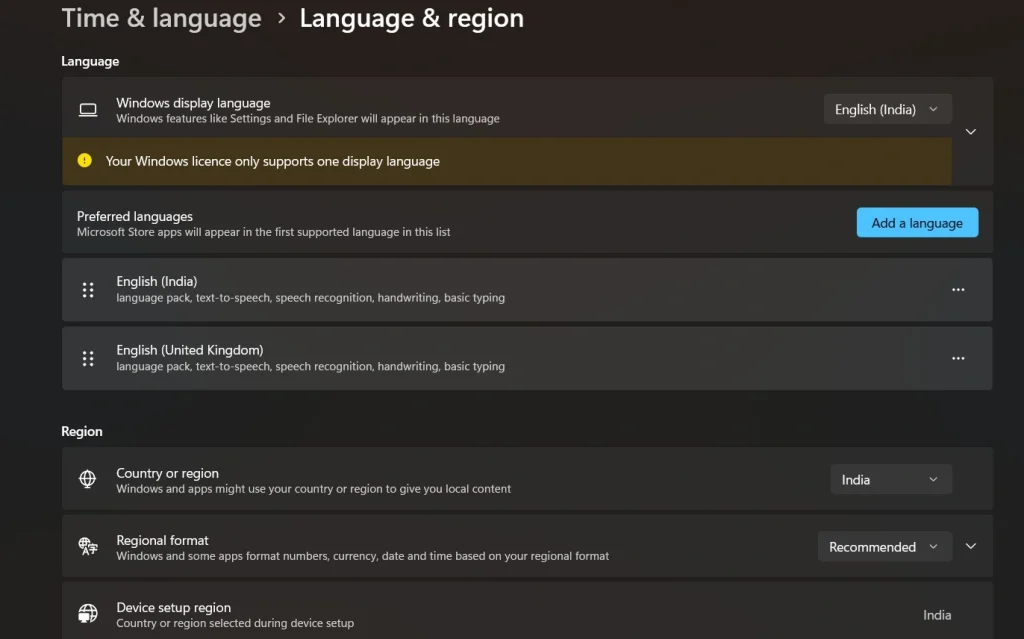
Step 1: Press Windows + I to open the Settings app. Go to Time and Language, then click on Region or Language and Region. Look for the Change the date and time formats and click on it. You will see dropdown menus for short time and long time.
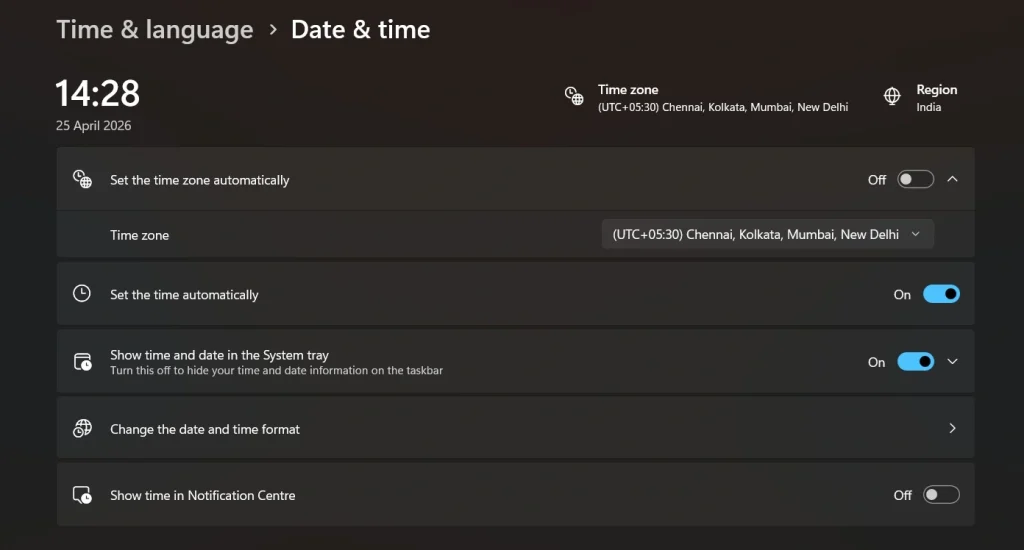
Step 2: Select your preferred format from the dropdowns. Choose h: mm tt for 12-hour or HH: mm for 24-hour. Click Apply and then OK to save your changes.
Method 2: Using the Control Panel
The Control Panel is the older route, but it is still fully functional on modern Windows versions. It gives you slightly more control than the Settings app, including the ability to type a custom format string if you need something specific.
Many experienced users prefer this method because it has been around for years and feels familiar. It is also a reliable way to change time format when the Settings app does not show all the options you need.
Step 1: Click the Start menu and search for Control Panel. Open it and navigate to Date and Time.
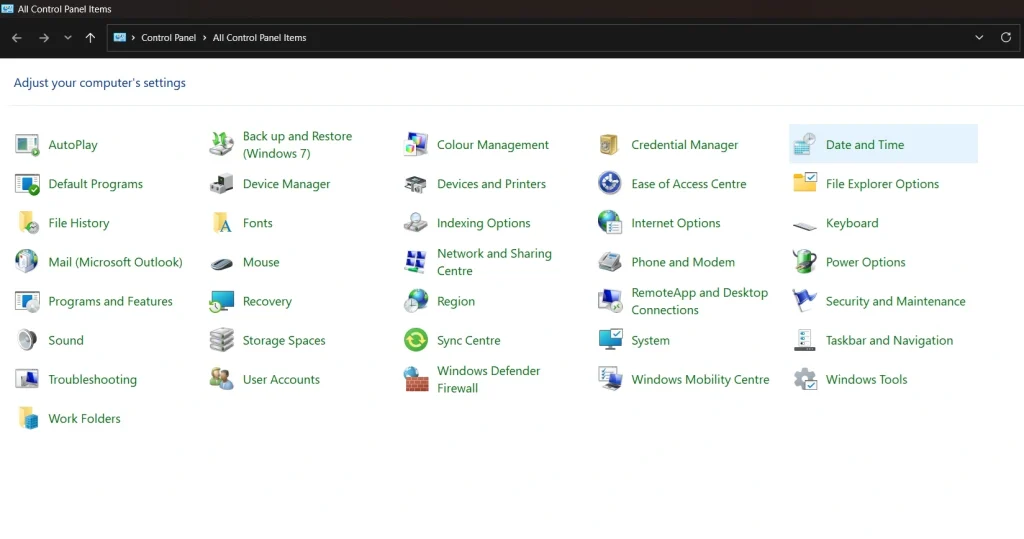
Step 2: Click on the Change Date and Time button.
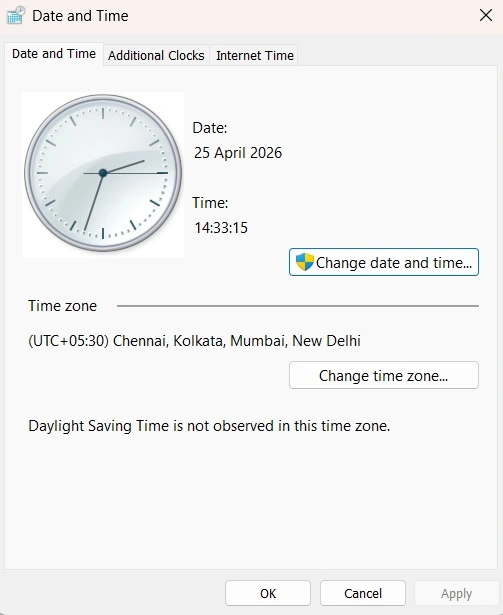
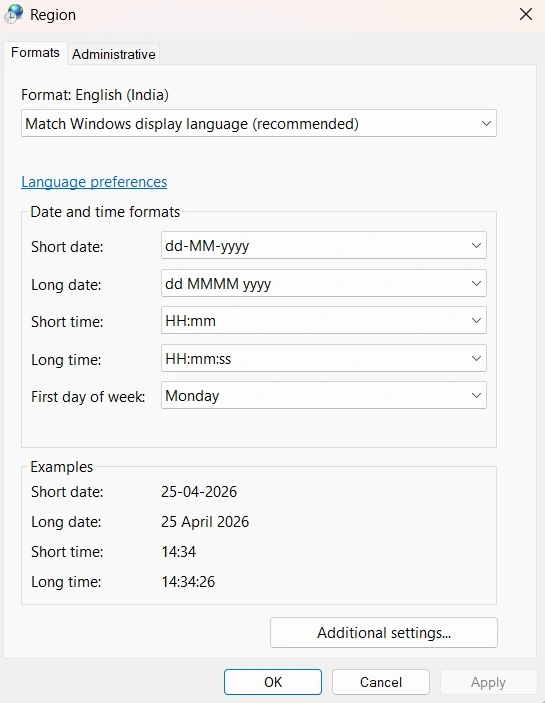
Step 3: Click the Change Calendar Settings option.
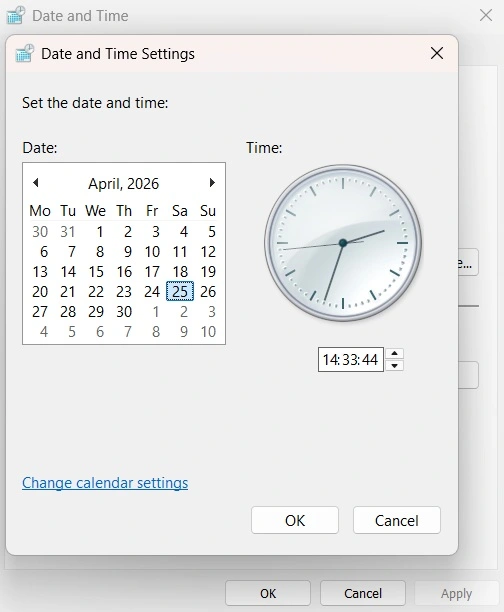
Step 4: A pop-up window will appear. Go to the Formats tab and look for the short time and long time fields. If you want something custom, click Additional Settings and type your format manually. Hit Apply and then OK to confirm.
Method 3: Using the Taskbar Clock Shortcut
This method is the quickest of all three. If you are already working on your desktop and want to change time format without opening multiple menus, this shortcut saves you time. It takes you directly to the time and date settings panel with just a right-click. It is ideal when you are in a hurry and need to make a fast adjustment without navigating through the full Settings menu.
Step 1: Right-click on the clock in the bottom-right corner of your taskbar. A small menu will appear. Click on Adjust date and time or Date and Time Settings, depending on your Windows version.
Step 2: Scroll down and click on the link for Language and region formatting or Additional clocks. From there, follow the same steps as Method 1 to select and apply your preferred time format.
Extra Help: Third-Party Tools and Other Ways
Sometimes the built-in Windows options are not enough. Maybe you want a more visual clock, a floating display, or a format that Windows simply does not support natively. In those cases, outside tools can help.
These apps are safe to use and give you more flexibility to change time format beyond what Windows offers. Here are three popular options worth trying.
ElevenClock: ElevenClock is a free and open-source app. It adds a customizable clock to your taskbar, especially useful on multi-monitor setups. You can set the time format, font, size, and position. It is a great tool for people who want more visual control without touching deep system settings.
T-Clock Redux: T-Clock Redux is a lightweight tool that replaces your default Windows clock. It lets you set a fully custom format using format codes. You can show seconds, use 24-hour time, add the date, and even change colors. It is simple to install and easy to use, even for beginners who want to change time format in a personalized way.
Rainmeter: Rainmeter is a desktop customization app. It lets you place clock widgets anywhere on your desktop. You can choose from hundreds of community-made designs and fully control the time format displayed. It is more of a design tool, but it gives total freedom over how time looks on your screen.
Author’s Tip
After testing all these methods across different Windows versions, the Settings app route is the fastest and cleanest for most users. It takes less than two minutes and does not require any downloads or extra software.
If you use multiple monitors or need seconds displayed in the taskbar, ElevenClock is worth installing. It solves problems that Windows native settings simply cannot handle, especially on extended displays.
One thing many people overlook is that the short-time and long-time formats are separate settings. Short time affects what you see in the taskbar. Long time shows up in places like file properties and event logs. Always update both when you want a complete change across the system.
Conclusion
Changing your time display does not have to be complicated. Windows gives you multiple built-in ways to change time format, and third-party tools make it even easier if you want something more custom. Whether you prefer AM/PM or the clean 24-hour style, your system can match exactly what you like.
The key is knowing where to look. The Settings app, Control Panel, and the taskbar shortcut all lead you to the same place. Any of these three methods will get the job done in just a few clicks. You do not need to be a tech expert to manage something this simple.
Take a few minutes today to check your current format and decide if it works for you. If it does not, use this guide to change time format the right way. Small changes like this make your daily computer experience smoother and more comfortable.
FAQs
Q1: How do I change the time format from 12-hour to 24-hour on Windows 11?
Open Settings and go to Time and Language, then Region. Click on Change data formats. Under the short time dropdown, select HH: mm for 24-hour format. Under long time, select HH:mm:ss. Click Apply to save. Your taskbar will now show time in 24-hour style. The whole process takes about one minute. If you do not see the change right away, restart your explorer process from Task Manager.
Q2: Why does my clock still show AM/PM after I changed the settings?
This usually happens when the change was applied to long time but not short time. Go back into Region settings and check both dropdowns. The short time format controls the taskbar clock. Make sure you selected a format without AM or PM there. Also, some third-party apps override Windows time display. If the taskbar looks right but an app still shows AM/PM, check that app’s own settings.
Q3: Can I show seconds in the Windows 11 taskbar clock?
Yes, but it requires a small workaround. Go to Settings, then Personalization, and then Taskbar. Look for the option to show seconds in the system tray clock. On some builds, this option is directly available. On others, you may need to enable it through a registry tweak or use a tool like ElevenClock, which makes it simple and safe to change time format display, including seconds, without touching the registry manually.
Author Bio:
Dinesh Lakhwani 

Dinesh Lakhwani, the entrepreneurial brain behind “TechCommuters,” achieved big things in the tech world. He started the company to make smart and user-friendly tech solutions. Thanks to his sharp thinking, focus on quality and the motto of never giving up, TechCommuters became a top player in the industry. His commitment to excellence has propelled the company to a leading position in the industry.
Popular Post


Recent Post

Monitor Screen Calibration Guide: Everything You Should Know
Your monitor shows colors every single day. But are those colors actually correct? Most people never stop to check this. They just use the screen as it comes out of the box. This habit can lead to wrong colors in photos, videos, and work files. Colors may look too warm or too cold without you […]

How To Check Installed RAM and RAM Slots [Complete Guide]
RAM plays an important role in how smoothly a computer runs. Short for Random Access Memory, it stores the data and instructions that Windows and active applications need at any given moment. From opening multiple browser tabs to running games and productivity software, RAM helps keep everything responsive. A system with limited memory may experience […]

What is Microsoft Autopilot Everything You Need To Know
Technology has changed the way companies manage computers. Well, yes! Employees now work from offices, homes, and remote locations. Setting up devices manually for every worker takes time and effort. It can also create mistakes that slow down productivity. This is where Microsoft Autopilot becomes useful. It helps businesses prepare and deploy Windows devices with […]

Enable Automatic Device Locking Feature Windows: Complete Guide
Introduction: Your computer stores important information such as emails, documents, passwords, and personal photos. Leaving it unlocked can put that data at risk. Thankfully, Windows includes built-in features that can automatically lock your device when you are away. Setting up automatic device locking is quick and does not require any extra software. In this guide, […]

How to Update Wireless Network Driver in Windows 11 and 10
Your Wi-Fi keeps dropping. Pages load slowly. The connection feels unstable? Well, you are not alone. Most of the time, the problem is not with your internet plan. It is with your wireless network driver. A driver is a small piece of software that helps your computer talk to its hardware. When it gets outdated, […]

Common Windows 11 Problems and Solutions (2026 Version)
Windows 11 has become more polished over the years, but it is still not completely free from problems. Even after regular updates from Microsoft, many users continue to face issues like lagging performance, failed updates, audio troubles, random crashes, and network errors. Some problems appear after installing new features, while others develop gradually as the […]

Fortect Driver Updater Review: Features, Steps, Pros, and Cons.
A new PC usually feels quick and responsive. Applications open instantly, games run smoothly, and everything works as expected. As time passes, however, you may notice slower performance, system crashes, hardware glitches, or devices that stop working properly. While many people assume malware or low storage space is to blame, outdated drivers are often the […]

New Features Coming in Windows 11 This Year [2026]
Microsoft is always working to make Windows better. This year is no exception. The company has announced and rolled out several exciting updates for its users. These updates touch almost every part of the operating system. From the Start menu to system settings, changes are arriving fast. If you use Windows daily, you will want […]

Top 14 Duplicate Photo Finder and Remover For Windows [2026]
Introduction: Photos pile up fast. Well, yes! You take ten shots of the same moment. You download the same image twice. You back up your folder and forget you already did it. Before you know it, your storage is packed with copies. A good duplicate photo finder helps you take back that space without losing […]

Advanced System Settings on Windows 11: Complete Guide
Windows 11 is a powerful operating system. It comes with many features that most users never explore. One of the most useful areas is the System Properties panel. This is where you can control how your computer performs, starts up, and handles memory. Many users only change basic settings like wallpaper or display options. But […]

