











Read my honest Wise Duplicate Finder review. See features, pricing, pros and cons, and real PC test results. Find out if this free duplicate cleaner can free up your Windows storage.
11 Methods to Fix the Windows 11 Not Shutting Down Completely Issue
Introduction
After completing the work for the day, one shuts down their computer. However, in some cases, clicking the shutdown icon does not properly switch the device’s power off. In the background, the CPU and hard drive continue running and taking up power, which can damage your PC later.
Typically, reasons for Windows 11 not shutting down completely include a damaged taskbar, fast startup, or a new upgrade of Windows. Also, excess system files can lag the device, and constantly running background apps will slow the total system performance.
You can use the CCleaner Professional app to remove these unwanted files, shut down active operations, and optimize system health. Besides that, here are some useful tactics.
Best Ways to Fix Windows 11 Not Shutting Down Error
As mentioned, specific software or hardware-related issues can affect the device’s regular functioning and affect regular system functions like shut down. We considered all the issues that can cause the Windows 11 shutdown problem and compiled the following list of solutions.
Solution 1: Use keyboard shortcuts to power off
One of the easiest ways to fix the problem of Windows 11 not shutting down is using the device’s keyboard for shortcuts. You can press the Alt and F4 buttons simultaneously, which would open the “Shut Down” prompt on the screen.
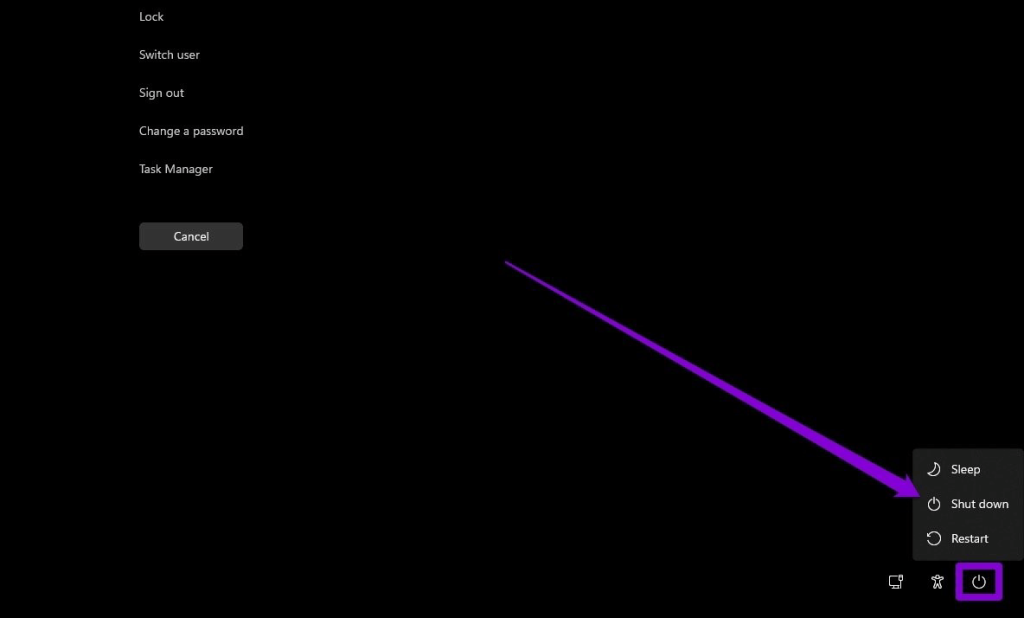
Besides that, you can press the keys Ctrl + Alt + Del on the keyboard and then press the power icon. Choose the shutdown option.
Solution 2: Force-shut Windows 11
If the Windows 11 is not shutting down well, you can force it to shut down. Press the power button on the laptop or desktop device’s keyboard area and hold your finger in place. That would force shut the device.
However, this technique would not provide information about why the shutdown feature was not working.
Solution 3: Make changes to the Settings through Control Panel
Users can rectify the Windows 11 shutdown problem by directly accessing the Settings on the device and making specific changes. The Control Panel route is useful to handle for both experienced and beginner-level users.
How to do this?
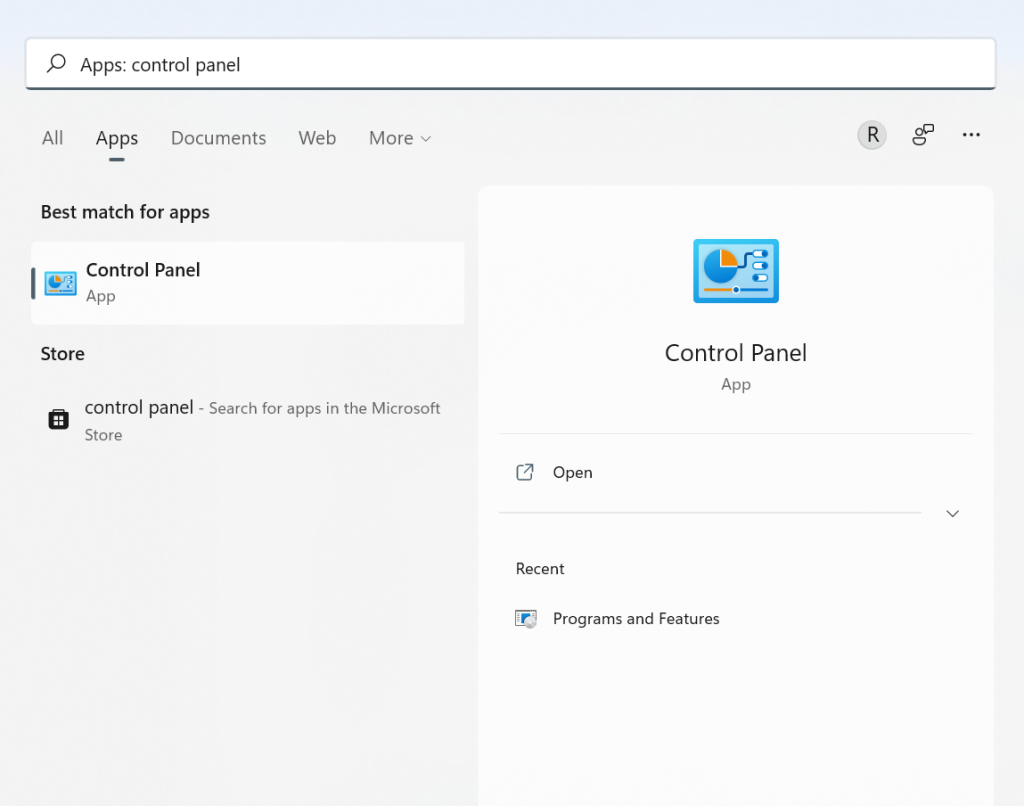
Step 1: Open the Search tab from the Taskbar and type in “Control Panel” within the text field. Then, open the first result.
Step 2: From the options that come up in this window, click on the “Hardware and Sound” option.
Step 3: Press the Power Options choice and click on “Choose what the power button does” from the options.
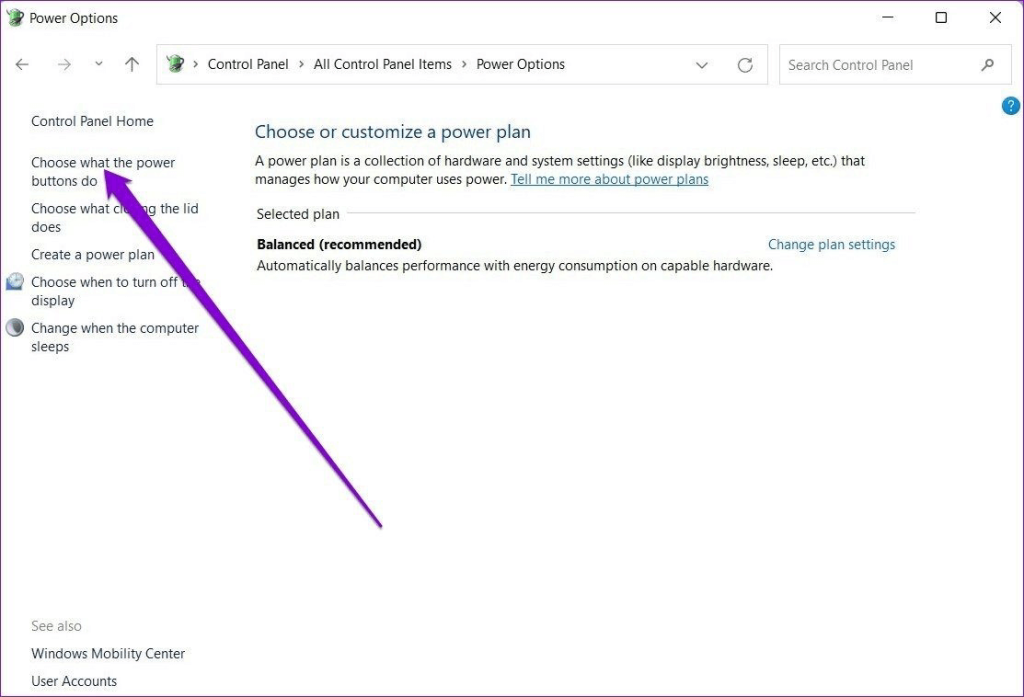
Step 4: Then, choose “Shut Down” as the action for the button from the small drop-down menu.
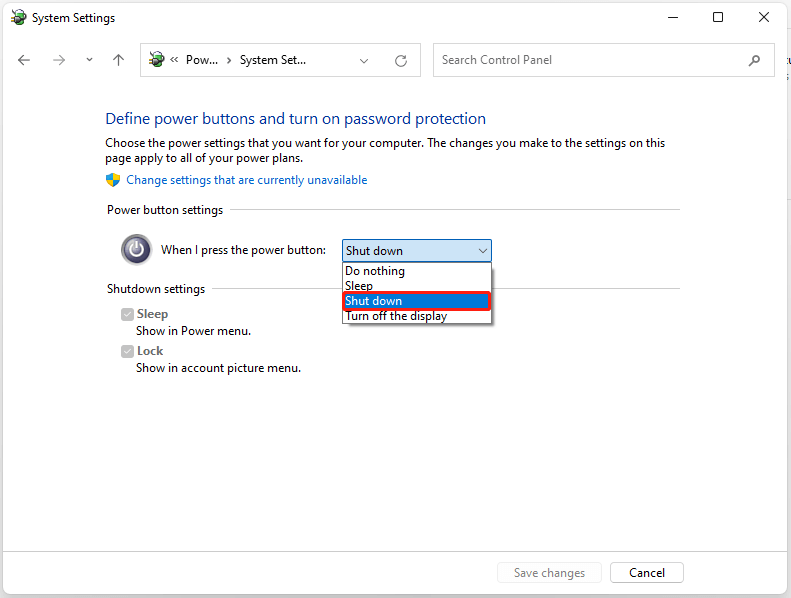
Step 5: Click on Save Changes to complete the process.
Solution 4: Disable the Fast Startup mode
On Windows 11, there is a specific mode called Fast Startup. When this is active, the Windows 11 device runs around 30% faster when compared to another device with similar hardware but an older OS version.
This feature is a cross between the logout function and sleep mode in Windows and can affect the normal functioning of the Windows 11 shutdown process. So, to fix it, you have to disable the Fast Startup setting.
How to do this?
Step 1: Access the Control Panel through the Windows icon or Search button on the Taskbar.
Step 2: Open the Power Options menu and then select “Power Options” out of the functions.
Step 3: See the window’s left pane and click on the option- Choose what the power button does.
Step 4: Click on the “Change settings that are currently available” in the next window.
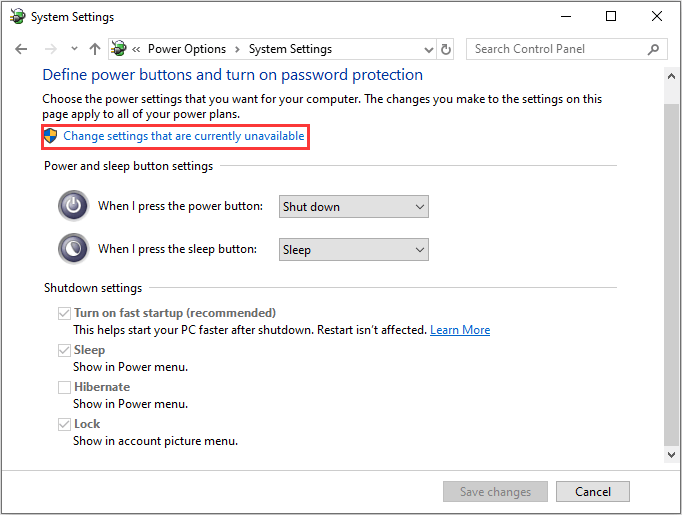
Step 5: When you see the “Turn on Fast Startup” option, uncheck the mark on the box beside.
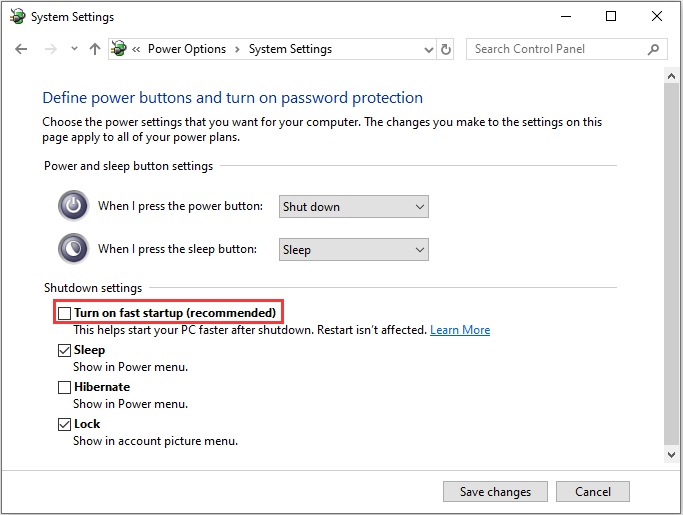
Step 6: Click on “Save Changes” to complete the action.
Solution 5: Try Running the Power Troubleshooter
On Windows 11, you would find an available troubleshooting system for every activity and service that the software allows. For Windows 11 not shutting down completely, a Power troubleshooter is present that you can configure to rectify the issue. It would detect the main problem and fix the problem.
How to do this?
Step 1: Open the Windows 11 Start menu. Search with “Troubeshooter Settings” in the text field and press the Enter button.
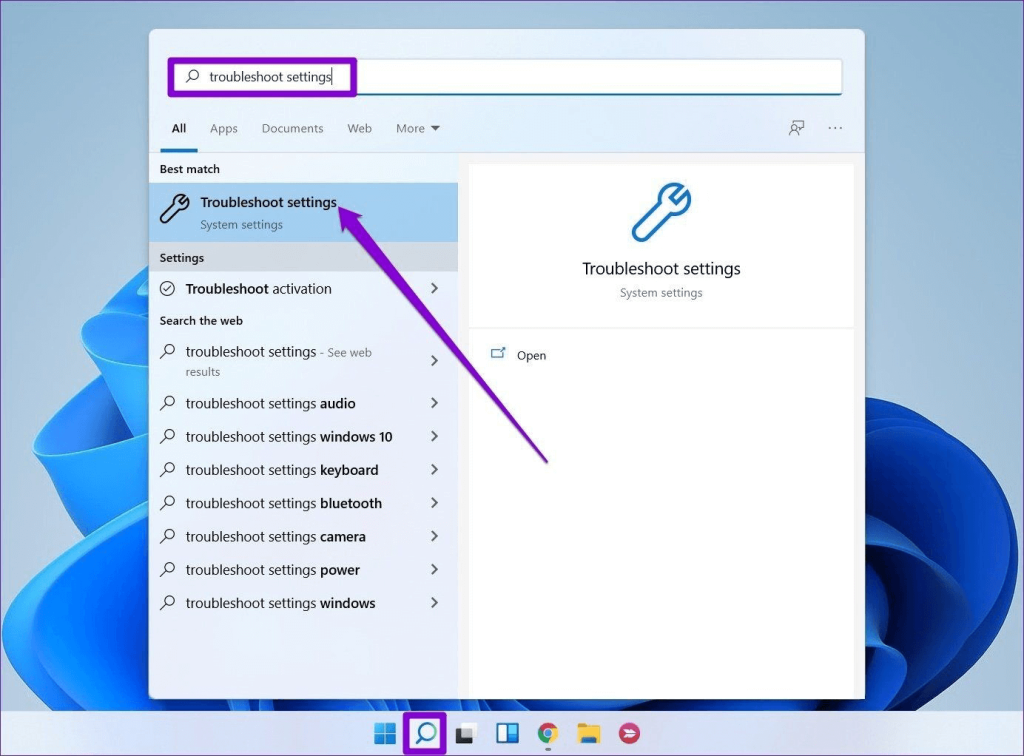
Step 2: Click on the “Other troubeshooters” option.
Step 3: Click the Run button to activate.
Solution 6: Check and Update your Current OS Version
In some cases, the main issue that does not allow the Windows 11 shutdown process is due to the lack of correct upgrades. When the device’s operating system is up to date with the current software and features, it will consistently provide new updates and resolve errors after detecting them.
So, you must upgrade your system to Windows 11 update and get the right software versions and functions.
How to do this?
Step 1: Open Search > Settings > Updates & Security.
Step 2: Choose the “Windows Upgrade” option from the left-hand panel.
Step 3: Click on the “Check for updates” option to allow the system to search and download any updates.
If this step does not work efficiently, you should troubleshoot the issues as an administrator.
Solution 7: Use the System Restore tool
In case the regular solutions to fix the issue of Windows 11 not shutting down completely fail to work, you can use the System Restore tool to bring the device to its original version. This happens if the updated software clashes with your device system due to incompatibility. Notably, this solution only works if a primary system restoration point is already available.
How to do this?
Step 1: Through the Search icon, type “Create a recovery drive” and open the app that appears. Allow access.
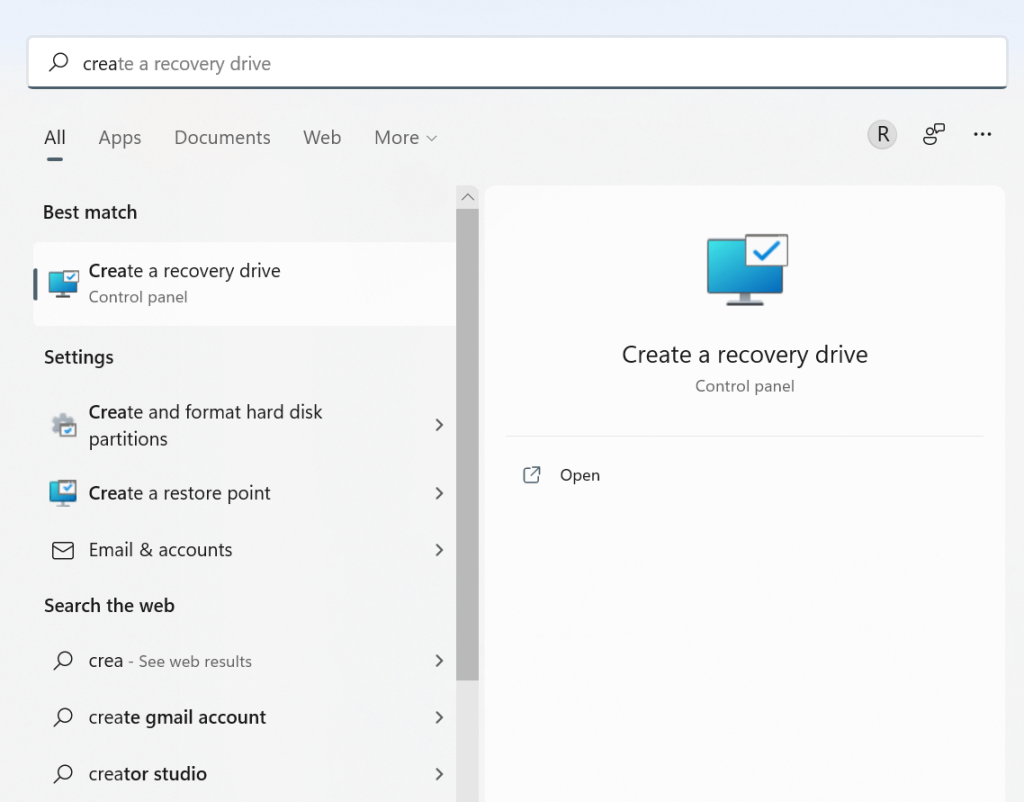
Step 2: Click on System Properties > System Protection.
Step 3: In the next window, click on the “System Restore” option. From the next list, choose the restore point you want to use for the system restoration and click on it.
Step 4: Press the button- Scan for affected programs. You will see information on the changes that will occur. It will also show which apps will get added and removed from your system since they were removed/added after the restore point was created.
Step 5: Click on the “Next” button to restore the system.
Step 6: Finally, click on the “Finish” button. The system would restore appropriately to the selected restore point in your system.
Solution 8: Run the SFC Scan
If you have system files that have become corrupted in your system, that can affect the normal functioning of your system software. You can use an app like CCleaner to get a complete PC health checkup and remove corrupted files. Another easy process is directly running a System File Checker scan or SFC of the device.
How to do this?
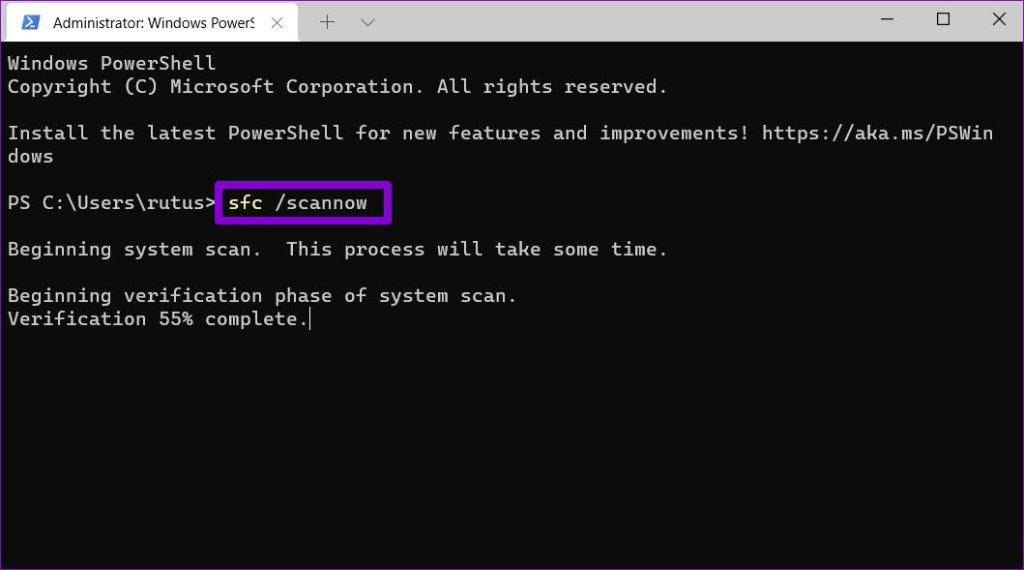
Step 1: Press the Win + X keys on the keyboard. From the menu that comes up, click on the “Windows Terminal (Admin)” option.
Step 2: The Command Prompt window will appear. Type the following command into the text field and then press the Enter key:
sfc /scannow
Step 3: The command would run, and the device will shut down successfully afterward.
Solution 9: Shut Down Device with Command Prompt
You can access the command prompt or CMD and request the system to force stop. This will forcefully close all running apps and shut the device down.
How to do this?
Step 1: Through the Search button, search for the Command Prompt tab.
Step 2: Click on the “Run as Administrator” option.
Step 3: Type the “shutdown /p” command into the text field. Press the Enter key.
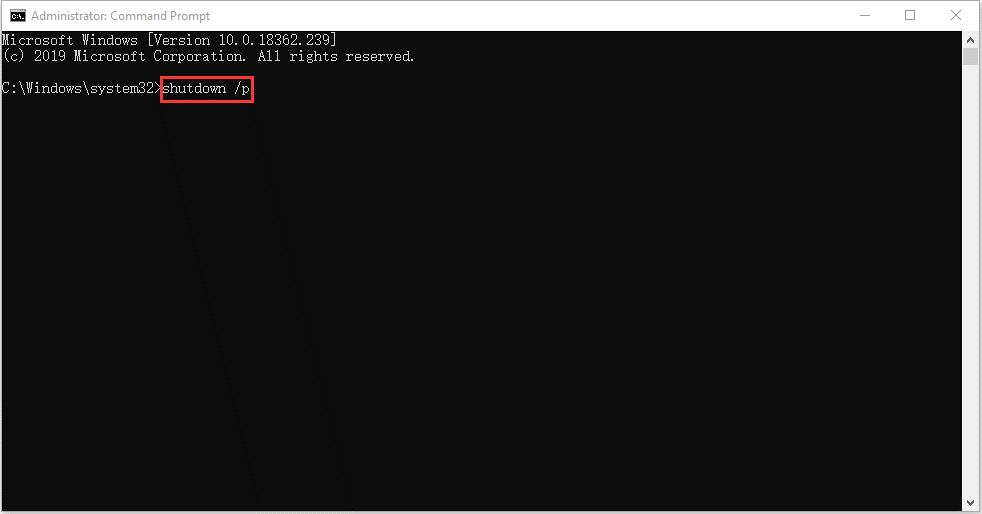
The computer device would quickly shut down without processing updates or installing anything.
Solution 10: Shut Down Delivery Update Optimization on Windows 11
Windows 11 constantly downloads new updates of the software. However, when multiple devices are running on one network in an office setting or similar situation, it is counterproductive to download updates individually on all computers. Therefore, Microsoft’s Delivery Update Optimization service is useful for exchanging updated system files simultaneously on all connected computers.
Therefore, if another computer running on your distributed network is acquiring updates from your device, it would not close while the files are transferring. You can disable this automated feature to shut down the device properly.
How to do this?
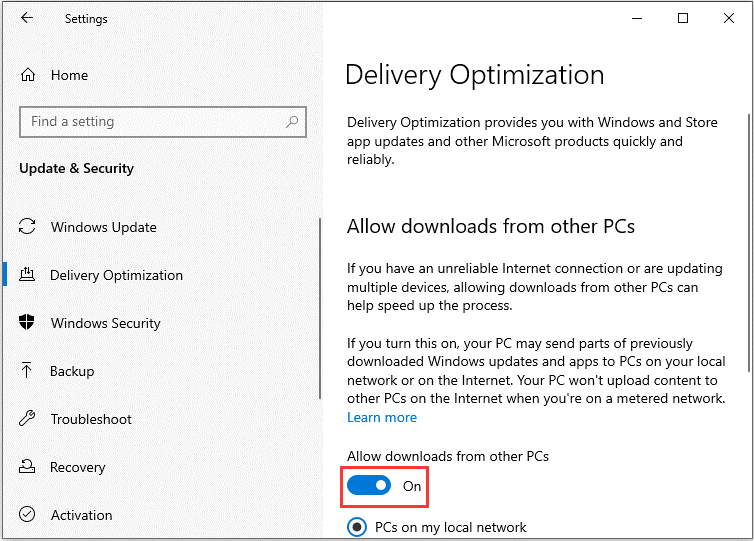
Step 1: Click on the Windows icon, open the Settings option, or directly search for it through the Search menu.
Step 2: Open the “Update & Security” option in the Settings menu.
Step 3: Click on the “Delivery Optimization” option from this window to continue.
Step 4: Turn the toggle for “Allow downloads from other PCs” to OFF.
Solution 11: Decide which apps will start automatically
Some processes and applications on desktop devices start running in the background since startup by default. They begin operating automatically and are typically hard to notice unless one searches for them. They do not shut off when one tries to switch the device off, and that causes the Windows 11 shutdown problem.
You should disable such services and apps on your device that are not necessary to start at startup. That would improve the startup and shutdown processes.
How to do this?
Step 1: Press the Ctrl + Shift + Esc keys on your keyboard together. This would launch the Task Manager. Open the “More details” option.
Alternatively, you can search for Task Manager through the Search icon via Taskbar.
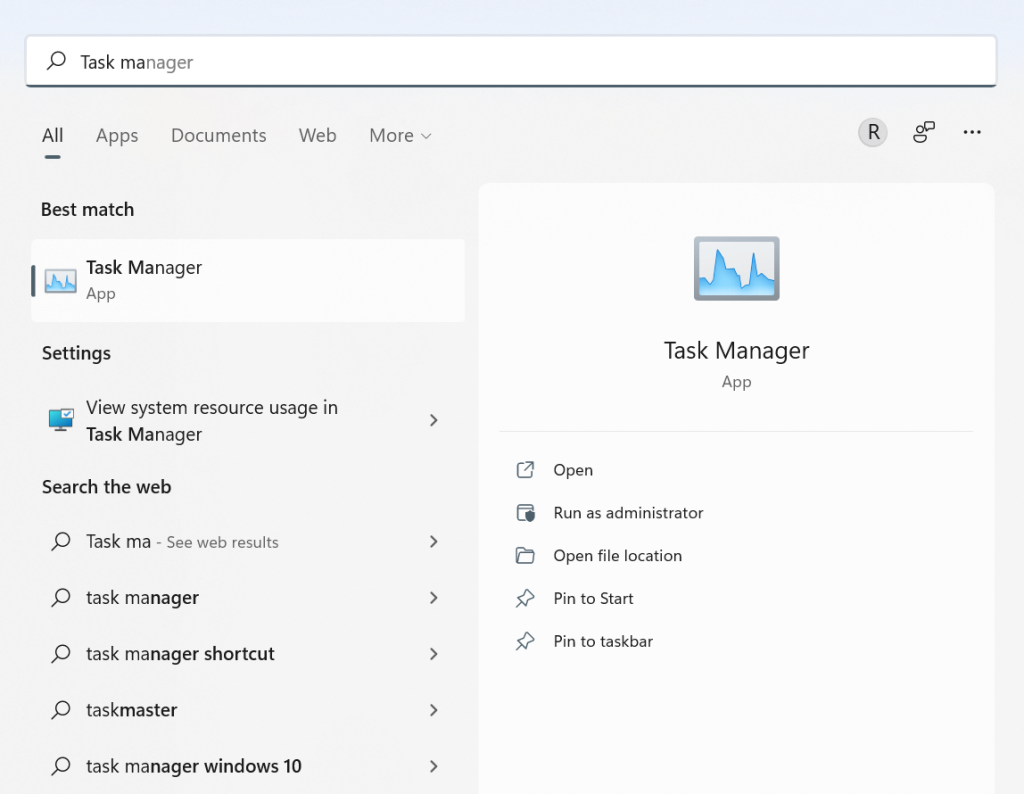
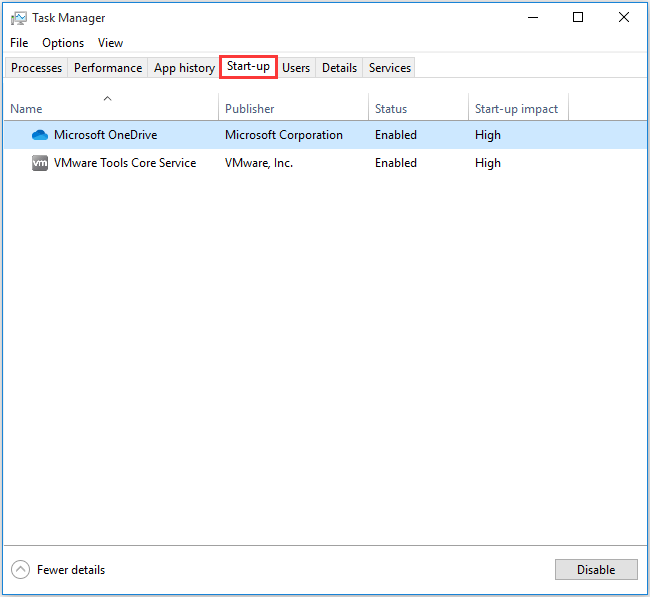
Step 2: Choose the “Start-up” tab from the top row in the Task Manager window.
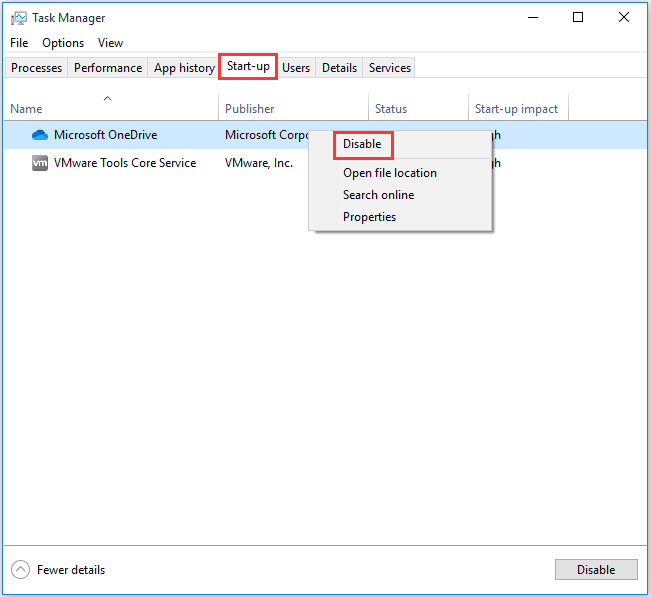
Step 3: Select the app you want to disable from the list and right-click your cursor on top of it. Then, click on the Disable button.
Conclusion
Specific problems like a defect in the system feature, an excessive number of stored elements, and malware can affect regular system functions like shutting down. You should try the different steps we mentioned for fixing it, like updating drivers or running the troubleshooting sequence.
Other than that, use a reliable system optimization tool like CCleaner to boost system performance, remove wrong files, and handle overall PC health evaluation and maintenance. Try the right solutions for your system and take professional help if these options do not work efficiently.
Author Bio:
Dinesh Lakhwani 

Dinesh Lakhwani, the entrepreneurial brain behind “TechCommuters,” achieved big things in the tech world. He started the company to make smart and user-friendly tech solutions. Thanks to his sharp thinking, focus on quality and the motto of never giving up, TechCommuters became a top player in the industry. His commitment to excellence has propelled the company to a leading position in the industry.
Popular Post
Recent Post

How to Recover Deleted Files from Pen drive, USB Drive, SD Card
Introduction: On tech forums, you’ll often see posts like this: “I connected my pen drive to my laptop this morning, but the folder was empty. All my college project files had vanished. I don’t have a backup. Can someone help me?” Stories like this are very common. Pen drives, USB drives and SD cards are […]

How To Recover Files Deleted from the Recycle Bin [Windows 11]
Losing a file can happen in seconds. You clear your desktop, hit Delete, and empty the Recycle Bin. Then, just when you need that file again, it seems to have vanished. This guide will walk you through ways to restore files removed from the Recycle Bin. We will begin with simple fixes, then look at […]

Disk Drill Data Recovery Tool Explained: Full Review and Guide
It happens in a split second. You delete a folder by mistake. Your drive stops showing up. A photo album from your last trip just vanishes. And your stomach drops. Lost files feel personal. They are not just data. They are memories, work hours, and sometimes years of effort packed into a few gigabytes. When […]

Recover Deleted Files In Windows 11 With Software & Without
Introduction What is the first thing that goes through your mind the second an important file vanishes from a Windows 11 PC? For most people, it is a mix of panic and disbelief, followed by a frantic click through every folder that file could possibly be hiding in. It happens in a split second: one […]

EaseUS Data Recovery Wizard: Everything To Know
Data loss does not always come from a big disaster either. Most cases start small and boring. A drive gets formatted by mistake. A laptop freezes mid-save and restarts on its own. A memory card stops showing up after being pulled out too fast. None of these feel like emergencies at first, until you realize […]

Recuva Data Recovery Tool: Is it Actually Worth it?
When I first tried Recuva Data Recovery, I wanted to see if it could really bring back lost files. The tool is free, small in size, and promises quick recovery, which made me curious enough to test it on my own PC. The setup was fast, and the wizard guided me step by step. I […]

GetData Recover My Files Data Recovery Tool: Honest Review
A hard drive error brings a special kind of silence. Well, yes! The screen freezes, then a message appears saying the drive can’t be found or must be formatted. In that moment, years of photos and work files feel at risk. It never happens at a good time. Coffee spills near a laptop, a memory […]
Windows File Recovery: A Complete Review [Tried & Tested]
Imagine this. You spend hours perfecting a video project. You hit save. Then your laptop freezes, reboots, and when the screen comes back. The file is gone. Your stomach sinks. It’s not just you. Lost files happen all the time. A dropped hard drive, a bad update, an accidental delete, or a corrupted partition can […]

5 Best Data Recovery Software For Windows 11 and Windows 10
Introduction: A crashed drive can ruin a whole day. One minute your photos, work files, and tax records sit safe on your PC. The next minute they are gone. A power cut, a bad update, or one wrong click can wipe out years of memories and months of work in seconds. That sinking feeling is […]

