










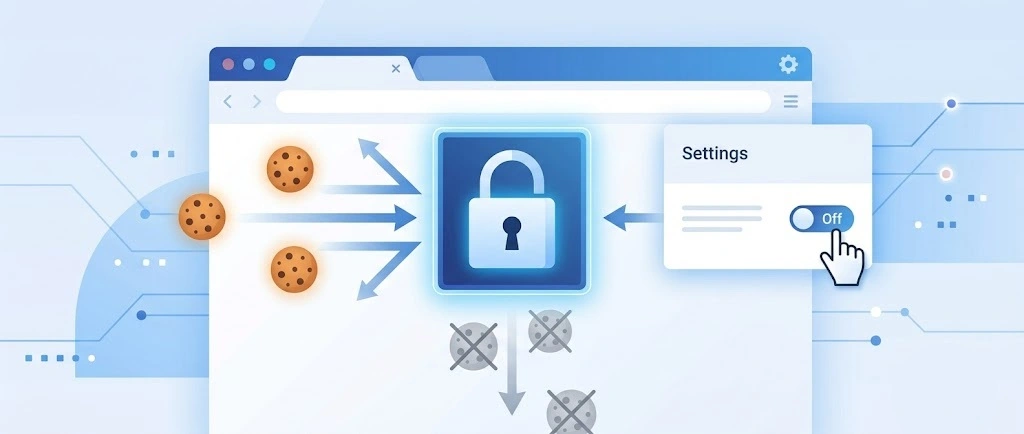
So, search for a pair of shoes once online. Close the tab. By evening, those same shoes are sitting on your news site, your video app, and even your recipe blog. Nobody placed them there by chance. A cookie did. Well, yes! Cookies are small files that websites place on your device while you browse. […]
11 Solutions to Fix the Seagate External Hard Drive Not Working
Has your computer refused to detect your Seagate external hard drive? Do you have important data stored on your Seagate disk?
Then, no need to panic. There are many easy ways to fix a Seagate external drive issue for you. Just follow the steps discussed below to access your data stored on the Seagate hard disk.
Why Is the External Hard Disk Seagate Not Working for You?
Many reasons contribute to stimulating the Seagate external hard drive not working issue on Windows and Mac, such as:
- Faulty or damaged USB ports or cables
- Outdated operating system
- Unsupported file system
- Problematic motherboard
- A virus infected a USB device
- Hard drive partitioning issues
- Corrupted or outdated hard disk
- Physically damaged external hard drive, etc.
Take a Backup Before Fixing the Seagate Hard Drive Not Working Issue
There is a possibility that you might lose your hard disk data while fixing the error. Thus, you must back up all your external hard drive data for the safe side.
How to Fix a Seagate Hard Drive Not Working Error?
We are going to show the easiest to hardest solutions to fix a Seagate hard drive not working error. This way, you can rule out the easy solutions first before trying technical solutions.
Solution 1. Try a Different USB Port or Cable
If your external hard drive flashes, but your PC is unable to detect it. In that case, there is no problem with your USB drive. It is an issue with your computer or connecting cable.
So, you can attach your Seagate drive to another USB port or cable. You can also restart your PC to fix temporary memory glitches. If this doesn’t work, let’s move to the next solution.
Solution 2. Reinstall Seagate Hard Drive Driver
If your hard drive is not visible in Disk Management or Device Manager, this might be an issue with your hard drive driver. So, you can uninstall and reinstall the Seagate hard drive driver on your computer. Here’s how to do it:
Step 1. Attach your Seagate external hard drive to your computer.
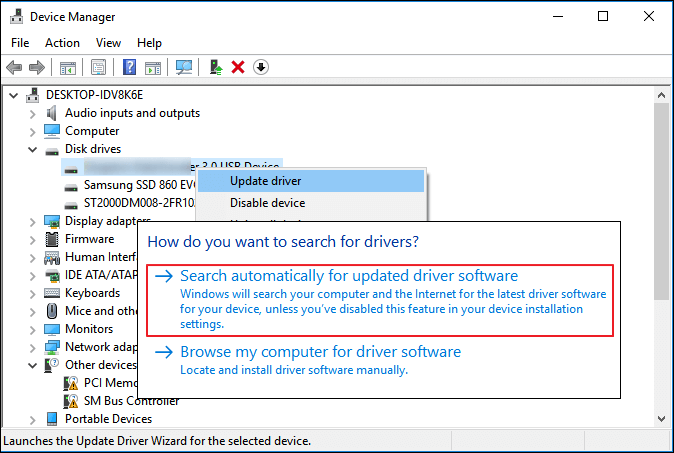
Step 2. Launch Device Manager from the Start menu.
Step 3. Expand the disk driver and, right-click on your external hard drive, choose Update Driver.
Step 4. Choose the Search automatically for updated driver software and restart your computer.
Solution 3. Format RAW Seagate External Hard Drive
This is a bit of a tricky solution. You might lose data on your external hard drive. So, you must back up your external hard disk data before moving ahead.
When your external hard drive is Unallocated on your computer, you can format it to NTS format as follows:
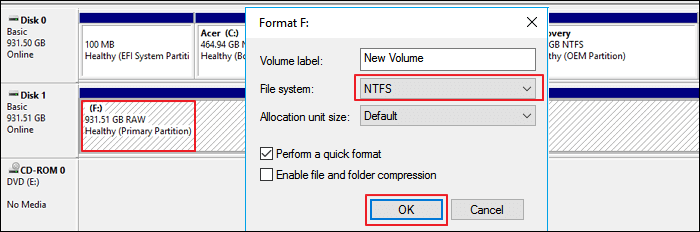
Step 1. After connecting the hard drive to your computer, open Disk Management.
Step 2. Right-click on your external hard drive and select Format.
Step 3. Set volume label to New Volume and File System to NTFS. Then, check the Quick Format box and click on OK to start the formatting. This will take a few minutes.
Solution 4. Create a New Partition on RAW Seagate External Drive
Again, this method can lead to data loss, so back up your data. After that, go to Disk Management and create a new partition as follows:
Step 1. Connect the Seagate drive and open Windows Disk Management.
Step 2. Right-click on the unallocated partition and select New Simple Volume.
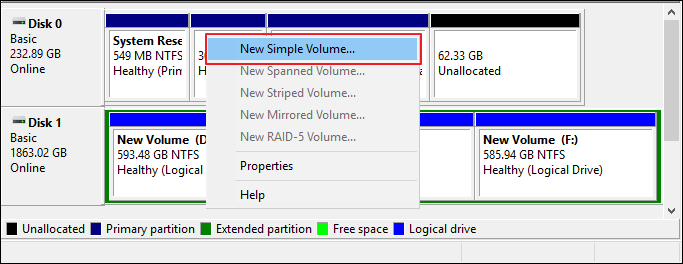
Step 3. After that, define partition size, drive letter, and file system to NTFS. Click on OK to confirm your actions.
Step 4. Finally, click on Finish to complete the process.
Solution 5. Change Seagate Drive Letter
Another solution to fix the Seagate hard drive not working is changing the drive letter. When the driver letter does not show up, your external hard drive will display as New Volume in Disk Management without a driver letter.
To fix this problem, you can add a new driver letter to your Seagate hard drive as follows:
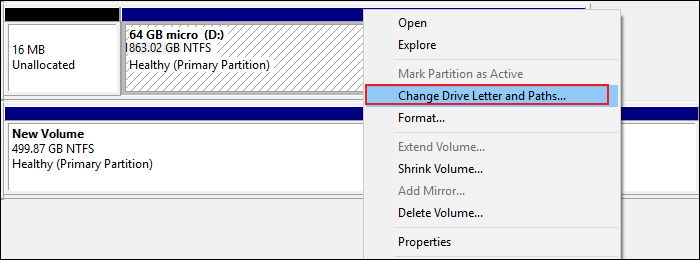
Step 1. Go to Disk Management, right-click on the partition and select the Change Drive Letter and Paths.
Step 2. Set a new drive letter and click on OK to confirm.
Solution 6. Turn On USB Root Hub
Sometimes, USB drives may not function correctly if you have connected multiple devices to the same USB hub. This will take your device into selective suspension.
You can enable the USB root hub to recover the USB port from its unresponsive condition to make your drive work again:
Step 1. Open Device Manager and expand the Universal Serial Bus controllers.
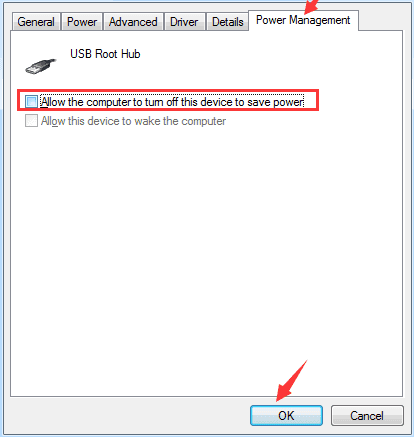
Step 2. Right-click on USB Root Hub > Properties > Power Management.
Step 3. Uncheck the “Allow the computer to turn off this device to save power” option and restart the PC.
Solution 7. Check all the Hidden Devices
Sometimes, you might not notice, but some hidden devices are linked to your Windows device. Unfortunately, this can interfere with your Seagate portal getting detected on your device. Here’s how to do it:
Step 1. Press the Windows and R keys to open the Run command box. Type devmgmt.msc and press Enter.
Step 2. Click on the View menu and select Show Hidden Devices.
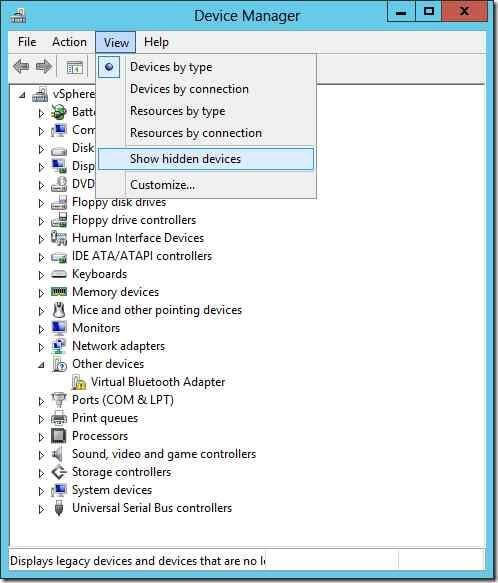
Step 3. Select the Uninstall option from the context menu if you see any gray entries.
Step 4. Restart your computer and see if the error is fixed now.
Solution 8. Use a Different Device
When your USB drive is corrupted or infected with viruses, the computer will not detect it. So, you can change your Seagate device and check if your system recognizes it now. If it does, you can replace it or contact the manufacturer to fix the drive.
Solution 9. Turn on the External Hard Drive Visibility
This solution is for Mac users. They can check disk visibility to ensure they can view external hard drives. There is also an option to set preferences on Mac as follows:
Step 1. Go to Finder and select Preferences from the menu. Then, from the dropdown menu, select General.
Step 2. Check under ‘Show these things on the desktop’ for either Hard drives or External disks.
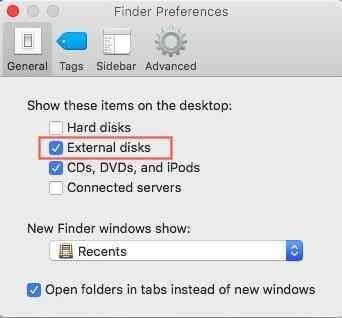
Step 3. Here you can enable external hard drive visibility.
Step 4. Likewise, go to Finder > Preferences > Sidebar. Look for the Hard drives and External disks under Show these objects on the sidebar.
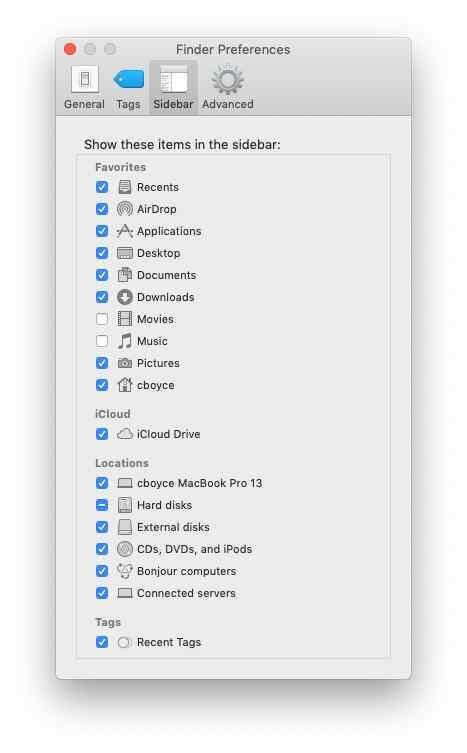
Step 5. Also, go to Finder > Applications > Utilities > Disk Utility. From there, you can check all mountable and non-mountable devices.
Solution 10. Initialize the External Hard Drive
When the Seagate external hard drive is not working on your computer, you can Disk Management. From there, you can manually connect a USB drive to your computer. However, if you are connecting a new hard disk for the first time, you have to initialize it first. Here’s how you can do it:
Step 1. Press the Windows and R keys. Type diskmgmt.msc and press Enter to launch Disk Management.
Step 2. Right-click on your Seagate disk and select Initialize Disk.
Step 3. Select a partition style and click OK.
Solution 11. Use First Aid
First Aid is an awesome feature for Mac users to repair Seagate hard disks. You can use this program when you can’t access an external drive after manually monitoring from Disk Utility. First Aid will automatically repair your external disk as follows:
Step 1. Go to the Dock and search for the Other Option. And click open Disk Utility.
Step 2. From there, you can select the unmountable Seagate drive and select First Aid from the top menu.
Step 3. Click on Run to repair the hard disk.
Parting Remarks: Ready to Fix a Seagate Hard Drive Not Working?
As you can see, there are many ways to fix a Seagate hard drive working on Windows and Mac. However, we suggest you start with easy fixes like updating drivers or checking USB ports.
When simple solutions fail, you can try technical solutions like formatting RAW hard drives or changing a driver letter. Moreover, don’t forget to back up your data using the EaseUS Data Recovery wizard before trying any technical solutions. That’s because of a small goof-up, and you might end up losing your entire data.
That’s it for now! Keep on following us for more updates and guides.
Author Bio:
Dinesh Lakhwani 

Dinesh Lakhwani, the entrepreneurial brain behind “TechCommuters,” achieved big things in the tech world. He started the company to make smart and user-friendly tech solutions. Thanks to his sharp thinking, focus on quality and the motto of never giving up, TechCommuters became a top player in the industry. His commitment to excellence has propelled the company to a leading position in the industry.
Popular Post
Recent Post
How To Disable Background Apps In Windows: 4 Quick Methods
A slow PC rarely gives a warning. One day, it simply takes longer to start. Apps open late. The fan runs loud, even when the screen is almost empty. Most people blame old hardware. Often, that is not the real reason. The real reason is hiding in plain sight. Windows keeps many apps active in […]
How to Activate Windows with a Product Key for Windows 11 & Windows 10
It always shows up at the worst time. You are halfway through a report, or about to join a video call. Then you spot it in the bottom right corner of the screen. Activate Windows. Go to Settings to activate Windows. Initially, an unactivated copy of Windows may seem like a minor inconvenience. Over time, […]
Is Easy Duplicate Finder Worth It? Honest Review
The photos folder looked normal at first glance. Then the storage warning popped up. One trip photo appeared four times. A tax PDF sat in three different folders. Two old setup files were still in Downloads, and each one was over 500 MB. Nobody plans this mess. Copies pile up slowly. A download runs twice. […]
Wise Duplicate Finder Review: Real Results from Wise Duplicate Finder
Read my honest Wise Duplicate Finder review. See features, pricing, pros and cons, and real PC test results. Find out if this free duplicate cleaner can free up your Windows storage.
How to Recover Deleted Files from Pen drive, USB Drive, SD Card
Introduction: On tech forums, you’ll often see posts like this: “I connected my pen drive to my laptop this morning, but the folder was empty. All my college project files had vanished. I don’t have a backup. Can someone help me?” Stories like this are very common. Pen drives, USB drives and SD cards are […]

How To Recover Files Deleted from the Recycle Bin [Windows 11]
Losing a file can happen in seconds. You clear your desktop, hit Delete, and empty the Recycle Bin. Then, just when you need that file again, it seems to have vanished. This guide will walk you through ways to restore files removed from the Recycle Bin. We will begin with simple fixes, then look at […]
Disk Drill Data Recovery Tool Explained: Full Review and Guide
It happens in a split second. You delete a folder by mistake. Your drive stops showing up. A photo album from your last trip just vanishes. And your stomach drops. Lost files feel personal. They are not just data. They are memories, work hours, and sometimes years of effort packed into a few gigabytes. When […]
Recover Deleted Files In Windows 11 With Software & Without
Introduction What is the first thing that goes through your mind the second an important file vanishes from a Windows 11 PC? For most people, it is a mix of panic and disbelief, followed by a frantic click through every folder that file could possibly be hiding in. It happens in a split second: one […]
EaseUS Data Recovery Wizard: Everything To Know
Data loss does not always come from a big disaster either. Most cases start small and boring. A drive gets formatted by mistake. A laptop freezes mid-save and restarts on its own. A memory card stops showing up after being pulled out too fast. None of these feel like emergencies at first, until you realize […]

