Fix Overscaling Or Overscan in Windows 10 and Windows 11: 10 Ways
Last updated on February 17th, 2024 at 3:20 am
Imagine you are all set for a family movie night. But when you connect your TV to your laptop to broadcast a movie on a bigger screen, it doesn’t fit your TV screen. All you could see is the movie taking up a smaller area on your TV, and the rest of the screen is plain black space.
Guys, this is an Overscreen issue. Mostly, your monitors, TV screens, and all Windows 10 devices can auto-detect display settings and resolutions. Sometimes, simple miscommunication between Windows 10 PC and other connected display devices can cause an overscan problem.
To be honest, Windows 10 overscan isn’t a big issue. With a little tweak here and there, you can fix overscan Windows 10. For your ease, the TC team has found ten ways to fix Windows 10 overscan issue.
How to Fix Overscaling & Overscan Windows 10 and Windows 11
Whether your TV or Windows 10 device is causing the overscan issue, you can try the following ten methods to fix overscan:
1. Fix Overscan on Windows 10 & 11 by Changing the Screen Resolution
Once you have connected your laptop to your TV screen, you should experiment with different screen resolutions to adjust the screen. To tweak with Windows 10 screen resolution, go to:
- Control Panel from the Start Menu or using Win+X keyboard shortcut.
- Click open the Appearance and Personalisation.
- Select Display and then click on the Change Display Settings. Also, select the Advanced Display Settings link.
- From the drop-down menu next to Resolution, select a different resolution setting.
- Once you find the preferred screen resolution, click to Apply.
2. Fix Overscan Windows 10 and 11 by Adjusting Display Scaling
If the resolution setting change didn’t work for you, the next step is to check out Windows 10 display scaling. Almost every desktop over scaling issues can be fixed by:
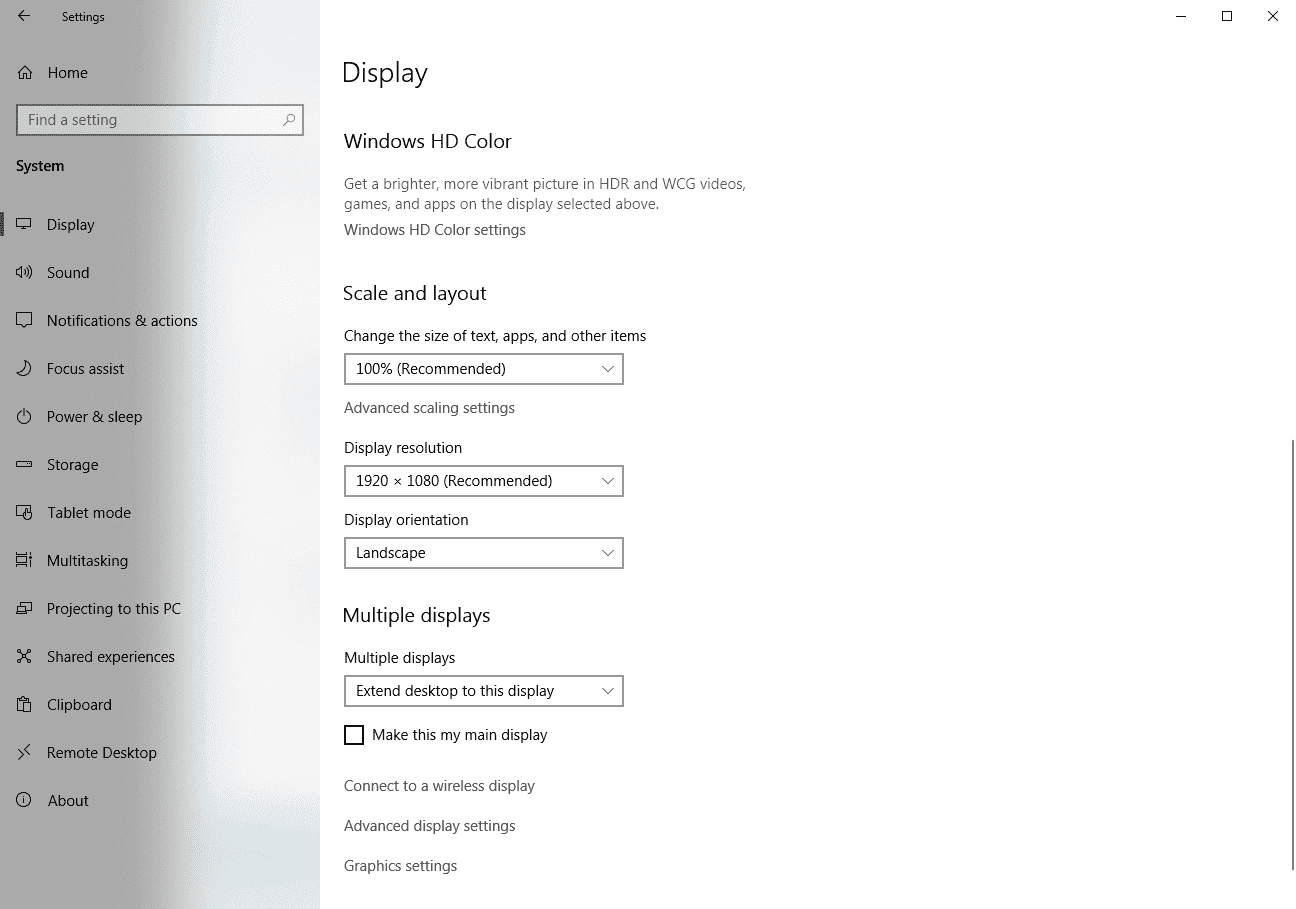
- Go to Start Menu > Settings > System > Display.
- Under the Scale and Layout section, look for the Change the size of text, apps, and other items. Here, you can select different options like 125% or 150% to increase the display items scale.
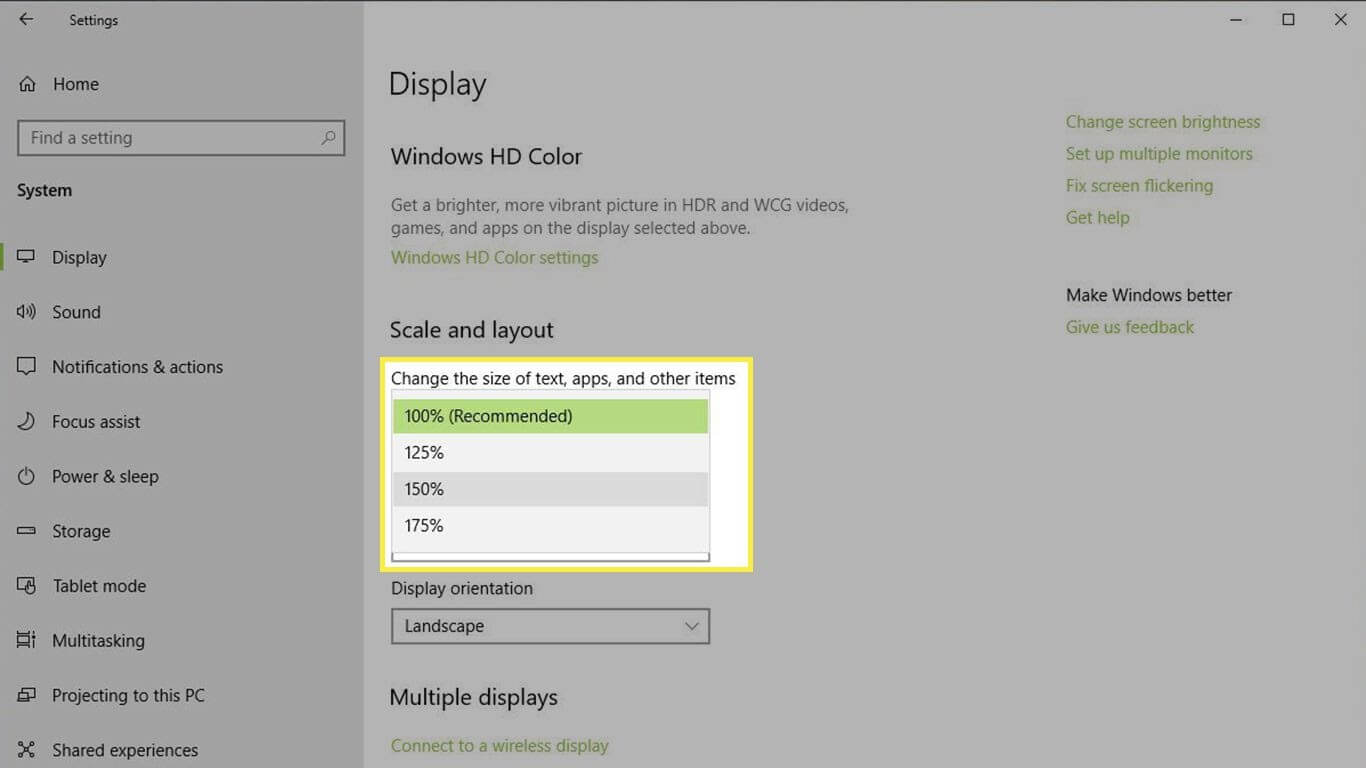
- To customize the display scale size, you can select the Advanced scaling settings.
3. Fix Overscaling Windows 10 and 11 Using the Intel Graphics Control Panel
If you have a traditional Windows 10 PC running on an Intel CPU, you can use the Intel Graphics Control Panel to fix overscan on Windows 10. You can experiment with numerous options until you get a desirable screen preview, such as:
- Open the Windows search box and enter Intel. You can press CTRL+ALT+F12 keys to launch the Intel Graphics Control Panel.
- On the Intel Graphics Control Panel screen, you have multiple options to adjust your screen size.

4. Fix Overscan Windows 11 & 10 with the Nvidia Control Panel
If you aren’t an Intel CPU user, you will probably be the Nvidia CPU user. In that case, you have to modify Nvidia Control Panel settings to solve the overscan problem. To do so:
- Open the Windows search box and type Nvidia in it.
- Click on the Display and Adjust desktop size and position.
- Check off the Enable desktop resizing option and then select Resize while connected to the monitor.
5. Fix Windows 10 Overscan by Calibrating your Monitor
To fix various display issues, Windows 10 comes with a built-in calibration tool. There’s always the option to use third-party calibration tools too. If you want to move ahead with Windows 10 calibration tool, you simply have to:
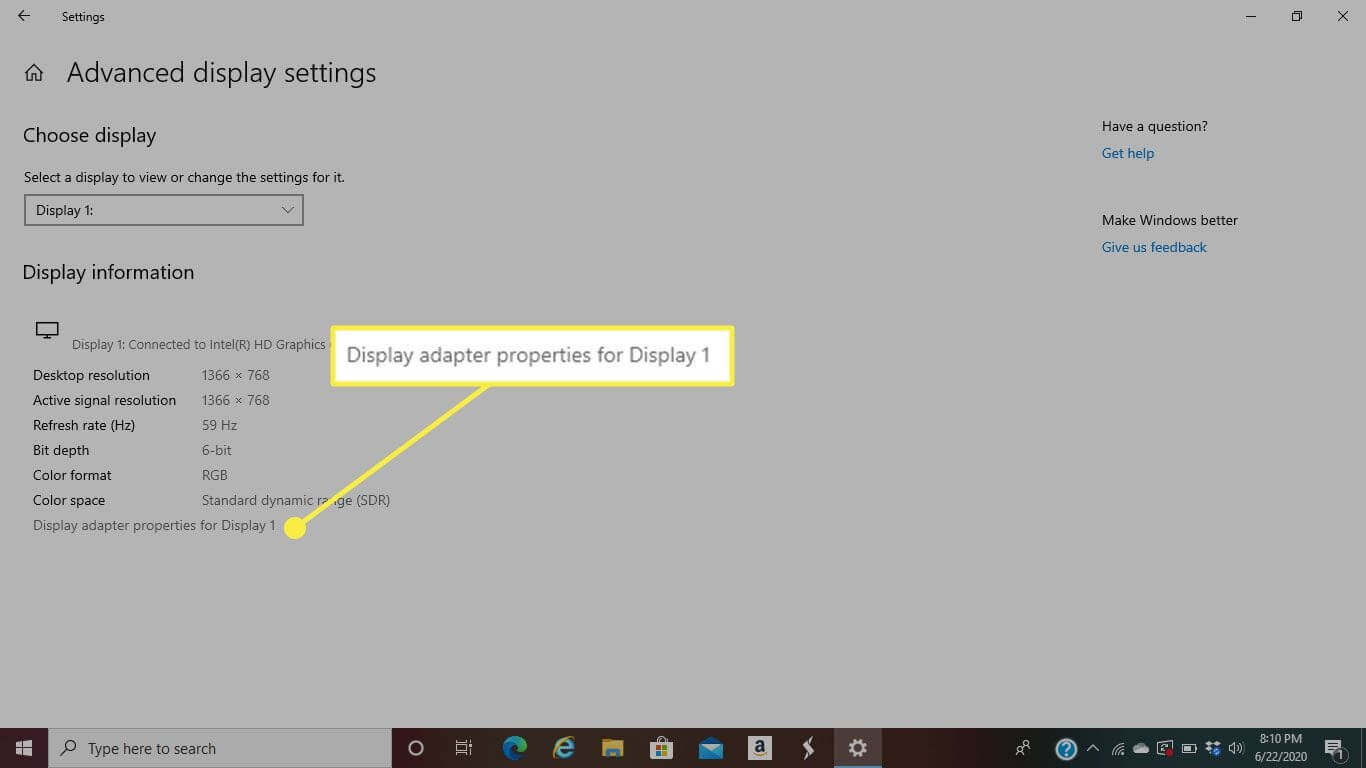
- Open the Windows 10 Settings and then System.
- Select the Display tab, scroll down to the Advanced display settings.
- Click open the Display adapter properties for the display that you want to calibrate.
- Go to the Color Management > Advanced > Calibrate Display.
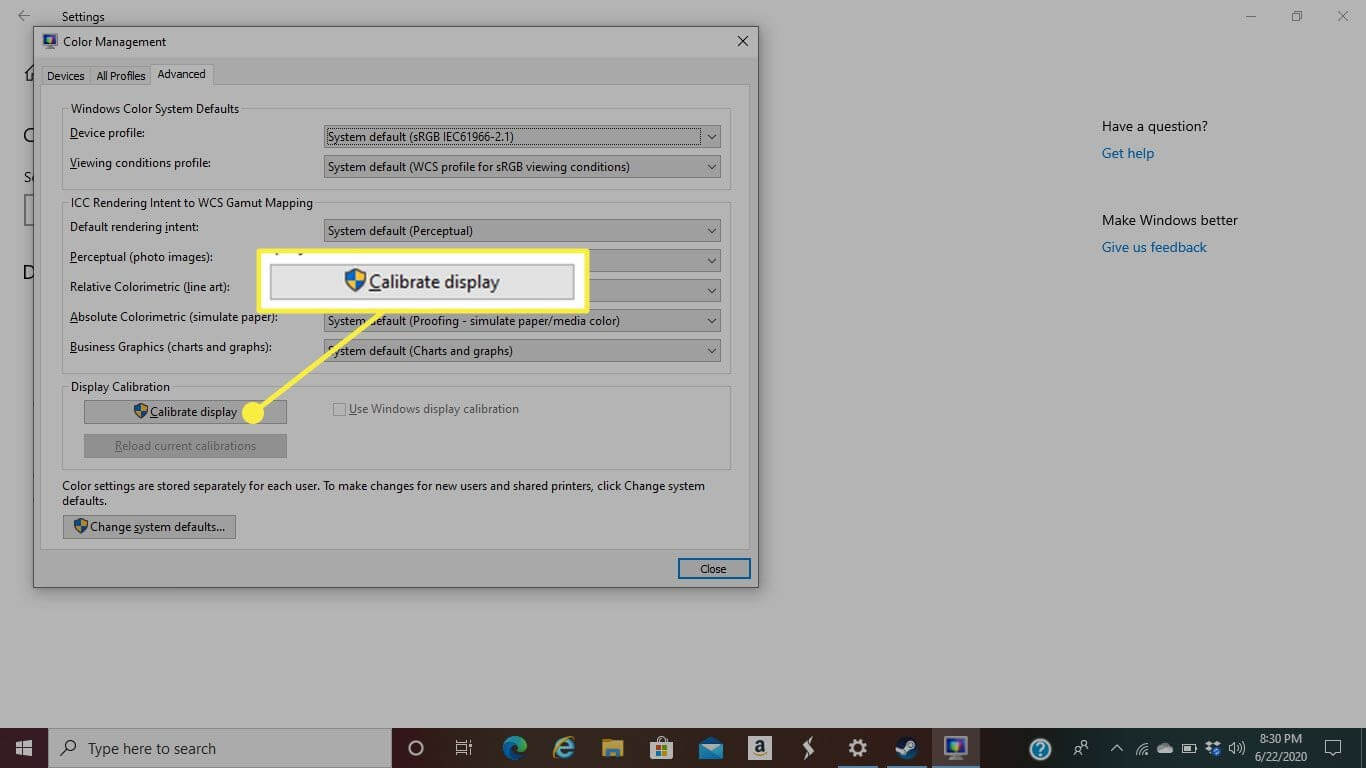
- Simply follow the on-screen instructions to complete the calibration process.
6. Fix Windows 10 & 11 Overscaling by Updating OS
Updating Windows 10 OS can almost fix all the bugs-related issues. So, if your overscan issue has something to do with outdated OS and bugs, you gotta update your system. You can check system updates from:
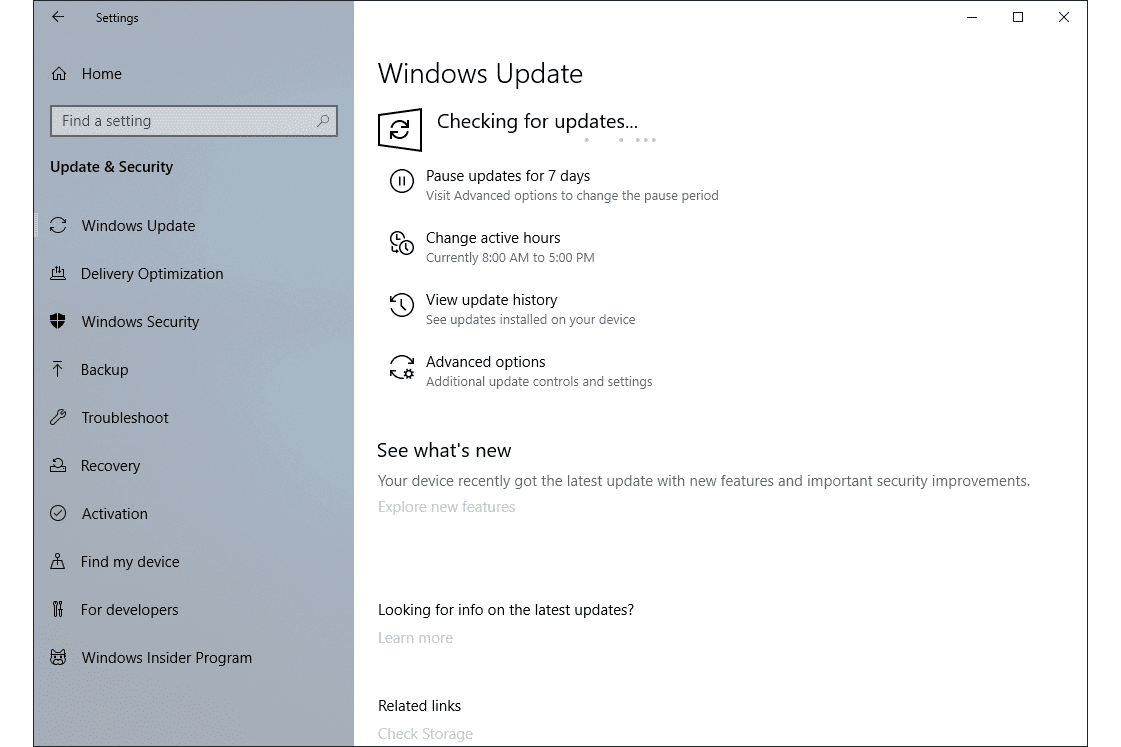
- Open Settings > Update & Security > Windows Update.
- Click on Check for updates to find new Windows 10 updates for your PC.
- If there’s an update available for you, download and install it immediately. It might take some time to update OS, so be patient.
7. Fix Overscan Windows 10 and Windows 11 by Updating Drivers
Another way to squash bugs and glitches in Windows 10 is by updating the system drivers. If your monitors and display adapter drivers are outdated or unreliable, you need to fix them.
To update drivers, you can opt for a straight manual method. However, locating an outdated driver, finding the latest one, and updating it could be a slightly technical and time-consuming task. Therefore, many people prefer to use automatic driver updater to ease their workload. There are plenty of different driver updates available in the market that you can select as per your requirements.
For this guide, we will show you how to update drivers using AVG Driver Updater:
- You can quickly download AVG Driver Updater online. If you already have a tool downloaded on your system, launch it.
- Click on the Scan Drivers.
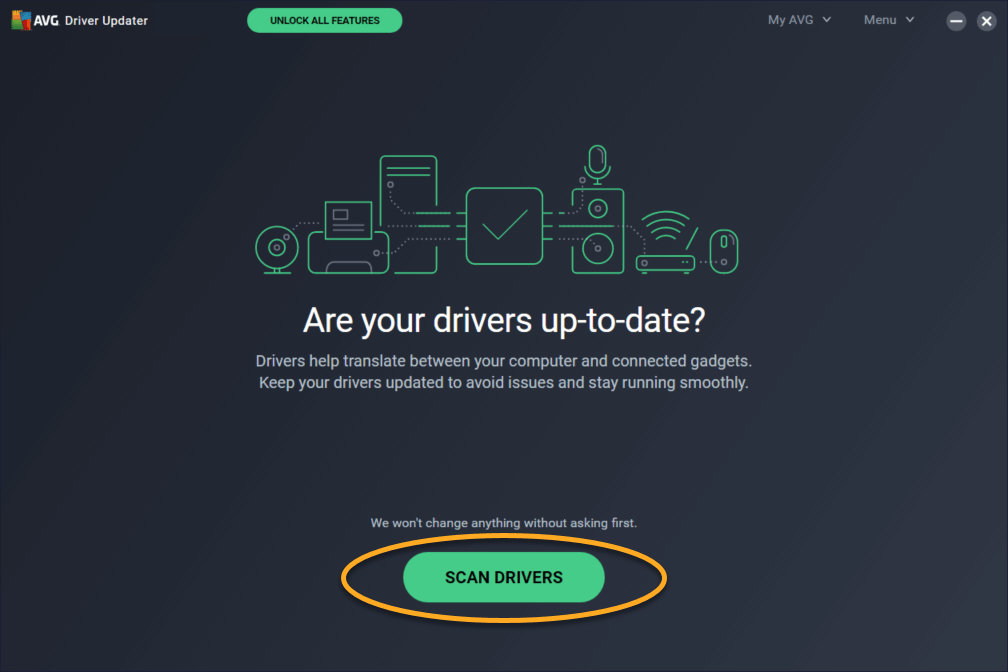
- Now, AVG Driver Updater will scan your entire system and detect outdated drivers.
- Select the monitors and display adapter if it is on the list.
- Click Update Selected, and the software will automatically update the driver for you.
8. Fix Overscaling On Windows 11 and Windows 10 Using Registry
If you have full confidence in your technical abilities, you can adjust Registry settings to fix the overscan Windows 10 problem. Remember one thing, tweaking with Registry can cause irrecoverable damage to your PC, so be cautious. You can follow these steps to safely edit the Registry on your computer:
- Click on the Start button, write regedit, and enter.
- On the Registry Editor, follow this path — HKEY_LOCAL_MACHINE\SYSTEM\CurrentControlSet\Control\Video
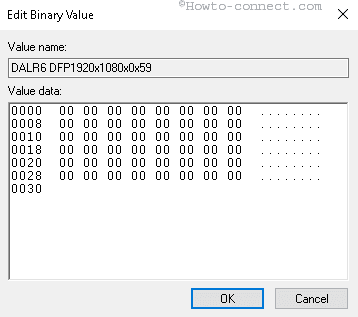
- Here, you will see a few Registry keys. Expand all the keys and look for keys that have 0000 and 0001, 0002, and video subkeys together.
- Take 0000 0001 and 0002 keys backup.
- Choose the 0000 key and search HDMI resolution in the right pane.
- Now, select the key that matches your resolution, right-click, and select Modify binary data.
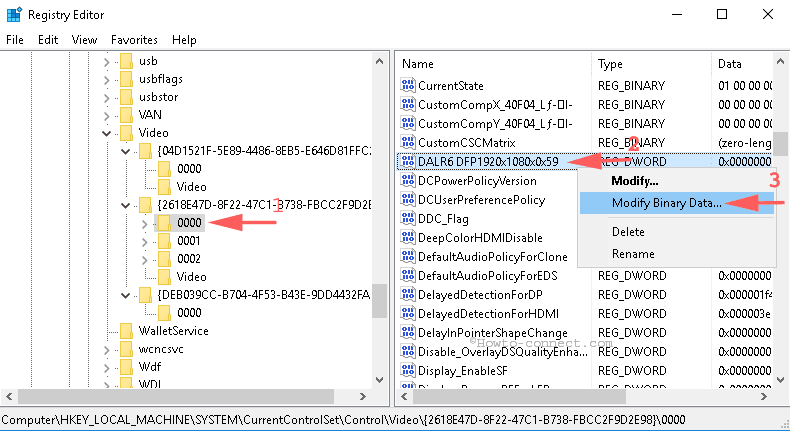
- Change all binary values to zero and click OK. Do the same with 0001 and 0002 subkeys and change binary data to zero.
- Next, go to Settings > System > Advanced display settings.
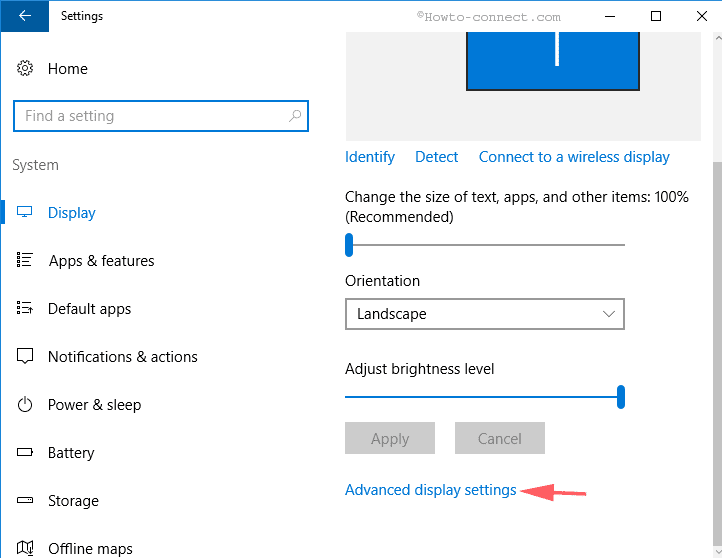
- From the Resolution drop-down menu, first, change resolution other than 1920×1080 and then change back again. Now, when you start TV, the overscan problem won’t annoy you.
9. Fix Overscan Windows 10 from the Monitor’s or TV’s Settings
You can tweak your monitor’s and TV’s display settings to resize the screen. For every TV and monitor brand, the display settings menu functions differently. So, you should go through your device’s manual before adjusting the display settings.
10. Fix Windows 11 and Windows 10 Overscaling with HDMI Cable
You can always use the good old disconnecting and reconnecting the HDMI cable method to fix overscan on Windows 10. Sometimes, when the HDMI cable isn’t properly plugged in, it can disturb the connection between your TV and computer. So, recheck the HDMI cable connection to fix the problem. Also, try to use a different HDMI cable to connect display devices.
Parting Thoughts
After exploring ten awesome ways to fix overscan Windows 10, you can now easily save your family movie night. Overscan is a simple problem that can bug you anytime, so always remember these solutions. For more guides like this, keep on following us, and don’t forget to share your thoughts in the comments!
Author Bio:
Dinesh Lakhwani 

Dinesh Lakhwani, the entrepreneurial brain behind “TechCommuters,” achieved big things in the tech world. He started the company to make smart and user-friendly tech solutions. Thanks to his sharp thinking, focus on quality and the motto of never giving up, TechCommuters became a top player in the industry. His commitment to excellence has propelled the company to a leading position in the industry.
Popular Post


Recent Post

How to Be a Better Project Manager
The role of the project manager is to provide you and your team with the goals, organizational systems, and feedback necessary for creating a positive workplace result. Everything from coding to content development can benefit from a high-quality project manager. This article will cover some of the actionable steps you can take to become better […]

How to Use a Dedicated Server for Gaming
Online multiplayer games offer the chance to connect and compete with your friends, meet new people, and work collaboratively to build something great. If you’re ready to take your online gaming experience to the next level, a dedicated server is a great option for hosting. Instead of operating game servers from your own hardware, you’ll […]

Importance of the Best Mirrorless Camera for Travelling
It can be difficult to find the best mirrorless camera for under 1000 dollars. This blog post discusses some of the best models on the market and provides a link to Amazon where you can purchase them. We are going to give you a couple of the best mirrorless cameras that are under 1000. We […]

How to Reset Network Settings on a Mac
Macs are usually always trustworthy, although you may experience issues attaching to the web or experiencing poor surfing speeds at times. The web may be operating well on your additional devices, which might be frustrating. That’s not always clear what’s causing an issue, or whether one exists at all. When you discover yourself in a […]

How to Create a Timeline in Google Slides
Timelines are an excellent method for displaying sequential listings of activities from start to end. It is a visual display of information that includes lists, charts, or visuals. A timeline is written down and organized in the same chronological sequence. A timeline is a smart method to condense information and better explain your brand using […]
How to Undo and Redo on a Mac
Almost every Mac software includes the option to implement an “Undo,” that would be, to overturn the previous action. Similarly, practically every single Mac software offers the capability to “Redo,” that would be, to completely upend the most recently undone operation. The Mac shortcut keys for doing Undo as well as Redo have always been […]

How to Increase Internet Speed on Windows 10
Internet connectivity is a mandated requirement for many routine works on Windows 10 systems. Whether it is some official work or personal work, having a smooth internet connection is important for both. However, internet connectivity is not so smooth for all Windows 10 users. This is due to multiple reasons like geographical issues, increased traffic, […]
How to upgrade to Windows 11 for free
Windows 11 offers the ultimate experience to the users and comes with multiple features. Hence, all devices require an updated version of Windows for seamless operations. Many times a user has to go to purchase the costly Windows 11. Due to the cost constraints, it is not feasible for all Windows users to purchase the […]

11 Best File Encryption Software for 2024
The finest encryption software enables keeping your files private and safe for security considerations, as well as protecting them against intrusion. When it relates to securing your data and documents, encryption software seems to have become increasingly vital. Hacking attempts and privacy breaches have made it simpler for total strangers to access the most private […]

How to record screen on Windows 10/11
Have you often pondered how to display your desktop on whether you’re a Windows 11,10 user or recently updated towards the beta windows version 11? It is a question that almost all of us have asked. Using a display capturing app is the most straightforward approach to record a screen. And TweakShot is one of […]

