Fix Overscaling Or Overscan in Windows 10 and Windows 11: 10 Ways
Last updated on February 17th, 2024 at 3:20 am
Imagine you are all set for a family movie night. But when you connect your TV to your laptop to broadcast a movie on a bigger screen, it doesn’t fit your TV screen. All you could see is the movie taking up a smaller area on your TV, and the rest of the screen is plain black space.
Guys, this is an Overscreen issue. Mostly, your monitors, TV screens, and all Windows 10 devices can auto-detect display settings and resolutions. Sometimes, simple miscommunication between Windows 10 PC and other connected display devices can cause an overscan problem.
To be honest, Windows 10 overscan isn’t a big issue. With a little tweak here and there, you can fix overscan Windows 10. For your ease, the TC team has found ten ways to fix Windows 10 overscan issue.
How to Fix Overscaling & Overscan Windows 10 and Windows 11
Whether your TV or Windows 10 device is causing the overscan issue, you can try the following ten methods to fix overscan:
1. Fix Overscan on Windows 10 & 11 by Changing the Screen Resolution
Once you have connected your laptop to your TV screen, you should experiment with different screen resolutions to adjust the screen. To tweak with Windows 10 screen resolution, go to:
- Control Panel from the Start Menu or using Win+X keyboard shortcut.
- Click open the Appearance and Personalisation.
- Select Display and then click on the Change Display Settings. Also, select the Advanced Display Settings link.
- From the drop-down menu next to Resolution, select a different resolution setting.
- Once you find the preferred screen resolution, click to Apply.
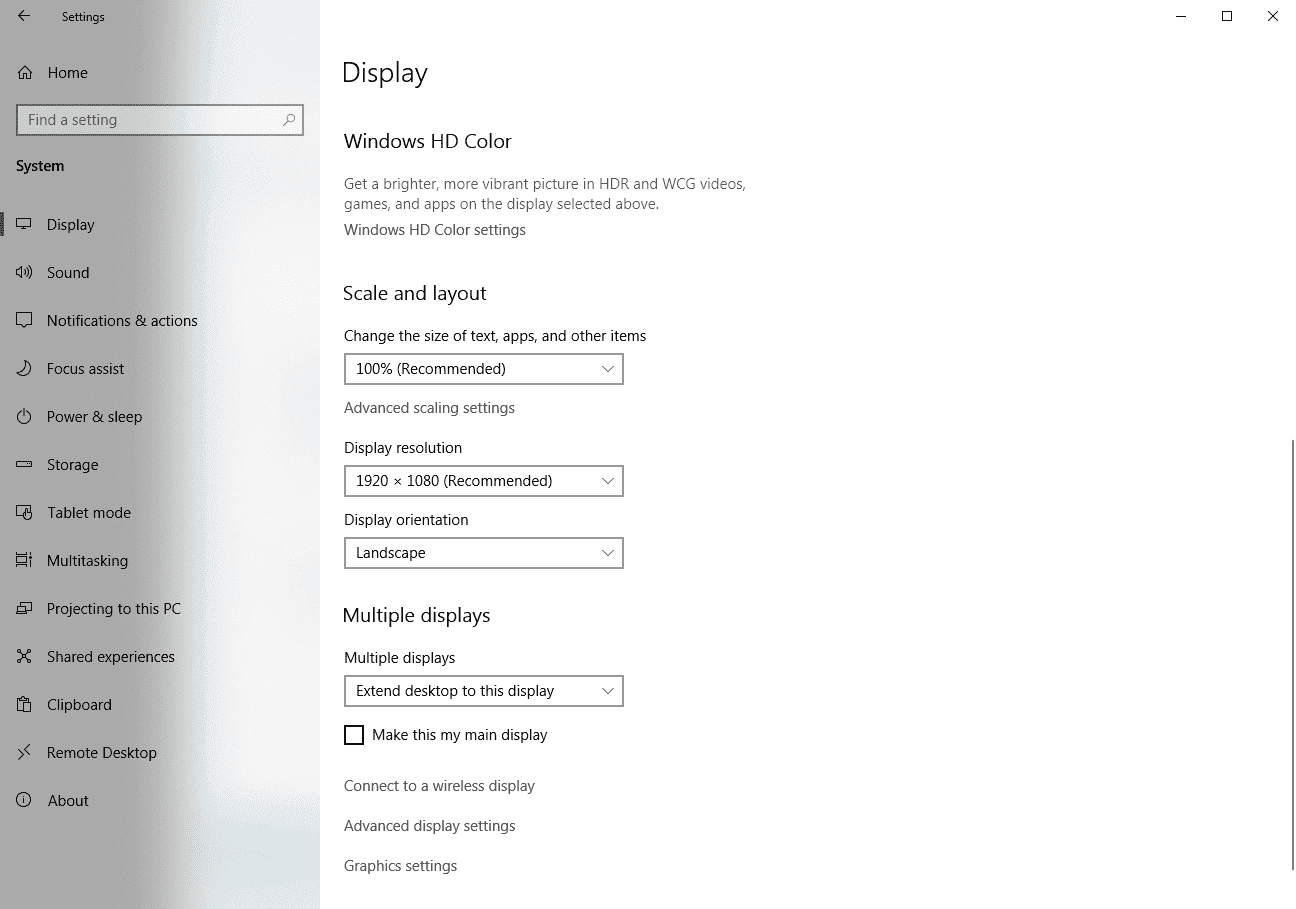
2. Fix Overscan Windows 10 and 11 by Adjusting Display Scaling
If the resolution setting change didn’t work for you, the next step is to check out Windows 10 display scaling. Almost every desktop over scaling issues can be fixed by:
- Go to Start Menu > Settings > System > Display.
- Under the Scale and Layout section, look for the Change the size of text, apps, and other items. Here, you can select different options like 125% or 150% to increase the display items scale.
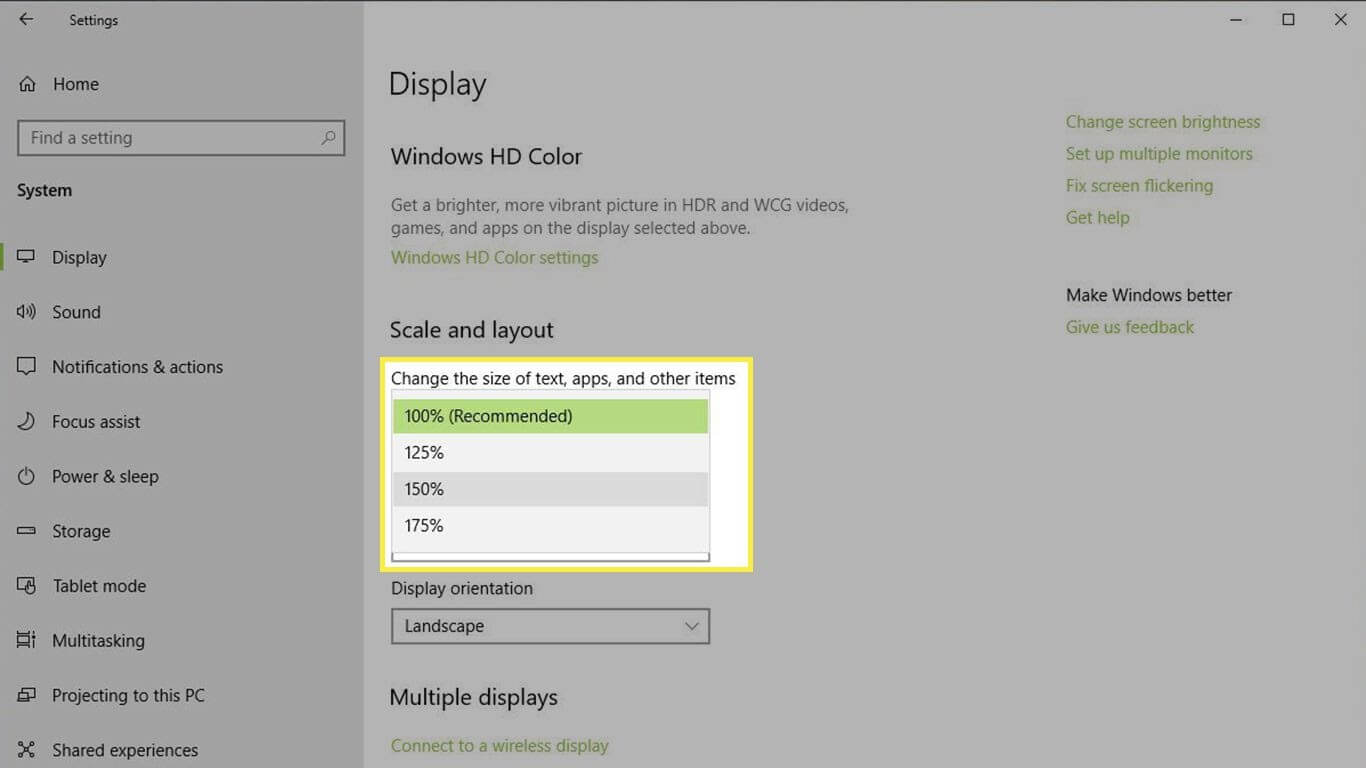
- To customize the display scale size, you can select the Advanced scaling settings.
3. Fix Overscaling Windows 10 and 11 Using the Intel Graphics Control Panel
If you have a traditional Windows 10 PC running on an Intel CPU, you can use the Intel Graphics Control Panel to fix overscan on Windows 10. You can experiment with numerous options until you get a desirable screen preview, such as:
- Open the Windows search box and enter Intel. You can press CTRL+ALT+F12 keys to launch the Intel Graphics Control Panel.
- On the Intel Graphics Control Panel screen, you have multiple options to adjust your screen size.

4. Fix Overscan Windows 11 & 10 with the Nvidia Control Panel
If you aren’t an Intel CPU user, you will probably be the Nvidia CPU user. In that case, you have to modify Nvidia Control Panel settings to solve the overscan problem. To do so:
- Open the Windows search box and type Nvidia in it.
- Click on the Display and Adjust desktop size and position.
- Check off the Enable desktop resizing option and then select Resize while connected to the monitor.
5. Fix Windows 10 Overscan by Calibrating your Monitor
To fix various display issues, Windows 10 comes with a built-in calibration tool. There’s always the option to use third-party calibration tools too. If you want to move ahead with Windows 10 calibration tool, you simply have to:
- Open the Windows 10 Settings and then System.
- Select the Display tab, scroll down to the Advanced display settings.
- Click open the Display adapter properties for the display that you want to calibrate.
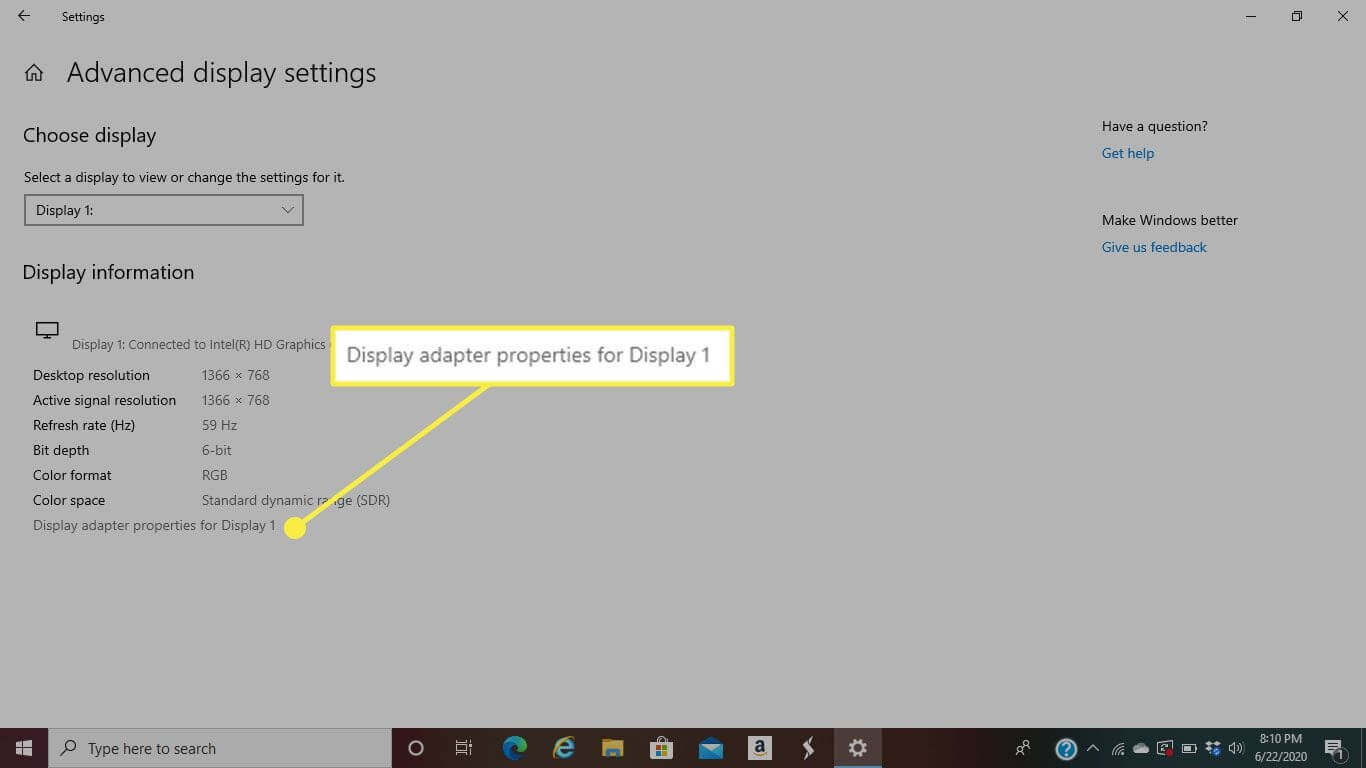
- Go to the Color Management > Advanced > Calibrate Display.
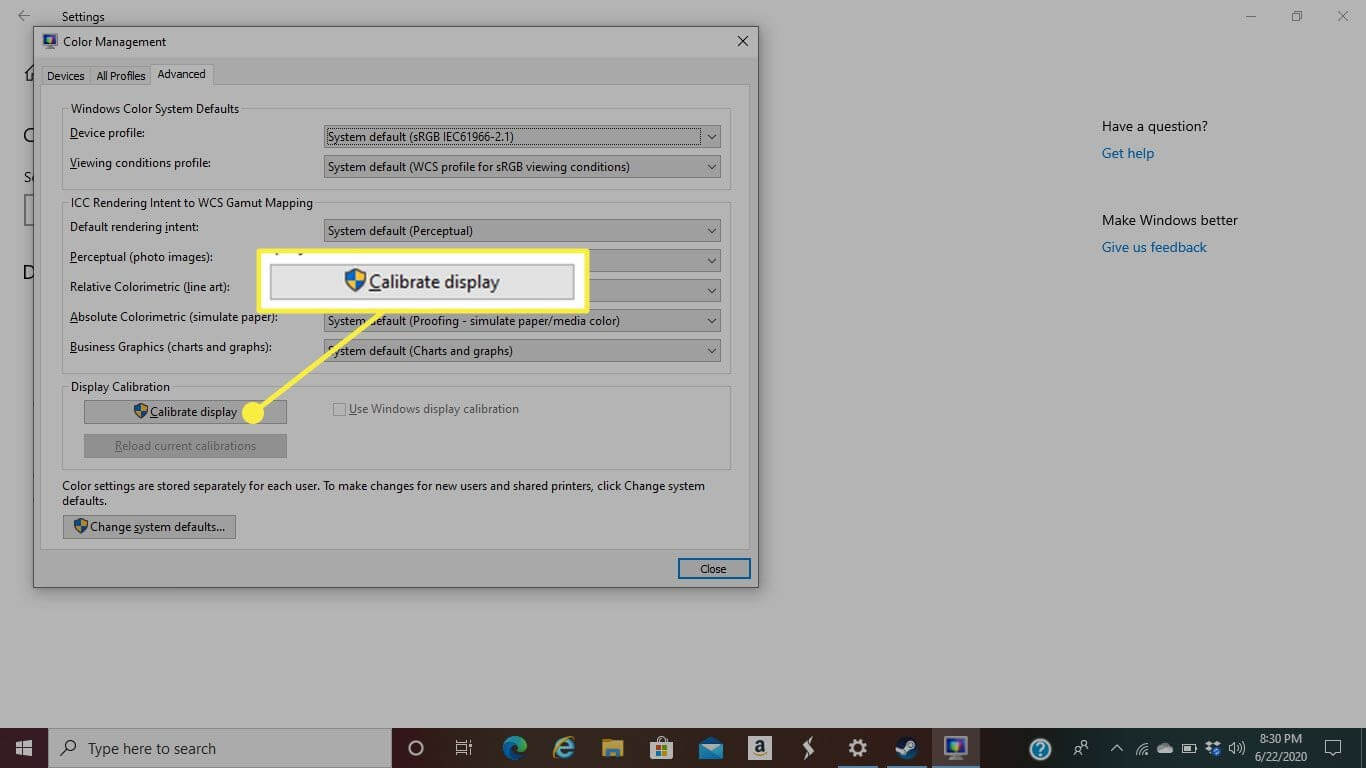
- Simply follow the on-screen instructions to complete the calibration process.
6. Fix Windows 10 & 11 Overscaling by Updating OS
Updating Windows 10 OS can almost fix all the bugs-related issues. So, if your overscan issue has something to do with outdated OS and bugs, you gotta update your system. You can check system updates from:
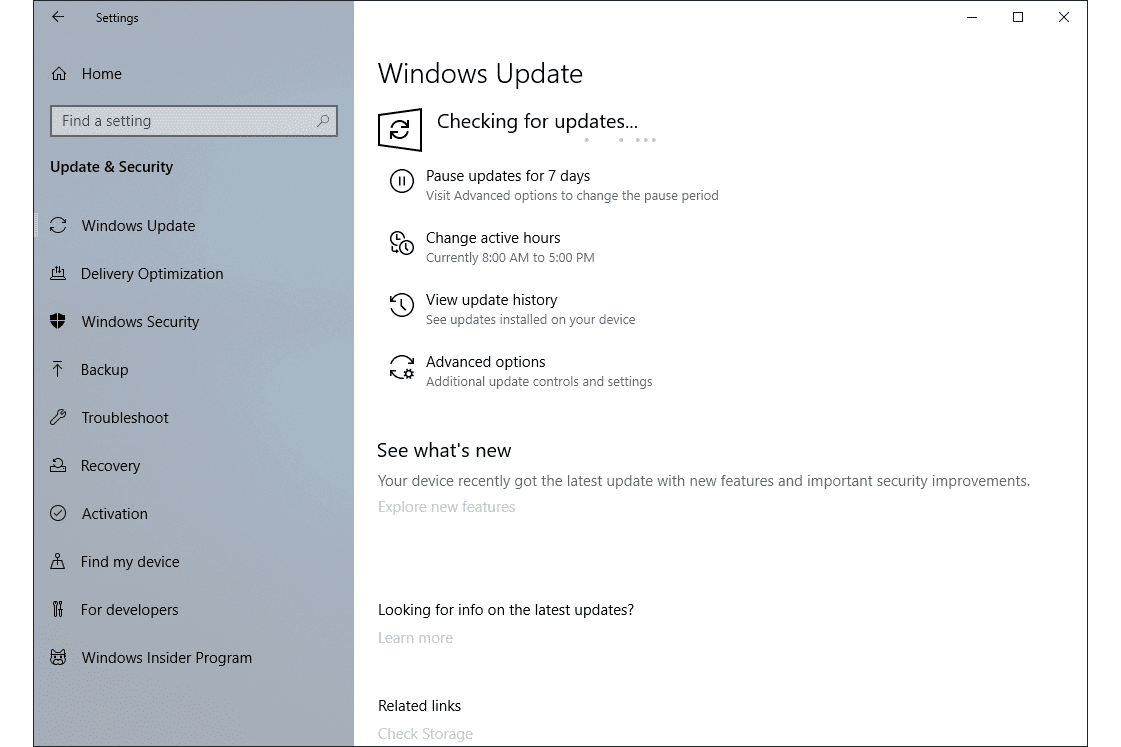
- Open Settings > Update & Security > Windows Update.
- Click on Check for updates to find new Windows 10 updates for your PC.
- If there’s an update available for you, download and install it immediately. It might take some time to update OS, so be patient.
7. Fix Overscan Windows 10 and Windows 11 by Updating Drivers
Another way to squash bugs and glitches in Windows 10 is by updating the system drivers. If your monitors and display adapter drivers are outdated or unreliable, you need to fix them.
To update drivers, you can opt for a straight manual method. However, locating an outdated driver, finding the latest one, and updating it could be a slightly technical and time-consuming task. Therefore, many people prefer to use automatic driver updater to ease their workload. There are plenty of different driver updates available in the market that you can select as per your requirements.
For this guide, we will show you how to update drivers using AVG Driver Updater:
- You can quickly download AVG Driver Updater online. If you already have a tool downloaded on your system, launch it.
- Click on the Scan Drivers.
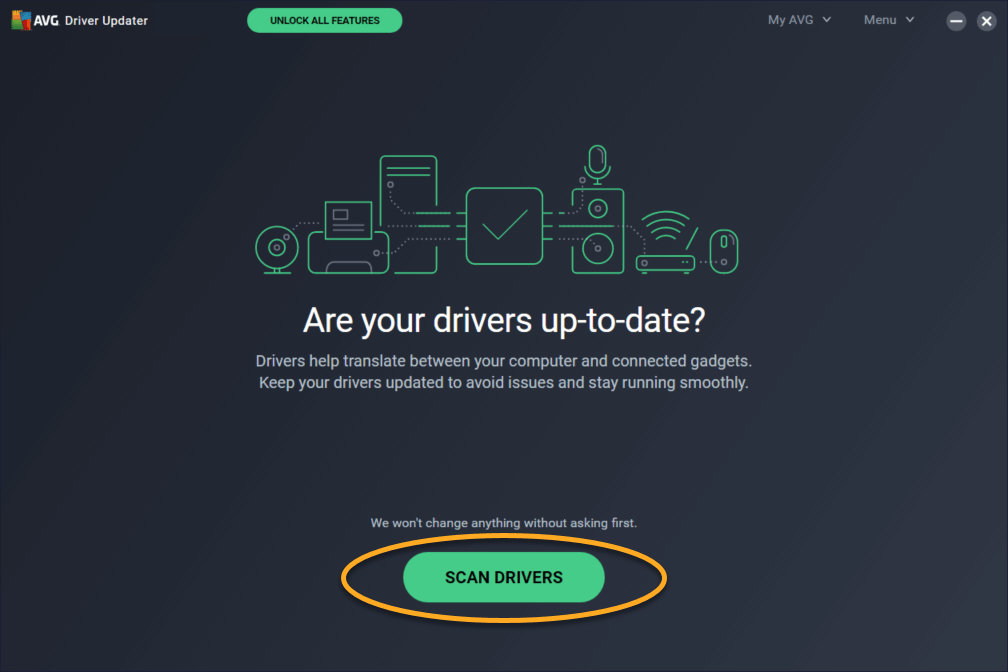
- Now, AVG Driver Updater will scan your entire system and detect outdated drivers.
- Select the monitors and display adapter if it is on the list.
- Click Update Selected, and the software will automatically update the driver for you.
8. Fix Overscaling On Windows 11 and Windows 10 Using Registry
If you have full confidence in your technical abilities, you can adjust Registry settings to fix the overscan Windows 10 problem. Remember one thing, tweaking with Registry can cause irrecoverable damage to your PC, so be cautious. You can follow these steps to safely edit the Registry on your computer:
- Click on the Start button, write regedit, and enter.
- On the Registry Editor, follow this path — HKEY_LOCAL_MACHINE\SYSTEM\CurrentControlSet\Control\Video
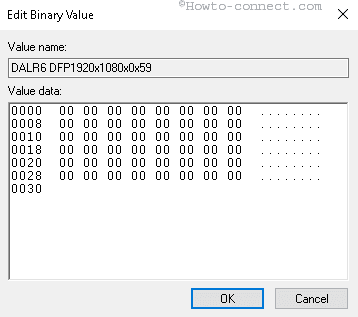
- Here, you will see a few Registry keys. Expand all the keys and look for keys that have 0000 and 0001, 0002, and video subkeys together.
- Take 0000 0001 and 0002 keys backup.
- Choose the 0000 key and search HDMI resolution in the right pane.
- Now, select the key that matches your resolution, right-click, and select Modify binary data.
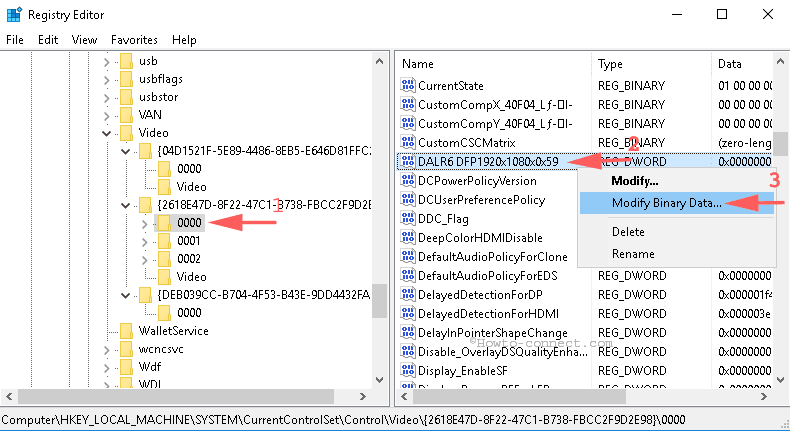
- Change all binary values to zero and click OK. Do the same with 0001 and 0002 subkeys and change binary data to zero.
- Next, go to Settings > System > Advanced display settings.
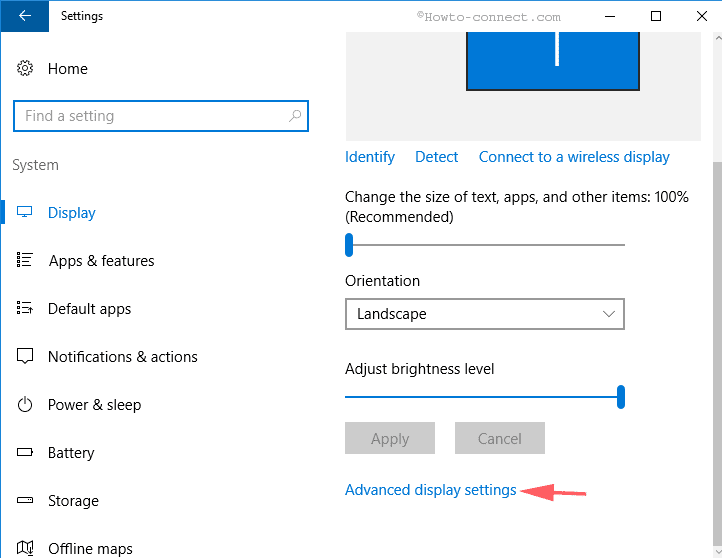
- From the Resolution drop-down menu, first, change resolution other than 1920×1080 and then change back again. Now, when you start TV, the overscan problem won’t annoy you.
9. Fix Overscan Windows 10 from the Monitor’s or TV’s Settings
You can tweak your monitor’s and TV’s display settings to resize the screen. For every TV and monitor brand, the display settings menu functions differently. So, you should go through your device’s manual before adjusting the display settings.
10. Fix Windows 11 and Windows 10 Overscaling with HDMI Cable
You can always use the good old disconnecting and reconnecting the HDMI cable method to fix overscan on Windows 10. Sometimes, when the HDMI cable isn’t properly plugged in, it can disturb the connection between your TV and computer. So, recheck the HDMI cable connection to fix the problem. Also, try to use a different HDMI cable to connect display devices.
Parting Thoughts
After exploring ten awesome ways to fix overscan Windows 10, you can now easily save your family movie night. Overscan is a simple problem that can bug you anytime, so always remember these solutions. For more guides like this, keep on following us, and don’t forget to share your thoughts in the comments!
Author Bio:
Dinesh Lakhwani 

Dinesh Lakhwani, the entrepreneurial brain behind “TechCommuters,” achieved big things in the tech world. He started the company to make smart and user-friendly tech solutions. Thanks to his sharp thinking, focus on quality and the motto of never giving up, TechCommuters became a top player in the industry. His commitment to excellence has propelled the company to a leading position in the industry.
Popular Post


Recent Post

How to Access Microsoft’s New Emoji in Windows 11
Ever since the public introduction of Windows 11, we’ve seen it gradually mature further towards the operating system that it is presently. Microsoft is working hard to give Windows 11 a next-generation experience, as well as new updates, are being released as a result. So now, emoticons in Windows 11 have been updated. Microsoft later […]

How to Transfer iPhone Photos to Your Mac (8 Easy Solutions)
Have you clicked a stellar image with your iPhone and now want to upload it on your website or edit it? Then, you can easily transfer your iPhone photos to your Mac to edit them with robust MacOS editing tools and further upload them on the web. Transferring photos from iPhone to Mac can save […]
How to Set Up and Use iCloud on Mac
If you haven’t set up iCloud on your Mac yet, do it now. iCloud is a powerful cloud storage service for Apple users that allow people to back up and synchronize email, photos, contacts, and other files across various devices. iCloud service was introduced in 2011, and it supports MacOS 10.7 or higher. As of […]

How to Create a Guest User Account on Mac
Computers are a very personal thing today. They store all your private documents, photos, videos, and other data. Thus, giving your Mac password to someone else is never a good idea. But what if you have to share your Mac with a colleague or friend for some reason? Sharing Mac’s user password can jeopardize your […]

How to Set Up a New Mac in a Few Minutes
Have you bought or received a brand new Mac computer? Then, you must be on the seventh cloud. Your Mac will open a pandora of several graphics-rich apps and features for you. If you are moving from Windows to Mac for the first time, the change will be really dramatic. At first, all the interfaces […]
How to Clear Browsing History
Are you concerned about what others could see if they use your web browser? Is your browser history clogging up your device and slowing things down? A list of the website pages you have viewed is stored in every web browser. You can remove this listing easily. It will clean your browser history and erase all […]

The Definitive Guide to Managing Your Mac’s Storage Space
Are you struggling with low storage space on Mac? Wondering what is taking up so much space?You are at the right place. Here we will discuss how to reclaim space on Mac. Gone are those days when you used Mac machines only for p rofessional purposes. Now, everything from downloading movies to streaming content, saving […]

Is New World a modern-day RuneScape?
Amazon Game Studios has released an MMO nearly identical to RuneScape, but with a new look, a better PvP system, and a lot more money. Allow me to clarify. New World is influential ‘RuneScape only it’s not RuneScape.’ New World vs. RuneScape 3 New World digs deep into the well of memories and pulls out […]

How To Set Up Voicemail on iPhone 11
Although accessing voicemail is extremely beneficial to you, users should understand how to set up voicemail on their iPhone 11. You can remove, categorize, and play the voicemails from the easy menu. Once you are occupied or unable to pick up the phone, this program will give you info in the style of an audio […]

Best Virtual Machine Software for Windows 10/11 in 2024
A virtual machine software, often known as VM software, is an application that replicates a virtual computer platform. A VM is formed on a computer’s underlying operating platform, and the VM application generates virtual CPUs, disks, memory, network interfaces, and other devices. Virtual machine solutions are becoming more popular because of the flexibility and efficiency […]

