How to Transfer iPhone Photos to Your Mac (8 Easy Solutions)
Have you clicked a stellar image with your iPhone and now want to upload it on your website or edit it?
Then, you can easily transfer your iPhone photos to your Mac to edit them with robust MacOS editing tools and further upload them on the web. Transferring photos from iPhone to Mac can save storage space on your iPhone and allows you to safely backup your special images.
Since iPhone and Mac are both Apple products; thus, there are many ways available to transfer photos from iPhone to Mac. Let’s scroll down to check out 8 easy solutions to transfer photos from iPhone to Mac.
Solution 1. AirDrop Photos
AirDrop is Apple’s data transfer technology that allows users to share data across multiple Apple devices ranging within 30 feet. To AirDrop photos, first, turn on the WiFi network and Bluetooth on both your iPhone and Mac. After that, follow these steps:
Step 1. Open the Photos app on your iPhone and select the photo or photos you want to transfer to Mac.
Step 2. Tap on the Share icon from the bottom and select AirDrop from the popup menu.
Step 3. Choose your Mac’s name.
Step 4. Wait for a few minutes until the iPhone shows a successful transfer message.

Solution 2. Through Photos App
The Photos app is a centralized location in both Mac and iPhone to store photos and videos. Thus, you can easily transfer photos between both Apple devices using this app as:
Step 1. Connect the iPhone to your Mac using a USB cable and launch the Photos app.
Step 2. The Photos app on Mac can Import all the photos and videos from your iPhone Photos app. Select the iPhone name from the Photos sidebar if the Import screen doesn’t automatically appear on Mac.

Step 3. Unlock your iPhone and tap on the Trust when a Trust This Computer message displays.
Step 4. Select Import Selected to transfer chosen photos to Mac or simply click on Import All New Photos to transfer the entire camera roll.
Solution 3. The Files App
The Files app is a default Apple program that helps users to manage files on iPhone and share across Dropbox, Google Drive, etc. This tool can also manage photos and send them to Mac. Here’s how you can use this utility app to transfer photos from iPhone to Mac:
Step 1. Launch the Files app on your iPhone.
Step 2. Tap the ellipsis icon on the upper right corner or on the Browse if you are on any other screen.
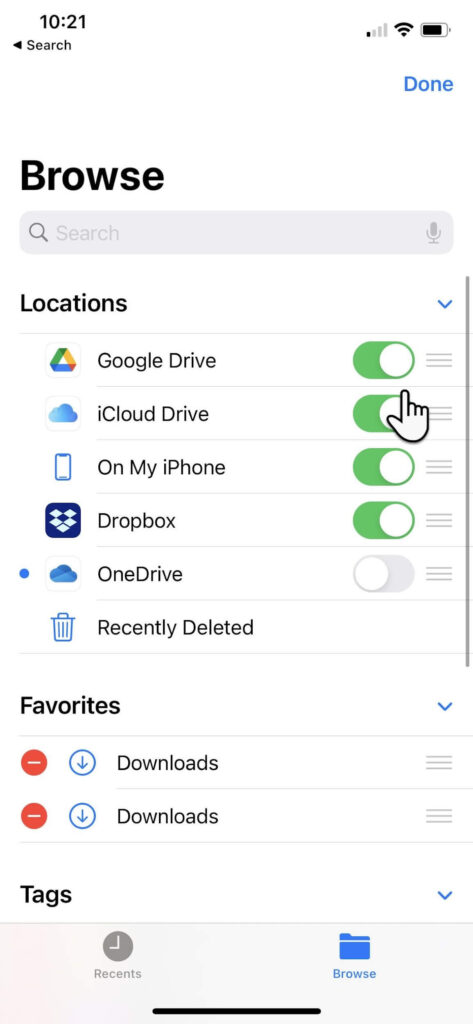
Step 3. Tap Edit and under the Location, turn on the toggle next to iCloud Drive or other third-party cloud services. Tap Done.
Step 4. Go to the Photos app on iPhone, select the photo to transfer, and tap on the Share icon.
Step 5. Select Save to Files and choose iCloud Drive or any other storage services. Tap Done.
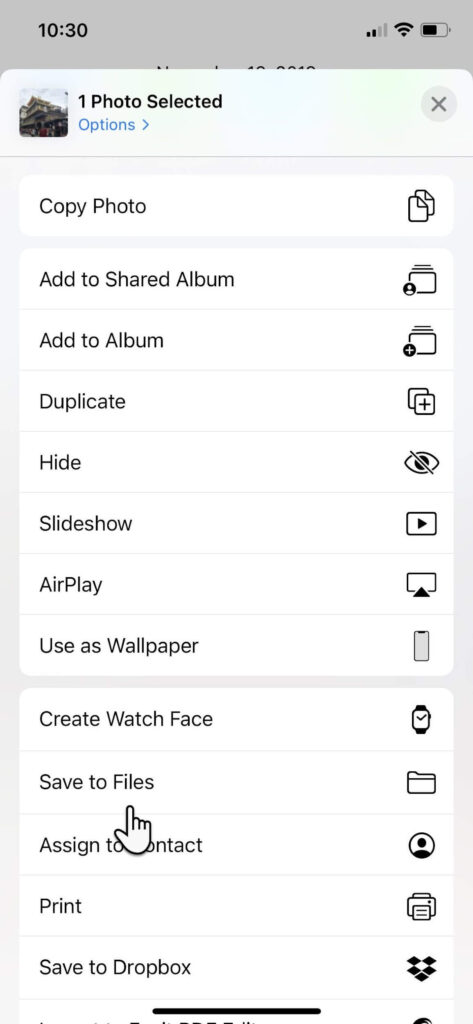
Step 6. Open iCloud Drive on your Mac, and the selected photo will be now available there.
Solution 4. iCloud Photos
Once you sync iCloud with Photos, you can access all Photos app content across all your devices. However, the only problem is that iCloud offers 5 GB of free space, which will exhaust pretty quickly. Thus, you have to buy extra space on iCloud to enjoy the auto photo library sync feature.
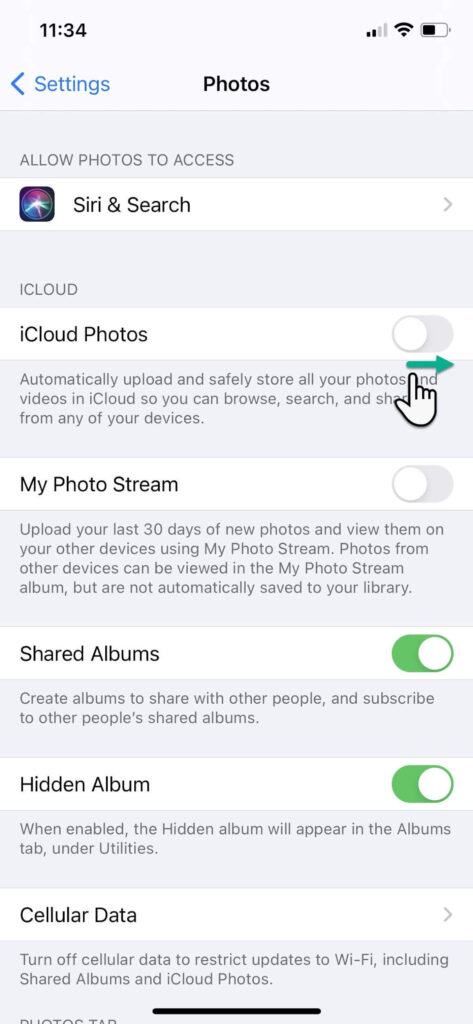
Before that, make sure that iCloud Photos is enabled on your iPhone and Mac:
Go to Settings on your iPhone > Photos > Switch toggle to green next to iCloud Photos.
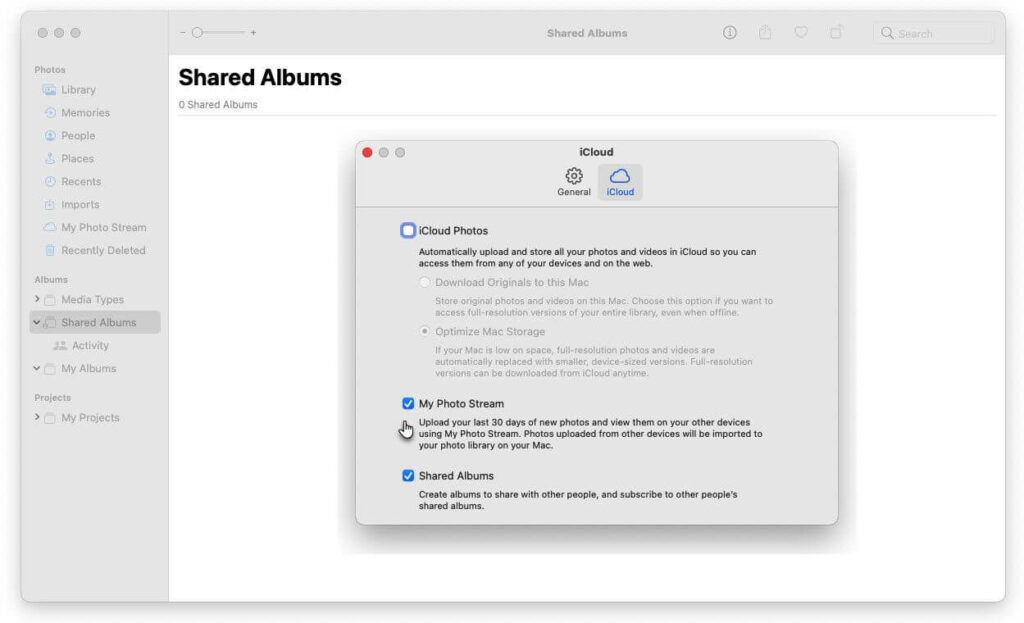
Open the Photos app on Mac > Photos > Preferences > iCloud > Checkbox next to iCloud Photos.
Solution 5. Use iCloud Photos Stream
One second, we have already discussed this solution. No, we have talked about iCloud Photos, not iCloud Photos Stream. But what’s the difference?
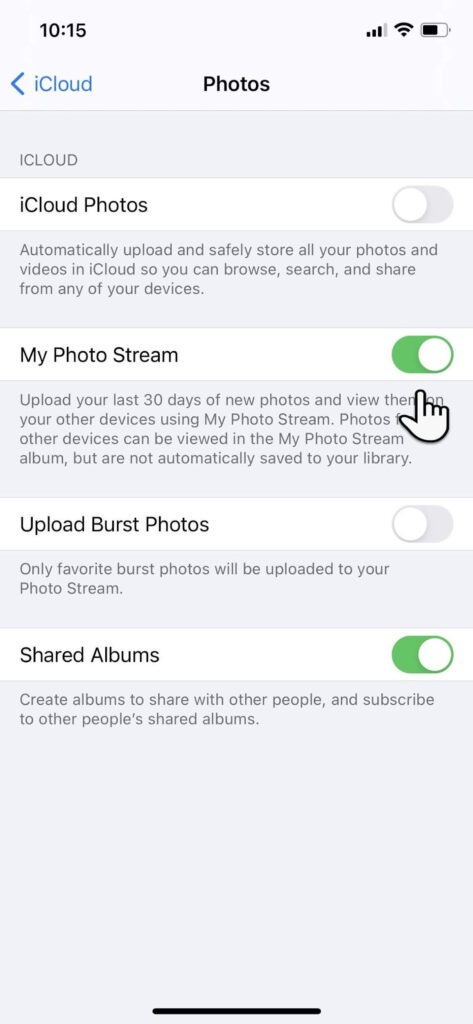
The iCloud Photos allows you to store all photos and videos on the cloud. But iCloud Photos Stream only uploads your new photos (no Live Photos or videos). It will only keep 30 days old photos on the cloud. This is a great feature to save space on iCloud.
To enable this feature on iPhone, go to Settings > iCloud > Photos > My Photo Streams.
On Mac, open the Photos app > Photos > Preferences > iCloud > My Photo Streams.
Solution 6. Image Capture
Image Capture is a default Mac utility app to import photos from digital cameras and scanners. But it can transfer photos from other devices too, including iPhone, as follows:
Step 1. Connect the iPhone to your Mac using the USB cable.
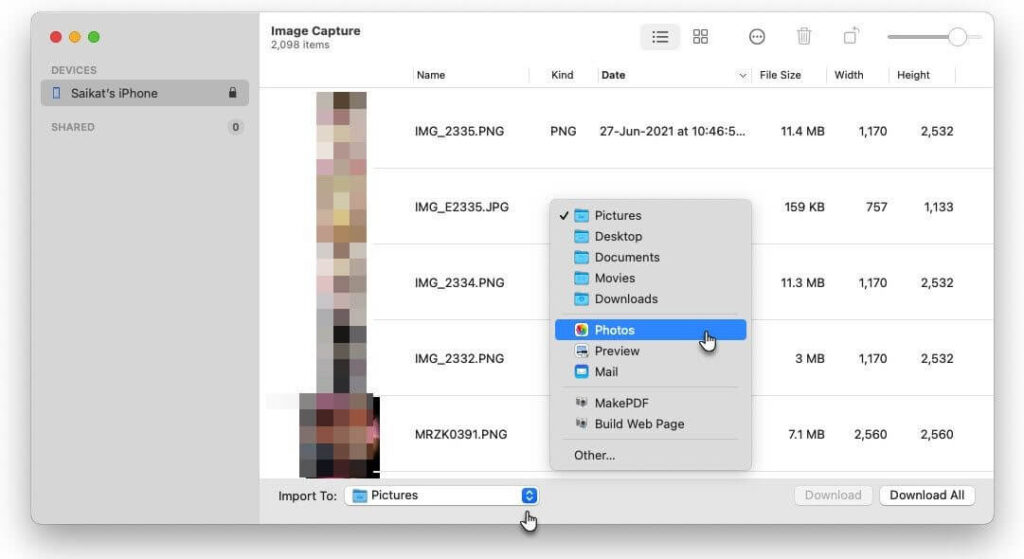
Step 2. Launch the Image Capture app on Mac and select your iPhone name from the Devices or Shared list.
Step 3. Select the images you want to transfer to Mac.
Step 4. Choose the Import To from the bottom of the window and select the location to save photos. You can also save photos as web pages or PDF.
Solution 7. Use Finder
If you use macOS Catalina (10.15) or later, you can easily transfer photos from iPhone to Mac via Finder. To do so:
Step 1. Connect the iPhone to your Mac using a USB cable.
Step 2. Open the Finder window on Mac and select your iPhone under the Devices.
Step 3. Click Photos from the top of your screen and check the “Sync Photos” box.
Step 4. Select all photos and albums or just a few photos, click Apply to complete the transfer.
Solution 8. Third-party Program
If you want a better solution than the iCloud and Photos app to transfer photos from iPhone to Mac, you can use a third-party tool called AnyTrans. It is a backup and media downloader that can seamlessly transfer content between iPhone and Mac. To use this app:
Step 1. Download AnyTrans on both your devices and connect them to the same network.
Step 2. Connect the iPhone to your Mac using a cable.
Step 3. Allows AnyTrans to access your photos and navigate to Device Manager > Export iPhone content to your Mac.
That’s it! Now, you are ready to transfer photos from iPhone to Mac. You can use any method at your convenience to migrate photos. If you get stuck somewhere, jot down below to us. We will shortly help you out.
To read more articles on Mac usability, you can go to other articles on this blog site or follow us on social media networks.
Popular Post
Recent Post
How to Troubleshoot Xbox Game Bar Windows 10: 8 Solutions
Learn how to troubleshoot and fix issues with the Xbox Game Bar not working on Windows 10. This comprehensive guide provides 8 proven solutions to resolve common problems.
How To Record A Game Clip On Your PC With Game Bar Site
Learn how to easily record smooth, high-quality game clips on Windows 11 using the built-in Xbox Game Bar. This comprehensive guide covers enabling, and recording Game Bar on PC.
Top 10 Bass Booster & Equalizer for Android in 2024
Overview If you want to enjoy high-fidelity music play with bass booster and music equalizer, then you should try best Android equalizer & bass booster apps. While a lot of these apps are available online, here we have tested and reviewed 5 best apps you should use. It will help you improve music, audio, and […]
10 Best Video Player for Windows 11/10/8/7 (Free & Paid) in 2024
The advanced video players for Windows are designed to support high quality videos while option to stream content on various sites. These powerful tools support most file formats with support to audio and video files. In this article, we have tested & reviewed some of the best videos player for Windows. 10 Best Videos Player […]
11 Best Call Recording Apps for Android in 2024
Whether you want to record an important business meeting or interview call, you can easily do that using a call recording app. Android users have multiple great options too. Due to Android’s better connectivity with third-party resources, it is easy to record and manage call recordings on an Android device. However it is always good […]
10 Best iPhone and iPad Cleaner Apps of 2024
Agree or not, our iPhones and iPads have seamlessly integrated into our lives as essential companions, safeguarding our precious memories, sensitive information, and crucial apps. However, with constant use, these devices can accumulate a substantial amount of clutter, leading to sluggish performance, dwindling storage space, and frustration. Fortunately, the app ecosystem has responded with a […]
10 Free Best Barcode Scanner for Android in 2024
In our digital world, scanning barcodes and QR codes has become second nature. Whether you’re tracking packages, accessing information, or making payments, these little codes have made our lives incredibly convenient. But with so many barcode scanner apps out there for Android, choosing the right one can be overwhelming. That’s where this guide comes in! […]
11 Best Duplicate Contacts Remover Apps for iPhone in 2024
Your search for the best duplicate contacts remover apps for iPhone ends here. Let’s review some advanced free and premium apps you should try in 2024.
How To Unsubscribe From Emails On Gmail In Bulk – Mass Unsubscribe Gmail
Need to clean up your cluttered Gmail inbox? This guide covers how to mass unsubscribe from emails in Gmail using simple built-in tools. Learn the best practices today!
7 Best Free Methods to Recover Data in Windows
Lost your data on Windows PC? Here are the 5 best methods to recover your data on a Windows Computer.


