











A slow PC rarely gives a warning. One day, it simply takes longer to start. Apps open late. The fan runs loud, even when the screen is almost empty. Most people blame old hardware. Often, that is not the real reason. The real reason is hiding in plain sight. Windows keeps many apps active in […]
How to Clear Browsing History: Chrome, Mozilla, Opera, Safari
Are you concerned about what others could see if they use your web browser? Is your browser history clogging up your device and slowing things down? A list of the website pages you have viewed is stored in every web browser. You can remove this listing easily. It will clean your browser history and erase all tracks on your laptop, desktop, or smartphone.
Here, we will discuss clearing your browsing history on several browsers, including Chrome, Safari, and others. All of these browsers have their settings. Thus, you need to know the procedures for clearing all browsing history types. Now, let’s begin with the procedures to clear your browsing history in some of the most common browsers.
Clearing Your Browsing History in Google Chrome
For quite some time, Google Chrome has been the most widely used browser on the planet. As more users use this famous web browser, it is essential to understand how to remove its browsing history. As a result, below are the step-by-step instructions for removing your online browser history:
Step 1: First of all, you need to visit your chrome browser.
Step 2: You will notice three dots in the corner on the upper-right side.
Step 3: You will have to click on the “History” option. Following that, click again on the “History” option on the side menu.
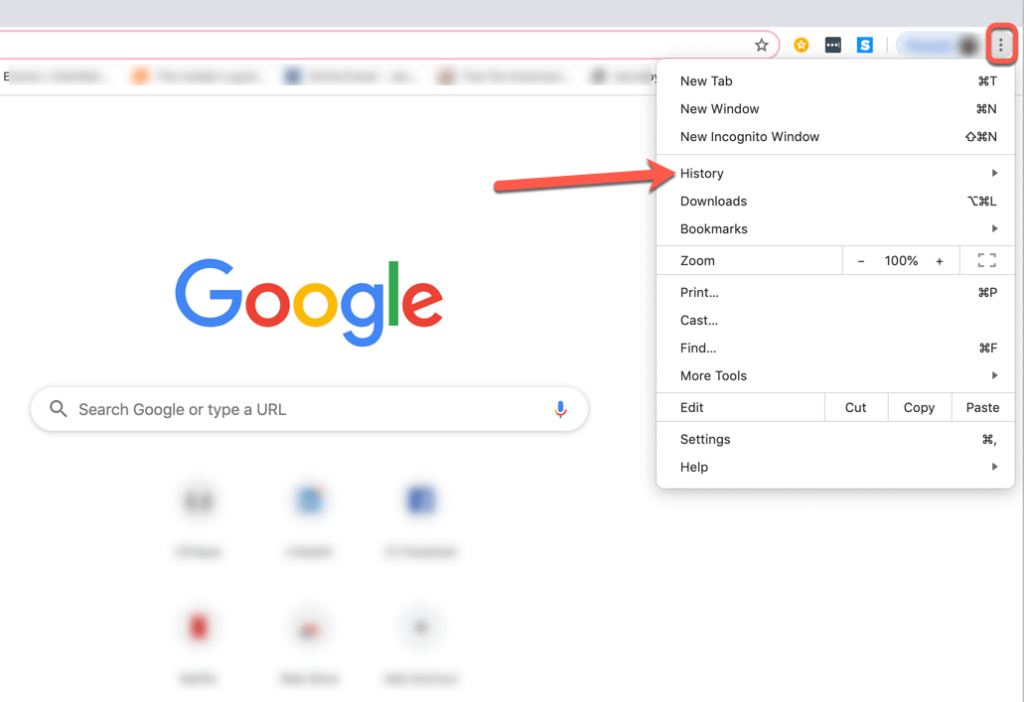
Step 4: Here, you will see a new tab opening. Look for the “clear browsing data” on the left side.
Step 5: A new tab will appear on the screen, with a pop-up box. Now, select the checkboxes next to the option “Browsing History.”
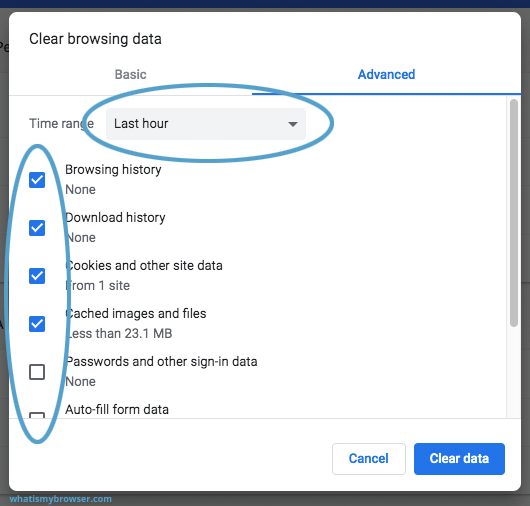
Step 6: Select the time range to delete the history. The time range depicts the period of the history you want to delete.
Step 7: Finally, you need to click on the “clear data” option on the pop-up window box.
Know-How to Delete Your Mozilla Firefox Browsing History
Mozilla Firefox is an open-source browser that is available for free. Though it is a safe browser, you should know how to wipe out the browsing history. So, here are the necessary steps to erase the browsing history of browser history.
Step 1: You will first have to open your Firefox web browser.
Step 2: Navigate to the menu bar and click on the “History” option.
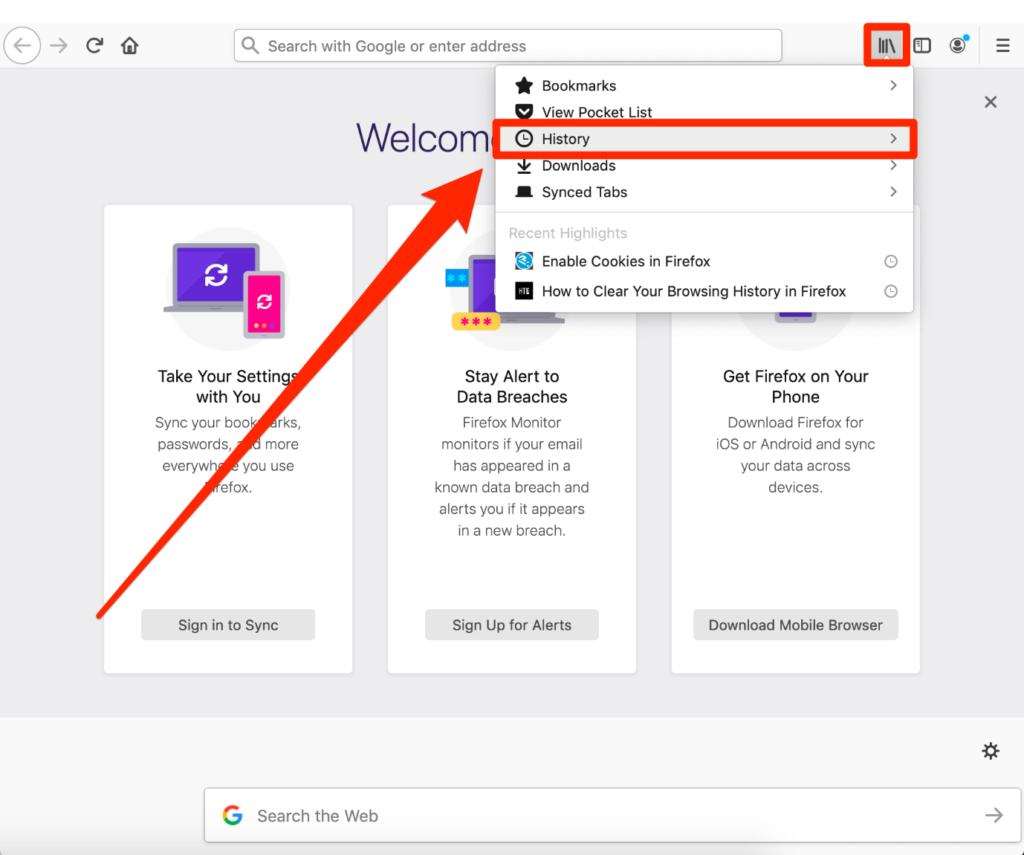
Step 3: You will have to hit on the “Clear Recent History” option.
Step 4: Following that, click on the checkboxes next to the Form & Search history” and “Browsing & Download history.”
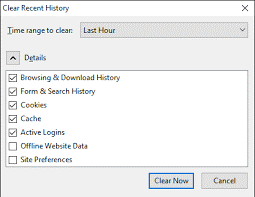
Step 5: Next, you need to select the time for stating the length of time you want to delete the history.
Step 6: Lastly, you need to click on the “OK” option to delete the browsing history.
Wipe Out Your Browsing History from Safari on Your iPhone or iPad
People using iPhones or iPad must have acquaintance with the Safari web browser. But the question that appears in your mind is how to clear your browsing history. So, if you are looking for the procedures, here are some steps that assist in the deletion of browsing history in Safari:
Step 1: First, you will have to open your settings in your iPod or iPhone.
Step 2: Now, look for the “Safari” option and click on it.
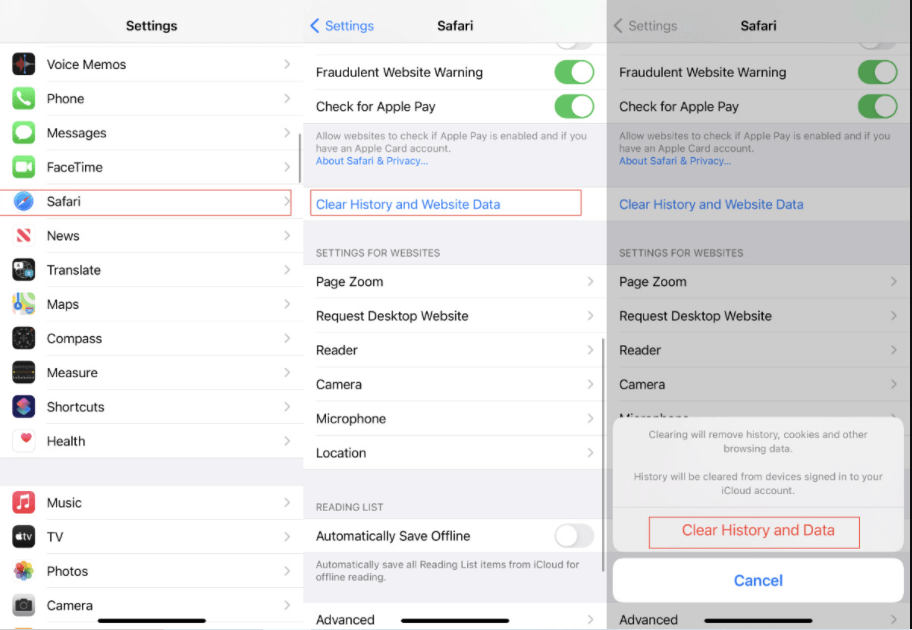
Step 3: Next, you must navigate the “Clear History and Website Data” option.
Step 4: Then choose “Clear History and Data” option.
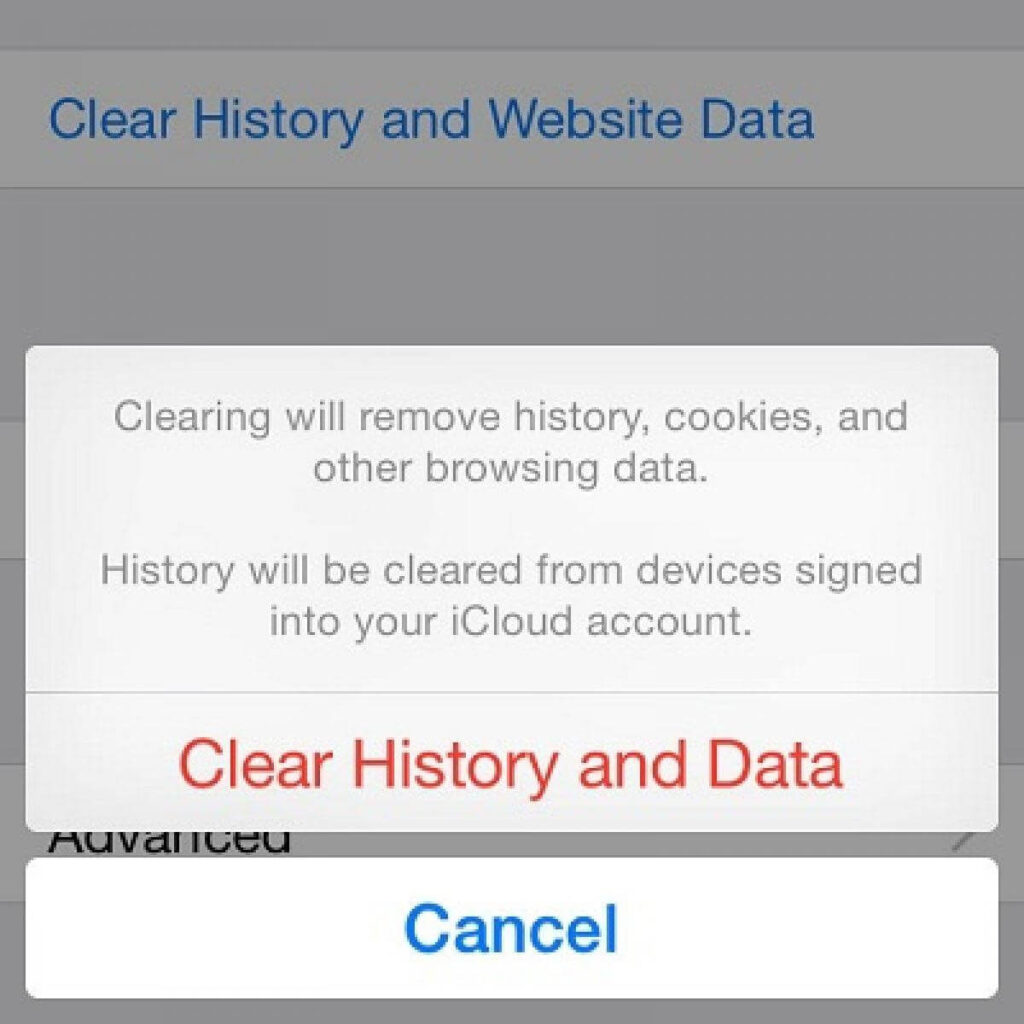
Step 5: This will confirm your deletion of browsing history and clear all your browsing data. It also includes cookies and cache.
If you want to explore and visit different sites without creating a browsing history, you can turn the private history “on.” It will not create a browsing history, and you can browse Safari securely.
Erase the Browsing History on your Internet Explorer or Microsoft Edge
Think about changing your current browser to a different browser if you still use Internet Explorer. It is only because Microsoft has no longer upgraded Internet Explorer, it is subject to security flaws that hackers may misuse.
However, the steps to clear the browsing history in both the browsing history, whether Microsoft Edge:
Step 1: To begin, start the Microsoft Edge browser.
Step 2: Next, you have to navigate to the “three dots” on the upper right corner of the browser and click on it.
Step 3: After that, you have to click on the “History” option denoted with a clock-arrow option.
Step 4: Again, click on the three dots in the history option. Then, select the “clear browsing data” option from the menu bar.
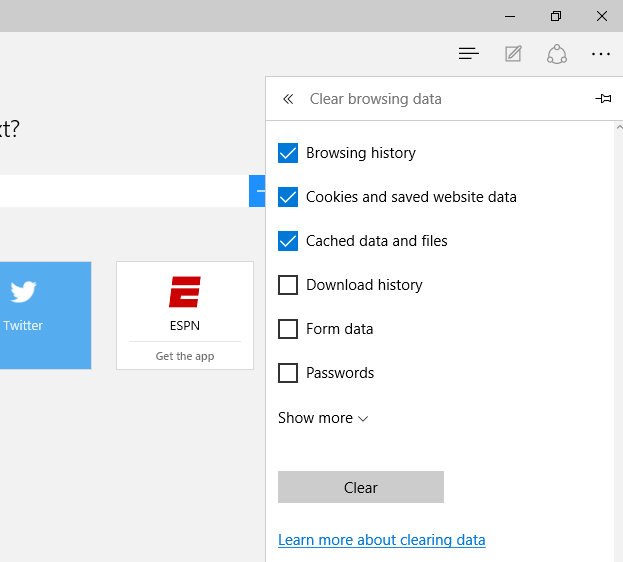
Step 5: Following that, you need to ensure that you have checked the box near the “browsing history.”
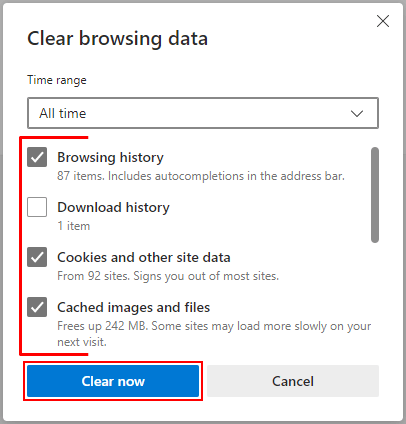
Step 6: Finally, click on the “clear now” option to confirm your process.
Delete the Browsing History on Opera Browser
Opera is a multi-platform safe and secure web browser. Many people prefer to rely on this web browser instead of using the default ones. For those people, we are here with the steps to erase the browsing history on your Opera browser:
Step 1: Firstly, start Opera to begin with the process.
Step 2: Next, navigate to the far-left toolbar and click on the “clock” icon.
Step 3: If you want to delete individual page history, hover on the link and then select the X icon on the right side to close it.
Step 4: Else, you can click on the “Click browsing data” to erase it all at once.
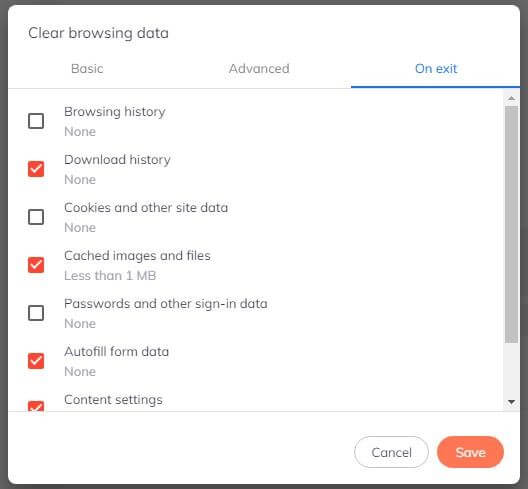
Step 5: You will see a new window appearing. Now, ensure that the option next to “Browsing history” is checked, and then select a time frame. Selecting the time range will ensure how many days you want to erase your browsing data.
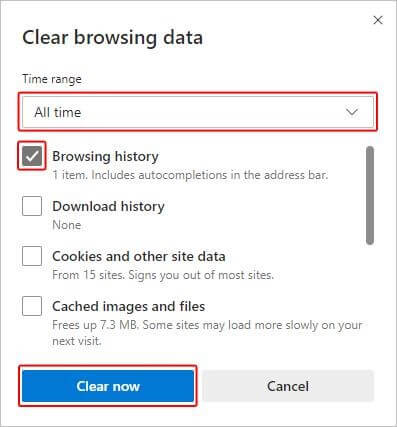
Step 6: Once you are done, you will have to click on “Clear Data” to complete the procedure.
Final Thoughts
You are just erasing the locally saved history on your system after you erase your browsing history. Deleting the browser history does not affect the information kept on servers. We have offered the procedures of deleting the browsing history of several web browsers. You can follow all the steps to clear all your browsing data safely. You will not face any issues in clearing your browsing data in any of the browsers.
Author Bio:
Dinesh Lakhwani 

Dinesh Lakhwani, the entrepreneurial brain behind “TechCommuters,” achieved big things in the tech world. He started the company to make smart and user-friendly tech solutions. Thanks to his sharp thinking, focus on quality and the motto of never giving up, TechCommuters became a top player in the industry. His commitment to excellence has propelled the company to a leading position in the industry.
Popular Post
Recent Post
How to Activate Windows with a Product Key for Windows 11 & Windows 10
It always shows up at the worst time. You are halfway through a report, or about to join a video call. Then you spot it in the bottom right corner of the screen. Activate Windows. Go to Settings to activate Windows. Initially, an unactivated copy of Windows may seem like a minor inconvenience. Over time, […]

Is Easy Duplicate Finder Worth It? Honest Review
The photos folder looked normal at first glance. Then the storage warning popped up. One trip photo appeared four times. A tax PDF sat in three different folders. Two old setup files were still in Downloads, and each one was over 500 MB. Nobody plans this mess. Copies pile up slowly. A download runs twice. […]
Wise Duplicate Finder Review: Real Results from Wise Duplicate Finder
Read my honest Wise Duplicate Finder review. See features, pricing, pros and cons, and real PC test results. Find out if this free duplicate cleaner can free up your Windows storage.
How to Recover Deleted Files from Pen drive, USB Drive, SD Card
Introduction: On tech forums, you’ll often see posts like this: “I connected my pen drive to my laptop this morning, but the folder was empty. All my college project files had vanished. I don’t have a backup. Can someone help me?” Stories like this are very common. Pen drives, USB drives and SD cards are […]

How To Recover Files Deleted from the Recycle Bin [Windows 11]
Losing a file can happen in seconds. You clear your desktop, hit Delete, and empty the Recycle Bin. Then, just when you need that file again, it seems to have vanished. This guide will walk you through ways to restore files removed from the Recycle Bin. We will begin with simple fixes, then look at […]
Disk Drill Data Recovery Tool Explained: Full Review and Guide
It happens in a split second. You delete a folder by mistake. Your drive stops showing up. A photo album from your last trip just vanishes. And your stomach drops. Lost files feel personal. They are not just data. They are memories, work hours, and sometimes years of effort packed into a few gigabytes. When […]
Recover Deleted Files In Windows 11 With Software & Without
Introduction What is the first thing that goes through your mind the second an important file vanishes from a Windows 11 PC? For most people, it is a mix of panic and disbelief, followed by a frantic click through every folder that file could possibly be hiding in. It happens in a split second: one […]
EaseUS Data Recovery Wizard: Everything To Know
Data loss does not always come from a big disaster either. Most cases start small and boring. A drive gets formatted by mistake. A laptop freezes mid-save and restarts on its own. A memory card stops showing up after being pulled out too fast. None of these feel like emergencies at first, until you realize […]

Recuva Data Recovery Tool: Is it Actually Worth it?
When I first tried Recuva Data Recovery, I wanted to see if it could really bring back lost files. The tool is free, small in size, and promises quick recovery, which made me curious enough to test it on my own PC. The setup was fast, and the wizard guided me step by step. I […]

