How to Burn DVD on a Mac

Last updated on March 25th, 2024 at 2:20 pm
Are you looking for a way to save movies on DVD, Blu-ray discs and share them with loved ones?
You are at the right place; we will share steps to burn DVDs on Mac.
Need of Burning Movies to DVD
In pursuit of moving users to iCloud, Apple, for some years now, has been moving away from the DVD and CD drive for some years now. All users do not welcome this strategy, and some still want to burn and play CDs and DVDs on their Mac.
Understanding this, in this post, we will explain how to burn movies to DVD.
Benefits of Burning Movies on a DVD
- Burning movies on your Mac is a good choice for sharing.
- Save disk space occupied by movies saved on Mac.
Now that you know the benefits, let us learn how to burn a movie to DVD on Mac.
- Method 1. The quick and most straightforward solution for burning movies to DVD on Mac
- Method 2. Free solution to burn movies to DVD on Mac
- Method 3. The direct method to burn movies to DVD with Finder
Method 1. Easiest Way for burning movies to DVD on Mac.
To burn a movie to DVD on Mac, we recommend using Wondershare UniConverter, powerful software that allows burning movies and other videos to DVD.
You can customize, edit, trim, crop, add subtitles and burn movies to DVD using free menu templates provided by Wondershare Uniconvertor.
Wondershare UniConverter
- Burn movies, HD videos, and more on DVD without compromising the quality.
- Burn ISO image file or DVD folder to Movies.
- Different static and dynamic free DVD menu templates.
- Customizable DVD settings.
- Real-time preview and 90X faster DVD burning speed.
- The built-in video editor.
- Batch DVD video conversion.
- Burn downloaded movies & recorded movies to DVD.
- Versatile toolbox
- Supported OS: Windows & Mac.
How to burn a movie to DVD?
Step 1
Download, install and launch Wondershare UniConverter. Click browse and add movies or drag and drop movies into the converter.
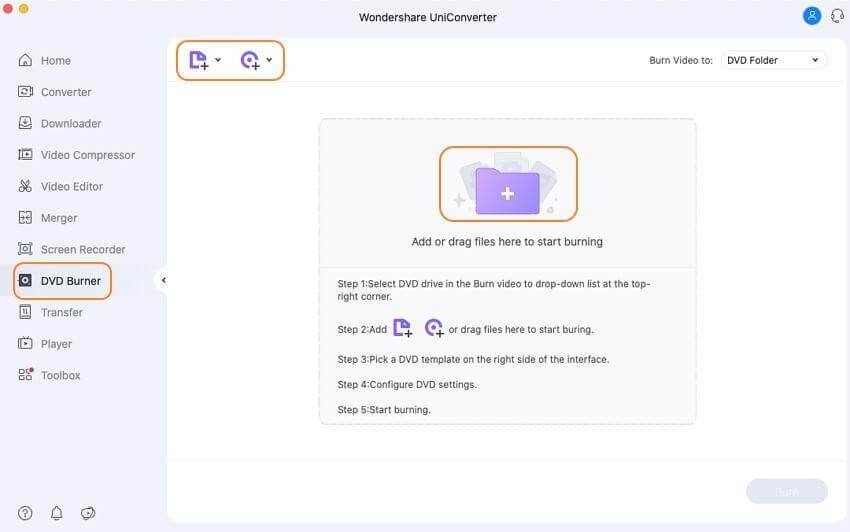
If you want to cut, crop, or trim a specific part of a movie before burning it to DVD, this is the step for you. To edit, click the desired editing icon under the thumbnail image.
However, if you don’t want to edit the movie, you can skip this step.
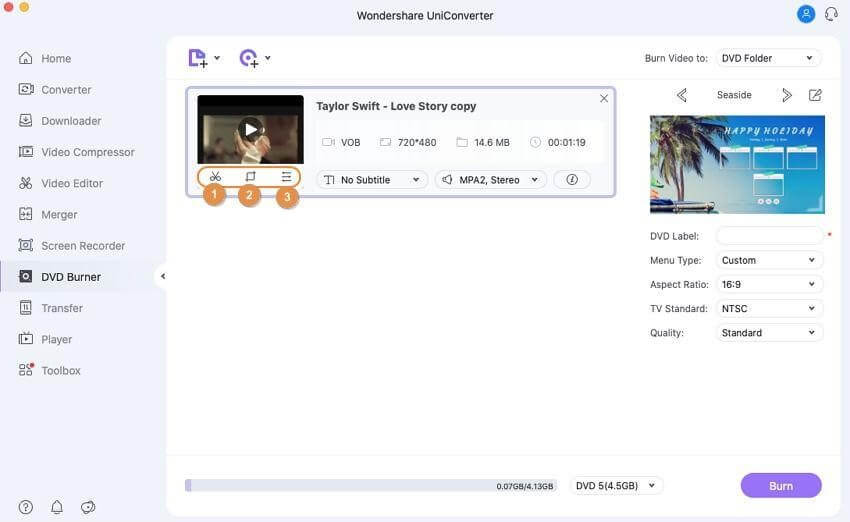
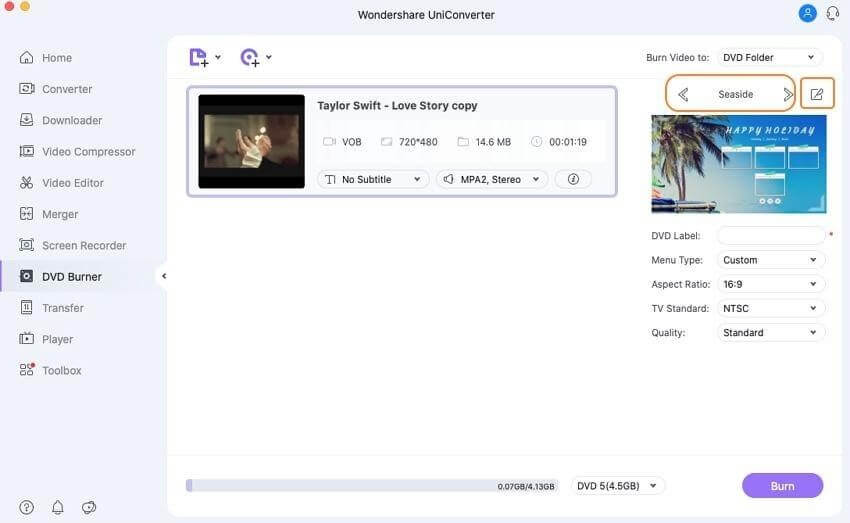
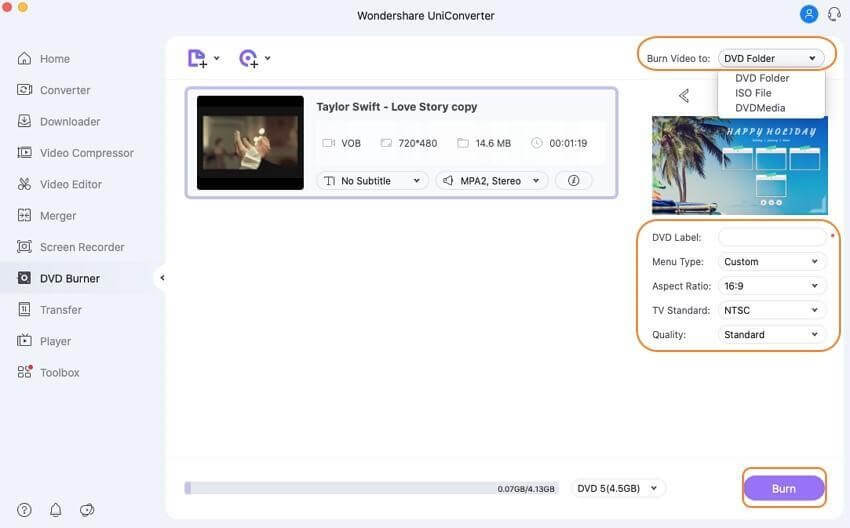
Select DVD template for movies from the right panel. Next, click the edit icon next to the template design name and open the Template window.
Step 4
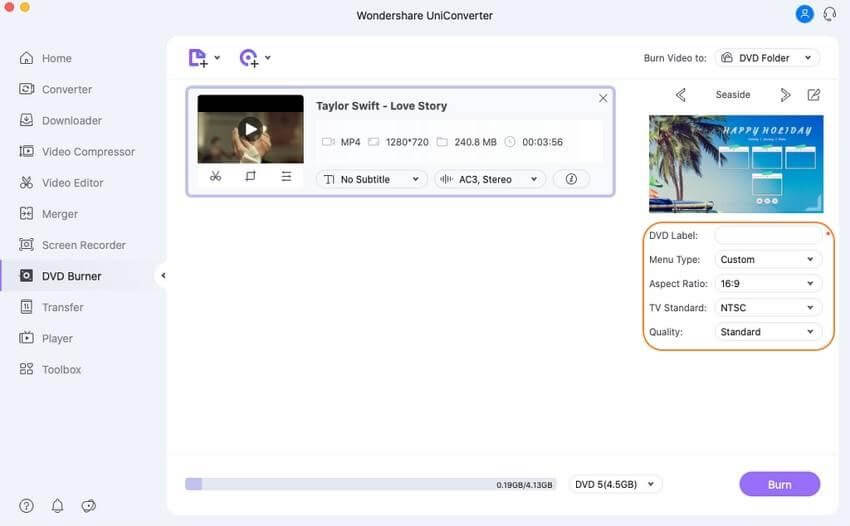
Give DVD a label and select related parameters like TV standard, quality, aspect ratio, and menu types.
Step 5
Next, click the top-right corner > Burn Video tab > select the location where you want to burn the movie files. Insert a blank disk and hit the Burn button.
Method 2. Burning a movie to DVD with Finder.
If you do not want to use a third-party software to burn DVD, Mac offers a direct method to burn a movie to DVD. To use this method, your Mac needs to have either a built-in optical drive or an option to connect an external drive.
Steps on how to burn a movie to DVD on Mac directly:
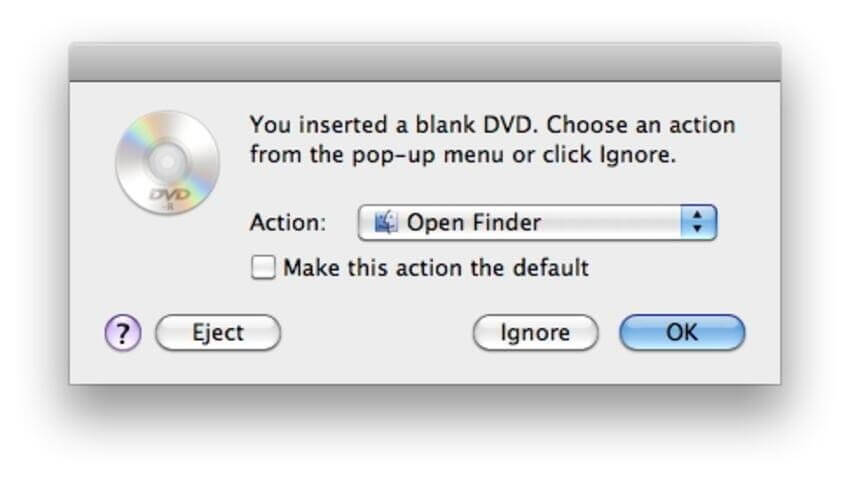
Step 1: Insert a blank disc into your Mac. Open Finder. This will show the disc on the Mac desktop.
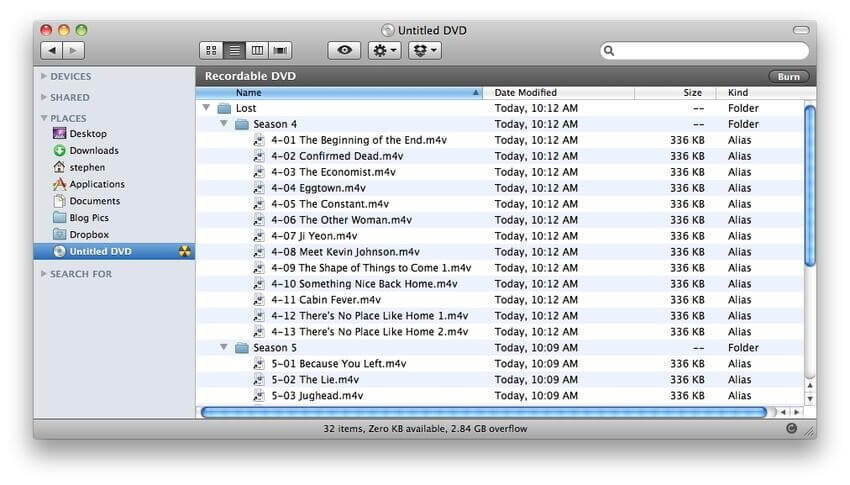
Step 2: Double-click on the disc; you will now see an entry with an Untitled DVD. Drag and drop the movies you want to burn. Arrange the files and rename them if required.
Step 3: Select the Disc Name tab, and name the DVD.
Step 4: Click Burn speed and select other options.
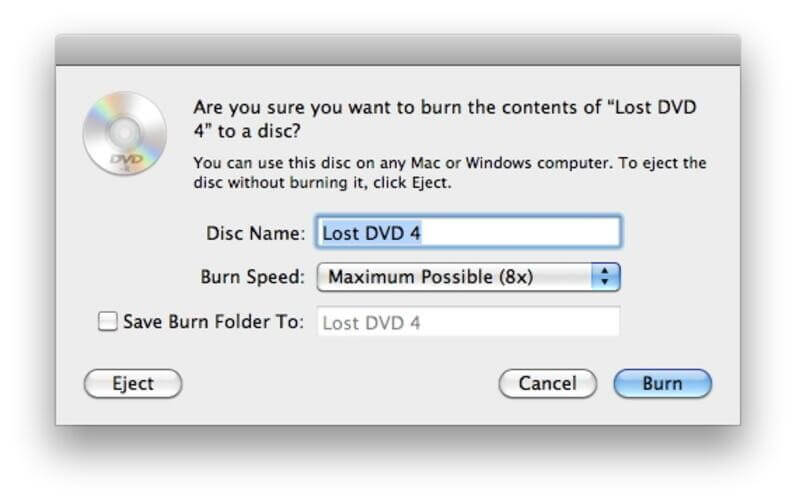
Step 5: Lastly, click Burn & start the burning process.
Part 2. Free solution to burn movies to DVD on Mac.
If you are looking for a free Mac burn DVD movie solution, Burn software is a decent choice. Using this program, you can burn movies, music, data, and other videos to a disc. The interface of the software is simple and intuitive that makes it easy for non-techy users as well.
Key features:
- Allows creating decent quality discs from movies on your Mac.
- Allows creating an audio CD in a few simple steps. Offers advanced options like MP3 tagging and CD-text.
- Allows creating interactive menus by selecting a theme or creating your own as needed.
- Copy one disc to another or use disk images to create a DVD.
- Convert video and audio files to disc compatible format.
Additional Method – Burning movies to DVD on Mac using Burn:
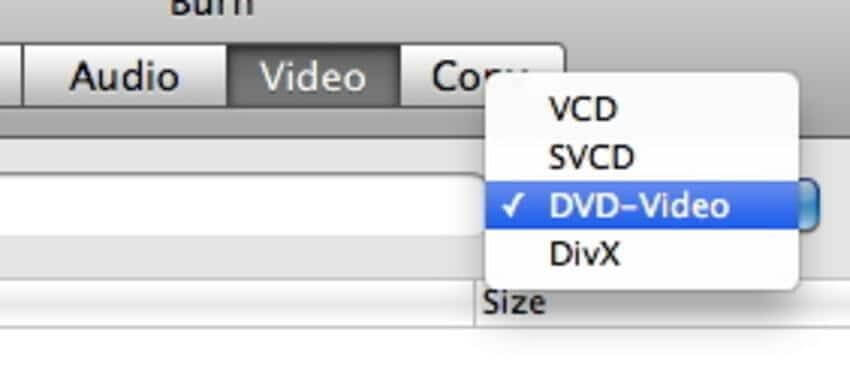
Step 1: Download, install and launch the Burn program. Click the Video tab, and select the DVD-Video option from the drop down menu.
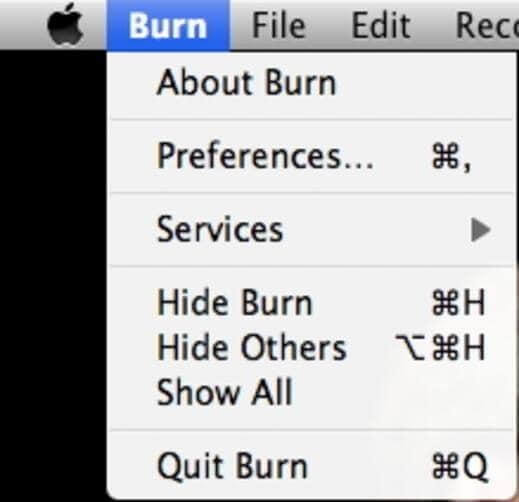
Step 2: Click the Burn menu to open Preferences. Click the Video tab > select NTSC or PAL from the Region settings.
If you want to preview the file click the Preview button present on the bottom of the preference window.
Step 3: To add the movie click + from the main window. To start the process click Convert > select the location to save the file.
Since Burn is a basic tool you will only get to use limited features. Also compared to UnivConvertor its speed is slower.
Conclusion
Using these simple steps and the amazing tool like Wondershare UniConvertor, you can quickly burn movies to DVD. If you want to burn CDs with themes and customize things use the Wondershare tool. However, you can go with the manual steps if you don’t want to spend on a DVD burning tool.
Do let us know which method you picked and your experience in the comments section.
Author Bio:
Dinesh Lakhwani 

Dinesh Lakhwani, the entrepreneurial brain behind “TechCommuters,” achieved big things in the tech world. He started the company to make smart and user-friendly tech solutions. Thanks to his sharp thinking, focus on quality and the motto of never giving up, TechCommuters became a top player in the industry. His commitment to excellence has propelled the company to a leading position in the industry.
Popular Post


Recent Post

How to Be a Better Project Manager
The role of the project manager is to provide you and your team with the goals, organizational systems, and feedback necessary for creating a positive workplace result. Everything from coding to content development can benefit from a high-quality project manager. This article will cover some of the actionable steps you can take to become better […]

How to Use a Dedicated Server for Gaming
Online multiplayer games offer the chance to connect and compete with your friends, meet new people, and work collaboratively to build something great. If you’re ready to take your online gaming experience to the next level, a dedicated server is a great option for hosting. Instead of operating game servers from your own hardware, you’ll […]

Importance of the Best Mirrorless Camera for Travelling
It can be difficult to find the best mirrorless camera for under 1000 dollars. This blog post discusses some of the best models on the market and provides a link to Amazon where you can purchase them. We are going to give you a couple of the best mirrorless cameras that are under 1000. We […]

How to Reset Network Settings on a Mac
Macs are usually always trustworthy, although you may experience issues attaching to the web or experiencing poor surfing speeds at times. The web may be operating well on your additional devices, which might be frustrating. That’s not always clear what’s causing an issue, or whether one exists at all. When you discover yourself in a […]

How to Create a Timeline in Google Slides
Timelines are an excellent method for displaying sequential listings of activities from start to end. It is a visual display of information that includes lists, charts, or visuals. A timeline is written down and organized in the same chronological sequence. A timeline is a smart method to condense information and better explain your brand using […]

How to Undo and Redo on a Mac
Almost every Mac software includes the option to implement an “Undo,” that would be, to overturn the previous action. Similarly, practically every single Mac software offers the capability to “Redo,” that would be, to completely upend the most recently undone operation. The Mac shortcut keys for doing Undo as well as Redo have always been […]

How to Increase Internet Speed on Windows 10
Internet connectivity is a mandated requirement for many routine works on Windows 10 systems. Whether it is some official work or personal work, having a smooth internet connection is important for both. However, internet connectivity is not so smooth for all Windows 10 users. This is due to multiple reasons like geographical issues, increased traffic, […]
How to upgrade to Windows 11 for free
Windows 11 offers the ultimate experience to the users and comes with multiple features. Hence, all devices require an updated version of Windows for seamless operations. Many times a user has to go to purchase the costly Windows 11. Due to the cost constraints, it is not feasible for all Windows users to purchase the […]

11 Best File Encryption Software for 2024
The finest encryption software enables keeping your files private and safe for security considerations, as well as protecting them against intrusion. When it relates to securing your data and documents, encryption software seems to have become increasingly vital. Hacking attempts and privacy breaches have made it simpler for total strangers to access the most private […]

How to record screen on Windows 10/11
Have you often pondered how to display your desktop on whether you’re a Windows 11,10 user or recently updated towards the beta windows version 11? It is a question that almost all of us have asked. Using a display capturing app is the most straightforward approach to record a screen. And TweakShot is one of […]

