How to Import and Export Chrome Passwords?
Whether you are moving to a new laptop or changing the operating system, you can import and export chrome passwords to easily log in to your different accounts.
Earlier, Chrome users had to use third-party tools to save their different passwords. With the recent Chrome development, you can export and import passwords to Chrome with a built-in password manager.
Chrome browser lets you bulk download all the passwords and upload them back again with ease. So, let’s export and import Chrome passwords now!
How to Import and Export Chrome Passwords End-to-end Process
The complete process to export Chrome passwords and then import passwords to Chrome along with deleting the exported passwords has been drafted by our technical team for your ease.
Activate Chrome Feature to EXPORT your Saved Passwords from your Old Account
The first export Chrome passwords step is to retrieve all your saved passwords from your old Google account.
- Open a new Google Chrome browser on your laptop or computer.
- On the top right corner, click on the button with your name and choose the account from where you want to export your bulk passwords.
- Enter this URL in your Chrome’s address bar — chrome://flags/#PasswordExport

- Now, you will see that you have been navigated to the experimental ‘flags’ area of your Google Chrome.

- In the Password Export row, click on the drop-down menu and select Enabled.

- Now, the export Chrome passwords feature is activated on your Chrome browser. You need to click on the Relaunch Now button or quit the X mark browser and relaunch it on your computer.
Export your Saved Passwords to your Device
Next, you have to export Chrome passwords to your laptop or computer for importing later on.
- Once your Google Chrome browser relaunches, use the same Google account (used in the first step) and go to — chrome://settings/passwords.
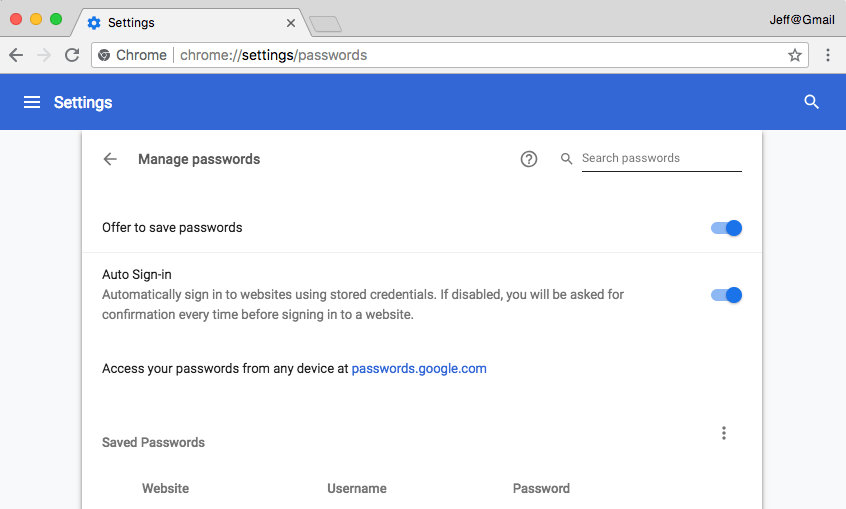
- At the right section on the screen, look for the “Saved Passwords” and click on the three vertical eclipses to reveal the options “Export Passwords.”
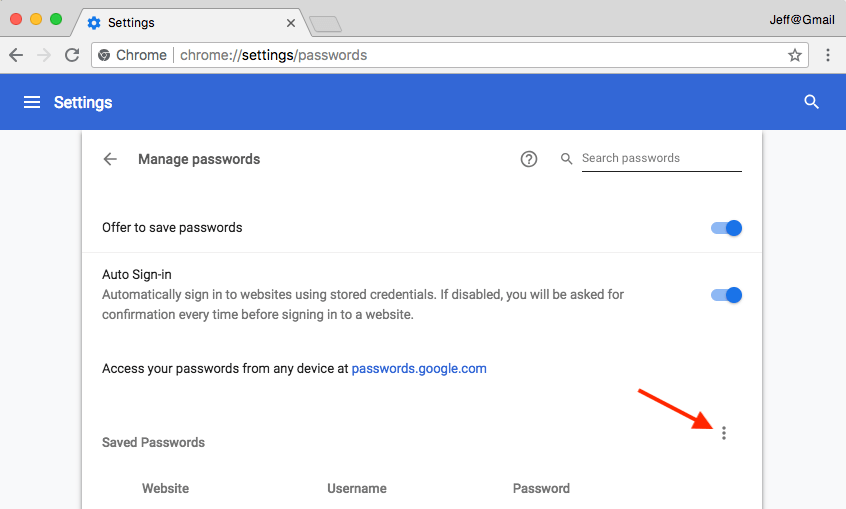
- Now, click on the “Export Passwords” option.

- Then, click on the Export Passwords on the pop-up window.
- Here, your operating system might ask permission to Export passwords to Chrome. If you are using a password to protect your computer, you have to enter your Windows password to confirm that you are using the device.
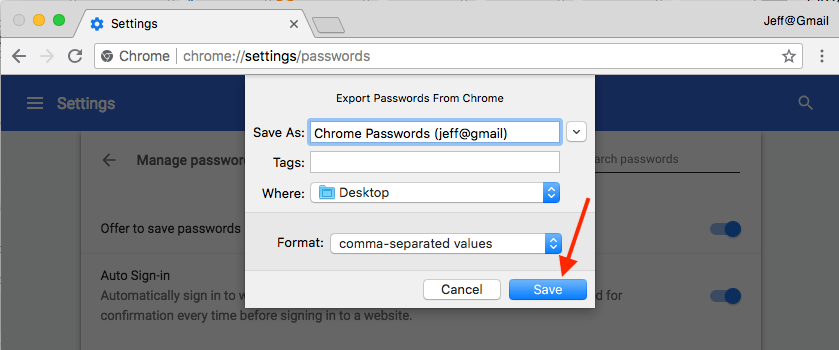
- Next, give your export file a name and then save it on your computer from where you can easily access it.
Activate Chrome Feature to IMPORT your Saved Passwords from your New Account
The export Chrome passwords process is done, and now you need to import Chrome passwords. For that, first, activate the hidden Google Chrome feature.
- Switch to your new account where you wish to import your Saved Passwords.
- Open this address into your Chrome’s search bar and hit enter — chrome://flags/#PasswordImport
- Now, you are taken to the experimental ‘flags’ area.
- Click on the drop-down menu in the Password Import row and then click on the Enabled.
- Next, you need to relaunch your Google Chrome to activate this hidden feature.
Finally! Import Passwords to Chrome
Now, you can import Chrome passwords to your new account. Based on your Chrome version, you can use the suitable “Import Passwords to Chrome” from the given two alternatives.
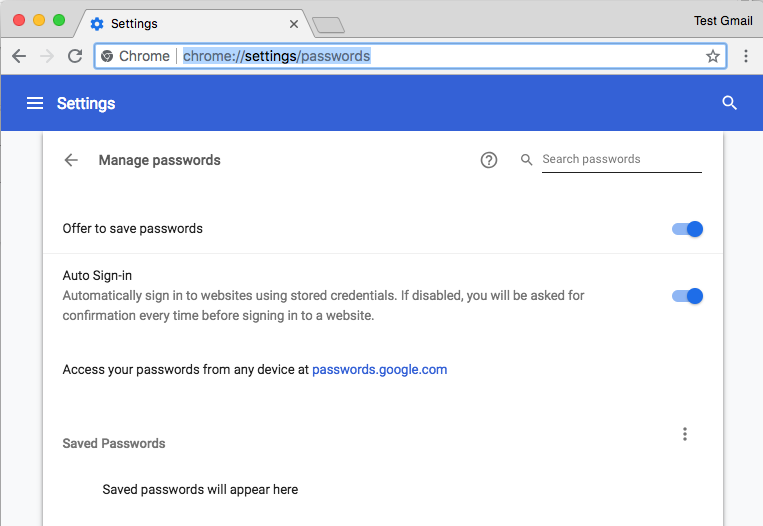
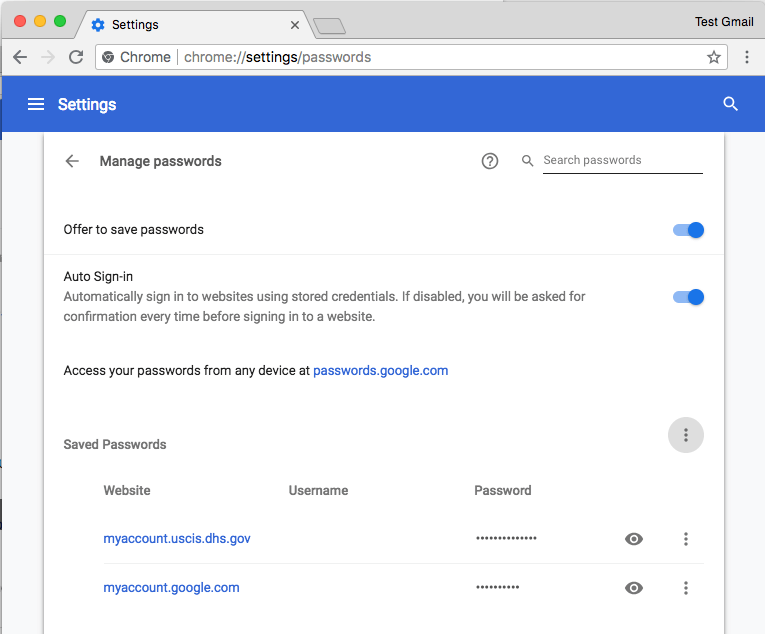
- On the right corner, look for the “Saved Passwords” option and click on the three vertical dots to expose the Import option.
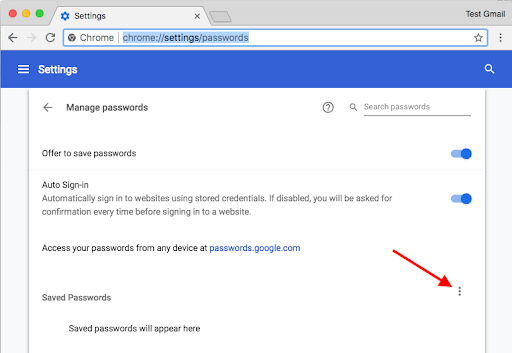
- Click on the Import.
- Navigate and select the Saved Passwords CSV file you have exported earlier.
- Click open the file, and you will immediately see all the Saved Passwords in your new account.
Alternative Method to Import Chrome Passwords
For some Chrome versions, this method to import Chrome passwords might work:
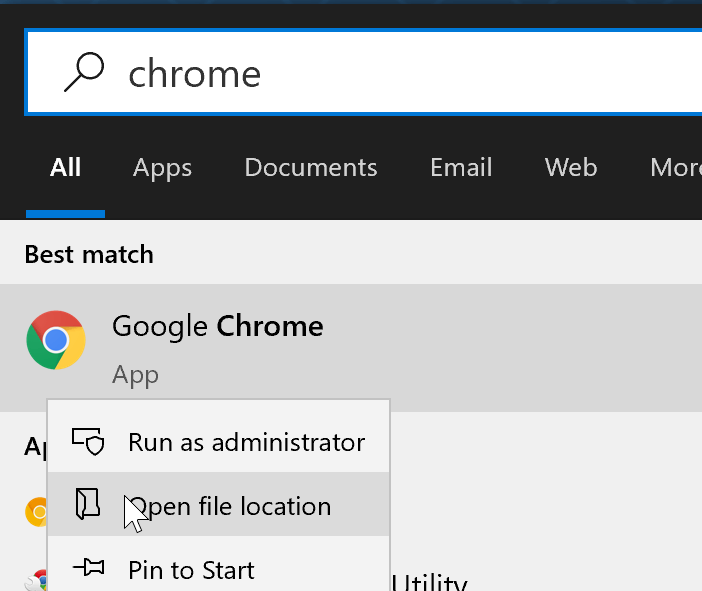
- Create a Chrome browser shortcut on your desktop or search for Chrome using the Start menu. Then, right-click on the Chrome result and click Open file location.
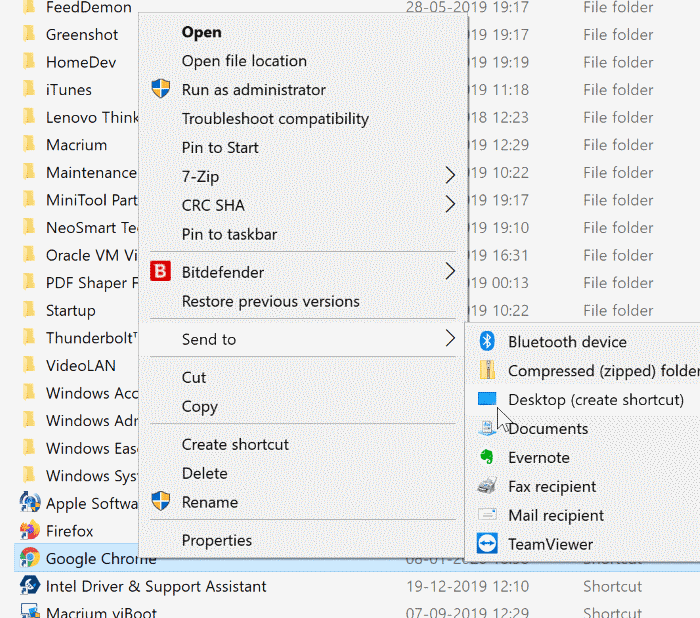
- Right-click on the Chrome shortcut, click on the Send To, and next on the Desktop (create shortcut) option to create Chrome shortcut on the desktop.
- Right-click on the Chrome shortcut that you have just created and click on the Properties to open the properties dialogue box.
- In the Shortcut tab, add the following parameter at the end of the current Target path. Click Apply.
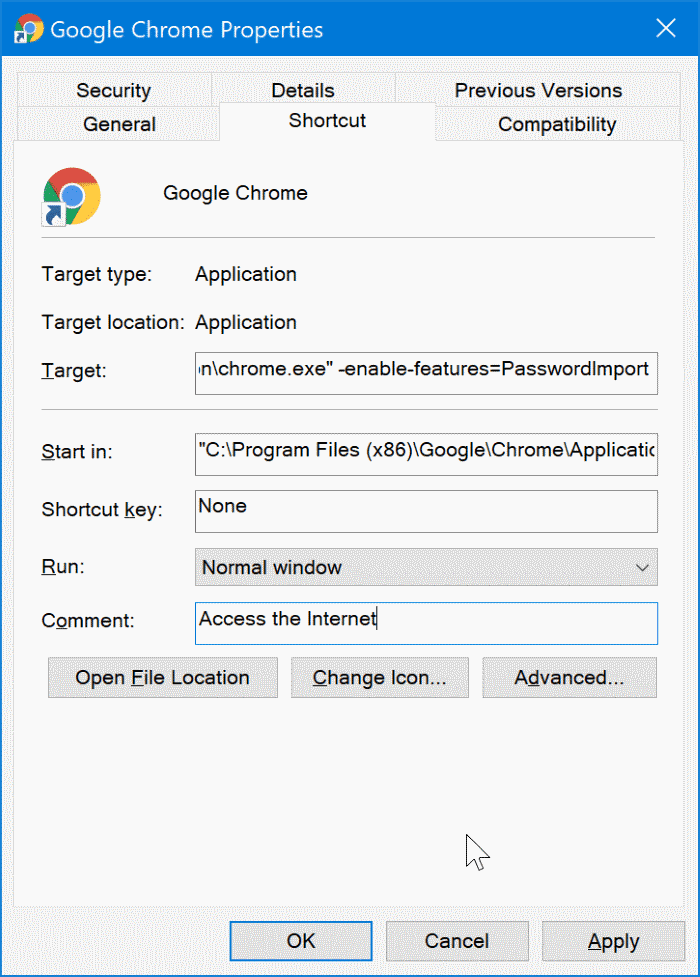
- A prompt window will appear; click on the Continue button.
- Open the Chrome browser and then open the password page by copying and pasting this URL and press the Enter — chrome://settings/passwords.
- Now, under the Saved Passwords section, click on the three vertical dots icon to see the Import option. Then, select the export CSV file and click on the Open button to import passwords to Chrome.
Delete your Saved Passwords Export File
Your Saved Passwords export file contains your personal and private information. If you don’t want the wrong person to access your passwords, you should immediately delete the CSV file from your computer. To do so:
- Navigate the file on your computer.
- Delete the file to your Trash.
- Even go to the Trash folder and permanently remove it from your computer.
That’s it! You have now successfully imported and exported Chrome passwords to your new account. Now, you can access all your Chrome passwords without any hassle.
However, if you can’t import and export Chrome passwords on your device, comment below, and our experts will shortly help you out.
Popular Post
Recent Post
How To Record A Game Clip On Your PC With Game Bar Site
Learn how to easily record smooth, high-quality game clips on Windows 11 using the built-in Xbox Game Bar. This comprehensive guide covers enabling, and recording Game Bar on PC.
Top 10 Bass Booster & Equalizer for Android in 2024
Overview If you want to enjoy high-fidelity music play with bass booster and music equalizer, then you should try best Android equalizer & bass booster apps. While a lot of these apps are available online, here we have tested and reviewed 5 best apps you should use. It will help you improve music, audio, and […]
10 Best Video Player for Windows 11/10/8/7 (Free & Paid) in 2024
The advanced video players for Windows are designed to support high quality videos while option to stream content on various sites. These powerful tools support most file formats with support to audio and video files. In this article, we have tested & reviewed some of the best videos player for Windows. 10 Best Videos Player […]
11 Best Call Recording Apps for Android in 2024
Whether you want to record an important business meeting or interview call, you can easily do that using a call recording app. Android users have multiple great options too. Due to Android’s better connectivity with third-party resources, it is easy to record and manage call recordings on an Android device. However it is always good […]
10 Best iPhone and iPad Cleaner Apps of 2024
Agree or not, our iPhones and iPads have seamlessly integrated into our lives as essential companions, safeguarding our precious memories, sensitive information, and crucial apps. However, with constant use, these devices can accumulate a substantial amount of clutter, leading to sluggish performance, dwindling storage space, and frustration. Fortunately, the app ecosystem has responded with a […]
10 Free Best Barcode Scanner for Android in 2024
In our digital world, scanning barcodes and QR codes has become second nature. Whether you’re tracking packages, accessing information, or making payments, these little codes have made our lives incredibly convenient. But with so many barcode scanner apps out there for Android, choosing the right one can be overwhelming. That’s where this guide comes in! […]
11 Best Duplicate Contacts Remover Apps for iPhone in 2024
Your search for the best duplicate contacts remover apps for iPhone ends here. Let’s review some advanced free and premium apps you should try in 2024.
How To Unsubscribe From Emails On Gmail In Bulk – Mass Unsubscribe Gmail
Need to clean up your cluttered Gmail inbox? This guide covers how to mass unsubscribe from emails in Gmail using simple built-in tools. Learn the best practices today!
7 Best Free Methods to Recover Data in Windows
Lost your data on Windows PC? Here are the 5 best methods to recover your data on a Windows Computer.
100 Mbps, 200 Mbps, 300Mbps? What Speed is Good for Gaming?
What internet speed is best for gaming without lag? This guide examines whether 100Mbps, 200Mbps, or 300Mbps is good for online multiplayer on PC, console, and mobile.


