How to Export Chrome Bookmarks
We often save some web pages which we feel are important for us or to be frequently visited. Google Chrome bookmarks are such links which are meant to be visited often or later. Each of these links is a precious corner of the web you would want to visit repeatedly.
We often wish to get the same bookmarks on our smartphone or on other devices and browsers. That is the reason it’s important to export Google Chrome bookmarks and keep them backed up always.
Before you encounter any mishaps, Google Chrome lets you save all your favorites and bookmarks in a single HTML file and you can also sync them automatically across all your devices. Let’s quickly have a look at easy and simple steps to back up and export Chrome bookmarks.
There are two methods, manual and automatic.
Creating Bookmarks
Whenever you come across any page which is meaningful for you and you wish to view it again, you can add that page to your Google Chrome bookmarks.
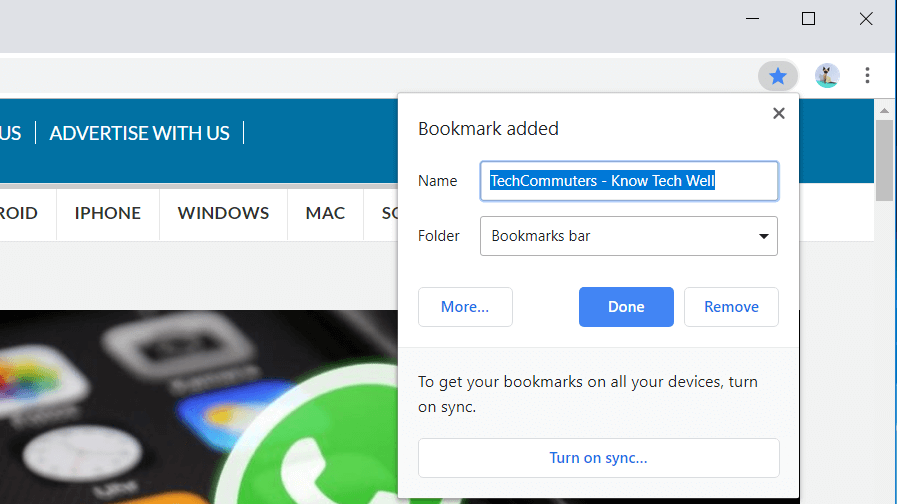
Adding bookmarks to your favorites list is extremely easy. We will cover this in three simple steps which you can also see in this image.
Step 1. Open the browser and search for the page which you want to add to your bookmarks. Click on the STAR ICON on your Google chrome.
Step 2. Enter the name with which you want to save the bookmark for your reference. You can keep the default name it suggests or you may enter your own description as per your choice.
Step 3. If there are multiple folders in which you manage your bookmarks, you can go ahead and select the folder else simply click on DONE to save the bookmark.
Export Google Chrome Bookmarks To HTML File (Windows)
To export chrome bookmarks as an HTML file, you will need to follow these simple steps.
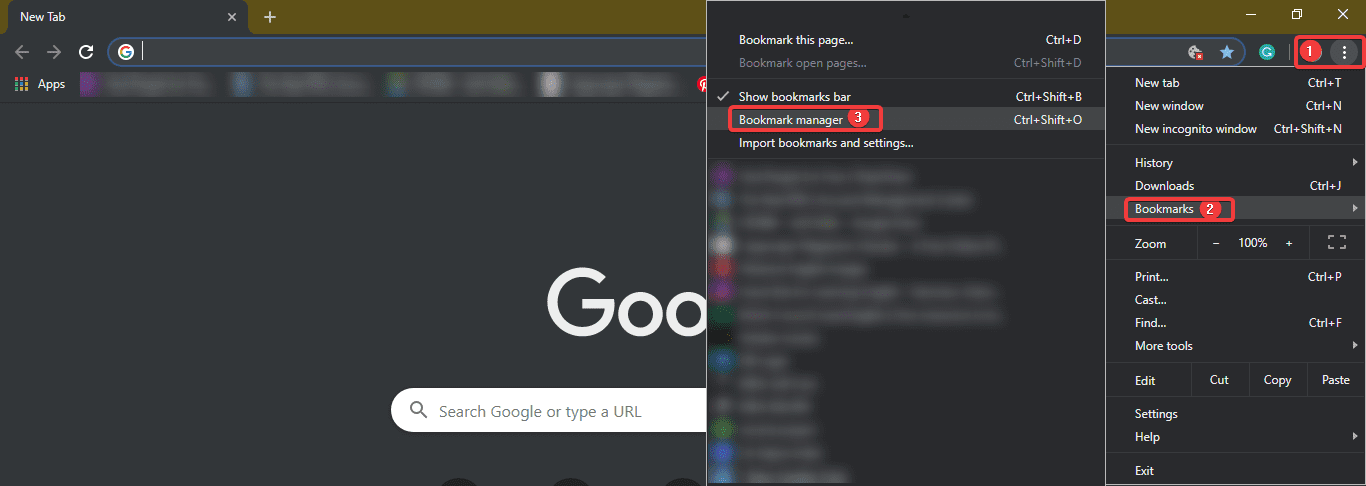
Step 1. Click on those 3 dots at the top right corner of the screen to access the drop-down menu.
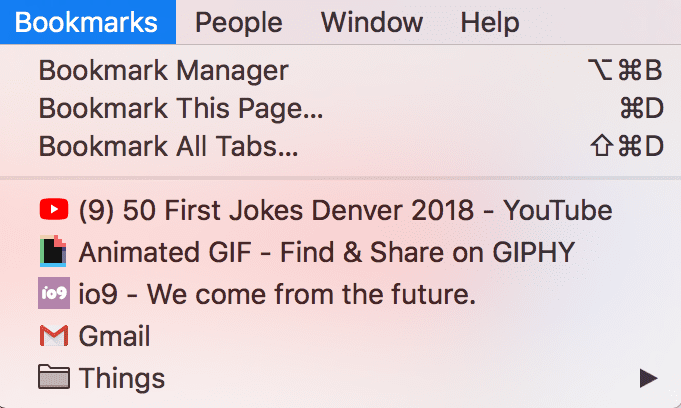
Step 2. Go to Bookmarks & click on Bookmarks Manager. The same can be accessed using hotkeys (Ctrl + Shift + ‘O’)
Step 3. The bookmark manager will open in a new tab show below.
Step 4. Click on the word ‘Organize’ above all the listed bookmarks.
Step 5. From the drop-down menu, click on ‘Export Bookmarks to HTML File’ located at the bottom of the list. In the most recent updated browser, it will just give you ‘Export Bookmark’ option.
Step 6. An explorer will open where you need to ensure that the save file type is ‘.html’ followed by the file name provided by you. Select the file destination and click on the ‘SAVE’ option.
All your bookmarks are stored in the file saved on your specified location.
Export Chrome Bookmarks From The Hidden Folder
Now here we are going to talk about the manual process to export Chrome Bookmarks using Windows Explorer. You just need to find the relevant folder by following the instructions given below for your Windows PC or Mac OS. Once you locate the folder, simply copy and paste the located Bookmarks file from your Chrome profile folder to another secure location.
Step 1. Navigate to the User Data folder on your PC. This is the default location for all your entire browser profiles (it includes Bookmarks, Passwords, Extensions, and Settings).
Windows (Windows 10, 8, 7 & Vista)
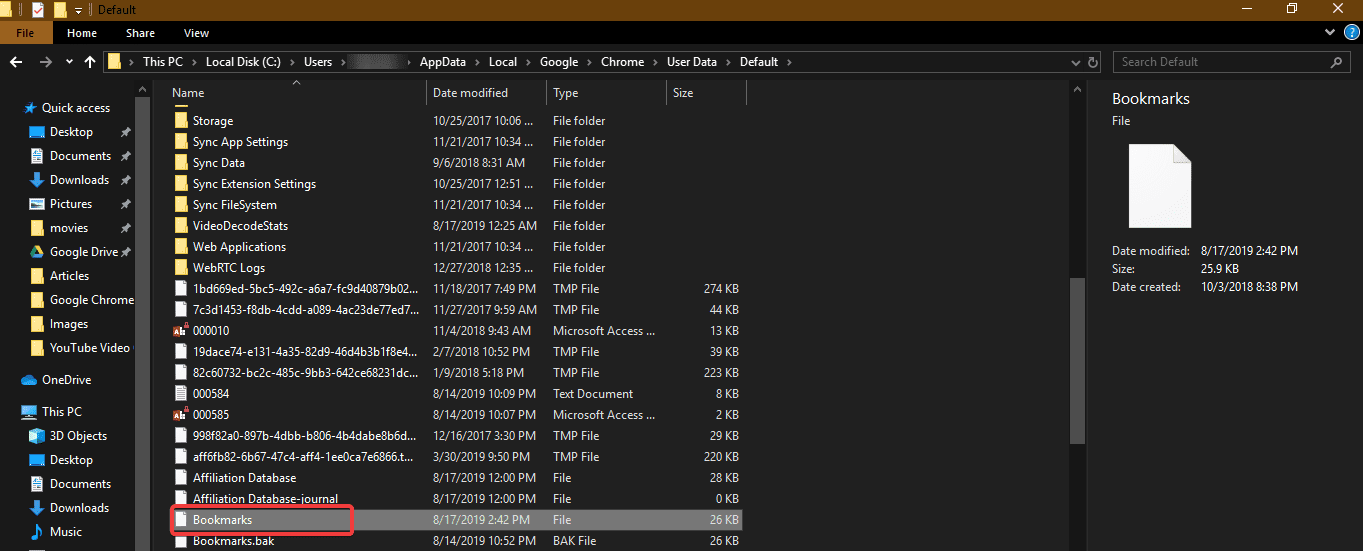
The default location is: C:\Users\<Your_Username>\AppData\Local\Google\Chrome\User Data\Default
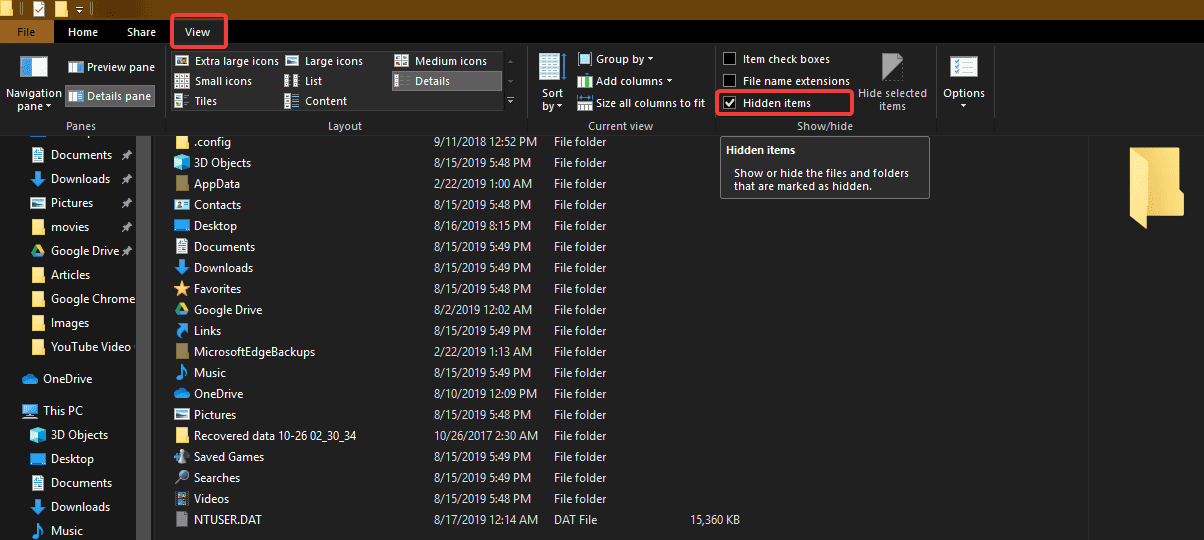
Step 2. It might be possible that you are unable to see AppData folder if your ‘Hidden Items’ are not displayed. To show ‘Hidden Items’, simply click on View Menu and put a checkmark in front of ‘Hidden Items’. You will notice an increment in listed items and should be able to find dull-colored files and folders. These are hidden files.
Step 3. Navigate to the address until you find ‘Bookmarks’ file.
Step 4. Copy and paste the bookmark file to some other location to keep it safe and reserved for further use.
macOS
The default location is: Users/<Your_Username>/Library/Application Support/Google/Chrome/Default
Please Note: For both paths, replace Your Username with the account name you use on the computer.
You can also follow the Google Chrome bookmarks location from the browser and save the ‘.html’ file to your desired location.
Also Read: What are Cookies, Cache and their different types
What If There Are Multiple Chrome Profiles?
If you share your computer and the same windows account with someone else, then it’s better to maintain separate Chrome profiles with their own set of bookmarks. The User Data folder has a folder for each profile that you create in Chrome. If you only have one profile, that folder will be called Default as shown above. If you have more than one Google profile, the folders will be listed with the profile names.
Summing Up
Let’s practice the same steps today and ensure that we never miss out on any of our updates precious bookmarks. If this article helped you or you know someone who can be benefited with these steps, do like and share the article. If you have any other issues related to Chrome Bookmarks, do share the same in the comment section and we will revert with an appropriate solution to it.
Popular Post
Recent Post
How to Troubleshoot Xbox Game Bar Windows 10: 8 Solutions
Learn how to troubleshoot and fix issues with the Xbox Game Bar not working on Windows 10. This comprehensive guide provides 8 proven solutions to resolve common problems.
How To Record A Game Clip On Your PC With Game Bar Site
Learn how to easily record smooth, high-quality game clips on Windows 11 using the built-in Xbox Game Bar. This comprehensive guide covers enabling, and recording Game Bar on PC.
Top 10 Bass Booster & Equalizer for Android in 2024
Overview If you want to enjoy high-fidelity music play with bass booster and music equalizer, then you should try best Android equalizer & bass booster apps. While a lot of these apps are available online, here we have tested and reviewed 5 best apps you should use. It will help you improve music, audio, and […]
10 Best Video Player for Windows 11/10/8/7 (Free & Paid) in 2024
The advanced video players for Windows are designed to support high quality videos while option to stream content on various sites. These powerful tools support most file formats with support to audio and video files. In this article, we have tested & reviewed some of the best videos player for Windows. 10 Best Videos Player […]
11 Best Call Recording Apps for Android in 2024
Whether you want to record an important business meeting or interview call, you can easily do that using a call recording app. Android users have multiple great options too. Due to Android’s better connectivity with third-party resources, it is easy to record and manage call recordings on an Android device. However it is always good […]
10 Best iPhone and iPad Cleaner Apps of 2024
Agree or not, our iPhones and iPads have seamlessly integrated into our lives as essential companions, safeguarding our precious memories, sensitive information, and crucial apps. However, with constant use, these devices can accumulate a substantial amount of clutter, leading to sluggish performance, dwindling storage space, and frustration. Fortunately, the app ecosystem has responded with a […]
10 Free Best Barcode Scanner for Android in 2024
In our digital world, scanning barcodes and QR codes has become second nature. Whether you’re tracking packages, accessing information, or making payments, these little codes have made our lives incredibly convenient. But with so many barcode scanner apps out there for Android, choosing the right one can be overwhelming. That’s where this guide comes in! […]
11 Best Duplicate Contacts Remover Apps for iPhone in 2024
Your search for the best duplicate contacts remover apps for iPhone ends here. Let’s review some advanced free and premium apps you should try in 2024.
How To Unsubscribe From Emails On Gmail In Bulk – Mass Unsubscribe Gmail
Need to clean up your cluttered Gmail inbox? This guide covers how to mass unsubscribe from emails in Gmail using simple built-in tools. Learn the best practices today!
7 Best Free Methods to Recover Data in Windows
Lost your data on Windows PC? Here are the 5 best methods to recover your data on a Windows Computer.

