


A slow computer makes it hard to focus. Programs take too long to open. Free space keeps shrinking until the disk is almost full. This happens to most PC owners at some point. Even new machines can slow down after a while. That is the exact problem cleanup tools are built to solve. They comb […]
How to Easily Downgrade from Windows 11 to Windows 10?
Have you upgraded from Windows 10 to Windows 11? And realized you don’t like Microsoft’s latest operating system. Perhaps you dislike the new Start menu or taskbar. You may be missing some built-in apps or features. Though maybe you miss the familiarity of Windows 10. For whatever reason, you can revert to the previous operating system.
Microsoft gives you ten days to downgrade from Windows 11 to Windows 10. There is, however, a way to extend that deadline.
So here’s how to get back to the familiarity of Windows 10.
Does Microsoft Allow Users to Downgrade Windows 11 to 10?
Yes! Microsoft lets users downgrade Windows 11. Depending on how recently you upgraded to Windows 11, there are two ways to accomplish this.
First and foremost, if you upgraded to Windows 11 within the last ten days, you can “roll back” to your previous Windows OS. Consider it like pressing a big “Undo” button. You will regain access to your previous Windows 10 environment.
Because Windows only keeps your old operating system files for 10 days. Windows erases them from your internal drive after 10 days to free up space. You can also manually remove them using a program such as Disk Cleanup. This “Roll Back” feature is intended primarily as an emergency “Undo” button if you encounter a bug with a new Windows 11 system.
Second, if more than 10 days have passed, reinstalling Windows 10 on your computer is your only option. Unfortunately, it is a complete Windows reinstall—you’ll be replacing Windows 11 with a new Windows 10 system that you must configure from scratch.
Before proceeding, make a backup of any critical files. The roll-back process should keep your files on hand for the first 10 days, but the whole reinstallation process will remove everything on your drive. Backups are always a good idea, especially when reinstalling an operating system.
Prequels to Downgrade Windows 11
Downgrading from Windows 11 to Windows 10 is subject to certain conditions. Here they are:
- You can only downgrade to Windows 10 within 10 days of installing it. For instance, if you upgraded to Windows 11 on September 1, 2021, you can downgrade within 10 days. However, you cannot downgrade on September 25, 2021.
- Previous Windows version files are typically found in the windows.old folder, as well as other necessary files; these should be present on your system.
Important Precautions Before Downgrading to Windows 10:
Downgrading from Windows 11 to Windows 10 is a significant system change. It involves either rolling back to a previous version or performing a clean installation. While the process is useful in many cases, it can affect your files, apps, and settings. Taking proper precautions helps reduce risks and ensures a smoother experience. A little preparation can save a lot of time and effort later.
- Backup All Important Data
Always create a complete backup of your personal files, documents, and media. Downgrading can remove data, especially during a clean install. - Check the Downgrade Time Limit
The rollback option is available only for a limited period after upgrading to Windows 11. If that period has passed, you will need to perform a fresh installation. - Keep Your Windows 10 Product Key Ready
In some cases, you may need to activate Windows 10 again. Having your product key ready avoids activation issues later. - Ensure Sufficient Battery or Power Supply
Keep your laptop plugged in or ensure a stable power source. A sudden shutdown during the process can cause system errors. - Download Required Drivers in Advance
Some drivers may not install automatically after downgrading. Download key drivers like network and graphics beforehand. - Note Down Installed Applications
Most applications will be removed during the downgrade. Make a list of important apps so you can reinstall them easily. - Check Hardware Compatibility
Make sure your system supports Windows 10 properly. Some newer devices may not have full driver support for older versions. - Use a Reliable Installation Source
Always use official Microsoft tools or trusted installation media. This helps avoid corrupted files and installation failures.
How to Download from Windows 11 to Windows 10 within 10 Days?
Downgrading Windows 11 to 10 is easy. After checking Microsoft’s official suggestion and our own experience, we have to compile these easy steps to download Windows 11:
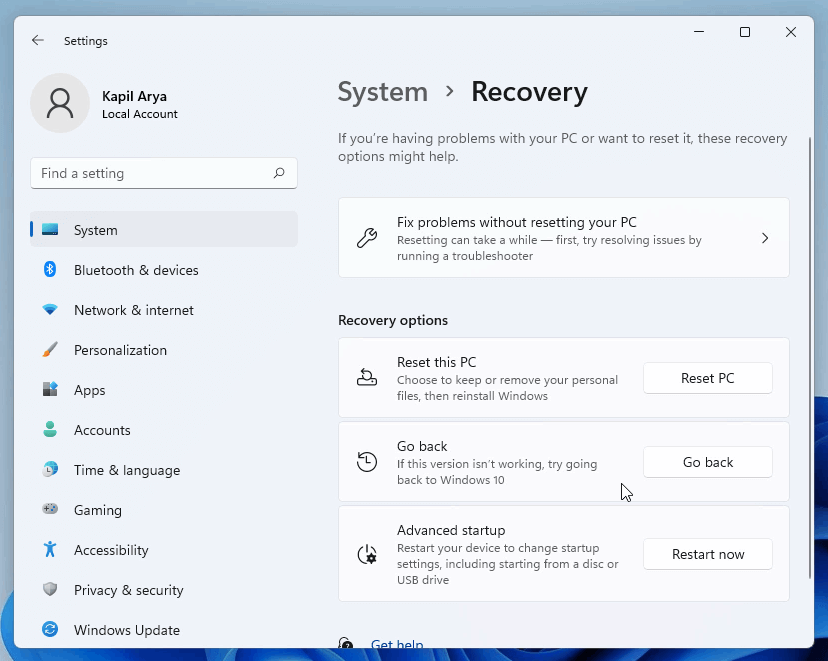
Step 1. Open the Settings app on your Windows 11 computer and go to System > Recovery. Then, click Go back under Recovery options.
Step 2. Now Return to Windows 10 should appear. Select a reason for returning and then click Next.

Step 3. Choose the Check for updates option on the next screen. If that fails, select No thanks.
Step 4. Make sure you thoroughly read the information under What you need to know. Then, when you’re finished, click Next.
Step 5. Note the Windows 10 password on the following screen to avoid being locked out. To proceed, click Next.
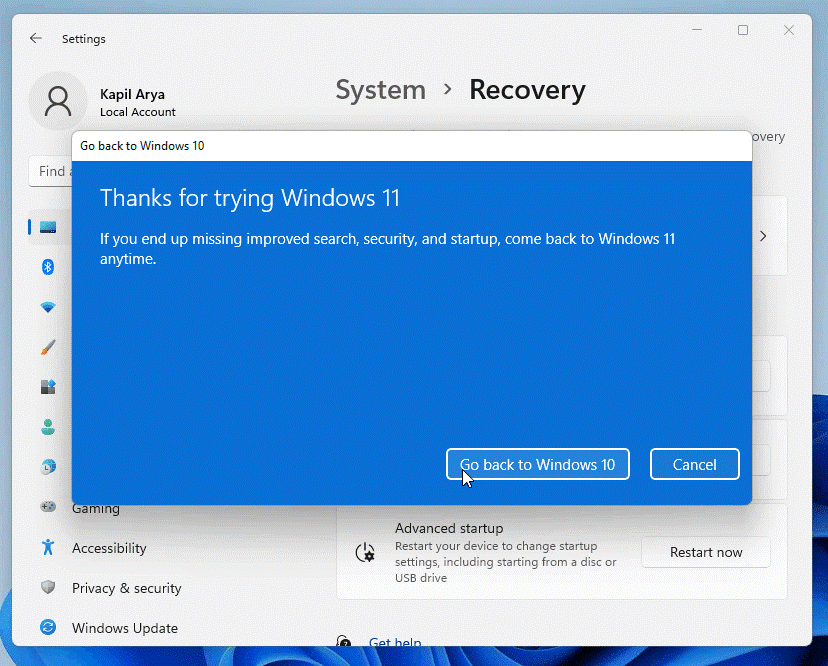
Step 6. Finally, select Go Back to Windows 10.
Step 7. Your computer will now reboot.
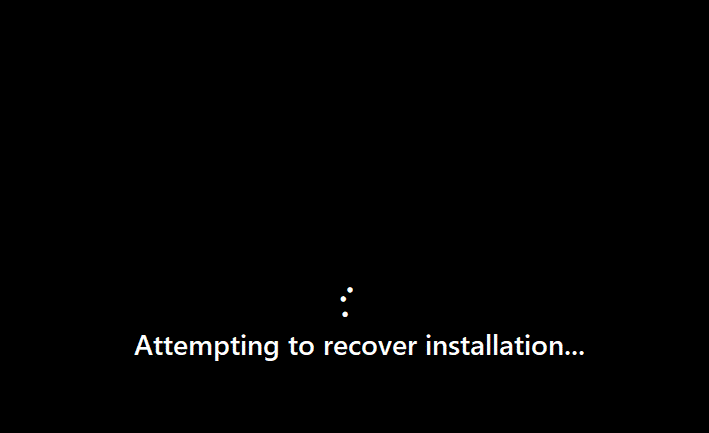
Step 8. After restarting, you will see the message Attempting to recover installation.
Step 9. You’ll see Restoring your previous version of Windows in a few moments. Step 10. However, this will take time, depending on how quickly your system and data are restored.
Step 10. After that, your system will restart and see the Windows 10 boot screen.
Step 11. Then, within a few moments, you can log into Windows 10.
Step 12. After logging in, use the winver command to determine your Windows 10 version.
How to Download from Windows 11 to Windows 10 After 10 Days?
Let’s say you want to use Windows 11 for more than 10 days but still want the option to revert to Windows 10. A handy Microsoft command line tool allows you to check the number of days remaining and even extend the deadline to as many as 60.
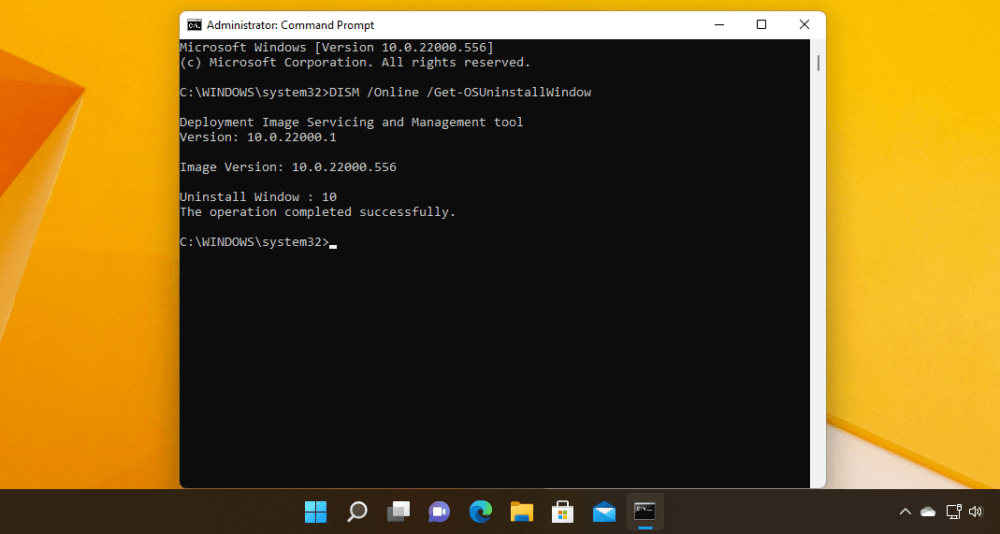
First, enter cmd in the search field. Then, click the Run as administrator link in the search results to open a command prompt with administrative privileges.
Enter the following command in the prompt window: DISM /Online /Get-OSUninstallWindow. The number following the phrase Uninstall Window indicates the number of days remaining.
To extend the deadline, type:
DISM /Online /Set-OSUninstallWindow /Value:days>
Change days with the number of days you want to apply. For example, to set the downgrade deadline to 30 days, type:
DISM /Online /Set-OSUninstallWindow /Value:30.
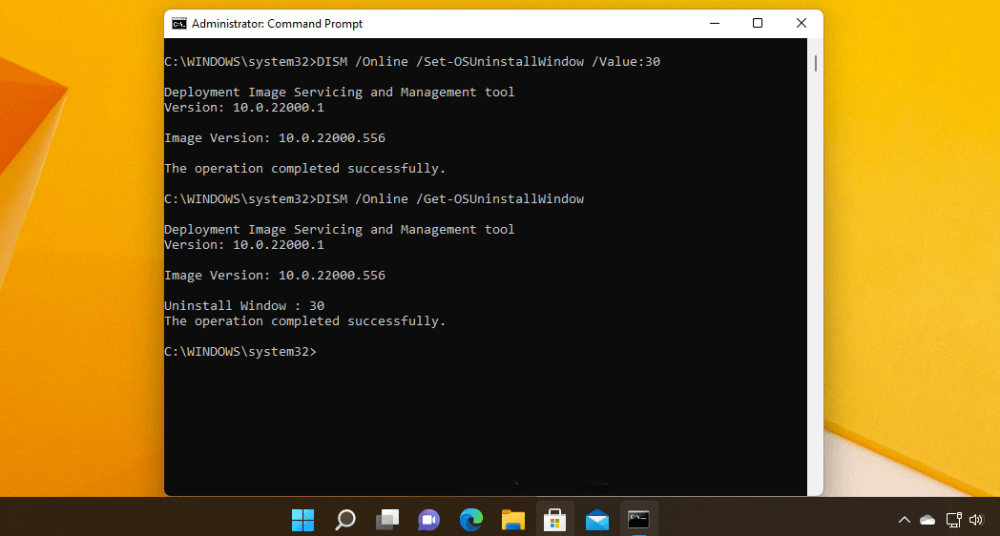
You can here set the date to two days or 60.
Then, using the up arrow key, bring up the DISM /Online /Get-OSUninstallWindow command. Enter to rerun that command and confirm that the number of days you specified is now in effect. You can now return to Settings and use the Go back command whenever you want before the new number of days expires.
How to Downgrade on a Pre-installed Windows 11 Computer?
Now, all new Windows gadgets come with pre-installed Windows 11 software. In this case, if you want to downgrade to Windows 10 for some reason, you must follow an entirely different process because Windows 10 was never installed on your device.
You have to install Windows 10 from scratch on your device as follows:
Step 1. Navigate to the Microsoft support website.
Step 2. Click the Download Tool Now button under the “Create Windows 10 installation media” section.
Step 3. Install the installer on your device.
Step 4. To use the tool, double-click the MediaCreationToolXXXX.exe file.
Step 5. Select the Accept option.
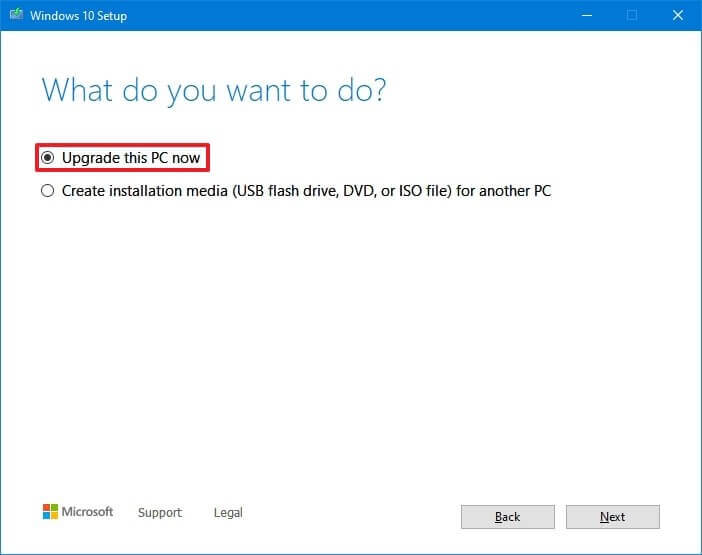
Step 6. Choose the Upgrade this PC now option.
Step 7. Click the Accept button once more.
Step 8. Select the Change what to keep checkbox.
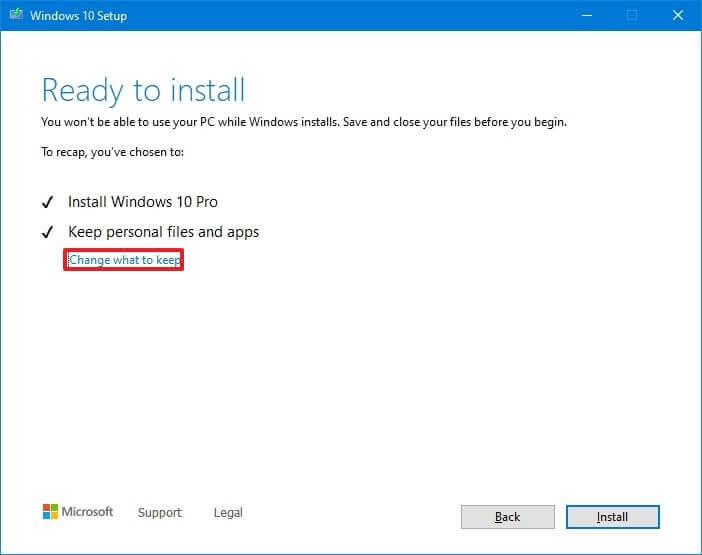
Step 9. Choose the Nothing option.
Step 10. Next, click the button.
Step 11. Select the Install option.
Step 12. Select your region setting (OOBE) from the out-of-the-box experience page.
Step 13. Select the Yes option.
Step 14. Choose your preferred keyboard layout.
Step 15. Select the Yes option.
Step 16. If you don’t need to configure a second layout, click the Skip button.
Step 17. Your PC will connect to the network automatically if it has an Ethernet connection. However, if you have a wireless connection, you must manually configure it (a security key may be required).
Step 18. On Windows 10 Pro, select the Set up for personal use option. (The option is not available in the “Home” edition.)
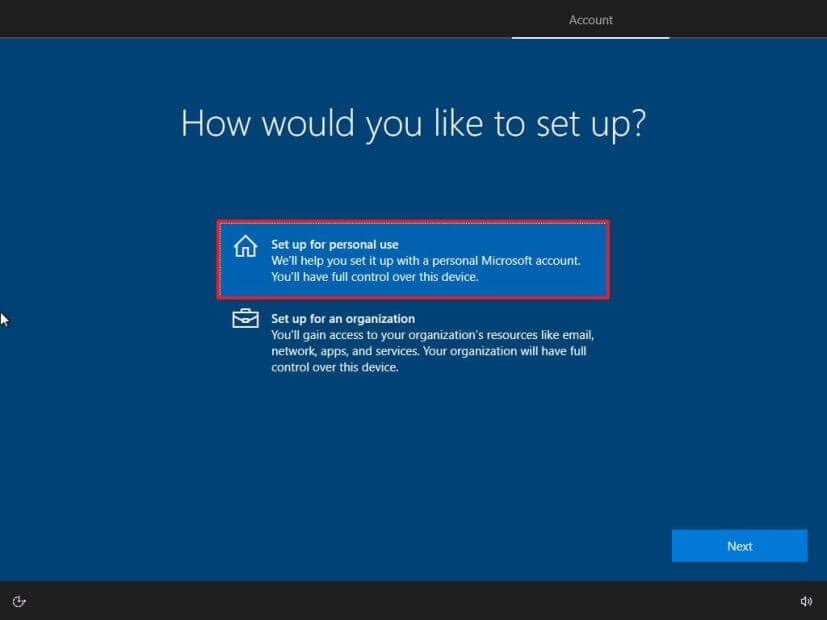
Step 19. Next, click the button.
Step 20. Add your Microsoft account email, phone number, or Skype identification to set up an account.

Step 21. Next, click the button.
Step 22. Confirm the password for your Microsoft account.
Step 23. Next, click the button.
Step 24. Select the Create a PIN option.
Step 25. Make a new PIN password for yourself.
Step 26. Press the OK button.
Step 27. Confirm the privacy settings that are best for you.
Step 28. Select the Accept option.
Step 29. (Optional) Select one or more ways you intend to use the device on the “Customize your device” page to allow the setup to suggest tools and services customization during this experience.
Step 30. To proceed, click the Accept button. (Alternatively, you can skip this step.)
Step 31. To avoid connecting your phone to your PC, click the “Skip for now” button.
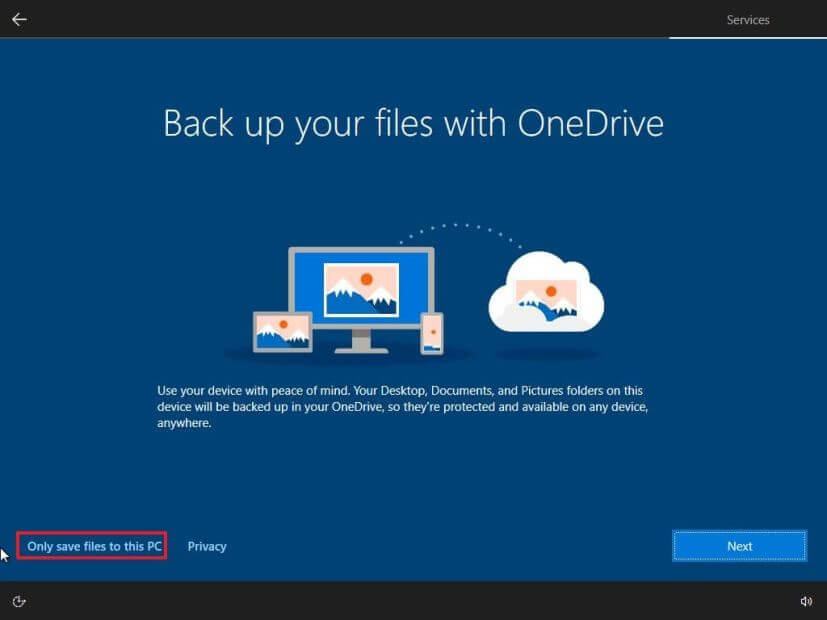
Step 32. To allow OneDrive to automatically back up your Desktop, Pictures, and Documents folders to the cloud, click the Next button. (Alternatively, you can skip this step by selecting “Only save the file to this PC.”)
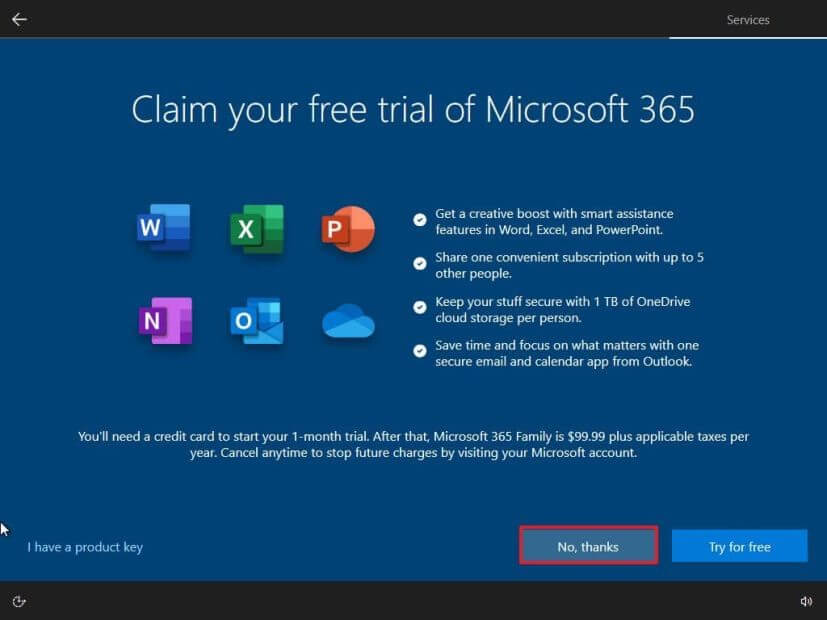
Step 33. To skip the Microsoft 365 setup, click the No, thank you button.
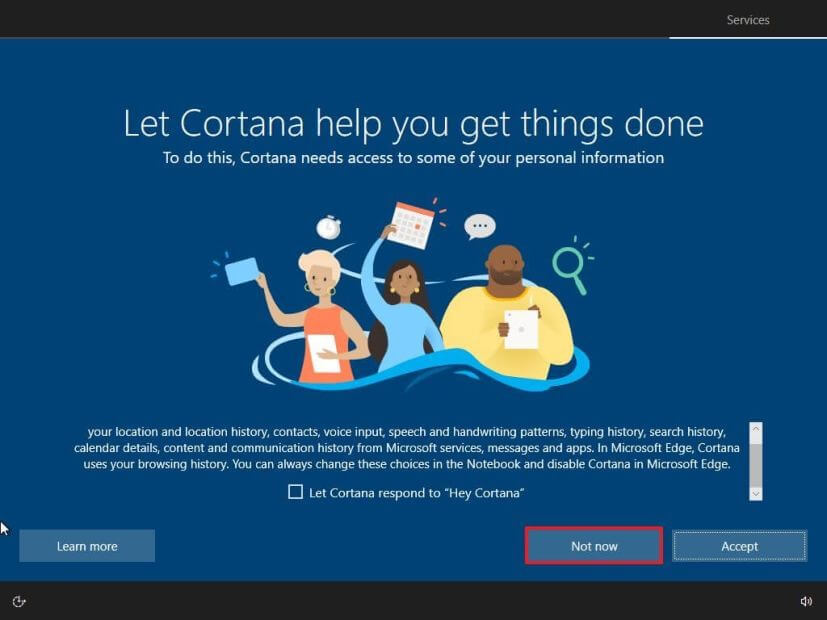
Step 34. To turn off Cortana, click the Not now button.
The setup will proceed with the Windows 10 downgrade when you finish the steps.
Conclusion
Downgrading from Windows 11 to Windows 10 can be helpful if you are facing performance issues or compatibility problems. Many users prefer Windows 10 for its stability and familiar interface. However, the process should be handled carefully. Proper preparation, such as backing up data and checking system requirements, makes the transition much smoother.
After completing the downgrade, take time to set up your system again. Install necessary drivers, update Windows, and restore your files. This ensures your system runs properly without missing features. Regular updates and maintenance will help keep your system stable over time. With the right steps, you can safely return to Windows 10 and continue your work without disruption.
FAQs
1. Can I downgrade from Windows 11 to Windows 10 without losing data?
If you use the rollback option within the allowed time, your files may remain intact, though some apps and settings might change. However, a clean installation will remove everything from the system drive. It is always safer to back up your data before starting the downgrade process.
2. How long does it take to downgrade to Windows 10?
The time depends on your system performance and the method used. A rollback usually takes around 20 to 40 minutes. A clean installation may take longer, as you will also need to reinstall apps and restore files afterward.
3. Will my apps work after downgrading to Windows 10?
Most apps will need to be reinstalled after the downgrade, especially if you perform a clean install. Some applications designed specifically for Windows 11 may not work properly on Windows 10. It is best to check compatibility before reinstalling important software.
Author Bio:
Dinesh Lakhwani 

Dinesh Lakhwani, the entrepreneurial brain behind “TechCommuters,” achieved big things in the tech world. He started the company to make smart and user-friendly tech solutions. Thanks to his sharp thinking, focus on quality and the motto of never giving up, TechCommuters became a top player in the industry. His commitment to excellence has propelled the company to a leading position in the industry.
Popular Post
Recent Post

Fortect Software Review: The Ultimate PC & Mobile Cleaning, Optimization & Security Tool
Slow computers are a common problem for almost every Windows user. Well, yes! Over time, your PC picks up junk files. These files sit quietly in the background. They take up space and slow things down. Programs open slower. Windows takes longer to boot. Even simple tasks like opening a folder can feel sluggish. There […]

CCleaner PC Optimizer Review: A Complete Guide for Windows Users
If your computer has started to feel slow, you are not alone. Most Windows PCs slow down over time. Junk files pile up. The registry gets messy. Too many apps open when you start your PC. All this adds up and makes even a good machine feel tired. This is where a PC cleaner tool […]

Auslogics Duplicate File Finder: Full Review and User Guide
A computer quietly gathers clutter over time. This includes duplicate photos, repeated downloads, and forgotten backups hiding in random folders. This buildup slowly eats away at storage and can make even a fast PC feel sluggish. Manually finding and deleting duplicates is tedious. It means checking every folder, comparing file names, and guessing which copies […]

CCleaner Duplicate File Finder: Key Features, Pricing, Step-by-Step Guide and More
Every computer collects junk over time. Right? Well, yes! Photos often get copied twice. Documents get saved in two folders by mistake. Old downloads pile up and never get deleted. This slowly eats up your storage space, and most people do not even notice until their drive is almost full. That is where a duplicate […]

Duplicate File Finder Pro: A Complete Review, Everything You Should Know
Computers collect thousands of files over time. Well, yes! Many of them end up being duplicates created by backups, downloads, or accidental copies. These extra files take up valuable storage space and make it harder to keep everything organized. Finding and removing them manually can take hours. Right? Duplicate File Finder Pro is a tool […]
Top 3 Duplicate File Finder for Windows 11 & Windows 10
If your PC storage keeps filling up even after you delete big files, duplicate files could be the real reason. Most of us save the same photo twice, download a document more than once, or copy a whole folder by mistake. Over months and years, these duplicate files pile up quietly. You do not even […]

Monitor Screen Calibration Guide: Everything You Should Know
Your monitor shows colors every single day. But are those colors actually correct? Most people never stop to check this. They just use the screen as it comes out of the box. This habit can lead to wrong colors in photos, videos, and work files. Colors may look too warm or too cold without you […]

How To Check Installed RAM and RAM Slots [Complete Guide]
RAM plays an important role in how smoothly a computer runs. Short for Random Access Memory, it stores the data and instructions that Windows and active applications need at any given moment. From opening multiple browser tabs to running games and productivity software, RAM helps keep everything responsive. A system with limited memory may experience […]

What is Microsoft Autopilot Everything You Need To Know
Technology has changed the way companies manage computers. Well, yes! Employees now work from offices, homes, and remote locations. Setting up devices manually for every worker takes time and effort. It can also create mistakes that slow down productivity. This is where Microsoft Autopilot becomes useful. It helps businesses prepare and deploy Windows devices with […]

