


Every computer collects junk over time. Right? Well, yes! Photos often get copied twice. Documents get saved in two folders by mistake. Old downloads pile up and never get deleted. This slowly eats up your storage space, and most people do not even notice until their drive is almost full. That is where a duplicate […]
How To Fix Preparing Automatic Repair Loop On Windows 10/11
Introduction:
The “Preparing automatic repair” loop is a common issue that affects Windows 10 and 11 users when the operating system fails to boot properly. This automatic repair process tries to diagnose and fix boot issues but often gets stuck repeatedly restarting and checking for problems, creating an endless loop.
There are several potential causes for this issue, ranging from system file corruption to hard drive errors. Thankfully, there are several ways to get out of this repair loop and boot back into Windows normally again. In this guide, we will walk through the top methods for fixing the Windows preparing automatic repair 10/11 loop issue.
What causes the “Preparing automatic repair” loop on Windows 10/11?
The loop happens when Windows fails to boot properly and launches automatic repair to try and diagnose the issue. This repair process checks for problems and tries to fix them, but often ends up in a restart loop.
Some common causes leading to this issue include:
- System file corruption – Damaged or missing system files like boot configuration data prevent Windows from starting correctly.
- Hard drive errors – Bad sectors, file system issues, or hard drive faults trigger the automatic repair.
- Software conflicts – Incompatible or faulty apps/drivers clash with Windows and cause startup issues.
- Windows Update issues – Buggy Windows updates can break things and stop Windows from booting.
- Registry errors – Corruption in registry files related to startup and boot configuration leads to the repair loop.
- Hardware faults – Defective RAM, storage drives, motherboards, and power issues can cause startup failures.
- Boot configuration problems – Errors in the boot loader, BCD store, or EFI boot settings manifest as automatic repair loops.
The good news is this is usually a software issue rather than a hardware failure. By troubleshooting the different possible causes, you can fix the preparing automatic repair problem and get back into Windows.
Laptop Stuck On Preparing Automatic Repair? Try These Fixes
Method 1. Perform a hard reboot
A hard reboot (or cold reboot) completely power cycles the computer to clear any temporary glitches causing the automatic repair loop. It flushes out any recent changes or corrupt memory contents that might be preventing a normal boot.
Here are the detailed steps to hard reboot a PC stuck in the preparing automatic repair 10/11 loop issue:
Step 1: Press and hold the power button for 5-10 seconds to forcefully power off the computer if the normal ‘Shut Down’ option doesn’t work.

Step 2: Once the computer is fully shut down, leave it off for at least 1 full minute. This clears residual power and drains all transient charges.
Step 3: Disconnect any peripherals you may have plugged in like USB drives or printers as a faulty device could cause boot issues.
Step 4: Press the power button again to turn the computer back on. As it boots, enter the BIOS setup screen and verify that the hard drive with the OS is set as the first boot device priority.
Step 5: Save changes and exit BIOS to continue booting. See if Windows starts normally now and boots past the preparing automatic repair loop.
The reboot resets everything and provides a clean slate for the operating system to start. If the issue was caused by temporary processes, memory states, or one-off events, this should resolve it. Try repeating the reboot 2-3 times if once doesn’t work.
Method 2. Boot your computer in Safe Mode
Safe Mode starts Windows with only the basic stuff running, so it can find and fix problems caused by other programs or drivers.
To access the Safe Mode options from the Advanced Startup screen showing Preparing Automatic Repair:
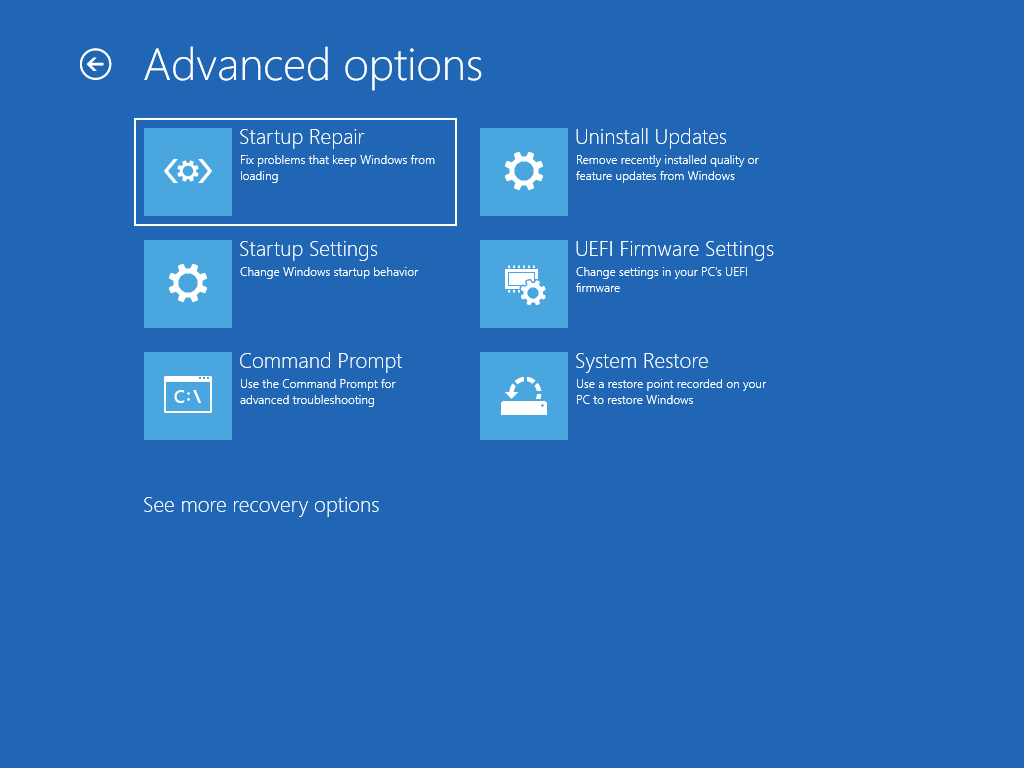
Step 1: Click the ‘Advanced options’ link at the bottom. On the resulting “Choose an option” screen, select ‘Troubleshoot’.

Step 2: Go to ‘Advanced options’ and click on ‘Startup Settings’.
Step 3: Click the ‘Restart’ button.
Step 4: After your PC restarts, it will display a list of startup settings showing different Safe Mode options.
Step 5: Press F4 to start in standard Safe Mode. Or F5 for Safe Mode with Networking if you need internet access. Log in with your account credentials once prompted.
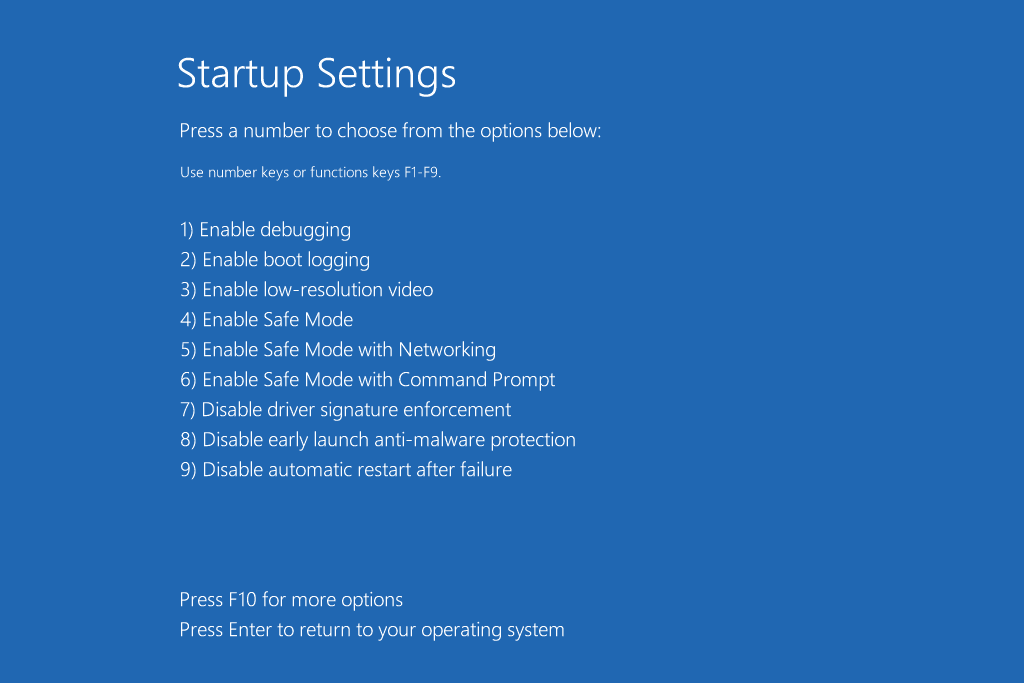
The minimalist nature of Safe Mode circumvents software issues and isolates the problem. If Safe Mode loads correctly, it indicates 3rd party apps or drivers are likely causing the error.
You can also run system repair tools like SFC and DISM scans in Safe Mode to check for corruption issues. Overall, Safe Mode isolates the issue and may directly resolve it.
Method 3. Rebuild BCD with the Command Prompt
The BCD (Boot Configuration Data) store contains important parameters for booting Windows. Rebuilding it can reset corrupt settings that may be causing the preparing automatic repair 10/11 loop.
Here are the steps to rebuild BCD via the Command Prompt:
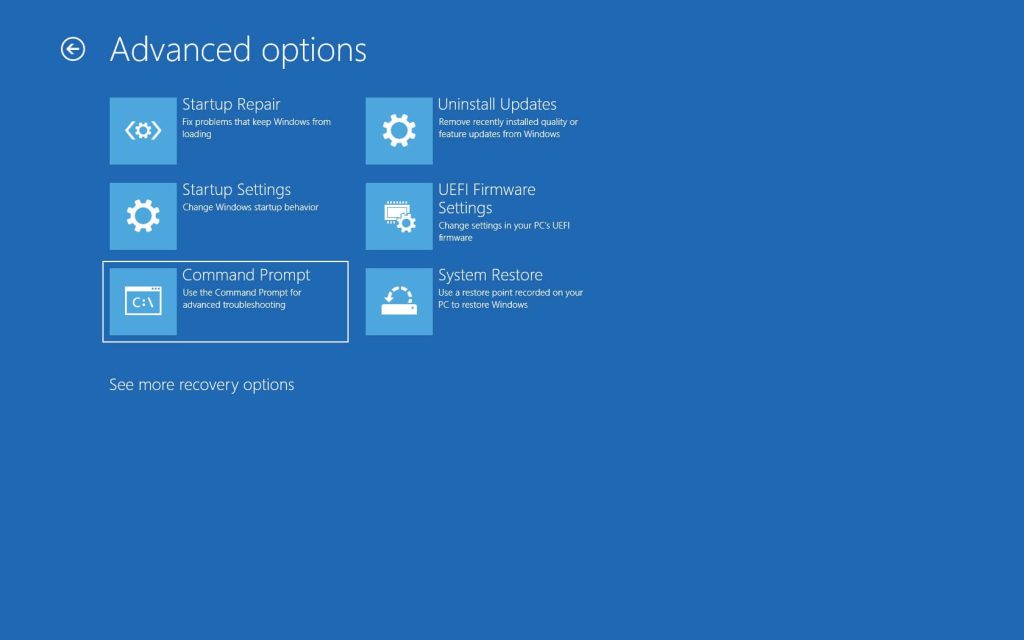
Step 1: On the Choose an option screen, select ‘Troubleshoot’.
Step 2: Go to ‘Advanced options’ and select ‘Command Prompt’.
Step 3: In the Command Prompt, type the following commands to backup the current BCD configuration:
bootrec /fixmbr
bootrec /fixboot
bootrec /scanos
bootrec /rebuildbcd
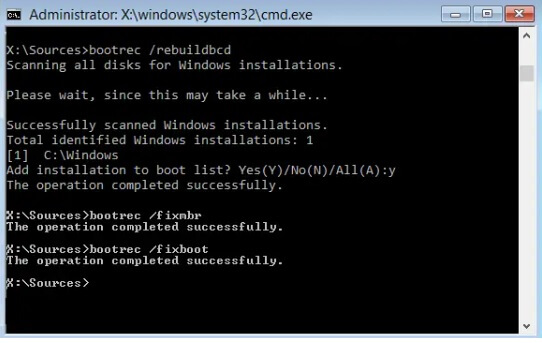
Step 4: Restart your PC when done.
The bcdedit /export command creates a backup of the existing BCD hive. The bcdedit /import command restores BCD from that backup – effectively resetting BCD to default settings.
This will reconstruct BCD if any corruption errors are present. Many boot parameters stored in BCD can trigger automatic repair issues when damaged.
Method 4. Disable Automatic Repair at boot
Disabling the automatic repair feature itself can prevent the preparing automatic repair loop from happening on boot. This stops Windows from trying to diagnose and fix startup issues.
To disable automatic repair:
Step 1: From the Advanced options screen, select ‘Command Prompt’.
Step 2: Type the command:
bcdedit /set {default} recoveryenabled No
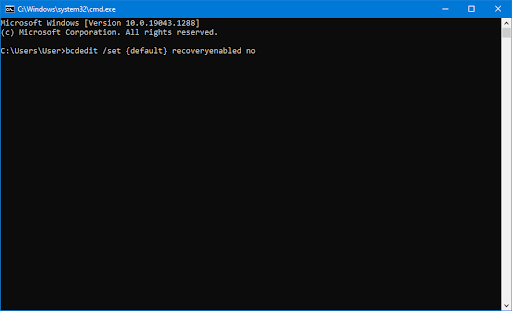
This will disable automatic repair on the default operating system entry.
Step 3: Close the Command Prompt and restart your PC.
Now Windows will boot directly to the OS instead of launching automatic repair when startup issues occur. You can re-enable automatic repair later by setting ‘recoveryenabled’ to Yes if needed.
Disabling auto repair just bypasses it rather than fixing the underlying problem. But at least it lets you boot into Windows.
Method 5. Run the Fixboot and Chkdsk commands
Damaged boot files or file system errors can trigger the preparing automatic repair loop. Fixboot finds and replaces corrupted boot files while chkdsk scans and fixes file system problems.
To use them:
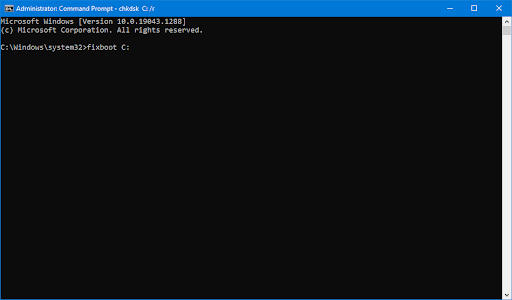
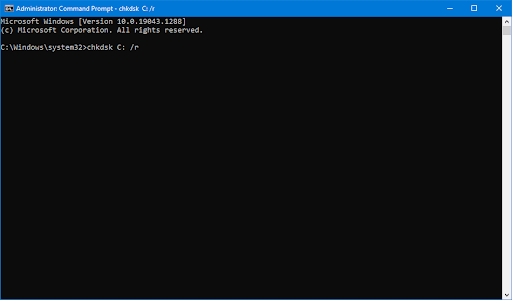
Step 1: Access the Command Prompt through the Advanced options.
Step 2: Type ‘fixboot’ and press Enter. This will scan boot files and restore any missing or corrupted ones.
Step 3: Next run ‘chkdsk /r’ to scan the drive for bad sectors, file system errors, and attempt repairs.
Restart your PC when done.
Fixboot targets boot file issues specifically while chkdsk takes a wider approach looking for any file system problems. Using them together covers both causes of corruption comprehensively.
Method 6. Repair corrupted system files
Underlying Windows system file corruption is a common reason behind the preparing automatic repair 10/11 loop. SFC and DISM can scan for and repair corrupted system files.
Step 1: Boot to Command Prompt or Safe Mode Command Prompt.
Step 2: Run the SFC command:
sfc /scannow
This scans all protected system files and replaces any corrupt ones it finds.
Step 3: Follow up with DISM scan:
DISM /Online /Cleanup-Image /RestoreHealth
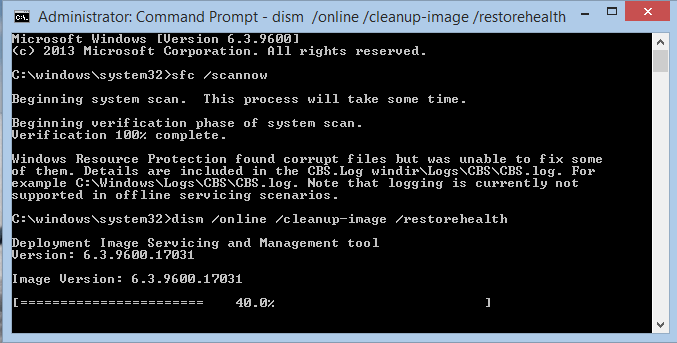
DISM scans and fixes issues in the Windows image files.
Step 4: Restart your PC after running both utilities.
SFC fixes system file errors while DISM repairs image file corruption. Using them together completely scans both areas for any issues and attempts to restore damaged files.
Method 7. Uninstall faulty Windows Updates
Recent buggy Windows Updates can break things and cause the preparing automatic repair loop. You may be able to boot normally again after uninstalling problematic updates.
Here are the steps to uninstall them:
Step 1: Boot into Safe Mode with Networking from the Advanced Startup options. This allows access to Windows Settings.
Step 2: Go to Settings > Windows Update > Update history.
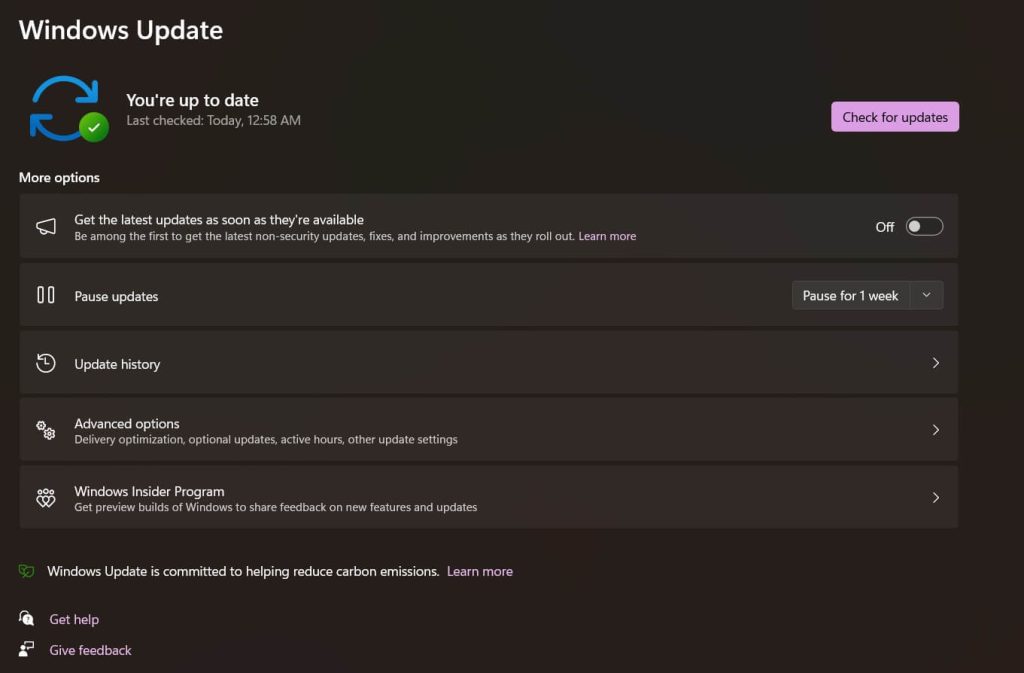
Step 3: Click ‘Uninstall updates’ at the bottom.
Step 4: The update history will now show a new ‘Uninstall’ button next to each update. Check online to identify any known bad updates, usually marked as KB5001330, etc.
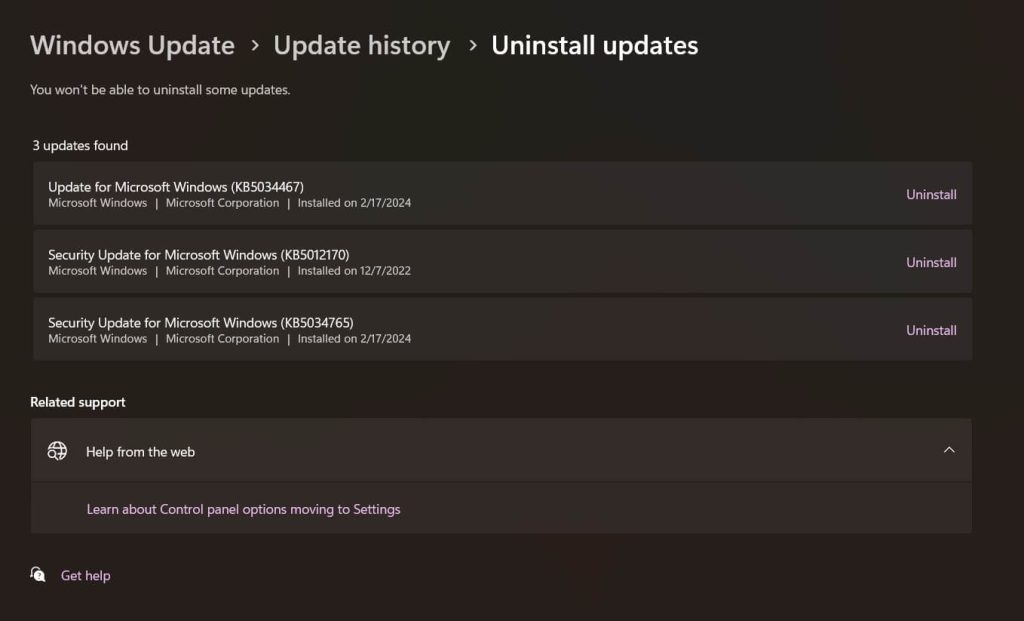
Step 5: Click Uninstall on the problematic updates one by one.
Step 6: Restart your PC when done uninstalling the bad updates.
After uninstalling the problematic updates, try booting normally again to see if the issue is resolved. You can also hide the bad updates to prevent them from accidentally being reinstalled later on.
Method 8. Restore the Windows Registry
Registry corruption related to boot settings can manifest as the preparing automatic repair loop. Restoring the registry may clear these errors.
Here are the steps to follow:
Step 1: Boot to the Choose an option screen via the Advanced Startup options. Select ‘Troubleshoot’.
Go to ‘Advanced options’ > ‘Startup Repair’.
Step 2: On the Startup Repair screen, click ‘Advanced options’. Click the ‘System Restore’ option.
Step 3: Select one of the default system restore points, or choose ‘Choose a different restore point’.
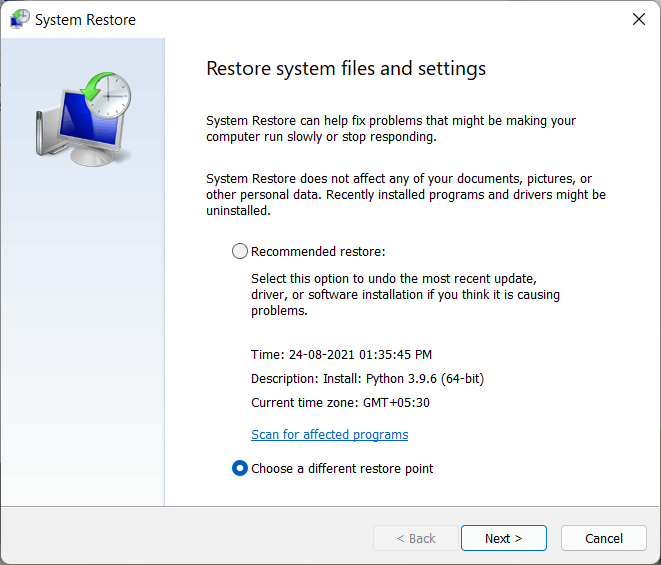
Step 4: Click ‘Next’ to confirm and restore the registry from that point. Restart your PC when done.
Using System Restore allows restoring the registry to an earlier stable point without needing a Command Prompt. The process is fully automated once you select the restore point.
This can fix any registry errors that may have developed recently and caused issues with startup and the preparing automatic repair loop. Reverting to an earlier registry snapshot should resolve them.
Method 9. Reset or Refresh Windows 11/10
If none of the above work, perform a full Windows reset or refresh to completely reinstall Windows. This guarantees to fix even the most stubborn preparing automatic repair 10/11 loop issues.
Windows Reset erases everything and reinstalls Windows from scratch. Refresh keeps your files and apps but reinstalls system files.
Step 1: Boot to Safe Mode with Networking via Advanced Startup.
Step 2: Go to Settings > System > Recovery.
Step 3: Under ‘Recovery options’, click Get started.
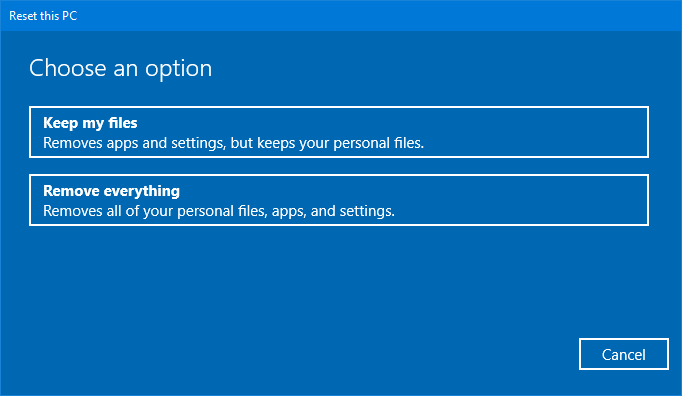
Step 4: Choose ‘Keep my files’ to refresh Windows. This keeps your personal files but reinstalls system files. Follow the prompts to complete the refresh process.
Resetting reinstalls Windows cleanly while refreshing replaces just the system files, retaining your data. Either option should resolve the issue by fully restoring Windows system files and settings.
Conclusion
In summary, the preparing automatic repair loop usually indicates an underlying software problem rather than hardware failure. Following the step-by-step troubleshooting guide outlined here should help identify and fix the issue so your PC boots normally again.
Begin with simpler options like hard reboots and Safe Mode before moving to advanced tools like SFC, DISM, and BCD rebuilding. Reset Windows as a last resort if all else fails.
For prevention, perform regular disk checkups with chkdsk and sfc scans to catch any creeping file corruption issues early. Overall though, the error can be successfully fixed with the right repair tools and troubleshooting methodology.
Author Bio:
Dinesh Lakhwani 

Dinesh Lakhwani, the entrepreneurial brain behind “TechCommuters,” achieved big things in the tech world. He started the company to make smart and user-friendly tech solutions. Thanks to his sharp thinking, focus on quality and the motto of never giving up, TechCommuters became a top player in the industry. His commitment to excellence has propelled the company to a leading position in the industry.
Popular Post
Recent Post

Duplicate File Finder Pro: A Complete Review, Everything You Should Know
Computers collect thousands of files over time. Well, yes! Many of them end up being duplicates created by backups, downloads, or accidental copies. These extra files take up valuable storage space and make it harder to keep everything organized. Finding and removing them manually can take hours. Right? Duplicate File Finder Pro is a tool […]

Monitor Screen Calibration Guide: Everything You Should Know
Your monitor shows colors every single day. But are those colors actually correct? Most people never stop to check this. They just use the screen as it comes out of the box. This habit can lead to wrong colors in photos, videos, and work files. Colors may look too warm or too cold without you […]

How To Check Installed RAM and RAM Slots [Complete Guide]
RAM plays an important role in how smoothly a computer runs. Short for Random Access Memory, it stores the data and instructions that Windows and active applications need at any given moment. From opening multiple browser tabs to running games and productivity software, RAM helps keep everything responsive. A system with limited memory may experience […]

What is Microsoft Autopilot Everything You Need To Know
Technology has changed the way companies manage computers. Well, yes! Employees now work from offices, homes, and remote locations. Setting up devices manually for every worker takes time and effort. It can also create mistakes that slow down productivity. This is where Microsoft Autopilot becomes useful. It helps businesses prepare and deploy Windows devices with […]

Enable Automatic Device Locking Feature Windows: Complete Guide
Introduction: Your computer stores important information such as emails, documents, passwords, and personal photos. Leaving it unlocked can put that data at risk. Thankfully, Windows includes built-in features that can automatically lock your device when you are away. Setting up automatic device locking is quick and does not require any extra software. In this guide, […]

How to Update Wireless Network Driver in Windows 11 and 10
Your Wi-Fi keeps dropping. Pages load slowly. The connection feels unstable? Well, you are not alone. Most of the time, the problem is not with your internet plan. It is with your wireless network driver. A driver is a small piece of software that helps your computer talk to its hardware. When it gets outdated, […]

Common Windows 11 Problems and Solutions (2026 Version)
Windows 11 has become more polished over the years, but it is still not completely free from problems. Even after regular updates from Microsoft, many users continue to face issues like lagging performance, failed updates, audio troubles, random crashes, and network errors. Some problems appear after installing new features, while others develop gradually as the […]

Fortect Driver Updater Review: Features, Steps, Pros, and Cons.
A new PC usually feels quick and responsive. Applications open instantly, games run smoothly, and everything works as expected. As time passes, however, you may notice slower performance, system crashes, hardware glitches, or devices that stop working properly. While many people assume malware or low storage space is to blame, outdated drivers are often the […]

New Features Coming in Windows 11 This Year [2026]
Microsoft is always working to make Windows better. This year is no exception. The company has announced and rolled out several exciting updates for its users. These updates touch almost every part of the operating system. From the Start menu to system settings, changes are arriving fast. If you use Windows daily, you will want […]

