


A slow computer makes it hard to focus. Programs take too long to open. Free space keeps shrinking until the disk is almost full. This happens to most PC owners at some point. Even new machines can slow down after a while. That is the exact problem cleanup tools are built to solve. They comb […]
How To Fix Exit Code 1 Minecraft Error: (9 Solutions)
Dealing with technical issues while diving into the blocky world of Minecraft can be frustrating, especially when encountering the notorious Exit Code 1 Minecraft error. This elusive problem often leaves players scratching their heads, wondering how to resolve it, and getting back to building, exploring, and crafting in their favorite virtual realm. Fear not!
In this guide, we’ll unravel the mysteries behind the Exit Code 1 error and provide comprehensive steps to fix it, ensuring a smooth and uninterrupted Minecraft experience.
What is Exit Code 1 Minecraft Error?
The Exit Code 1 error in Minecraft is a common hurdle that players encounter, halting their gameplay and causing the game to crash abruptly. This error often occurs due to various reasons, including incompatible mods or modifications, corrupted game files, insufficient system resources, or conflicts between different software components.
It manifests as a message indicating that the game has terminated unexpectedly with Exit Code 1, leaving players puzzled about its precise cause and solution.
Understanding and troubleshooting this error is crucial to resume uninterrupted enjoyment within the Minecraft universe.
What Causes the Exit Code 1 Minecraft Error?
Here are some common causes that trigger the Exit Code 1 error in Minecraft:
- Incompatible Mods or Modifications: Installation of mods that are outdated, incompatible with your Minecraft version, or conflicting with each other can lead to this error.
- Corrupted Game Files: Damage to Minecraft’s game files, either due to abrupt shutdowns, incomplete updates, or file corruption, may cause the game to terminate with Exit Code 1.
- Insufficient System Resources: Running Minecraft on a system with inadequate RAM, CPU, or graphics capabilities can result in the game encountering the Exit Code 1 error.
- Conflicts with Java or Java Runtime Environment (JRE): Incompatibility or issues with the Java installation or version used by Minecraft can cause the game to crash with this error.
- Conflicts with Other Software: Interference from other programs, antivirus software, or system utilities running concurrently with Minecraft might trigger the Exit Code 1 error.
How to Fix Exit Code 1 Minecraft Error on Windows?
The Exit Code 1 error in Minecraft refers to a crash that occurs when trying to launch the game. This usually happens due to incompatible or corrupt game files. Fixing this error may seem difficult, but there are several things you can try to get Minecraft running again. Here are 8 solutions to try:
Solution 1: Update Graphics Drivers
Updating your graphics drivers is important because newer versions contain bug fixes and performance improvements, and resolve issues with game crashes related to GPU conflicts.
Step 1: Open Device Manager on your computer. On Windows, right-click the Start button and select Device Manager.
Step 2: Expand the Display Adapters section. This will show your graphics card/GPU drivers.
Step 3: Right-click your graphics driver > Select Update driver. This will search for an updated version of the drivers.
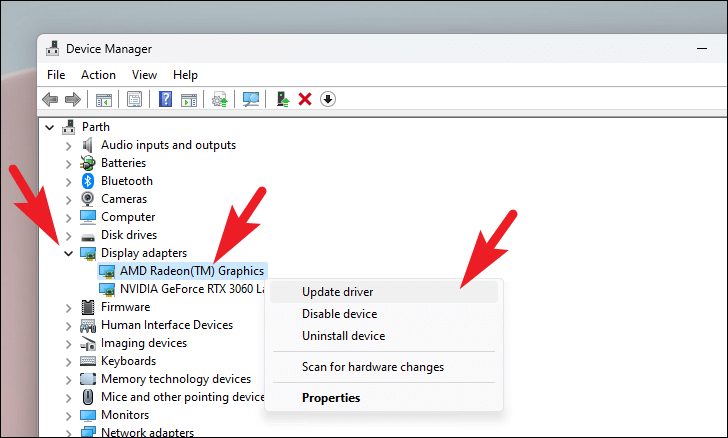
Step 4: Restart your computer after the update. Then try launching Minecraft again. Updated GPU drivers can resolve crashes and compatibility issues.
Also, you can use a tool to update the drivers automatically.
Solution 2: Update/Reinstall Minecraft
Reinstalling Minecraft replaces all game files, fixing any that have become corrupted or are outdated. Updating to the latest version also improves compatibility.
Step 1: Open the Minecraft launcher.
Step 2: Make sure you are logged into your Mojang/Microsoft account that owns Minecraft.
Step 3: On the bottom left, click the arrow next to the Play button. Select Installations.
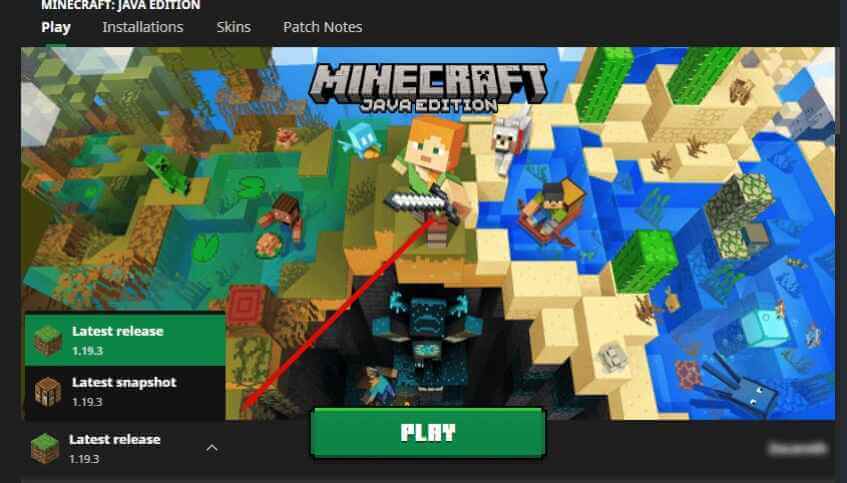
Step 4: For your current Minecraft version, click the 3 dots and choose Update. This will update Minecraft to the latest files.
Step 5: If updating does not work, choose Delete instead to completely remove that version. Then go to the Installations tab and install that Minecraft version again. Reinstalling will replace all files.
Solution 3: Verify Game Files
Verifying game files checks for corrupted data and re-downloads any files that are damaged or missing. This resolves crashes related to broken game assets.
Step 1: From the Minecraft launcher, make sure the correct Minecraft version is selected.
Step 2: Click the arrow next to Play and choose Launch Options.
Step 3: Check the box that says “Enable experimental development versions…”. Click Save.
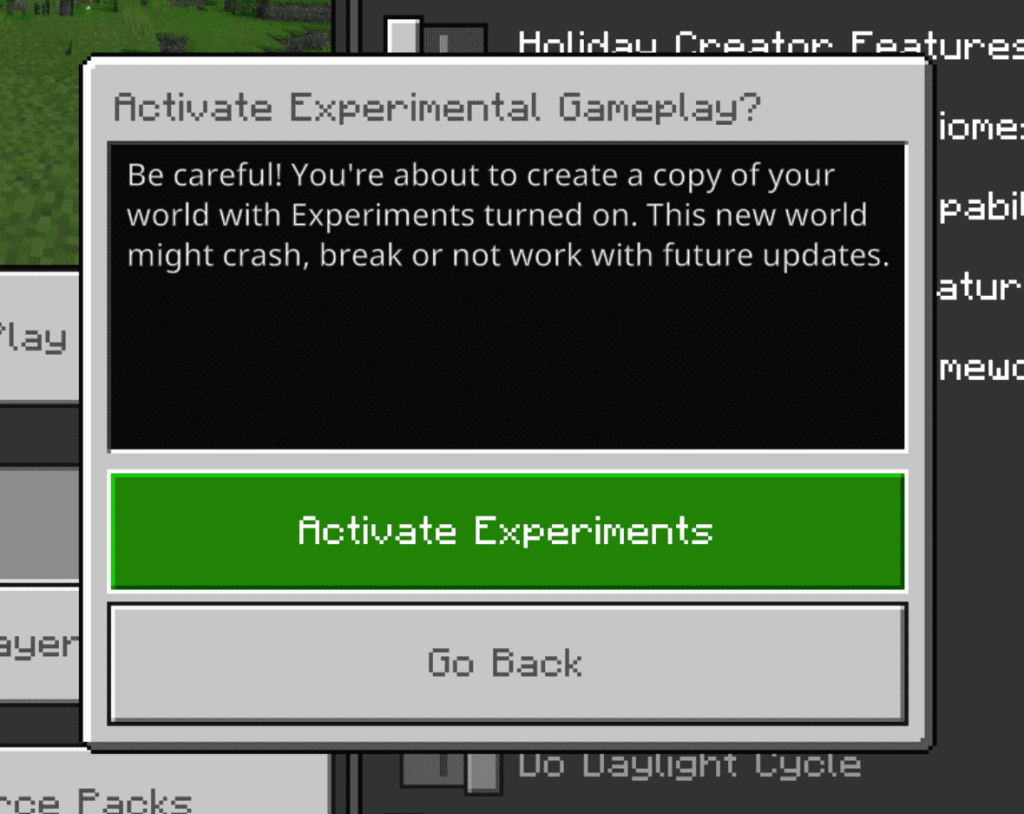
Step 4: Click the arrow next to Play again. Go back into Launch Options.
Step 5: Near the bottom, click the Verify button to check all game files for corruption. This scan may take several minutes.
Step 6: If any corrupted/missing files are found, the launcher will re-download them to fix issues. Try launching Minecraft again after it completes.
Solution 4: Update Java (If Applicable)
Having an outdated Java runtime environment can lead to Minecraft crashes on launch. Keeping Java updated improves stability.
Step 1: Open the command prompt/terminal on your computer. You can search for cmd or terminal.
Step 2: Type “java -version” without quotes and press Enter. This will check what Java version is installed.
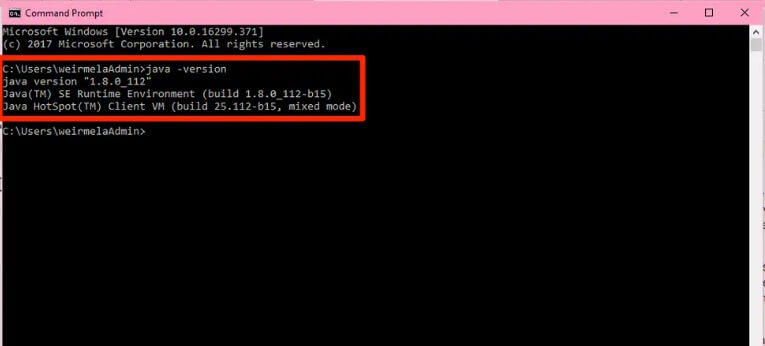
Step 3: Go to the Oracle Java website. You can search for “Oracle Java Download”. Under Java SE, grab the latest Java Runtime Environment (JRE) or Java Development Kit (JDK) for your system.
Step 4: Run the Java installer you downloaded. Make sure the newest version is installed, such as Java 17 or 18.
Step 5: Restart your computer after it finishes. Having an outdated Java runtime can prevent Minecraft from launching properly.
Solution 5: Reallocate More RAM to Minecraft
Here comes another solution to fix the exit code 1 Minecraft error. If Minecraft does not have enough memory allocated, it may crash with Exit Code 1. Increasing RAM resolves out-of-memory errors.
Step 1: From the Minecraft launcher, click Installations up top. Pick your Minecraft version.
Step 2: Click More Options on the bottom right. Then choose Advanced Settings.
Step 3: Under JVM Arguments, replace the -Xmx2G text after -Xmx with a higher amount. Try -Xmx4G or -Xmx6G based on your system memory.
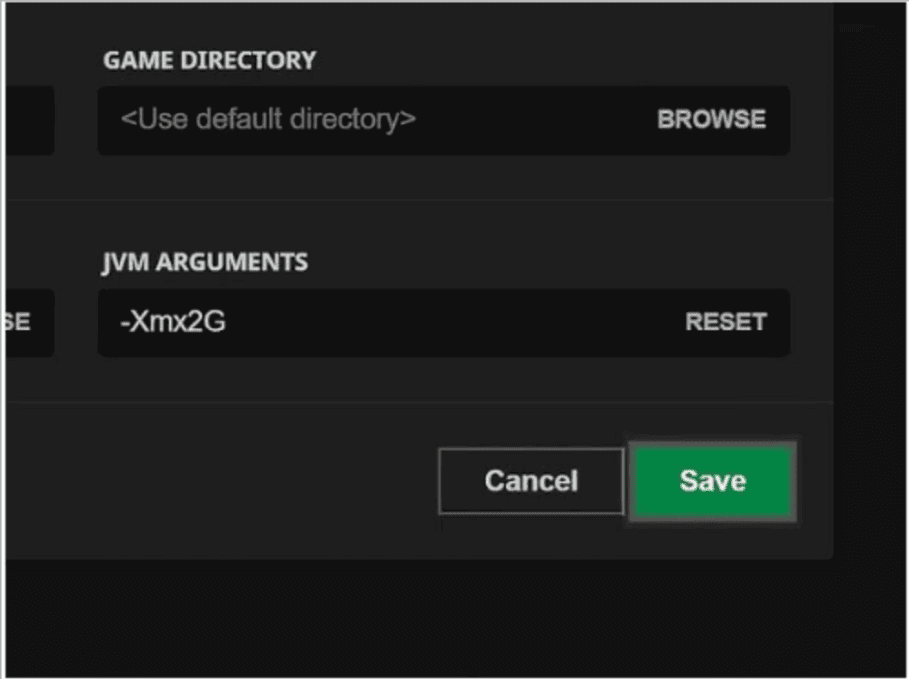
Step 4: Click Done to save and close Advanced Settings. Allocating more RAM resolves crashes from insufficient memory. Start Minecraft to see if it works now.
Solution 6: Re-install Graphics Card Drivers
A clean re-installation of graphics drivers can fix corrupted GPU files causing game conflicts and crashes.
Step 1: Open Device Manager like in Solution 1. Expand Display adapters to see graphics drivers.
Step 2: Right-click your graphics driver and select Uninstall device. Check the box to delete driver software too.
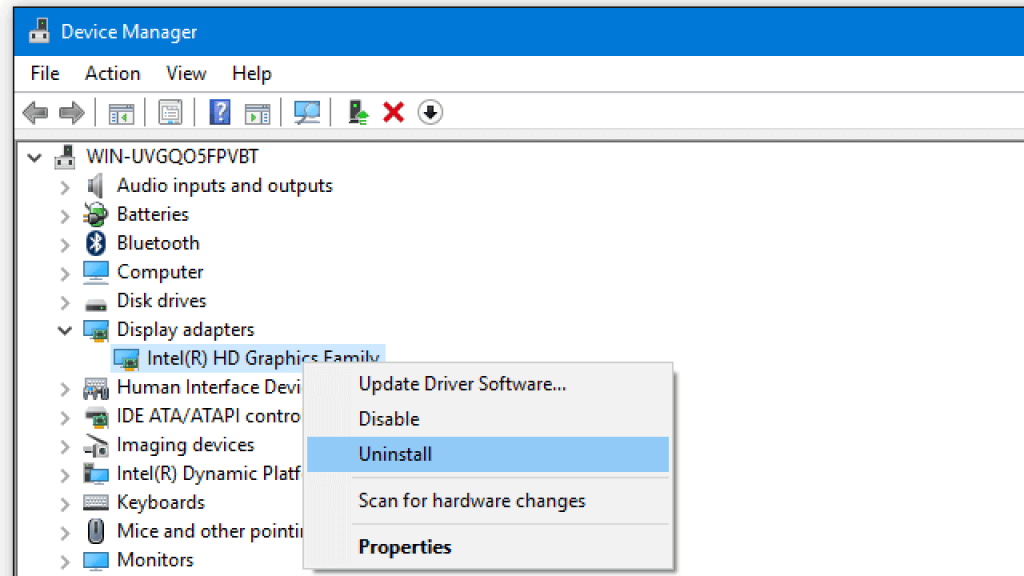
Step 3: After they are uninstalled, restart your computer. Windows will auto-reinstall missing drivers.
Step 4: Manually check for graphics driver updates after rebooting. Reinstalling often fixes corruption issues.
Solution 7: Disable Incompatible Applications
Background apps may have conflicts with Minecraft causing crashes. Temporarily closing them helps isolate the issue.
Step 1: Use Windows Search or Task Manager to find programs running in the background on your system.
Step 2: Temporarily close any unnecessary applications to prevent conflicts. Especially disable antivirus, FPS overlays (Nvidia GeForce Experience), RGB lighting utilities, or VOIP clients (Discord).
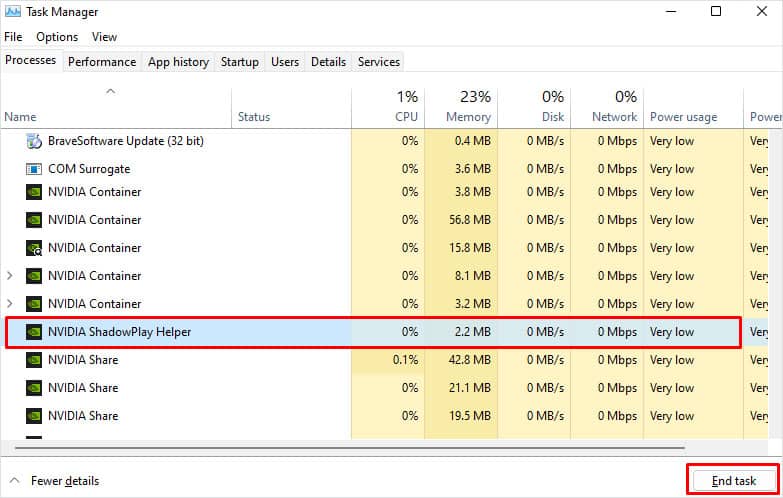
Step 3: Launch Minecraft to see if exiting those programs has resolved the Exit Code 1 crash. You can re-enable closed apps after verifying a fix.
Solution 8: Repair/Reset Windows System Files
File corruption in Windows itself could be leading to crashes across programs including Minecraft. Repairing system files rectifies OS issues.
Step 1: Open the command prompt as administrator. Right-click and choose Run as administrator. Say Yes to the prompt.
Step 2: Run the SFC command by typing “sfc /scannow”. This will scan Windows files for errors and repair broken ones.
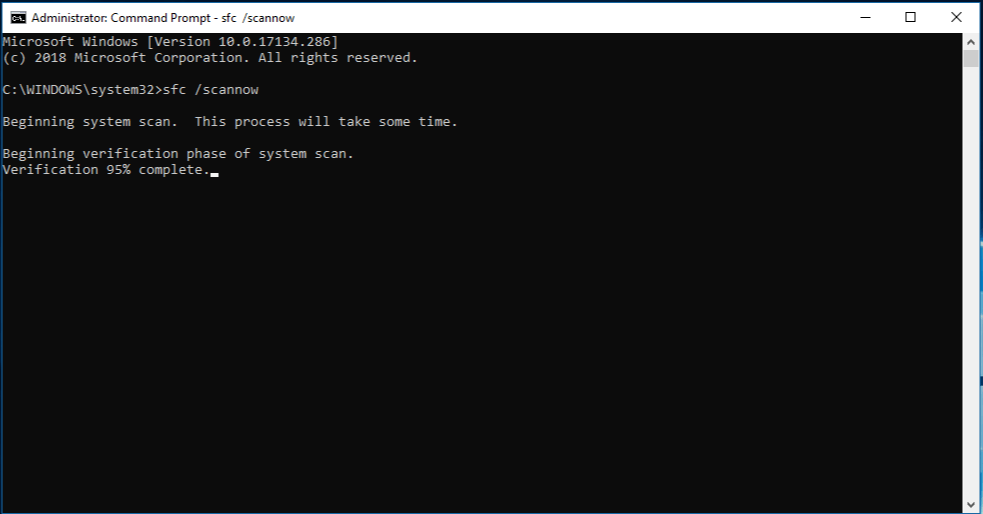
Step 3: Optionally, run “DISM /Online /Cleanup-Image /RestoreHealth” after sfc finishes. DISM checks the Windows image health too.
Step 4: Restart the computer when done. Repairing system files helps resolve Minecraft crashes and other odd OS behavior.
Following these troubleshooting steps should help get Minecraft running again if you see a mysterious Exit Code 1. Be sure to also keep your graphics card drivers as well as Windows itself updated to prevent future issues.
For any game crashes, check for app conflicts and run repairs on files. If Minecraft still doesn’t launch after trying these solutions, you may need to contact Mojang support for further help fixing the problem.
Solution 9: Delete or Update Outdated Mods
The “exit code: 1” error often arises from outdated mods. To fix this issue, checking the Minecraft mods folder and deleting it can help. However, it’s crucial to note that removing mods can potentially disrupt your worlds. Therefore, it’s highly recommended to create a backup before attempting any mod removal. Here’s a step-by-step guide:
Step 1: Press Win + R and enter the following in the Run dialog: %appdata%\
Step 2: Click OK to open File Explorer in the AppData\Roaming folder.
Step 3: Navigate to the .minecraft folder.
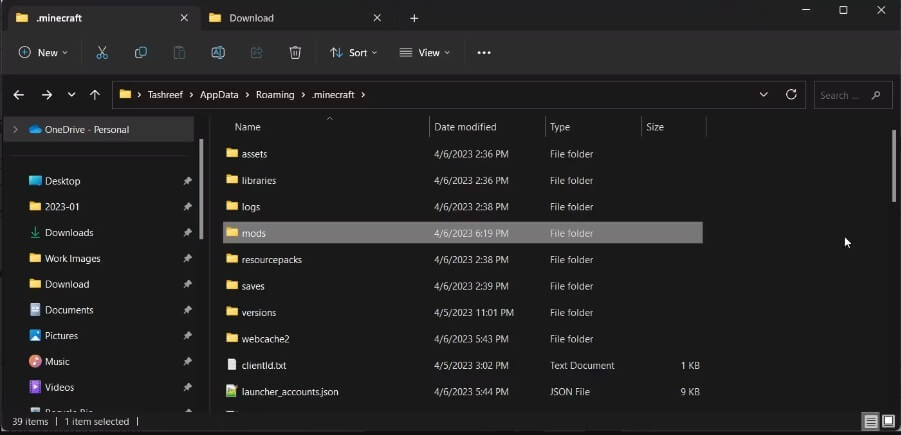
Step 4: Inside the .minecraft folder, locate and access the mods folder. Right-click on each mod individually and select Delete.
Step 5: After removing all the mods, close File Explorer and restart Minecraft to check if the error persists.
Be aware that removing mods may cause issues with existing Minecraft levels (worlds) upon relaunch. You might also need to re-download mods to implement further modifications or additions. Always proceed with caution and keep backups to safeguard your Minecraft data.
Tips to Avoid Exit Code 1 Minecraft Error
Here are some tips to help you avoid encountering the Exit Code 1 error in Minecraft:
- Regularly Update Mods: Ensure all installed mods are compatible with your Minecraft version. Regularly check for updates or compatibility patches to prevent conflicts that may trigger the error.
- Backup Game Files: Create backups of your Minecraft worlds and game files periodically. This precaution can help restore your game in case of corruption or unexpected errors.
- Monitor System Resources: Keep an eye on your system’s resources while playing Minecraft. Ensure you have enough RAM, CPU, and GPU capabilities to run the game smoothly, reducing the chances of encountering resource-related errors.
- Careful Mod Installation: When adding mods or modifications, install them one at a time and test the game after each addition. This approach helps identify which mod might be causing conflicts if the Exit Code 1 error occurs.
- Regularly Update Java: Keep your Java installation up to date. Minecraft heavily relies on Java, so ensuring you have the latest version can prevent compatibility issues that might lead to the Exit Code 1 error.
- Close Unnecessary Programs: Before launching Minecraft, close unnecessary background programs, especially resource-intensive applications or antivirus software that might conflict with the game’s operation.
- Check for Software Conflicts: Be mindful of software conflicts. If the error persists, consider temporarily disabling or uninstalling recently installed software that might interfere with Minecraft’s operation.
By following these preventive measures, players can significantly reduce the likelihood of encountering the frustrating Exit Code 1 error, ensuring a smoother and more enjoyable Minecraft gaming experience.
Conclusion
In conclusion, encountering the Exit Code 1 Minecraft error can be frustrating, but understanding its potential causes is the first step towards finding a solution. Whether it’s due to incompatible mods, corrupted game files, system resource limitations, Java conflicts, or software interference, troubleshooting this issue requires a systematic approach.
By following specific steps such as checking mods, verifying game files, ensuring system compatibility, updating Java, and managing conflicting software, players can often resolve the Exit Code 1 error and return to enjoying their blocky adventures in the expansive world of Minecraft hassle-free.
Author Bio:
Dinesh Lakhwani 

Dinesh Lakhwani, the entrepreneurial brain behind “TechCommuters,” achieved big things in the tech world. He started the company to make smart and user-friendly tech solutions. Thanks to his sharp thinking, focus on quality and the motto of never giving up, TechCommuters became a top player in the industry. His commitment to excellence has propelled the company to a leading position in the industry.
Popular Post
Recent Post

Fortect Software Review: The Ultimate PC & Mobile Cleaning, Optimization & Security Tool
Slow computers are a common problem for almost every Windows user. Well, yes! Over time, your PC picks up junk files. These files sit quietly in the background. They take up space and slow things down. Programs open slower. Windows takes longer to boot. Even simple tasks like opening a folder can feel sluggish. There […]

CCleaner PC Optimizer Review: A Complete Guide for Windows Users
If your computer has started to feel slow, you are not alone. Most Windows PCs slow down over time. Junk files pile up. The registry gets messy. Too many apps open when you start your PC. All this adds up and makes even a good machine feel tired. This is where a PC cleaner tool […]

Auslogics Duplicate File Finder: Full Review and User Guide
A computer quietly gathers clutter over time. This includes duplicate photos, repeated downloads, and forgotten backups hiding in random folders. This buildup slowly eats away at storage and can make even a fast PC feel sluggish. Manually finding and deleting duplicates is tedious. It means checking every folder, comparing file names, and guessing which copies […]

CCleaner Duplicate File Finder: Key Features, Pricing, Step-by-Step Guide and More
Every computer collects junk over time. Right? Well, yes! Photos often get copied twice. Documents get saved in two folders by mistake. Old downloads pile up and never get deleted. This slowly eats up your storage space, and most people do not even notice until their drive is almost full. That is where a duplicate […]

Duplicate File Finder Pro: A Complete Review, Everything You Should Know
Computers collect thousands of files over time. Well, yes! Many of them end up being duplicates created by backups, downloads, or accidental copies. These extra files take up valuable storage space and make it harder to keep everything organized. Finding and removing them manually can take hours. Right? Duplicate File Finder Pro is a tool […]
Top 3 Duplicate File Finder for Windows 11 & Windows 10
If your PC storage keeps filling up even after you delete big files, duplicate files could be the real reason. Most of us save the same photo twice, download a document more than once, or copy a whole folder by mistake. Over months and years, these duplicate files pile up quietly. You do not even […]

Monitor Screen Calibration Guide: Everything You Should Know
Your monitor shows colors every single day. But are those colors actually correct? Most people never stop to check this. They just use the screen as it comes out of the box. This habit can lead to wrong colors in photos, videos, and work files. Colors may look too warm or too cold without you […]

How To Check Installed RAM and RAM Slots [Complete Guide]
RAM plays an important role in how smoothly a computer runs. Short for Random Access Memory, it stores the data and instructions that Windows and active applications need at any given moment. From opening multiple browser tabs to running games and productivity software, RAM helps keep everything responsive. A system with limited memory may experience […]

What is Microsoft Autopilot Everything You Need To Know
Technology has changed the way companies manage computers. Well, yes! Employees now work from offices, homes, and remote locations. Setting up devices manually for every worker takes time and effort. It can also create mistakes that slow down productivity. This is where Microsoft Autopilot becomes useful. It helps businesses prepare and deploy Windows devices with […]

