How to Install Docker on a Mac?
Introduction
In Mac and even Windows computers, the Docker Desktop is a native app from Docker for various purposes, like launching, debugging, building, and testing containerized apps.
A wide range of features are available within this app, made to simplify the setup and monitoring processes of the isolated environments where the projects are available. The software ensures that all available dependencies do not conflict with each other, either.
Overall, users can expect many functional benefits from installing Docker for Mac, and the process of that is simple. Let’s discuss how that occurs.
What is Docker Desktop?
The Docker Desktop is a desktop app for Mac and Windows computers that are useful for debugging, creating, and testing containerized apps. Various features are available within the utility for its functions, like fast edit-test cycles, built-in compatibility for enterprise networks, file change alerts, etc.
While some VPNs like Avast SecureLine VPN work well on their own, you can run other VPNs and proxies with the support of this software too. Under this program, users will find different options like Kubernetes, developer tools, the Docker app, and version synchronization.
What is Containerized Apps?
The Containerized applications are cleanly packaged small bundles of software. These apps include multiple software sections that can work together for specific functions, all of them available within these singular self-contained boxes.
These containerized apps work for different user types, like businesses get many apps within these applications, easily operable with one server. This will exert little stress on different hardware in the system. Alternately, app developers can program specific codework for app development, carry them in the containerized apps and later run them in other systems.
From the end users’ perspectives, these apps are useful for storing many files in one app instead of different sections of the hard drive.
System Requirements on Mac Devices for Docker
It is possible to download and install Docker on Mac on devices running with Apple silicon and Intel-based chipsets equally. However, specific system requirements are important to note:
Mac with Intel chipset
Specifications include:
- macOS version 10.15 or newer versions are compatible, like Catalina, Monterey, and Big Sur.
- At least 4 GB of RAM capacity is required.
If your device running with an Intel chip is of an older macOS version, upgrade the system to a recent macOS version before using Docker.
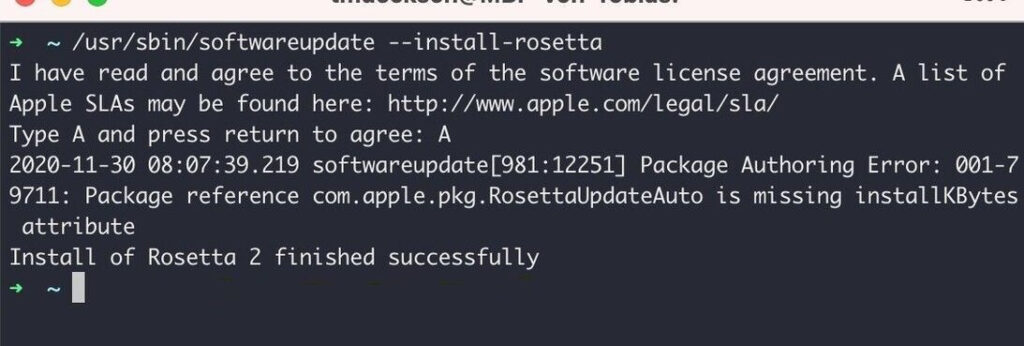
Mac with Apple Silicon chipset
The previous requirement of installing and using Rosetta 2 is not a prerequisite anymore since the launch of Docker Desktop version 4.3.0 and above. However, the software does run some important tools for the optional command line. So, it is better to install Rosetta 2 with the following command:
- softwareupdate –install-rosetta
Ways to Successfully Install Docker on Mac?
In the context of how to install Docker on Mac, there is essentially one simple method to handle the process directly. But, to activate the software or install the new upgrade, users must learn more sequences. Here are the varying processes, discussed in detail.
Method 1: Install Docker Desktop through Mac
The first process of getting and installing Docker for Mac is straightforward and accessible through the Docker official website. Make sure to check for the latest version of the app and then follow the correct steps for downloading.
How to do this?
Step 1: Visit the official website of Docker.
Step 2: Tap the “Install Docker Desktop” option > Install on Mac. Choose the software for your specific chipset and download the latest version of the Docker Desktop app.
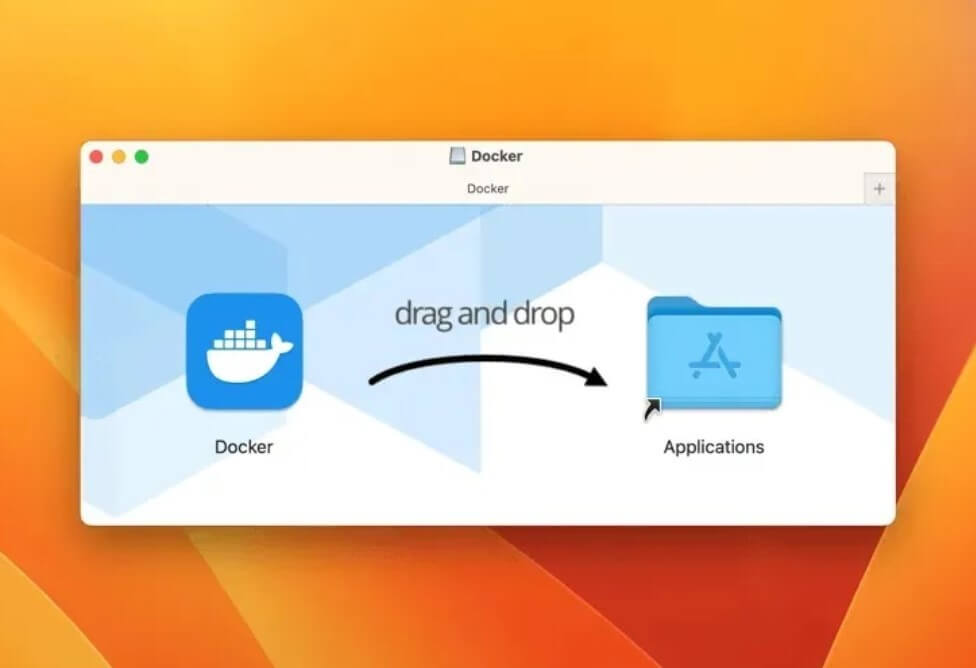
Step 3: Access the section in your Mac where files exist after downloading and double-click on the downloaded file.
Step 4: Drag and drop the “docker.dmg” file into the Applications folder.
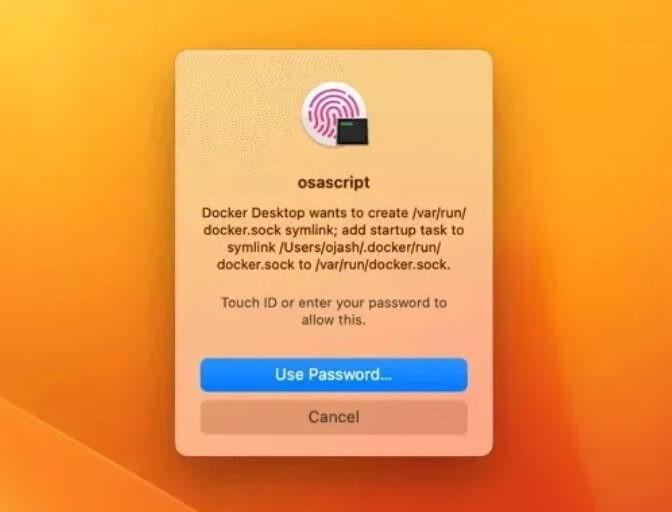
Step 5: Under the Applications folder, open Docker for Mac.
Step 6: When the pop-up prompt comes up, insert the device password to unlock the app.
Step 7: The Docker Desktop app will start automatically configuring the device as needed.
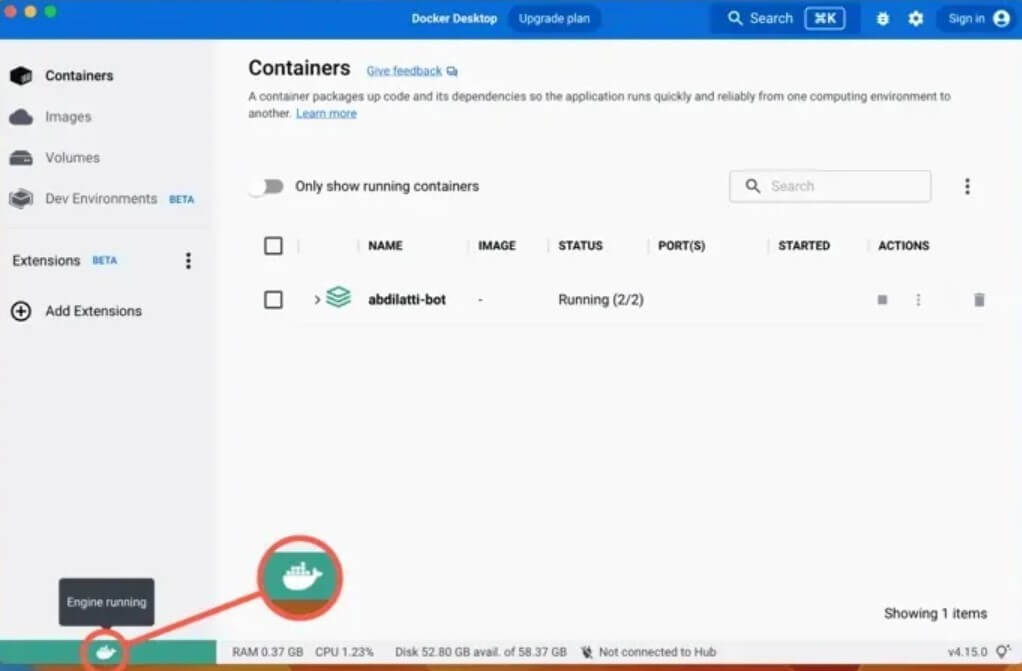
Step 8: Hover the cursor on top of the Docker logo at the bottom-left part of the window. If the “Engine Running” popup appears, it signifies the successful installation process.
Method 2: Verify Docker Desktop on Mac via Terminal
After you install Docker on Mac, it is better to check that the software is running as expected on your device. It is necessary to access the Terminal utility to complete the verification process securely on Mac.
How to do this?
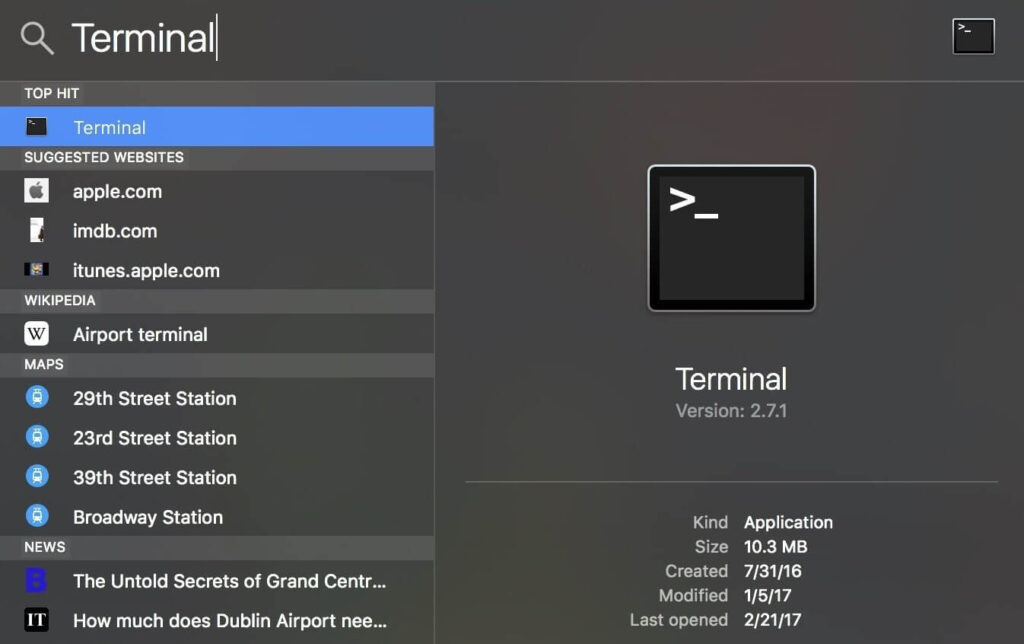
Step 1: On your Mac device, tap the Finder icon and choose Applications > Utilities.
Step 2: Select the Terminal option from the list of apps and access the app.
Step 3: Add the following command and hit the Enter key:
sudo docker –version
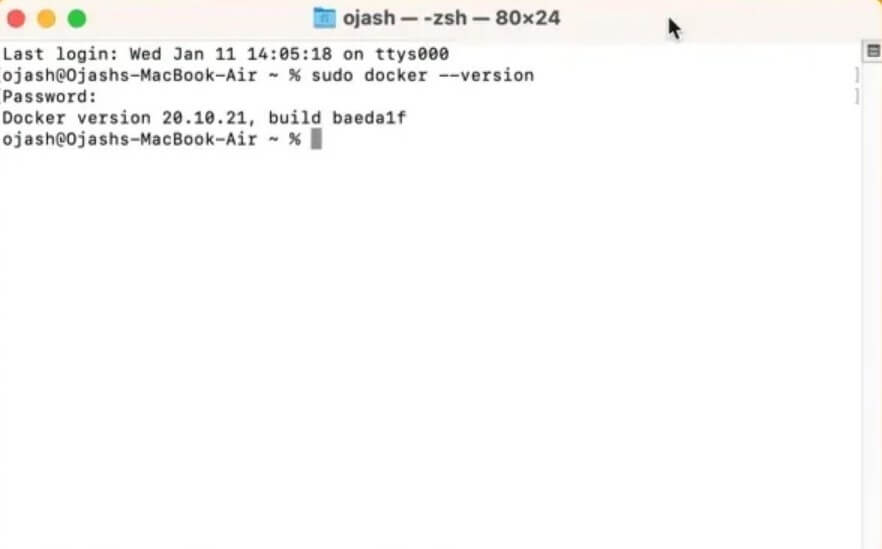
Step 4: Again, add the next command to verify the compose function > Enter:
sudo docker-compose –version
Step 5: Insert the following command for the installation machine version > Enter:
sudo docker-machine –version
Step 6: You can also check the installation status with the following command:
sudo docker run hello-world
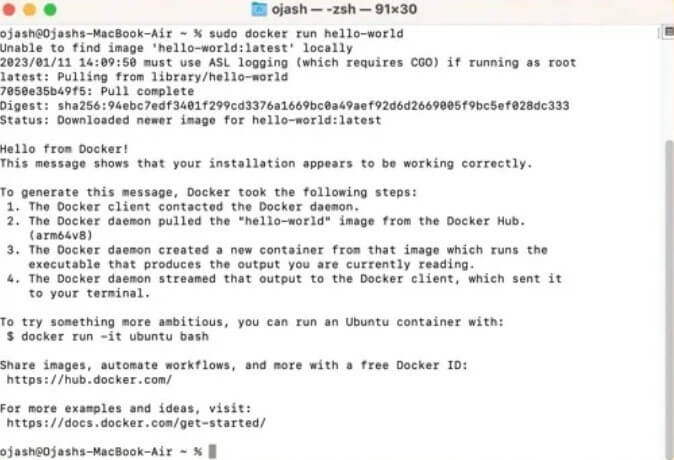
Step 7: If there are no errors, the installation is completed fully.
Method 3: Install via Command Line
It is possible to install Docker on Mac through the command line through the Terminal utility in the Applications folder. This occurs after you complete the Docker.dmg file. This version of accessing the Terminal and using commands to install the software is more complex to handle. So, it is best suited for developers will some technical expertise.
How to do this?
Step 1: Click on Finder > Applications > Utilities > Terminal.
Step 2: Run the next commands one after another and press Enter:
sudo hdiutil attach Docker.dmg
sudo /Volumes/Docker/Docker.app/Contents/MacOS/install
sudo hdiutil detach /Volumes/Docker
Step 3: The macOS system carries out many security checks in the first use of an app. So, the “install” command would not show results instantly.
The “Install” command will accept different flags, like:
–accept-license
–allowed-org=<org name>
–user=<username>
Method 4: How to Install the Docker Desktop Updates on Mac
Docker Desktop does get new updates that users must download and install into their system. When there are newly available updates, the icon for it will appear in the Docker menu. You can access System Preferences > Software Updates to search for any new updates directly.
Adjust the setting to download the software update immediately. Or, tap the Release Notes choice to see the new changes in the updated software available. Users can disable the automatic update checking functionality through Docker Desktop since version 4.3.0.
How to do this?
Step 1: Click on the Docker menu > Download update
to install the latest updates.
Step 2: Click on the Update and Restart option in the next section. The upgrades will start downloading automatically, and the device will reboot after that.
Step 3: Under the Docker Subscription Service Agreement section, read the terms and conditions and tap on Accept.
Conclusion
Indeed, the Docker Desktop is very useful on Mac for building and testing containerized apps for different user types. So, following suitable steps to safely download and install the program is important. The methods mentioned here are detailed and allow for a fast installation process of the software and the new updates later.
Take the time to understand your system specifications and follow the relevant installation commands carefully. In case of complex technical steps, take professional help if needed. Practice all of these methods first.
Author Bio:
Dinesh Lakhwani 

Dinesh Lakhwani, the entrepreneurial brain behind “TechCommuters,” achieved big things in the tech world. He started the company to make smart and user-friendly tech solutions. Thanks to his sharp thinking, focus on quality and the motto of never giving up, TechCommuters became a top player in the industry. His commitment to excellence has propelled the company to a leading position in the industry.
Popular Post


Recent Post

How to Update Wireless Network Driver in Windows 11 and 10
Your Wi-Fi keeps dropping. Pages load slowly. The connection feels unstable? Well, you are not alone. Most of the time, the problem is not with your internet plan. It is with your wireless network driver. A driver is a small piece of software that helps your computer talk to its hardware. When it gets outdated, […]

Common Windows 11 Problems and Solutions (2026 Version)
Windows 11 has become more polished over the years, but it is still not completely free from problems. Even after regular updates from Microsoft, many users continue to face issues like lagging performance, failed updates, audio troubles, random crashes, and network errors. Some problems appear after installing new features, while others develop gradually as the […]

Fortect Driver Updater Review: Features, Steps, Pros, and Cons.
A new PC usually feels quick and responsive. Applications open instantly, games run smoothly, and everything works as expected. As time passes, however, you may notice slower performance, system crashes, hardware glitches, or devices that stop working properly. While many people assume malware or low storage space is to blame, outdated drivers are often the […]

New Features Coming in Windows 11 This Year [2026]
Microsoft is always working to make Windows better. This year is no exception. The company has announced and rolled out several exciting updates for its users. These updates touch almost every part of the operating system. From the Start menu to system settings, changes are arriving fast. If you use Windows daily, you will want […]

Top 14 Duplicate Photo Finder and Remover For Windows [2026]
Introduction: Photos pile up fast. Well, yes! You take ten shots of the same moment. You download the same image twice. You back up your folder and forget you already did it. Before you know it, your storage is packed with copies. A good duplicate photo finder helps you take back that space without losing […]

Advanced System Settings on Windows 11: Complete Guide
Windows 11 is a powerful operating system. It comes with many features that most users never explore. One of the most useful areas is the System Properties panel. This is where you can control how your computer performs, starts up, and handles memory. Many users only change basic settings like wallpaper or display options. But […]

21 Advanced Windows Security Settings: Latest Updates
Introduction: Your computer holds a lot of important data. From personal photos to work files, everything sits on your Windows system. That is why protecting it properly matters more than ever. Windows security settings have come a long way. Microsoft keeps adding stronger layers of protection with every update. Most users never go beyond the […]

Security Upgrades of Microsoft Windows in This Decade [Complete Guide]
Introduction Microsoft has been working hard to make Windows safer every year. Cyberattacks are growing fast. Hackers are smarter now. They target millions of Windows users every single day. That is why Microsoft has added many powerful new security upgrades of Microsoft Windows since 2020. These upgrades protect your data, your identity, and your device […]

How To Link a Microsoft Account to a Digital License on Windows [2026]
Most people never think about Windows activation until it suddenly stops working. Something as simple as replacing hardware or reinstalling Windows can cause the system to lose its activated status. Linking your Microsoft account to your digital license beforehand helps prevent unnecessary trouble and makes activation recovery much easier later on. Many people using Windows […]

Monthly Round Up: All Big Incidents Happened for Windows Users in The Month of April 2026
Windows users had a turbulent April 2026. On April 14, Microsoft rolled out its scheduled Patch Tuesday security updates, a routine release meant to close vulnerabilities and resolve known issues. What followed was anything but routine. Rather than strengthening systems, the updates triggered a cascade of fresh problems across Windows 10, Windows 11, and Windows […]

