


A slow computer makes it hard to focus. Programs take too long to open. Free space keeps shrinking until the disk is almost full. This happens to most PC owners at some point. Even new machines can slow down after a while. That is the exact problem cleanup tools are built to solve. They comb […]
How to Remove Bloatware from Windows 10 Easily
Is your brand new laptop bloated with unwanted programs? Unfortunately, then, you are not the only one who is struggling with bloatware. That’s because Microsoft is no longer stronger on bloatware. However, the good thing is that you can remove bloatware in Windows 10 easily.
Today, a new Microsoft device is swamped with a series of unnecessary partnership applications that you might never use. The features like suggestions appearing on your Start Menu or programs running in the background are all bloatware that capture a huge space on your hard drive and slow down your system.
Luckily, there are many ways to debloat Windows 10 gadgets. And in this post, you will get to know all those easy tricks to remove bloatware from your system.
6 Ways to Remove Bloatware in Windows 10
Compared to previous Windows versions, Windows 10 is partnered with more sponsored programs that can increase bloatware in your laptop. On the top, bloatware doesn’t appear in the System > Apps & Features list. Therefore, it is essential for you to know how to debloat Windows 10 quickly, such as—
1. Remove Ads and Suggestions
Do you want to remove certain brands’ ads or Start Menu suggestions? Then, you can have an option to block suggestions from Windows 10. To do so, go to the Start button, enter “suggestion,” and choose the “Show suggestions occasionally in Start” tab.
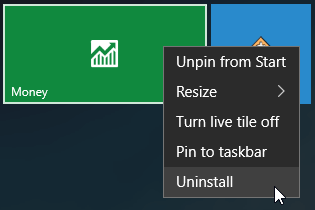
One more thing you can do is clean your Start Menu toolbar. Simply right-click on the program that you no longer need, and then click “Unpin from Start.” This will put a great relief on your system’s bloatware.
Also, if you are using an annoying Windows 8 tile Start Menu, immediately disable it and easily locate the bloated applications.
2. Uninstall Bloated Applications
You can also use the simple uninstall approach to remove bloatware in your Windows 10. To uninstall bloated applications, you can follow these steps—
- Click on the Windows icon in the bottom-left corner.
- Next, navigate to the program that you want to remove and right-click on it.
- Finally, click on the Uninstall button and confirm it.
You can repeat the process until you remove all the unwanted bloated applications.
3. Use PowerShell
Here is the automatic method to debloat your Windows 10—PowerShell. Windows PowerShell is a user interface developed by Microsoft to automate tasks and configure management. There you have two options to remove bloatware using PowerShell, including—
Remove-AppxPackage
In this method, you can debloat your computer without removing applications from your system. Instead, you will simply hide the applications, and it won’t disturb you reappearing in Windows reinstalls.
Before you start PowerShell, make sure that no other programs are running on your computer. Now, follow these steps—
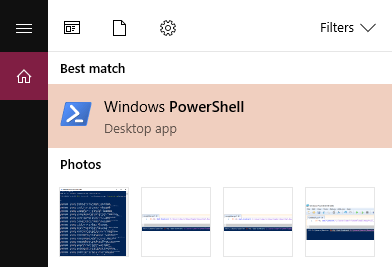
- Enter PowerShell in the search box located at the lower-left corner of the screen.
- Then, click on the “Run as Administrator” option.
- Click on “Yes” to confirm the process.
- Use the below-listed command with the application that you want to hide.
Get-AppxPackage *appName* | Remove-AppxPackage
- Just simply replace the ‘appName’ with the application you want to uninstall and then press Enter.
- Repeat the process until you uninstall all the applications, such as—
Calculator
Get-AppxPackage *windowscalculator* | Remove-AppxPackage
Alarms & Clocks
Get-AppxPackage *windowsalarms* | Remove-AppxPackage
Camera
Get-AppxPackage *windowscamera* | Remove-AppxPackage
Get Office
Get-AppxPackage *officehub* | Remove-AppxPackage
Groove Music
Get-AppxPackage *zunemusic* | Remove-AppxPackage
Voice Recorder
Get-AppxPackage *soundrecorder* | Remove-AppxPackage
Weather
Get-AppxPackage *bingweather* | Remove-AppxPackage
Use DISM
The second way to completely destroy bloatware with PowerShell is using the DISM command. DISM stands for Deployment Imaging Service and Management. You can implement this command as follows—
- Put PowerShell in the search box located at the lower-left corner.
- Click on the “Run as Administrator” button.
- Press “Yes” to confirm the process.
- You can view the entire bloatware list using this command—
DISM /Online /Get-ProvisionedAppxPackages | select-string Packagename
- Navigate for the program that you want to delete from the system.
- Copy the Packagename for the app and the following command—
DISM /Online /Remove-ProvisionedAppxPackage /PackageName:PACKAGENAME
- Replace the Packagename word with the application name that you wanted to delete based on the earlier generated list. For example—
DISM /Online /Remove-ProvisionedAppxPackage /PackageName:Microsoft.Xbox.TCUI_1.24.10001.0_neutral_~_8wekyb3d8bbwe
- Keep on repeating the process until you have fully removed all bloated applications from your PC.
- Restart your computer to see the effect.
4. Use Third-party Bloatware Apps
If PowerShell is too complicated and traditional uninstallation is too simple for you, in that case, you can use third-party software to remove bloated applications. There are plenty of different bloatware removal apps available in the market, such as NoBloat, FreshStart, Windows 10 Debloater app, and many more.
To use different applications, you have to follow the different steps depending on the app. For example, if you are using the Debloater app to remove bloatware apps, you have to follow these steps—
- Navigate to the Windows 10 Debloater site.
- Click on the Clone or Download button.
- Click on the Zip download and then save the file to your computer.
- Now, click on the “Extract all” button to extract all files from the downloaded zip folder.
- Check the “Show extracted files when complete” box to quickly locate the files.
- Right-click on the Windows10DebloaterGUI and choose “Run with PowerShell.”
- Click open, type Y, and press Enter.
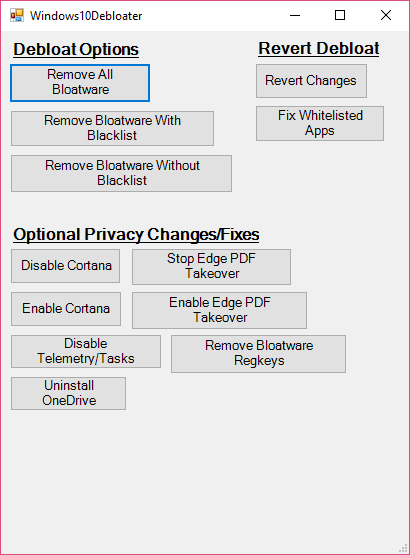
- Windows 10 Debloater will appear on your screen.
- Click on the “Remove All Bloatware” button.
- That’s it will immediately remove all bloated applications from your computer system.
5. Disable Startup Programs
Many apps installed on Windows are set to run automatically when the system starts. These apps often include pre-installed tools and background services that you may never use. Over time, they increase boot time and slow down your overall system performance.
Disabling startup programs does not remove the apps completely, but it prevents them from consuming resources unnecessarily. This is a safe and effective way to reduce system load without risking system stability. It also helps you identify which apps are actually important for daily use.
- Open Task Manager by pressing Ctrl + Shift + Esc and go to the Startup tab.
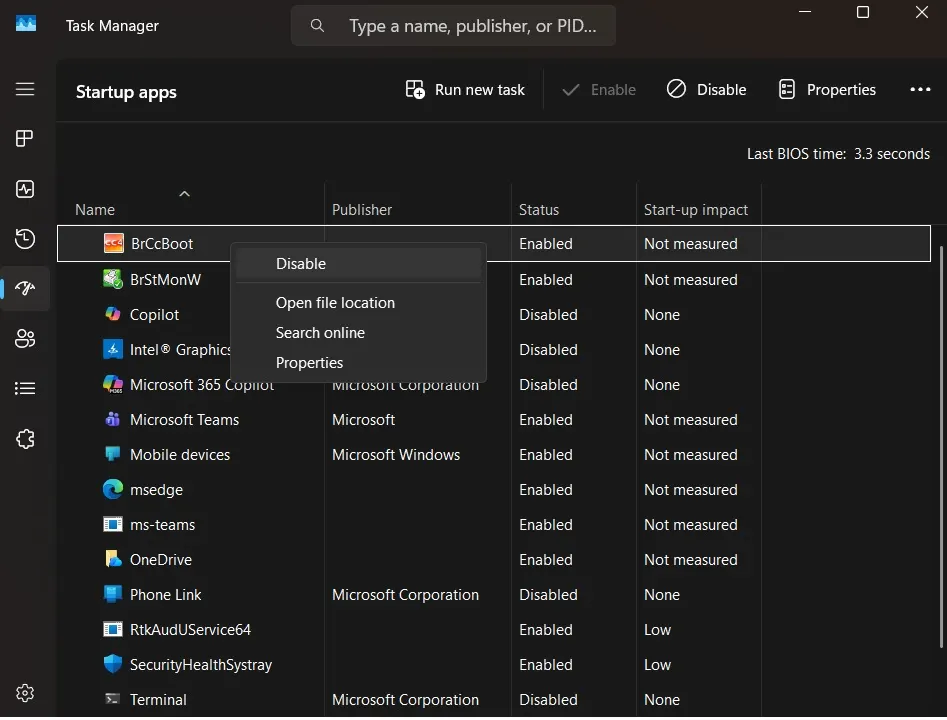
- Select unwanted programs and click Disable to stop them from running at startup.
6. Use the Installed Apps List in Windows 11
Windows 11 makes it very simple to remove unwanted apps through its updated Settings layout. It shows all installed apps in one place with clear options to manage or uninstall them. This method is easy to use and does not require any technical steps.
You can quickly scan the list and remove apps that you no longer need. It is one of the safest ways to clean bloatware because everything is organized and easy to understand. It works well for both pre-installed apps and programs you installed later.
- Open Settings, go to Apps, and click on Installed apps.
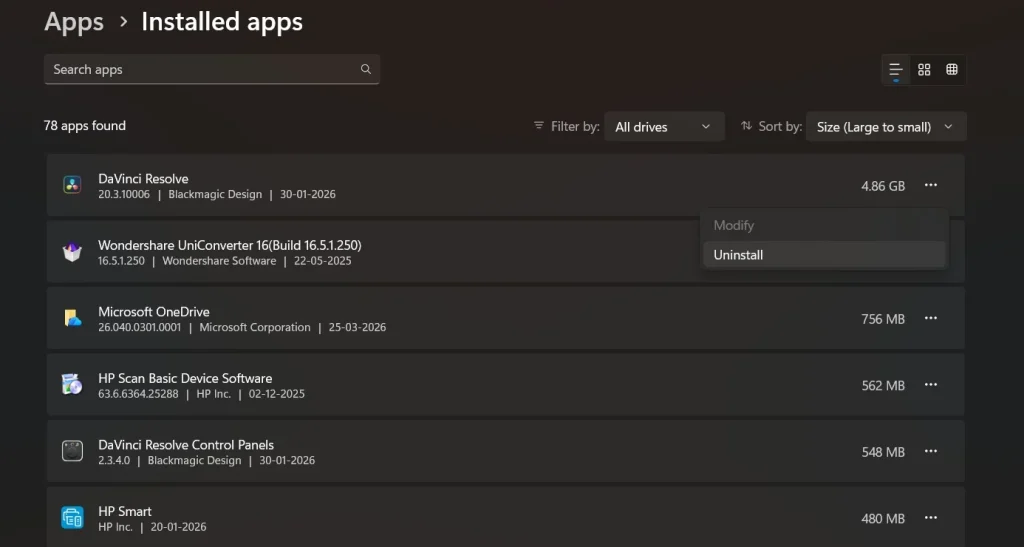
- Click the three dots next to any unwanted app and select Uninstall.
_________________________________________________________________________________
Stay Safe While Cleaning Your System
Removing bloatware can improve your system, but it should be done carefully. Some apps may look unnecessary, but support system functions. A wrong step can affect performance or stability. It is always better to move step by step and understand what you are removing.
Taking a few precautions will help you avoid problems. It also ensures your system remains stable after cleanup. A little preparation can save time and effort later.
- Create a system restore point
This allows you to return to a previous state if something goes wrong during the process. - Research before removing apps
Check what an app does before uninstalling it. Some system apps are important. - Avoid removing system-critical tools
Do not uninstall apps related to drivers, security, or core Windows services. - Back up important data
Save your files to an external drive or cloud storage before making changes. - Use trusted tools only
If using third-party apps, choose reliable and well-reviewed software. - Do not remove everything at once
Remove apps in small steps. This makes it easier to identify issues. - Restart after changes
A restart helps apply changes properly and clears temporary glitches. - Keep your system updated
Updates often fix issues and may remove unnecessary components automatically.
Author’s Tip
Start with the simplest methods first. Use Windows settings and built-in tools before moving to advanced options. This keeps the process safe and easy to manage. It also gives you a clear idea of what changes are happening on your system. Take your time with each step. Go through the list of apps carefully and remove only what you recognize or no longer need. A slow and steady approach helps avoid mistakes.
Also, build a habit of regular system cleanup. Do not wait for your computer to slow down. A quick check every few weeks can prevent clutter from building up. Remove apps you no longer use and review startup programs from time to time. Keep only what is necessary. This simple routine helps maintain better speed, stability, and overall performance for your Windows system.
Conclusion
Removing bloatware is one of the easiest ways to improve your Windows 10 performance. It frees up storage. It reduces background activity. Your system becomes faster and more responsive. Even small changes can bring noticeable results.
Make this a regular habit. Check your installed apps from time to time. Remove what you no longer use. Keep only what adds value. A clean system not only runs better but also gives you a smoother overall experience.
FAQs
1. Is it safe to remove all pre-installed apps from Windows 10?
Not all pre-installed apps should be removed. Some are linked to system functions and may cause issues if deleted. It is safe to remove apps like games, trial software, or promotional tools. Always check the purpose of an app before removing it. If unsure, leave it or disable it instead.
2. Will removing bloatware improve system speed?
Yes, removing bloatware can improve system speed. It reduces background processes and frees up memory. This leads to faster startup times and smoother performance. The improvement may vary depending on how many unnecessary apps were installed.
3. Can I reinstall apps after removing them?
Yes, most apps can be reinstalled if needed. You can download them again from the Microsoft Store or official websites. If you remove something by mistake, a system restore can also bring it back. This is why creating a restore point is important before starting.
Author Bio:
Dinesh Lakhwani 

Dinesh Lakhwani, the entrepreneurial brain behind “TechCommuters,” achieved big things in the tech world. He started the company to make smart and user-friendly tech solutions. Thanks to his sharp thinking, focus on quality and the motto of never giving up, TechCommuters became a top player in the industry. His commitment to excellence has propelled the company to a leading position in the industry.
Popular Post
Recent Post

Fortect Software Review: The Ultimate PC & Mobile Cleaning, Optimization & Security Tool
Slow computers are a common problem for almost every Windows user. Well, yes! Over time, your PC picks up junk files. These files sit quietly in the background. They take up space and slow things down. Programs open slower. Windows takes longer to boot. Even simple tasks like opening a folder can feel sluggish. There […]

CCleaner PC Optimizer Review: A Complete Guide for Windows Users
If your computer has started to feel slow, you are not alone. Most Windows PCs slow down over time. Junk files pile up. The registry gets messy. Too many apps open when you start your PC. All this adds up and makes even a good machine feel tired. This is where a PC cleaner tool […]

Auslogics Duplicate File Finder: Full Review and User Guide
A computer quietly gathers clutter over time. This includes duplicate photos, repeated downloads, and forgotten backups hiding in random folders. This buildup slowly eats away at storage and can make even a fast PC feel sluggish. Manually finding and deleting duplicates is tedious. It means checking every folder, comparing file names, and guessing which copies […]

CCleaner Duplicate File Finder: Key Features, Pricing, Step-by-Step Guide and More
Every computer collects junk over time. Right? Well, yes! Photos often get copied twice. Documents get saved in two folders by mistake. Old downloads pile up and never get deleted. This slowly eats up your storage space, and most people do not even notice until their drive is almost full. That is where a duplicate […]

Duplicate File Finder Pro: A Complete Review, Everything You Should Know
Computers collect thousands of files over time. Well, yes! Many of them end up being duplicates created by backups, downloads, or accidental copies. These extra files take up valuable storage space and make it harder to keep everything organized. Finding and removing them manually can take hours. Right? Duplicate File Finder Pro is a tool […]
Top 3 Duplicate File Finder for Windows 11 & Windows 10
If your PC storage keeps filling up even after you delete big files, duplicate files could be the real reason. Most of us save the same photo twice, download a document more than once, or copy a whole folder by mistake. Over months and years, these duplicate files pile up quietly. You do not even […]

Monitor Screen Calibration Guide: Everything You Should Know
Your monitor shows colors every single day. But are those colors actually correct? Most people never stop to check this. They just use the screen as it comes out of the box. This habit can lead to wrong colors in photos, videos, and work files. Colors may look too warm or too cold without you […]

How To Check Installed RAM and RAM Slots [Complete Guide]
RAM plays an important role in how smoothly a computer runs. Short for Random Access Memory, it stores the data and instructions that Windows and active applications need at any given moment. From opening multiple browser tabs to running games and productivity software, RAM helps keep everything responsive. A system with limited memory may experience […]

What is Microsoft Autopilot Everything You Need To Know
Technology has changed the way companies manage computers. Well, yes! Employees now work from offices, homes, and remote locations. Setting up devices manually for every worker takes time and effort. It can also create mistakes that slow down productivity. This is where Microsoft Autopilot becomes useful. It helps businesses prepare and deploy Windows devices with […]

