


A slow computer makes it hard to focus. Programs take too long to open. Free space keeps shrinking until the disk is almost full. This happens to most PC owners at some point. Even new machines can slow down after a while. That is the exact problem cleanup tools are built to solve. They comb […]
How to Upgrade RAM on a Laptop? [Latest Guide]
Whether running on Windows, Linux, or macOS, most laptop models have a lot of storage and space. However, the laptop gets sluggish in its performance with more programs, services, and apps a user adds. Older laptops especially bog down faster with more tabs open or freeze up.
You can download apps like CCleaner to optimize the system, detect background running apps/services, and remove unnecessary files. Another necessary solution is to upgrade the RAM on a laptop. In this post, that is we cover it in more detail.
Considerations Before Upgrading RAM on a Laptop
Before you can work on how to increase RAM in a laptop, you should check the maximum capacity of RAM in the device you are using. The amount of available RAM in a PC determines how many programs can operate on the system simultaneously. It influences the command response time of the system.
So, to understand the right RAM to upgrade, know the set parameters for the hardware and the OS by the device manufacturer.
Operating System
First, check the operating system of your laptop, like macOS or Windows.
- Mac– For the Mac devices, the 2006-2009 iMac models have 4 GB RAM, 2010-2012 (late) iMac models hold 16 GB RAM, and iMac 2013 (late) models have 32 GB of RAM. You cannot install the RAM if it does suit the PC model.
- Windows– For Windows laptops, check the type of processor first- 32-bit/64-bit. Choose RAM with the capacity indicated by the manufacturer. The limits are 2 TB of RAM on Windows Pro, Education, and Enterprise models with 64-bit processors, 128 GB of RAM on Windows Home models with 64-bit processors, and 3 GB of RAM in Windows laptops with 32-bit processors.
Hardware
Check the RAM space of the operating system in your laptop to know how to increase RAM in the laptop with said OS. If it is not compatible with the hardware, the upgrade cannot work. Checking the following points is important.
- Search about access to product documentation online
- Find motherboard documentation
- Operate a system cleaner software, like CCleaner for Windows or CleanMyMac X for macOS devices.
Advantages of Upgrading Laptop RAM
Upgrading your laptop’s RAM can dramatically improve performance and usability. More memory allows your system to handle tasks more efficiently, especially when multitasking or running demanding applications. Here are the key benefits:
Faster Multitasking
- More RAM lets you run multiple apps at once without slowdowns.
Improved System Performance
- Applications load quicker and respond more smoothly.
Better Gaming Experience
- Games run with fewer lags and can handle higher graphics settings.
Enhanced Productivity
- Programs like Photoshop, video editors, and IDEs work more efficiently.
Reduced Crashes and Freezes
- Extra memory prevents overload when handling large files or apps.
Future‑Proofing Your Device
- Keeps your laptop capable of handling new software updates.
Smoother Web Browsing
- Multiple tabs open without slowing down the system.
Energy Efficiency
- A well‑optimized RAM upgrade can reduce CPU strain, saving battery life.
Disadvantages of Upgrading Laptop RAM
While upgrading RAM has clear benefits, it’s not always the perfect solution. There are limitations and potential downsides to consider before making the investment:
Cost Factor
- High‑capacity RAM modules can be expensive.
Compatibility Issues
- Not all laptops support every type or size of RAM.
Limited Performance Gains
- If your CPU or storage is slow, RAM alone won’t fix bottlenecks.
Risk of Installation Errors
- Improper installation can damage components or void warranties.
Battery Drain in Some Cases
- More RAM may consume slightly more power.
Physical Limitations
- Some laptops have soldered RAM, making upgrades impossible.
Overkill for Light Users
- Casual users may not notice much difference after upgrading.
Potential Heat Increase
- Higher-performance components can generate extra heat.
Methods to Upgrade RAM on a laptop
The steps on how to increase RAM in laptop devices are not complex, time-consuming, or extremely costly. However, users need to follow the process carefully to avoid system defects, damage, or inconsistent performance. For a better experience, we present the right methods to carry out RAM upgradation.
Method 1: Check the Occupied Space on the Laptop
Before one can upgrade RAM on a laptop, it is important to check the available RAM on the device. This is important to understand the type of RAM with the necessary capacity you need to install into the system.
How to do this for Mac laptops?
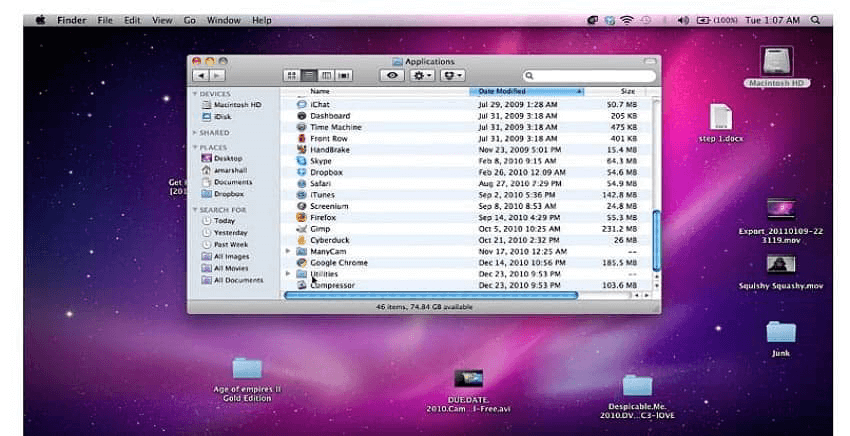
Step 1: On the Mac home screen, click on the Finder option to open the window.

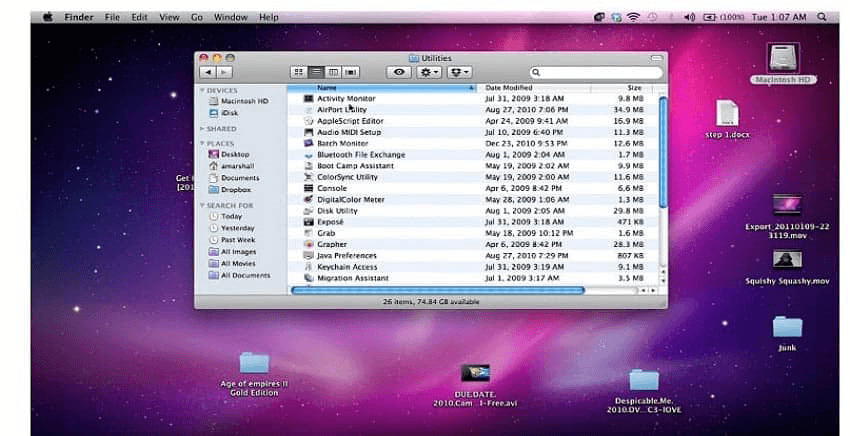
Step 2: Among the options that come up, choose the “Utilities” tab and click on it.
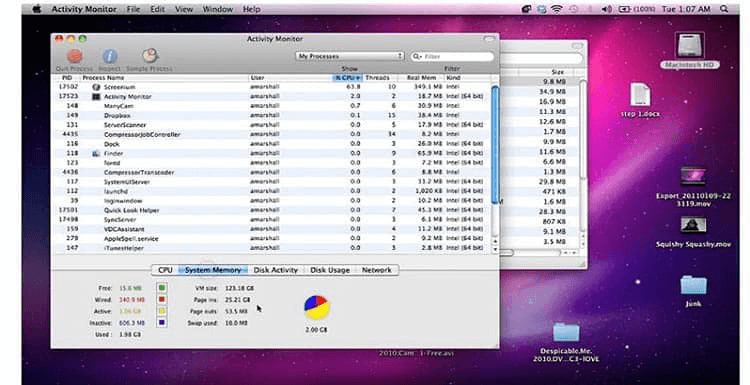
Step 3: Double-click your cursor on the “Activity Monitor” option to open the next window.
Step 4: Choose the “System Memory” tab. That would display the overall space that is in use within the device.
How to do this for Windows laptops?
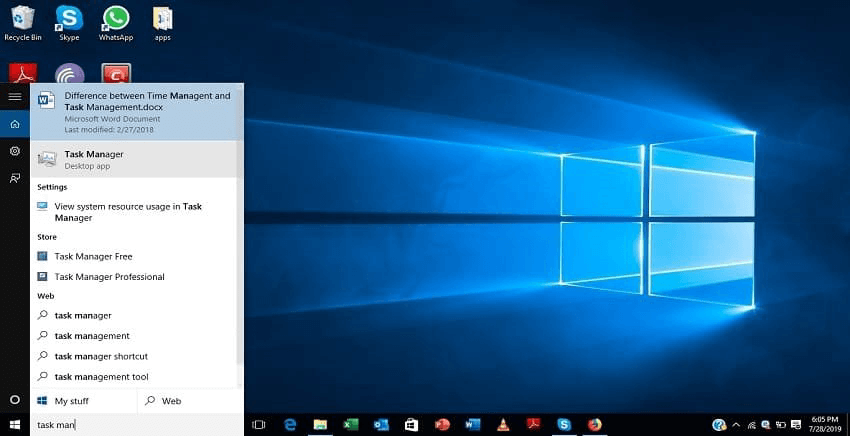
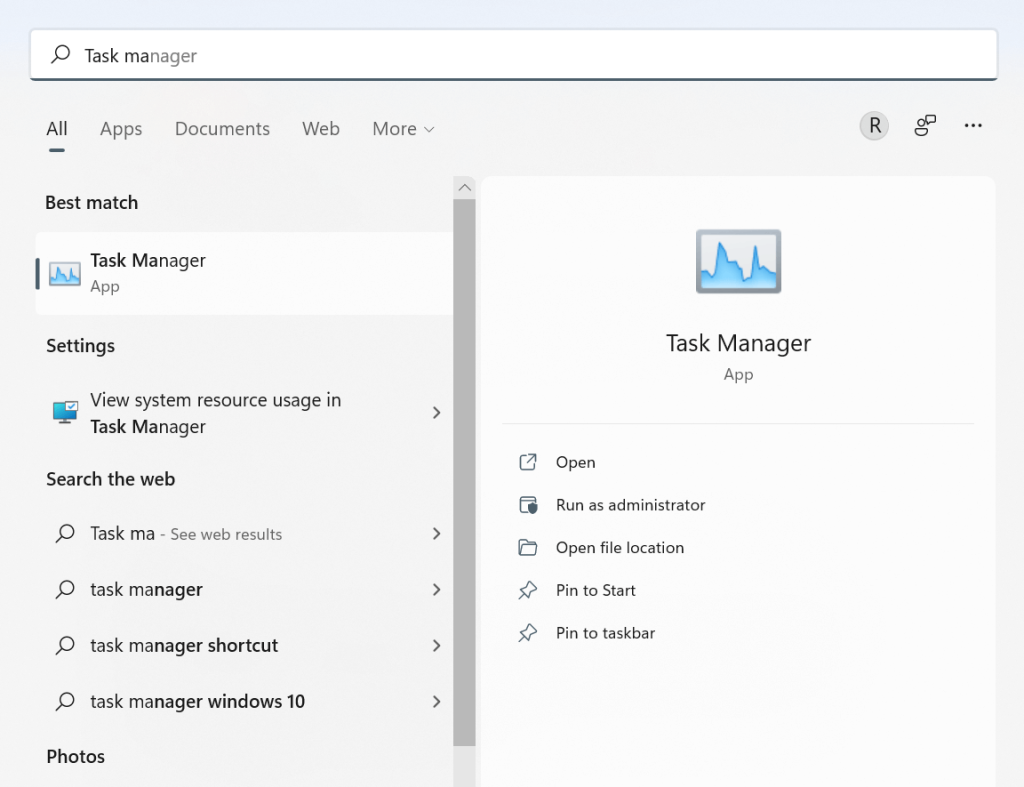
Step 1: Click on the Start icon on your Windows home screen taskbar at the bottom.
Step 2: Type the term “Task Manager” into the search text field.
Step 3: Then, click on top of the Task Manager app option that comes up and opens. It would open the Task Manager menu.
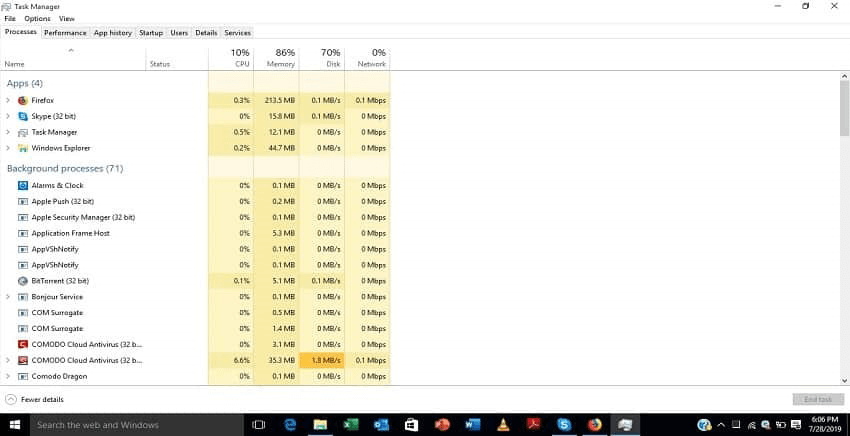
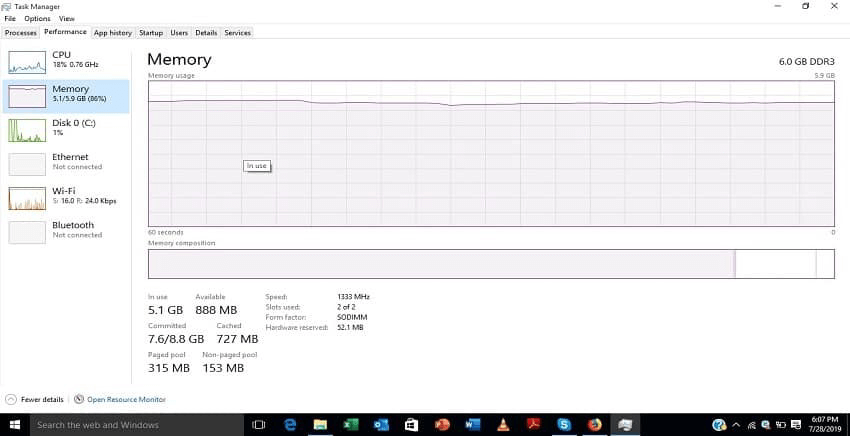
Step 4: Choose the “Performance Tab” option.
Step 5: Click on the “Memory” option. The details about the current space status are visible.
Method 2: Replace RAM Hardware Part in the Device
After checking the amount of RAM space left and choosing the RAM type, you have to open the device’s back portion to upgrade RAM on a laptop. You can take steps to replace RAM in the laptop device safely. Here, we discuss the right sequence to follow. Do these steps carefully.
How to do this?
Step 1: Use a screwdriver to remove all of the screws holding the laptop backplate in place.
In some laptops, a strip of rubber feet covers the screws. Cautiously peel it off.
Step 2: Take a small tool and slowly pry open the backplate of the laptop to see the device’s internal part. Start putting it off from a looser point that you pry up with the tool.
Step 3: If there is a metal plate that is protecting the RAM, gently pull away part of its tape or unscrew the metal part.
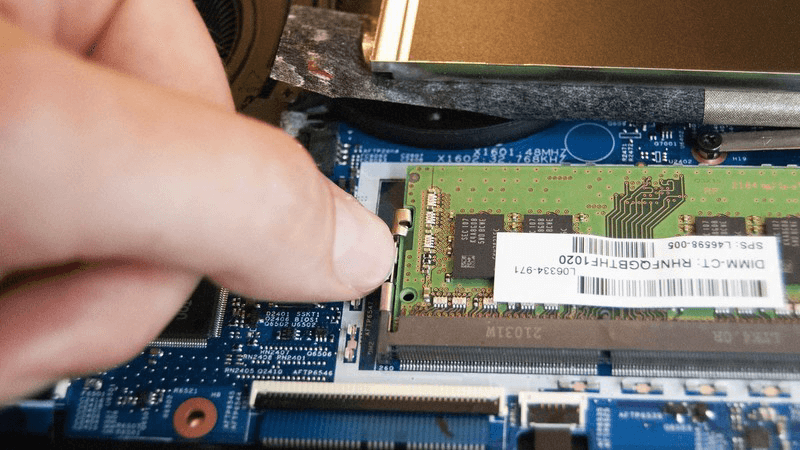
If metallic arms or clamps at the side hold the RAM in place, unfasten them or push them away cautiously. The RAM is free to take off. In some devices, the RAM pops out partially at this point.
Step 4: Pull this RAM gently from the slot space. Make sure to do this step at an angle to avoid damaging the laptop or RAM.
Step 5: Then, push the new RAM into the slot gently. When you hear a noticeable click sound, that indicates that the RAM is placed into the slot perfectly.
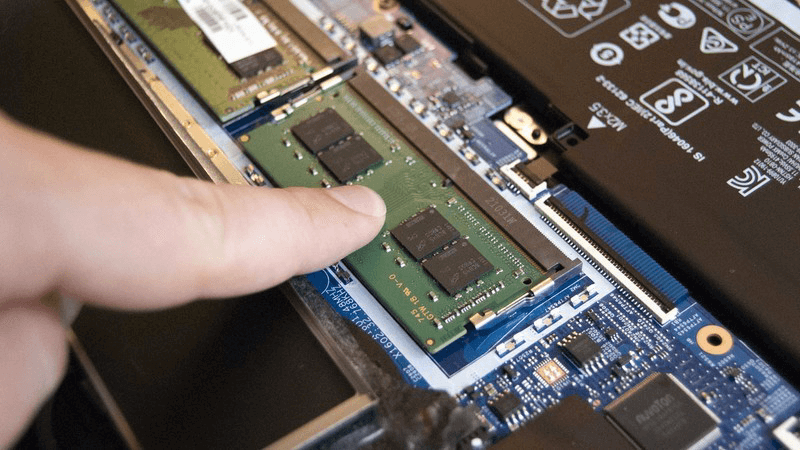
Repeat these steps for the other available RAM module as well, if necessary.
Step 6: Tape the piece back in the correct place for laptops with a RAM shield.
Step 7: Place the backplate of the laptop into place and then apply a little bit of pressure to put it perfectly. If you hear an audible clicking sound, it means that the backplate is attached well.
Step 8: Use a screwdriver to put all the screws in place. If there were rubber feet that you removed in Step 1, fix it in the right area at the end.
Method 3: Check the RAM Upgrade
After completing the hardware changing stage of how to increase RAM in the laptop process, you should check to see if it worked. Switch on your device after some minutes for the system to reorient properly. Take around 5 minutes.
How to do this?
Step 1: Power the PC back on.
Step 2: Click on the Start button on your device, like on Windows 10 laptops. You can then click on the System option that comes up.
Step 3: For Windows 11 devices or even 10 devices, type the term Task Manager into the search field after clicking on the Search icon on the home screen taskbar.
Step 4: Choose the Task Manager option
Step 5: Check the Memory option from the list. You can view the available RAM space.
Conclusion
Before starting the upgrading process for the laptop RAM, users need to check the available memory on the device. Also, make sure that you are using compatible software/hardware for your laptop device model. Follow the given sequence of steps and handle the hardware checking portion carefully. Take professional help, if necessary.
Found this post helpful? Please check out other posts on diverse software-related matters and get back to us with your thoughts.
FAQs
1. How do I know if my laptop supports RAM upgrades?
You can check your laptop’s specifications on the manufacturer’s website or use tools like CPU‑Z to see available slots and maximum supported memory.
2. Will upgrading RAM speed up my laptop instantly?
Yes, but only if RAM was the bottleneck. If your laptop is slow due to an old CPU or hard drive, adding RAM alone won’t solve everything.
3. Is upgrading RAM better than switching to SSD?
Both upgrades help, but in different ways. RAM improves multitasking and responsiveness, while an SSD speeds up boot times and file access. Ideally, combining both gives the best performance boost.
Author Bio:
Dinesh Lakhwani 

Dinesh Lakhwani, the entrepreneurial brain behind “TechCommuters,” achieved big things in the tech world. He started the company to make smart and user-friendly tech solutions. Thanks to his sharp thinking, focus on quality and the motto of never giving up, TechCommuters became a top player in the industry. His commitment to excellence has propelled the company to a leading position in the industry.
Popular Post
Recent Post

Fortect Software Review: The Ultimate PC & Mobile Cleaning, Optimization & Security Tool
Slow computers are a common problem for almost every Windows user. Well, yes! Over time, your PC picks up junk files. These files sit quietly in the background. They take up space and slow things down. Programs open slower. Windows takes longer to boot. Even simple tasks like opening a folder can feel sluggish. There […]

CCleaner PC Optimizer Review: A Complete Guide for Windows Users
If your computer has started to feel slow, you are not alone. Most Windows PCs slow down over time. Junk files pile up. The registry gets messy. Too many apps open when you start your PC. All this adds up and makes even a good machine feel tired. This is where a PC cleaner tool […]

Auslogics Duplicate File Finder: Full Review and User Guide
A computer quietly gathers clutter over time. This includes duplicate photos, repeated downloads, and forgotten backups hiding in random folders. This buildup slowly eats away at storage and can make even a fast PC feel sluggish. Manually finding and deleting duplicates is tedious. It means checking every folder, comparing file names, and guessing which copies […]

CCleaner Duplicate File Finder: Key Features, Pricing, Step-by-Step Guide and More
Every computer collects junk over time. Right? Well, yes! Photos often get copied twice. Documents get saved in two folders by mistake. Old downloads pile up and never get deleted. This slowly eats up your storage space, and most people do not even notice until their drive is almost full. That is where a duplicate […]

Duplicate File Finder Pro: A Complete Review, Everything You Should Know
Computers collect thousands of files over time. Well, yes! Many of them end up being duplicates created by backups, downloads, or accidental copies. These extra files take up valuable storage space and make it harder to keep everything organized. Finding and removing them manually can take hours. Right? Duplicate File Finder Pro is a tool […]
Top 3 Duplicate File Finder for Windows 11 & Windows 10
If your PC storage keeps filling up even after you delete big files, duplicate files could be the real reason. Most of us save the same photo twice, download a document more than once, or copy a whole folder by mistake. Over months and years, these duplicate files pile up quietly. You do not even […]

Monitor Screen Calibration Guide: Everything You Should Know
Your monitor shows colors every single day. But are those colors actually correct? Most people never stop to check this. They just use the screen as it comes out of the box. This habit can lead to wrong colors in photos, videos, and work files. Colors may look too warm or too cold without you […]

How To Check Installed RAM and RAM Slots [Complete Guide]
RAM plays an important role in how smoothly a computer runs. Short for Random Access Memory, it stores the data and instructions that Windows and active applications need at any given moment. From opening multiple browser tabs to running games and productivity software, RAM helps keep everything responsive. A system with limited memory may experience […]

What is Microsoft Autopilot Everything You Need To Know
Technology has changed the way companies manage computers. Well, yes! Employees now work from offices, homes, and remote locations. Setting up devices manually for every worker takes time and effort. It can also create mistakes that slow down productivity. This is where Microsoft Autopilot becomes useful. It helps businesses prepare and deploy Windows devices with […]

