How to Set Up Dual Monitors on a Mac?
While using a computer system, some users notice a limitation with the amount of display they can rely on. For example, if you are creating and editing a live stream video simultaneously, only depending on multiple windows or tabs is not enough. In fact, switching continuously between the files constantly can get tiring, lead to wrong data input if you read the wrong information, etc.
In this situation, it is better to set up dual monitors on the Mac that you currently use. Then, you can view the secondary information on the second display, handling your tasks more productively. Let’s learn the ways to make the connection here.
How to select the right technological products for a dual monitor setup?
Mac computer models do allow connectivity with one external display or multiple ones. However, for the best performance, you must closely consider the monitor options available to choose the one compatible with your existing Mac system.
Here are the main points to consider:
- Size– Typically, the display sizes of dual monitors on Mac can extend to 32 inches in size, which is useful for professionals with ultra-wide support. On the other hand, users with smaller desk spaces or who mostly focus on gaming can make do with 24-inch displays. On that note, 27 inches is the average option.
- Display Resolution– The monitors with higher resolutions like 1920 x 1080 pixels, have higher-quality image and video visuals. However, if your system supports 4K/5K level resolution, you must invest in a higher-powered
- Display/panel type– Options include LCD paneling with TN, IPS, and VA tech support ,which assures a high-performance OLED Display for Mac.
- Pixel density- This involves the PPI calculation, which accounts for the amount of the closeness of the display pixels. Image quality is high if you see a higher pixel density.
- Color accuracy– Check the color profiles compatible with the monitor options. For users with creative work needs, like video editing, a higher capacity of color accuracy is necessary for monitors.
- Refresh rate- While choosing the best option for a MacBook Pro dual monitor setup, check that it has at least a 60 Hz refresh rate. This is suitable for basic-level web browsing and office work. On the other hand, gamers with high graphics-related requirements can use monitors with a 144 Hz refresh rate.
- Additional features– Check what additional benefits to expect from the monitor option. For example, check for advanced feature support, like portrait mode, VESA mounting support, or curved monitor.
Moreover, choosing compatible dongles and adapters for the best quality MacBook Pro dual monitor setup would be best.
- DisplayPort- This is a standard type of connection for display monitors that support audio and video. To note, gamers can use this due to the higher refresh rates supported, strong bandwidth connection, and more FPS.
- HDMI– The HDMI 1.4 version can support 4K or lower resolution at 30 FPS. Following that, the HDMI 2.0 can support 4K video resolution at 60 FPS.
- Thunderbolt- This is an active connection from Apple and Intel for high-speed connection support, USB-based power delivery for charging devices, etc.
Best Methods to Set Up Dual Monitors on Mac
Different methods are available for the MacBook Pro dual monitor setup process, depending on the model you are using. Here are the detailed steps for each version.
Solution 1: Connecting Dual Monitors Wirelessly
It is possible to sync the macOS computer system you are using wirelessly. But this is only available as an accepted feature on certain Mac versions, namely the new macOS 13 (Ventura). Here, users can utilize the wireless connection to support another Mac laptop and some compatible Smart TV types.
The process of handling this MacBook Pro dual monitor setup is not highly complex for users. To note, it is compatible with different Apple products like Apple TV and iPads.
How to proceed?
Step 1: Access the Apple Menu on the main screen of your Mac device.
Step 2: Then tap on the System Settings option.
Step 3: Choose to open the Displays window.
Step 4:Hit the plus (+) icon beside the display monitor name to open the drop-down menu.
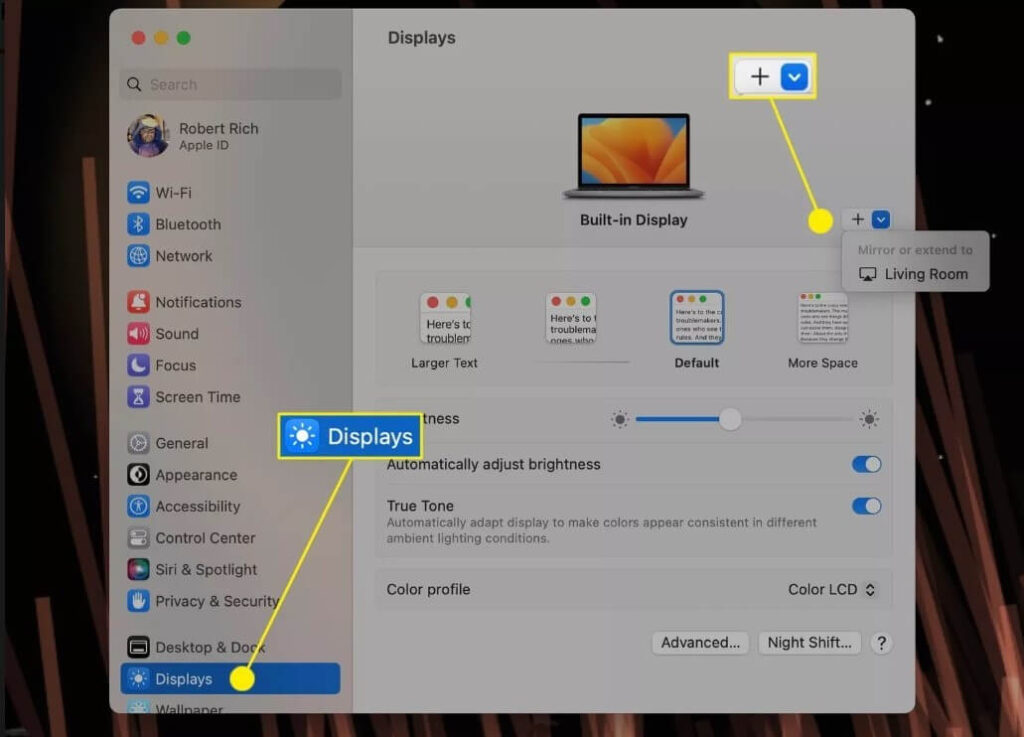
Step 5: Select the Apple device you will use as one of the dual monitors on Mac from the list.
Solution 2: Use adapters and cables to connect the secondary monitors to the Mac
You can activate the connection of two or more monitors suitable for macOS technology with wired devices for an easy process. However, before that, check that the adapter/cable type is suitable for enabling the dual monitor system in your device type.
For example, Mac Mini operating with Apple M1 chipset allows connection with one Thunderbolt/USB 4 monitor only per session. So, if you need to set up another monitor with this Mac computer, you must connect it to the HDMI port in Mac Mini.
Moreover, MacBook Pro and MacBook Air models that run with the M1 chipset can connect with only one external display. Then, you can view the display content on both screens simultaneously. Other models like Mac devices with HDMI/ Thunderbolt 4 (USB-C) ports can allow up to four external monitors to sync with Mac.
How to Proceed?
Step 1: Study your options and get your Mac device’s compatible cable, adapter, and external monitor type. Then, attach the cables to connect the monitor to Mac.
For desktop Mac system users, one has to link both dual monitors to the system.
Step 2: Properly position the devices as needed and switch the Mac device to the ON state. The system will automatically start detecting the connected monitor and activate it. However, some users need to change the default settings here in specific cases. For example, enable the monitor connection manually if the automated process fails to work.
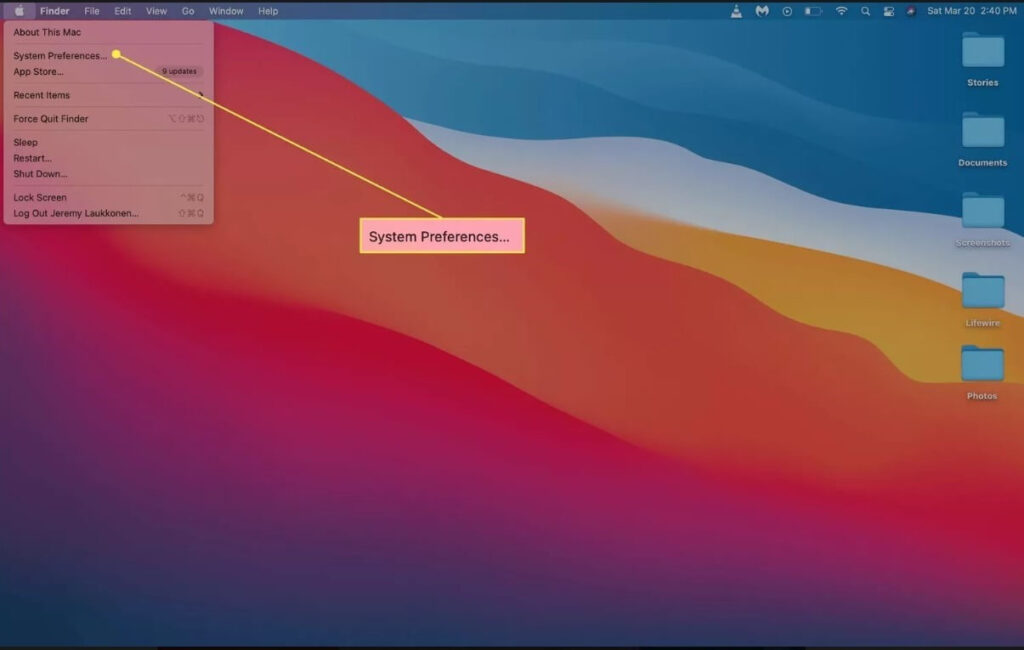
Step 3: Then, tap on the Apple menu on the top taskbar from your homepage and tap on the System Preferences option from the drop-down menu.
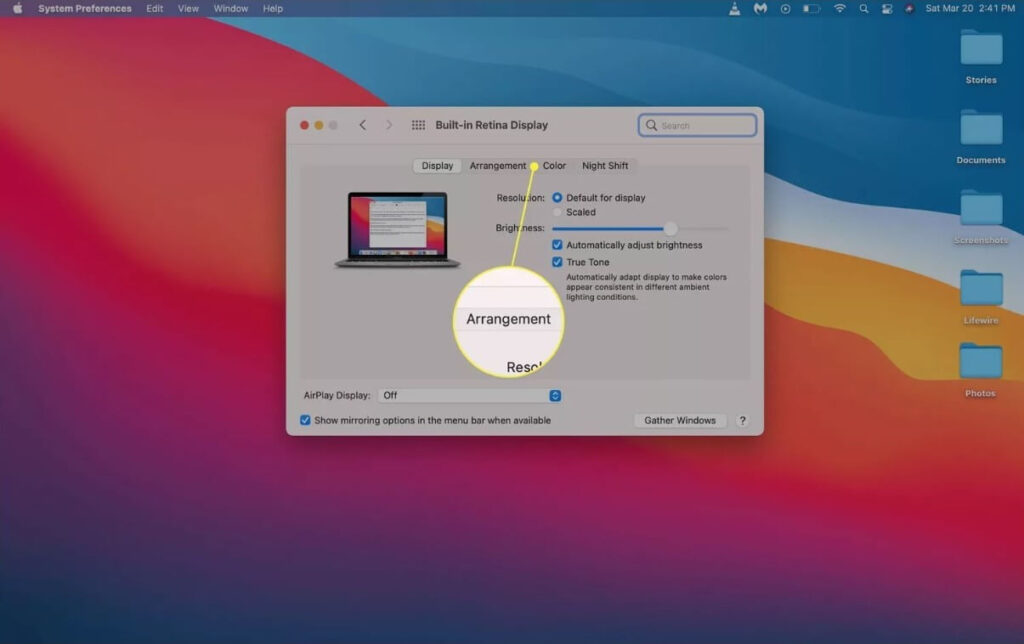
Step 4: In the next pop-up window, tap on the Displays option.
Step 5: Access the main display configurations and choose the Arrangement option.
Step 6: If the box for Mirror Displays shows the checkmark, the same image view will appear on both connected monitors. Instead, uncheck the box beside the Mirror Displays option.
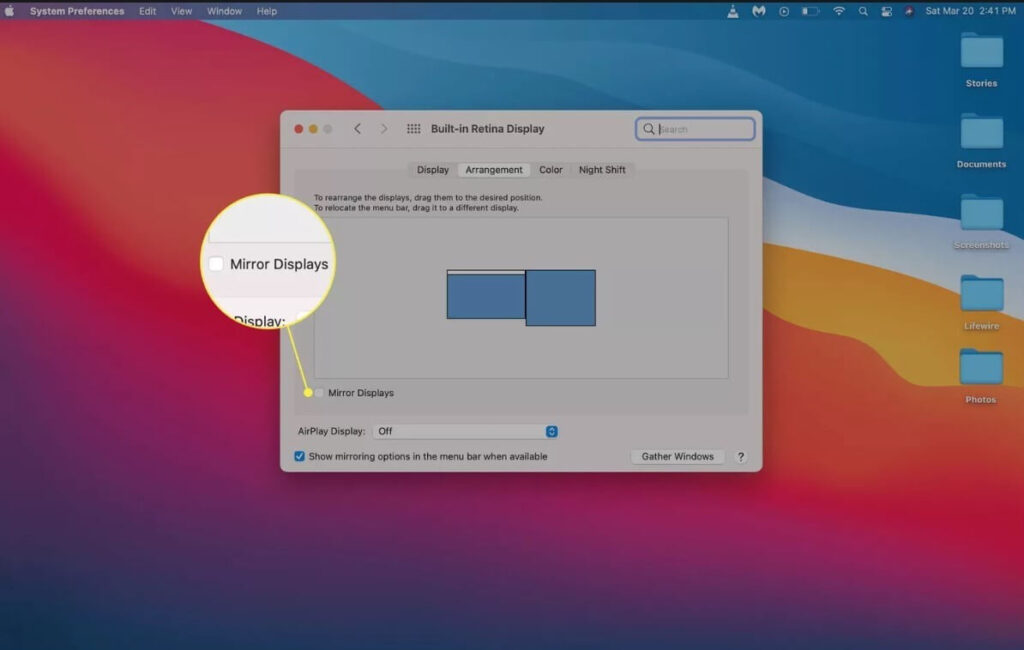
Step 7: Next, you can view a visible diagram for the display positioning arrangement. In case the positioning is not well managed, find the icon for the secondary monitor.
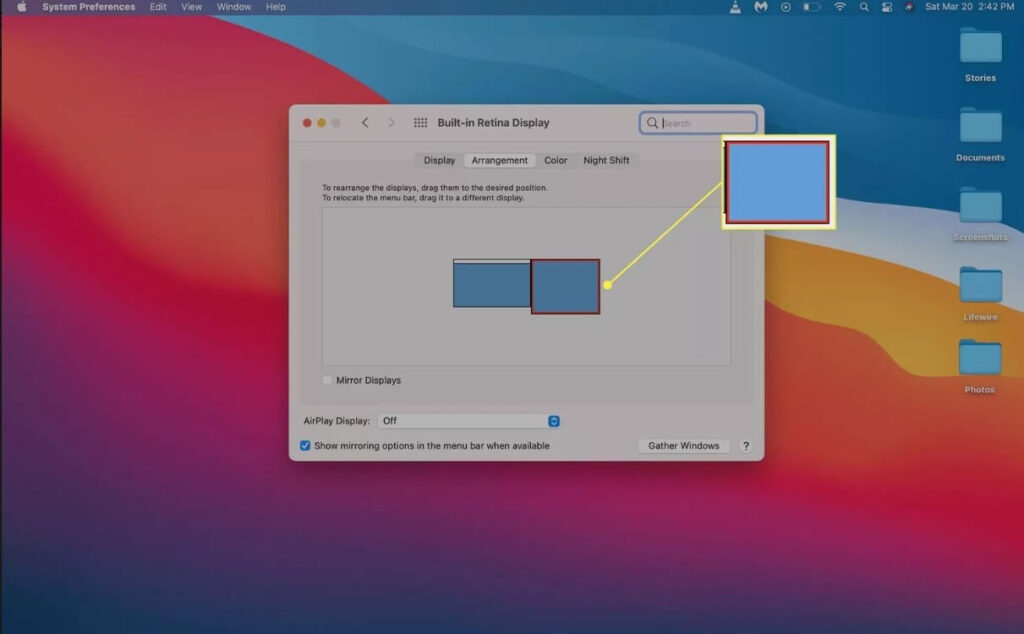
Step 8: Hold and drag the displayed secondary monitor icon to the right position you want. Release your hold on the mouse to drop it in the place you prefer.
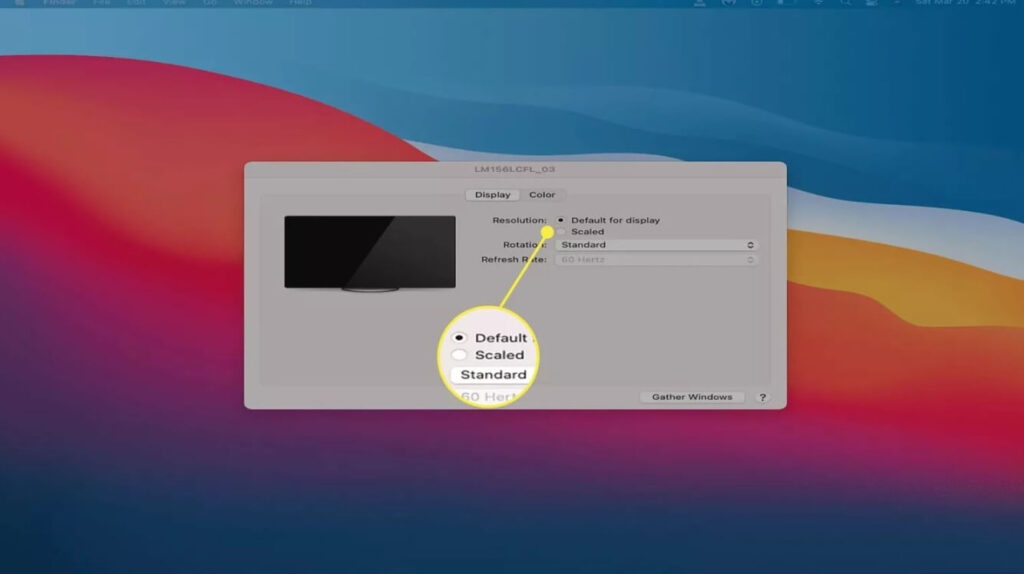
Step 9: Both the dual monitors on Mac are now active for consistent usage. However, further configurations on the secondary monitor are necessary in some cases to avoid it looking discolored or stretched out.
In case the image displayed on the second monitor is not well-placed, tap on the Scaled option.
Step 10: Next, choose the right screen resolution option, like the native preset resolution, for your Mac device to keep a consistent view. The same resolution or a lower version is suitable here.
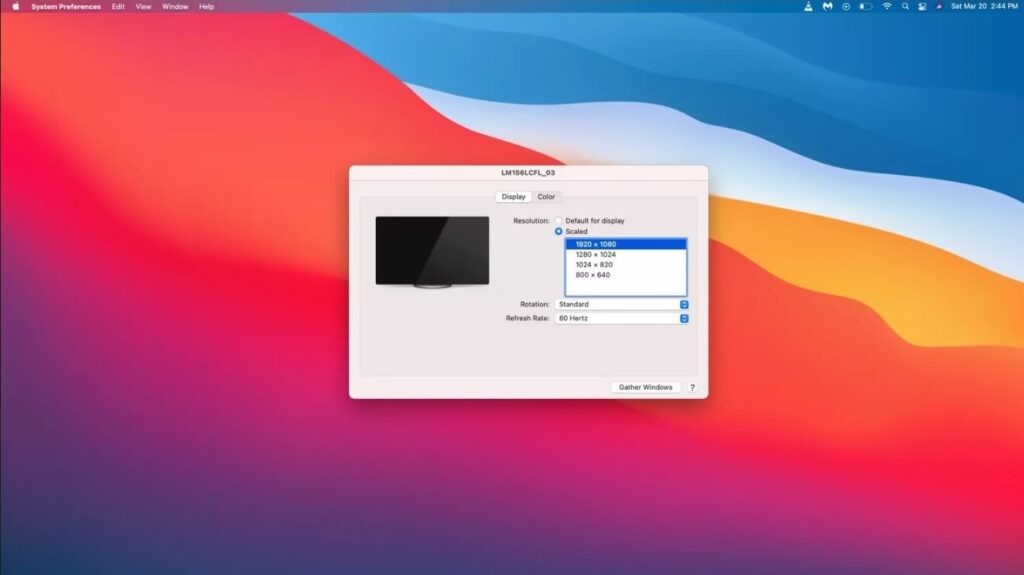
Step 11: Close the second monitor display settings if the second display appears normal. You can start working on the device next.
Conclusion
To summarise, more work demand is easier to manage if you have dual monitors on Mac to utilize for the tasks. Depending on your Mac device type (model and version specifications), you can use different methods like using cables to set up the second screen.
However, while connecting to the second monitor, you may see issues with performance overload when you perform complex tasks incompatible with the display. For this, you can use software like CCleaner.
With the app, you can check for system-based errors affecting the connection and optimize the speed, among others.
Author Bio:
Dinesh Lakhwani 

Dinesh Lakhwani, the entrepreneurial brain behind “TechCommuters,” achieved big things in the tech world. He started the company to make smart and user-friendly tech solutions. Thanks to his sharp thinking, focus on quality and the motto of never giving up, TechCommuters became a top player in the industry. His commitment to excellence has propelled the company to a leading position in the industry.
Popular Post


Recent Post

What is Microsoft Autopilot Everything You Need To Know
Technology has changed the way companies manage computers. Well, yes! Employees now work from offices, homes, and remote locations. Setting up devices manually for every worker takes time and effort. It can also create mistakes that slow down productivity. This is where Microsoft Autopilot becomes useful. It helps businesses prepare and deploy Windows devices with […]

Enable Automatic Device Locking Feature Windows: Complete Guide
Introduction: Your computer stores important information such as emails, documents, passwords, and personal photos. Leaving it unlocked can put that data at risk. Thankfully, Windows includes built-in features that can automatically lock your device when you are away. Setting up automatic device locking is quick and does not require any extra software. In this guide, […]

How to Update Wireless Network Driver in Windows 11 and 10
Your Wi-Fi keeps dropping. Pages load slowly. The connection feels unstable? Well, you are not alone. Most of the time, the problem is not with your internet plan. It is with your wireless network driver. A driver is a small piece of software that helps your computer talk to its hardware. When it gets outdated, […]

Common Windows 11 Problems and Solutions (2026 Version)
Windows 11 has become more polished over the years, but it is still not completely free from problems. Even after regular updates from Microsoft, many users continue to face issues like lagging performance, failed updates, audio troubles, random crashes, and network errors. Some problems appear after installing new features, while others develop gradually as the […]

Fortect Driver Updater Review: Features, Steps, Pros, and Cons.
A new PC usually feels quick and responsive. Applications open instantly, games run smoothly, and everything works as expected. As time passes, however, you may notice slower performance, system crashes, hardware glitches, or devices that stop working properly. While many people assume malware or low storage space is to blame, outdated drivers are often the […]

New Features Coming in Windows 11 This Year [2026]
Microsoft is always working to make Windows better. This year is no exception. The company has announced and rolled out several exciting updates for its users. These updates touch almost every part of the operating system. From the Start menu to system settings, changes are arriving fast. If you use Windows daily, you will want […]

Top 14 Duplicate Photo Finder and Remover For Windows [2026]
Introduction: Photos pile up fast. Well, yes! You take ten shots of the same moment. You download the same image twice. You back up your folder and forget you already did it. Before you know it, your storage is packed with copies. A good duplicate photo finder helps you take back that space without losing […]

Advanced System Settings on Windows 11: Complete Guide
Windows 11 is a powerful operating system. It comes with many features that most users never explore. One of the most useful areas is the System Properties panel. This is where you can control how your computer performs, starts up, and handles memory. Many users only change basic settings like wallpaper or display options. But […]

21 Advanced Windows Security Settings: Latest Updates
Introduction: Your computer holds a lot of important data. From personal photos to work files, everything sits on your Windows system. That is why protecting it properly matters more than ever. Windows security settings have come a long way. Microsoft keeps adding stronger layers of protection with every update. Most users never go beyond the […]

Security Upgrades of Microsoft Windows in This Decade [Complete Guide]
Introduction Microsoft has been working hard to make Windows safer every year. Cyberattacks are growing fast. Hackers are smarter now. They target millions of Windows users every single day. That is why Microsoft has added many powerful new security upgrades of Microsoft Windows since 2020. These upgrades protect your data, your identity, and your device […]

