


A computer quietly gathers clutter over time. This includes duplicate photos, repeated downloads, and forgotten backups hiding in random folders. This buildup slowly eats away at storage and can make even a fast PC feel sluggish. Manually finding and deleting duplicates is tedious. It means checking every folder, comparing file names, and guessing which copies […]
How to Optimize CPU Speed In Windows 10 PC? – 10 Tips
Undoubtedly, Windows 10 is one of the fastest and most robust operating systems. But over time, Windows 10 PCs start to slow down due to malware attacks, less disk space, heavy temp files, and so on.
There’s nothing to worry about if your Windows 10 PC is also running at a bulk cart speed. You can easily optimize your CPU speed to speed up your Windows 10 computer. Below, we have disclosed the best tips to speed up your computer system. So, let’s get started.
Why Do You Need to Optimize CPU Speed in Windows 10?
Your computer’s CPU (Central Processing Unit) is like its brain. It handles all the tasks you do. Like opening apps, browsing the internet, playing games, and more. If the CPU is slow, everything feels slow. Optimizing CPU speed helps your computer run faster, smoother, and without freezing. It also helps your PC stay cool and last longer.
Reasons to Optimize CPU Speed
- Makes your computer respond faster.
- Helps apps open quickly.
- Reduces freezing and crashing.
- Keeps your computer cooler.
- Saves battery on laptops.
- Improves gaming and video editing.
- Speeds up startup and shutdown.
- Helps your PC work better for longer.
Tips to Optimize CPU Speed In Windows 10 PC
Tip 1. Disable Startup Applications
When you have configured too many applications to start automatically during the PC startup, it can waste valuable system resources that can dramatically slow down your PC. So, the best solution is to disable unnecessary applications during startup. To do so:
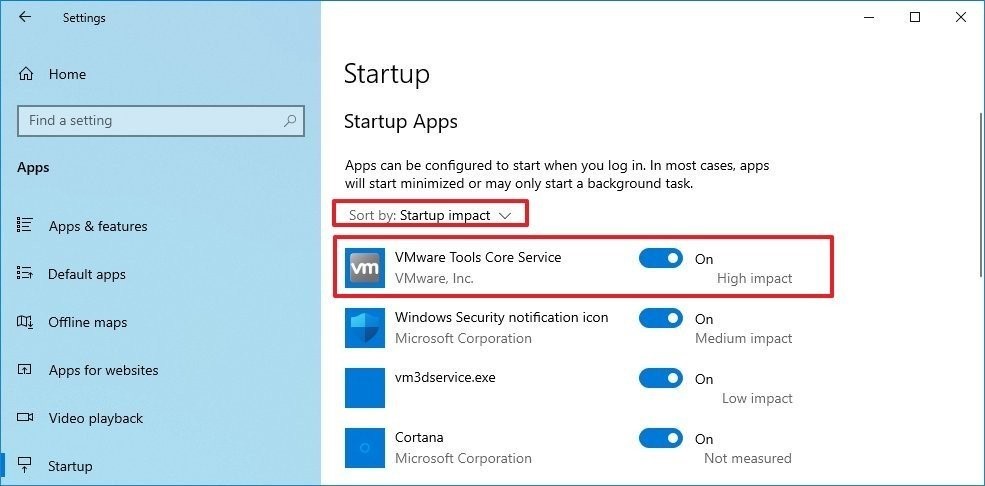
Step 1. Go to Settings > Apps > Startup.
Step 2. Click on the Sort by menu and choose the Startup impact option.
Step 3. Simply turn off the toggle next to the unwanted apps.
Tip 2. Disable Applications Restart on Startup
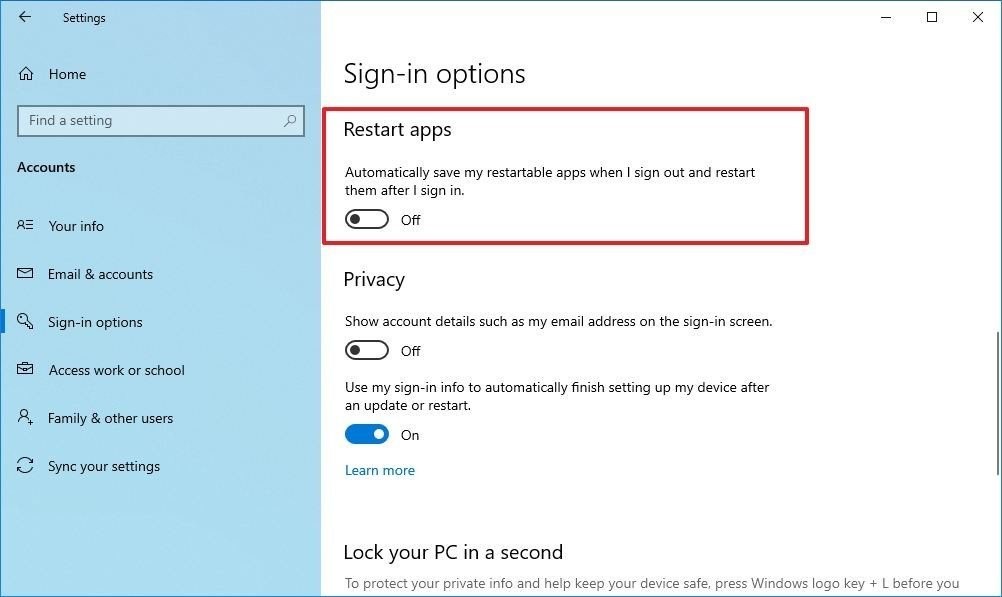
Windows 10 has a feature that can resume the apps from your last session after a reboot. This feature is useful to quickly resume your work from where you left off. But it can also impact the CPU’s performance.
In that case, you can disable the app relaunch at startup by going to Settings > Accounts > Sign-in options. Under the Restart apps, turn the toggle off. After that, unwanted apps won’t relaunch at startup and slow down your PC’s performance.
Tip 3. Change Power Settings
Do you use Power Saver settings on your Windows 10? Then, that can consume your computer’s performance to save energy. Thus, you should change your power settings to High performance or Balanced to maintain a good speed.
Open the Control Panel > Hardware and Sound > Power Options to change the power settings. You will see two options on the screen: Balanced and Power Saver mode. To unveil High performance, click on the down arrow next to Show additional plans.
Tip 4. Turn Off Windows Tips and Tricks
As you might have noticed, Windows 10 often shares tips and tricks to improve your user experience. This feature is extremely helpful for novice users. But it can also take up a share in your PC’s performance.
So, if you know your way around the Windows 10 interface, you can turn off tips and tricks to regain some of your PC’s performance. For this, go to Settings > System > Notifications & actions. After that, scroll down to the Notifications section and uncheck the box saying “Get tips, tricks, and suggestions as you use Windows.”
Tip 5. Uninstall Unuseful Apps
Often we install various applications on our devices, but we only use a couple of them daily. Now, all those non-essential apps consume a huge space on your hard disk and bring bloatware.
So, we suggest you do a bit of spring cleaning and uninstall all the apps that you haven’t used in a month. Just go to Settings > Apps > Apps & features > Select unwanted apps > Click on the Uninstall button.
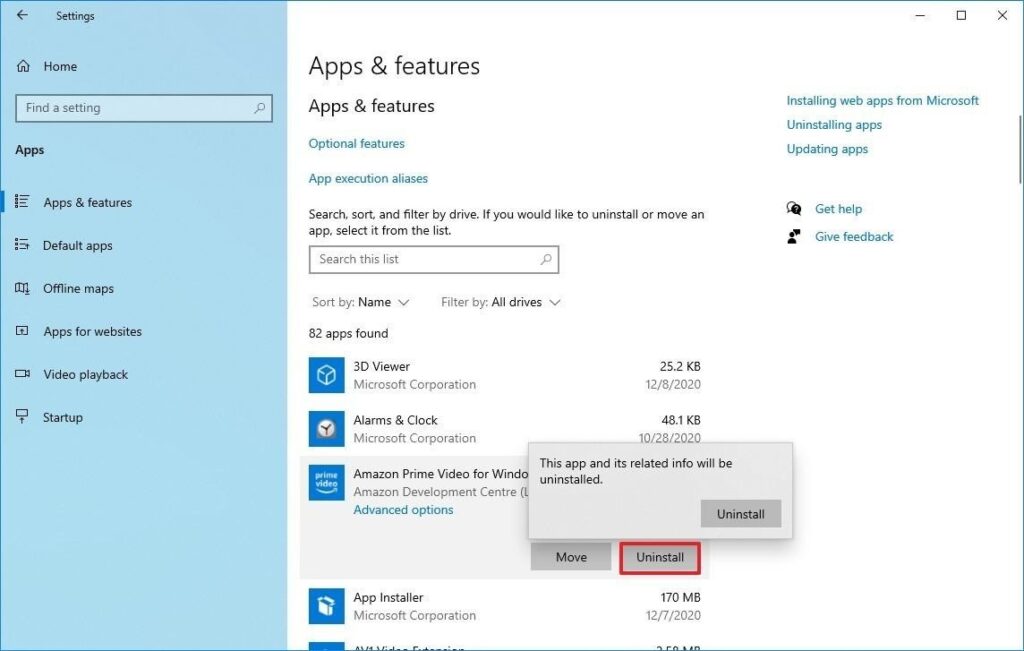
One more thing, only keep well-maintained and coded apps on the computer. It is common knowledge that poorly developed and old apps can negatively affect performance.
Tip 6. Clean Up Your Hard Drive
If running apps, managing files, and performing other tasks on your computer has gone super slow, it is likely because your hard drive is running out of space. This problem becomes more evident when you have used 70% of your HDD or SSD space.
The easiest way to solve this problem is to use Storage Sense to remove temporary and unwanted files to free up some space. For this:
Step 1. Launch Settings > System > Storage.
Step 2. Under the Local Disk section, click on the Temporary files option. Select the files you want to remove to reclaim the system.
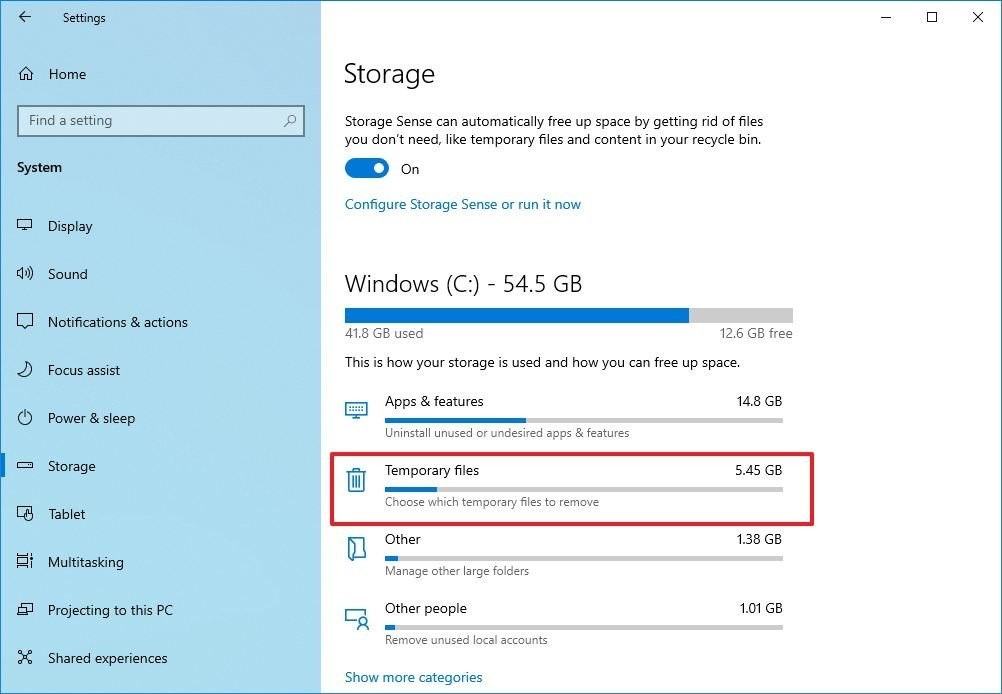
Step 3. Restart your PC, and it will perform better than before.
Tip 7. Use Drive Defragmentation
If you use older hardware with traditional rotating platters on Windows 10, it can take up your machine’s performance to organize data. Therefore, you should run the defragmentation tool to make files more accessible the next time.
To use the drive defragmentation tool on Windows 10:
Step 1. Go to Settings > System > Storage.
Step 2. Under the More storage settings section, click on the Optimize Drives option.
Step 3. Select the drive that needs defragmentation and click on the Optimize button.
Tip 8. Disable OneDrive Syncing
OneDrive is Microsoft’s cloud storage service that keeps on syncing files on your PC. It is a useful backup tool that helps to restore your computer.
But the constant cloud syncing can slow down your CPU’s performance. Here you can do one thing – pause OneDrive syncing for some time to ensure it is a problem behind your slow PC. To do so, right-click on the OneDrive icon from the taskbar, click on the More button, and select the duration to pause the syncing.
If there’s a noticeable speed boost, you can permanently turn off the OneDrive syncing on your PC. For this, right-click on the OneDrive icon > Settings > Accounts > Unlink this PC > Unlink account.
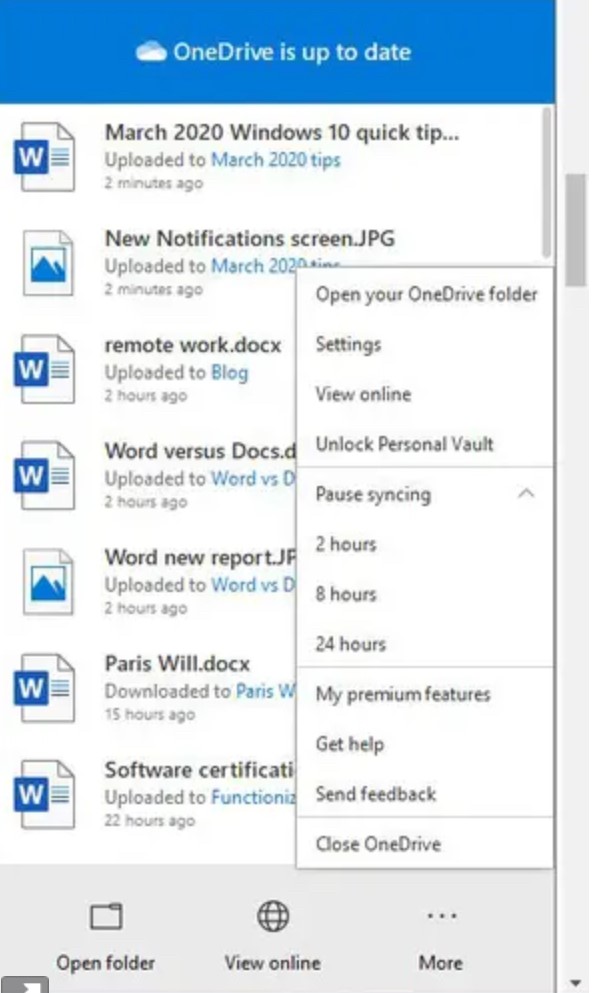
After this, you can still save files on OneDrive, but it won’t back up to the cloud.
Tip 9. Switch Off Search Indexing
Windows 10 keeps on indexing your hard disk in the background to allow you to search faster on your PC. But it can take down a portion of your PC’s performance with it. So, you can turn it off to give a speed boost to your computer.
To turn search indexing completely off:
Step 1. In the Windows 10 search box, type services.msc and press Enter.
Step 2. Scroll down to the Indexing Service from the list of services.
Step 3. Double click on it and click on the Stop.
Step 4. Now, restart your PC, your searches might take some time, but the PC’s performance will be better.
Tip 10. Configure ReadyBoost
ReadyBoost is not a new Windows 10 feature. It has been around for ages that using a flash drive or SD card to cache files and improve the overall system performance.
To activate ReadyBoost on a Windows computer, connect a USB drive to the device and follow these steps:
Step 1. Launch File Explorer and click on This PC.
Step 2. Right-click on the USB drive from the Devices and drives section and select the Properties option.
Step 3. Click on the ReadyBoost and choose the option Dedicate this device to ReadyBoost.

Step 4. Click on the Apply and then on the OK button to complete the process.
There you go! You have learned 10 awesome tips to optimize your CPU speed on Windows 10.
But there are many other ways to improve the PC’s speed, like running malware scans, updating Windows, upgrading drivers, and so much more. So, to know more ways to boost the CPU’s performance, stay connected with us.
FAQs
1. Can speeding up the CPU harm my computer?
No, if you use safe methods like changing power settings or turning off unused apps, it won’t hurt your computer. But avoid risky things like overclocking unless you know what you’re doing. Always follow trusted steps.
2. How do I know if my CPU is slow?
If your computer takes a long time to open apps, freezes often, or makes loud fan noises, your CPU might be struggling. You can check CPU usage in Task Manager. If it’s always high, even when doing simple tasks, it needs attention.
3. Is it better to upgrade my CPU or just optimize it?
Optimizing is a good first step and costs nothing. It can fix many problems. If your computer is still slow after trying everything, then upgrading the CPU or adding more RAM might help more.
Author Bio:
Dinesh Lakhwani 

Dinesh Lakhwani, the entrepreneurial brain behind “TechCommuters,” achieved big things in the tech world. He started the company to make smart and user-friendly tech solutions. Thanks to his sharp thinking, focus on quality and the motto of never giving up, TechCommuters became a top player in the industry. His commitment to excellence has propelled the company to a leading position in the industry.
Popular Post
Recent Post

CCleaner Duplicate File Finder: Key Features, Pricing, Step-by-Step Guide and More
Every computer collects junk over time. Right? Well, yes! Photos often get copied twice. Documents get saved in two folders by mistake. Old downloads pile up and never get deleted. This slowly eats up your storage space, and most people do not even notice until their drive is almost full. That is where a duplicate […]

Duplicate File Finder Pro: A Complete Review, Everything You Should Know
Computers collect thousands of files over time. Well, yes! Many of them end up being duplicates created by backups, downloads, or accidental copies. These extra files take up valuable storage space and make it harder to keep everything organized. Finding and removing them manually can take hours. Right? Duplicate File Finder Pro is a tool […]

Monitor Screen Calibration Guide: Everything You Should Know
Your monitor shows colors every single day. But are those colors actually correct? Most people never stop to check this. They just use the screen as it comes out of the box. This habit can lead to wrong colors in photos, videos, and work files. Colors may look too warm or too cold without you […]

How To Check Installed RAM and RAM Slots [Complete Guide]
RAM plays an important role in how smoothly a computer runs. Short for Random Access Memory, it stores the data and instructions that Windows and active applications need at any given moment. From opening multiple browser tabs to running games and productivity software, RAM helps keep everything responsive. A system with limited memory may experience […]

What is Microsoft Autopilot Everything You Need To Know
Technology has changed the way companies manage computers. Well, yes! Employees now work from offices, homes, and remote locations. Setting up devices manually for every worker takes time and effort. It can also create mistakes that slow down productivity. This is where Microsoft Autopilot becomes useful. It helps businesses prepare and deploy Windows devices with […]

Enable Automatic Device Locking Feature Windows: Complete Guide
Introduction: Your computer stores important information such as emails, documents, passwords, and personal photos. Leaving it unlocked can put that data at risk. Thankfully, Windows includes built-in features that can automatically lock your device when you are away. Setting up automatic device locking is quick and does not require any extra software. In this guide, […]

How to Update Wireless Network Driver in Windows 11 and 10
Your Wi-Fi keeps dropping. Pages load slowly. The connection feels unstable? Well, you are not alone. Most of the time, the problem is not with your internet plan. It is with your wireless network driver. A driver is a small piece of software that helps your computer talk to its hardware. When it gets outdated, […]

Common Windows 11 Problems and Solutions (2026 Version)
Windows 11 has become more polished over the years, but it is still not completely free from problems. Even after regular updates from Microsoft, many users continue to face issues like lagging performance, failed updates, audio troubles, random crashes, and network errors. Some problems appear after installing new features, while others develop gradually as the […]

Fortect Driver Updater Review: Features, Steps, Pros, and Cons.
A new PC usually feels quick and responsive. Applications open instantly, games run smoothly, and everything works as expected. As time passes, however, you may notice slower performance, system crashes, hardware glitches, or devices that stop working properly. While many people assume malware or low storage space is to blame, outdated drivers are often the […]

