










So, search for a pair of shoes once online. Close the tab. By evening, those same shoes are sitting on your news site, your video app, and even your recipe blog. Nobody placed them there by chance. A cookie did. Well, yes! Cookies are small files that websites place on your device while you browse. […]
How to Fix Laptop Keys Not Working: Complete Guide
Introduction:
You’re typing an important email when suddenly your laptop keys stop responding. This frustrating problem affects millions of laptop users daily. Right? Whether it’s a single key or your entire keyboard, non-functional keys can bring your productivity to a halt.
Laptop keyboard issues range from minor software glitches to serious hardware failures. Don’t worry! The good news is that most keyboard problems have simple solutions. You don’t need to be a tech expert to diagnose and fix these issues yourself.
This comprehensive guide walks you through proven methods to restore your laptop keyboard functionality.
We’ll cover everything from basic troubleshooting to advanced fixes. By the end of this article, you’ll have the tools to tackle any keyboard problem that comes your way.
Why Laptop Keys Don’t Work? Top Reasons.
Several factors can cause your laptop keys to malfunction, ranging from simple software issues to complex hardware problems. Understanding these root causes helps you choose the most effective repair method and prevents future occurrences.
- Outdated or corrupted keyboard drivers are causing communication errors between hardware and software
- Physical debris and dust accumulation under the keys are blocking proper key movement and contact
- Liquid spills or moisture damage can create short circuits or sticky key mechanisms
- Windows system updates that conflict with existing keyboard drivers or settings
- Malware or virus infections that interfere with system processes and input device functionality
- Hardware connection issues where internal keyboard cables become loose or disconnected
- Worn-out key switches from excessive use, leading to mechanical failure over time
- BIOS or UEFI settings that accidentally disable keyboard functionality during system configuration
How to fix laptop keys not working?
1. Restart your PC
The first quick hack to fix laptop keys not working is to restart your laptop. A quick restart could help you fix various performance issues effortlessly. It could kill the processes that hamper laptop keys from functioning. To do this, simply click Start menu > Power > Restart. If the mouse or touchpad isn’t working, then you need to press & hold the power button for a few seconds to turn the device off. Once done, press the power button again to restart it.
2. Update or Rollback laptop keyboard drivers
You may encounter various performance issues if you are running on outdated, corrupt, missing, or incompatible drivers. Updating drivers is the next best solution you can try if the laptop keyboard isn’t working. To update keyboard drivers, follow these steps:
- Right-click on the Start menu icon and select Device Manager.
- On the Device Manager window, expand the Keyboards category.
- Right-click on the device type and select Update Driver.
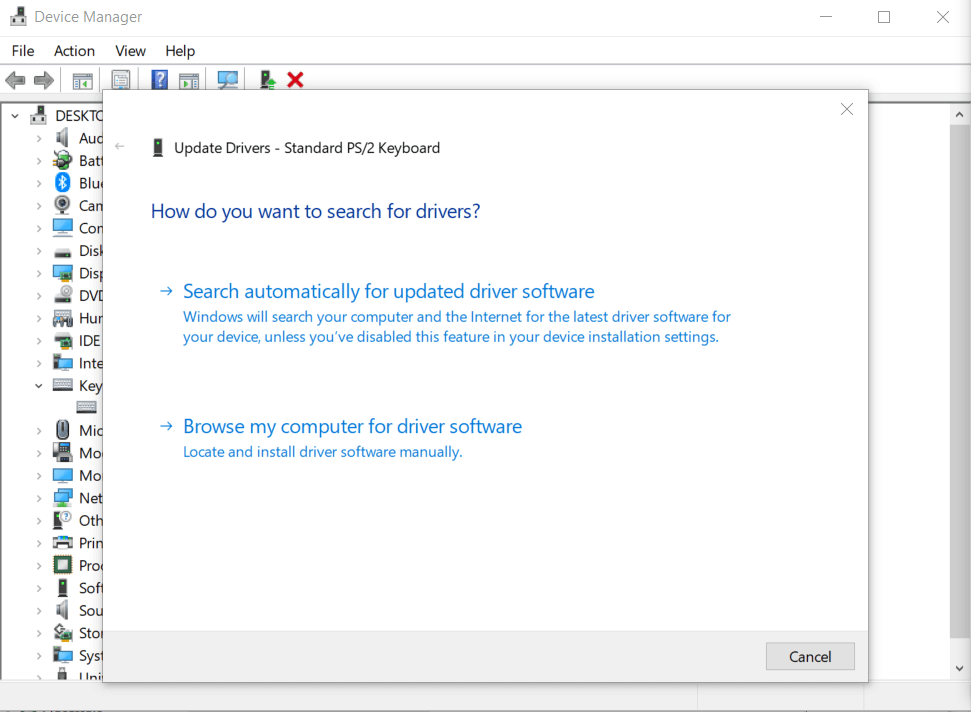
Now you will find two options:
- First, search automatically for updated driver software. If you choose this option, then Windows will search for the latest drivers on your PC and the Internet and install it on your device. This feature may not work if you have disabled this feature in your device installation settings.
- Second, browse my computer for driver software. You can use this option to locate and install driver software manually. Before you use this option, you need to download the driver installation file from the device manufacturer’s website.
Let the process complete and restart your PC.
You’re done.
Note: If you want to update drivers automatically, then try the best driver updater software. These powerful tools help you update & install outdated, missing, corrupt, and incompatible drivers automatically.
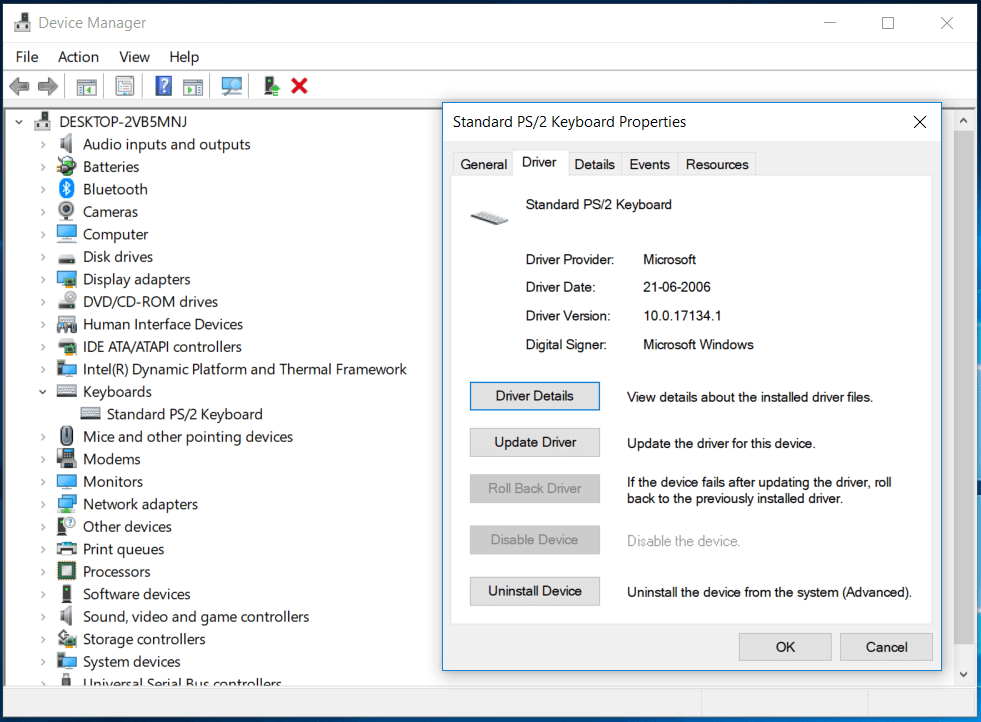
If updating drivers doesn’t work, then you need to uninstall the device and install it again. To do this, follow these steps:
- Go to Start > Device Manager.
- In the Device Manager window, expand the Keyboards category.
- Right-click on the device type and select Properties.
- Select the Driver tab.
- Now click Uninstall Device and press Ok.
- Restart your PC. It will reinstall drivers automatically.
Check if the laptop keys have started working again.
Note: If the device fails after updating the driver, click the Roll Back Driver option to return back to the previously installed driver.
3. Power reset your laptop
You can consider powering resetting your laptop to fix the laptop keys not working. To do this, follow these steps:
- Turn of your laptop.
- Now disconnect all peripherals and the power cable from your laptop.
- Remove the device battery (if it is removable).
- Next is to press & hold the power button for 15 seconds.
- Install the battery again and connect the power cable.
- Turn on your laptop and see if the issue is fixed.
Note: If it doesn’t work, then you need to check the bottom surface of your device to find the pinhole reset button. You need to press this pinhole button to power reset your laptop.
4. Fix specific key not working
If you find specific keyboard key isn’t working, then it can be fixed easily by changing the language settings. To ascertain the issue is with a specific key, open a text editor and press the key in question. If you find the output is different than desired, then you should change the language settings. To do this, follow these steps:
- Press Windows key + I to open Settings.
- In the Settings window, select Time & Language.
- On the next window, select the Region & Language option.
- Click Add a language and select the correct language option for your keyboard.
- Click Next and then Install to set the language.
- Follow the on-screen instructions to complete the process.

5. Check for hardware issues
In addition to other steps, you should consider checking for hardware issues to fix laptop keys not working. To do this, you should restart your PC and enter the BIOS. To enter the BIOS, you need to press the compatible key mentioned on the screen during the reboot process. It is usually the F2 or Delete key. You need to press this key until you enter BIOS mode. If you are able to enter the BIOS, then the issue is with the software. If you find an issue is with the hardware, then consider cleaning the keyboard or replacing it as needed.
6. Perform System File Checker (SFC) Scan
Corrupted system files can disrupt keyboard functionality by affecting the Windows components responsible for input device management. The System File Checker tool scans your entire Windows installation for damaged or missing system files and automatically repairs them using cached copies. This process fixes underlying system corruption that standard troubleshooting methods might miss.
SFC scans are particularly effective when keyboard problems appear after system updates, software installations, or unexpected shutdowns. The tool operates at a deep system level, repairing core Windows files that control hardware communication and driver management.
Steps:
- Right-click the Start button, select “Windows PowerShell (Admin)” or “Command Prompt (Admin),” type “sfc /scannow” and press Enter to begin the system scan.
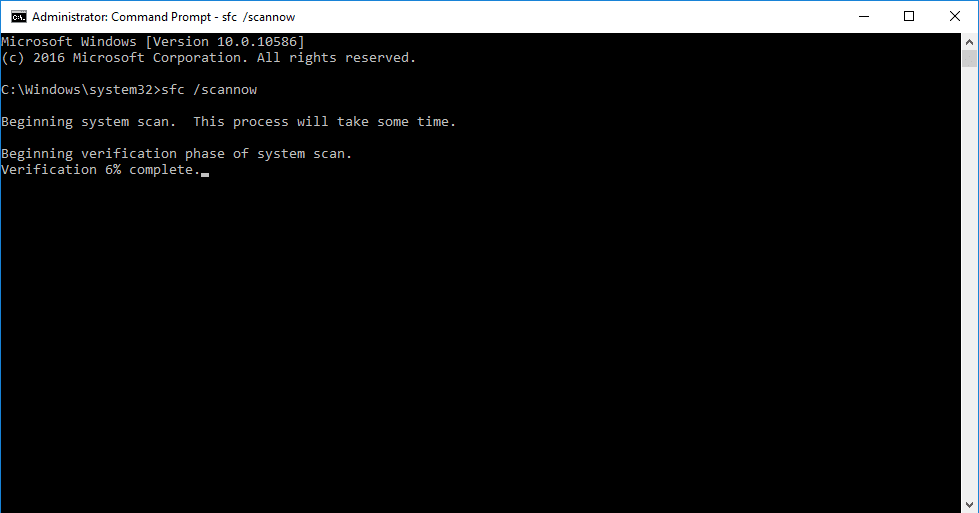
- Wait for the scan to complete (this may take 15-30 minutes), restart your computer when finished, and test your keyboard to verify the repair was successful.
7. Check Language and Regional Settings
Incorrect language or regional settings can cause keyboard keys to produce unexpected characters or stop working entirely. This issue commonly occurs after system updates or when multiple keyboard layouts are installed on your computer. Different language settings use various key mappings that can make familiar keys appear non-functional.
Regional settings also control how your system interprets keyboard input, including special characters and function key behaviors. Resetting these settings to match your physical keyboard layout often resolves mysterious typing problems.
Steps:
- Open Settings (Windows + I), go to “Time & Language” > “Language & Region,” remove any unnecessary keyboard layouts, and ensure your primary language matches your physical keyboard.

- Navigate to “Region” settings, verify your country/region is correct, click “Administrative language settings,” then “Change system locale,” and restart your computer to apply changes.

Laptop Key Maintenance Tips
Regular maintenance prevents most keyboard problems and extends your laptop’s lifespan significantly. Simple preventive measures save you time, money, and frustration while keeping your keyboard functioning optimally for years to come.
- Clean your keyboard weekly using compressed air to remove dust, crumbs, and debris that accumulate under keys
- Avoid eating or drinking near your laptop to prevent spills and sticky residue that damage key mechanisms
- Use a keyboard protector or cover when not using your laptop to shield keys from dust and environmental contaminants
- Keep your hands clean before typing to prevent oil buildup and reduce bacterial growth on frequently used keys
- Store your laptop properly in a clean, dry environment away from extreme temperatures and humidity
- Update drivers regularly through Windows Update or manufacturer websites to maintain optimal keyboard performance
- Perform gentle key removal only when necessary, using proper tools to avoid breaking delicate key mechanisms
- Schedule professional cleaning annually for deep maintenance that removes embedded dirt and checks internal connections
Conclusion
Laptop keyboard problems don’t have to derail your productivity or force expensive repairs. Most issues stem from common causes that respond well to systematic troubleshooting approaches. The methods outlined in this guide address both software and hardware-related problems effectively.
Prevention remains your best defense against future keyboard malfunctions. Regular cleaning, careful usage habits, and prompt attention to early warning signs keep your keyboard functioning smoothly. Don’t ignore minor issues like sticky keys or intermittent responses, as they often indicate larger problems developing.
Remember that some keyboard problems require professional intervention, especially those involving liquid damage or complex hardware failures. Know when to seek expert help versus attempting DIY repairs. With proper maintenance and quick problem resolution, your laptop keyboard will serve you reliably for years to come.
FAQs:
Q1: Why do only certain keys on my laptop stop working while others function normally?
Selective key failure usually means localized hardware problems. Individual keys can fail from physical damage or debris buildup. Worn-out key switches beneath specific keys cause this issue. Manufacturing defects sometimes affect only certain keyboard areas. Liquid spills damage keys in specific regions. Heavy usage of common keys like the space bar causes mechanical wear. Other keys remain unaffected because they’re used less frequently. Software issues like stuck modifier keys can also cause selective failure. Accessibility settings sometimes disable certain key combinations. This creates the appearance of hardware problems when it’s actually software-related.
Q2: Can liquid damage to laptop keys be repaired, or do I need a complete keyboard replacement?
Liquid damage repair depends on several factors. The type of liquid matters significantly. Response time affects repair success greatly. Water causes less damage than sugary drinks. Coffee and soda leave sticky residue. This residue continues damaging components over time. Quick action improves your repair chances. Turn off the laptop immediately after spills. Remove the battery if possible. Dry the area thoroughly with absorbent materials. Minor surface-level liquid exposure can often be cleaned. Use isopropyl alcohol for careful cleaning.
Q3: How can I determine if my keyboard problem is software-related or hardware-related before attempting repairs?
Test your keyboard in different operating environments first. Boot from a USB drive with different OS. Access BIOS/UEFI settings during startup. If keys work normally there, it’s likely software-related. Connect an external USB keyboard for testing. This isolates the problem to your built-in keyboard. Software issues usually affect all keys uniformly. They respond well to driver updates. System restores often fix software problems. Recent software installations may cause keyboard issues. Hardware problems show physical symptoms. Keys feel different when pressed. You might see visible damage or debris.
Author Bio:
Dinesh Lakhwani 

Dinesh Lakhwani, the entrepreneurial brain behind “TechCommuters,” achieved big things in the tech world. He started the company to make smart and user-friendly tech solutions. Thanks to his sharp thinking, focus on quality and the motto of never giving up, TechCommuters became a top player in the industry. His commitment to excellence has propelled the company to a leading position in the industry.
Popular Post
Recent Post
How To Disable Background Apps In Windows: 4 Quick Methods
A slow PC rarely gives a warning. One day, it simply takes longer to start. Apps open late. The fan runs loud, even when the screen is almost empty. Most people blame old hardware. Often, that is not the real reason. The real reason is hiding in plain sight. Windows keeps many apps active in […]
How to Activate Windows with a Product Key for Windows 11 & Windows 10
It always shows up at the worst time. You are halfway through a report, or about to join a video call. Then you spot it in the bottom right corner of the screen. Activate Windows. Go to Settings to activate Windows. Initially, an unactivated copy of Windows may seem like a minor inconvenience. Over time, […]

Is Easy Duplicate Finder Worth It? Honest Review
The photos folder looked normal at first glance. Then the storage warning popped up. One trip photo appeared four times. A tax PDF sat in three different folders. Two old setup files were still in Downloads, and each one was over 500 MB. Nobody plans this mess. Copies pile up slowly. A download runs twice. […]

Wise Duplicate Finder Review: Real Results from Wise Duplicate Finder
Read my honest Wise Duplicate Finder review. See features, pricing, pros and cons, and real PC test results. Find out if this free duplicate cleaner can free up your Windows storage.

How to Recover Deleted Files from Pen drive, USB Drive, SD Card
Introduction: On tech forums, you’ll often see posts like this: “I connected my pen drive to my laptop this morning, but the folder was empty. All my college project files had vanished. I don’t have a backup. Can someone help me?” Stories like this are very common. Pen drives, USB drives and SD cards are […]

How To Recover Files Deleted from the Recycle Bin [Windows 11]
Losing a file can happen in seconds. You clear your desktop, hit Delete, and empty the Recycle Bin. Then, just when you need that file again, it seems to have vanished. This guide will walk you through ways to restore files removed from the Recycle Bin. We will begin with simple fixes, then look at […]

Disk Drill Data Recovery Tool Explained: Full Review and Guide
It happens in a split second. You delete a folder by mistake. Your drive stops showing up. A photo album from your last trip just vanishes. And your stomach drops. Lost files feel personal. They are not just data. They are memories, work hours, and sometimes years of effort packed into a few gigabytes. When […]

Recover Deleted Files In Windows 11 With Software & Without
Introduction What is the first thing that goes through your mind the second an important file vanishes from a Windows 11 PC? For most people, it is a mix of panic and disbelief, followed by a frantic click through every folder that file could possibly be hiding in. It happens in a split second: one […]

EaseUS Data Recovery Wizard: Everything To Know
Data loss does not always come from a big disaster either. Most cases start small and boring. A drive gets formatted by mistake. A laptop freezes mid-save and restarts on its own. A memory card stops showing up after being pulled out too fast. None of these feel like emergencies at first, until you realize […]

