How to Fix the Audio Renderer Not Working for YouTube on Windows
Introduction
With a vast library of eclectic video content, high-quality resolution, and free video streaming benefits, YouTube is highly popular globally. However, some users can notice problems in functionality while operating the app. One prominent one is the audio renderer error Windows 10/11 message that comes up due to certain functional defects.
Typically, this prompt indicates an active audio enhancement feature on the PC that interferes with other functions, corrupted/old audio drivers, or temporary system glitching. You can use advanced software like IObit Driver Booster 9 to find and fix defective audio drivers. Yet, if the cause of the error is something else, you can take other measures. Here, we compile them all.
Steps to Rectify the YouTube Audio Renderer Not Working Problem
You can take multiple steps to remove the audio renderer error Windows 10 issue on your device. For a better experience, we have detailed all the steps you can take to remove this issue well. Please go through them and follow each part of the sequence accurately.
Fix 1: Unplug/replug the default Audio device
One of the easiest methods to fix the audio renderer problem for YouTube is to check the connected audio hardware, e.g., headphones. A wrongly attached device can cause minor troubles when trying to detect and allow audio rendering.
So, you should unplug the audio device and then replug it in the right socket. This method only applies to small-scale bugs and works if the glitch is not major.
Fix 2: Restart the computer
Restarting the computer is another suitable way to handle the audio renderer error Windows 10 and 11 users get on their device while trying to open YouTube. When you reboot the software, it would jumpstart the regular functioning of the PC and force-stop the cause of the error.
This is a temporary fix, and the issue can come up after a while if the main cause for the error is serious.
Fix 3: Update audio driver with IObit Driver Booster 9
One of the common issues that cause the problem of YouTube audio rendering is the pre-built PC drivers. The audio-specific drivers can stop performing and slow overall system functions if they are not up-to-date or have some damage.
You can download the IObit Driver Booster 9 app to fix audio renderer error on YouTube. It can analyze the system for defective or outdated drivers and allow users to update it. While the Pro version has more available driver options or advanced repair features, you can easily use the free version.
How to do this?
Step 1: Download and install the IObit Driver Booster app and launch it, following all on-screen instructions.
Step 2: Click on the Scan button. This process would take some time to complete.
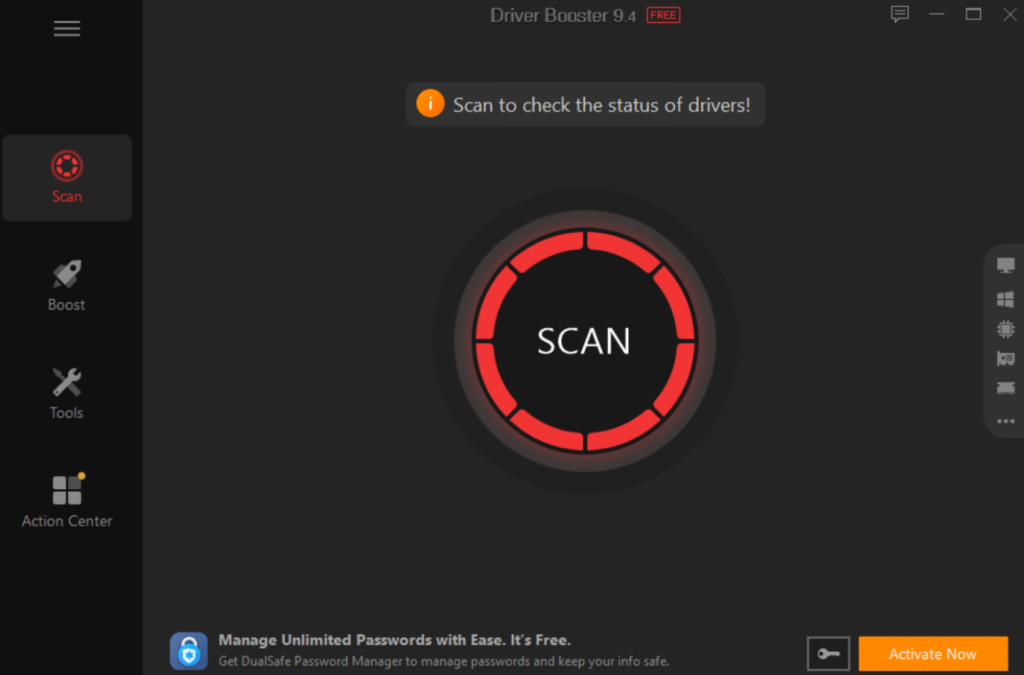
Step 3: Choose the right audio device drivers that the app detects as outdated if it comes up.
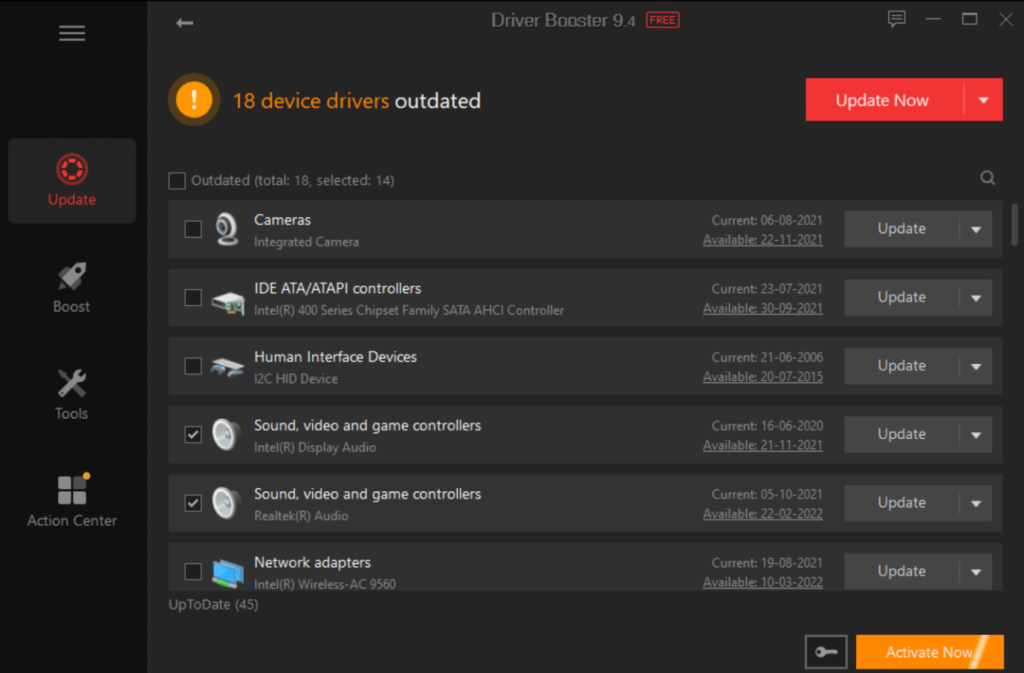
Step 4: Click on Update Now to start the update for the selected driver(s).
Fix 4: Get the Latest Audio Driver from Windows
If the audio renderer error in Windows 10 is due to outdated or defective audio drivers, you can also directly download it from Windows. The update may be available, but you must carry out specific steps to find and activate it. If the updates are unavailable here, you can directly visit the manufacturer’s website or rely on Fix 3, as mentioned.
How to do this?
Step 1: Click on the Start menu and type Device Manager. Click on the first option.
Step 2: When the window opens, find the “Audio Inputs and Outputs” option and double-click on it.
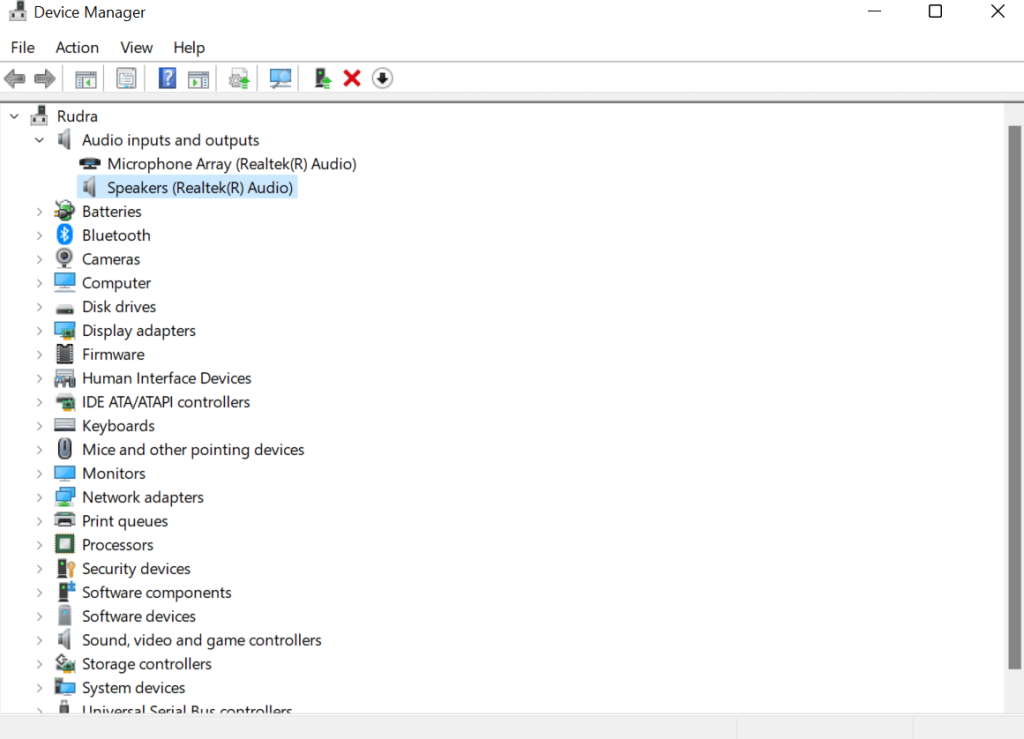
Step 3: Next, right-click the cursor on the audio device you have connected. From the next menu, select the “Update driver” option.
Step 4: Find “Search automatically for drivers” and click on it. The update process will activate.
Fix 5: Reboot Audio Device
One way to fix audio renderer error on Windows 10 or 11 devices is to enable/disable the audio device one is using. This is not the most common solution, but it is possible to bypass the audio renderer problem in YouTube by restarting audio devices.
How to do this?
Step 1: Press the Windows and X keys on your laptop keyboard. From the list, choose Device Manager.
Step 2: Choose the “Audio Inputs and Outputs” option and press the arrow beside it. When it expands, choose the device and click on Disable Device.
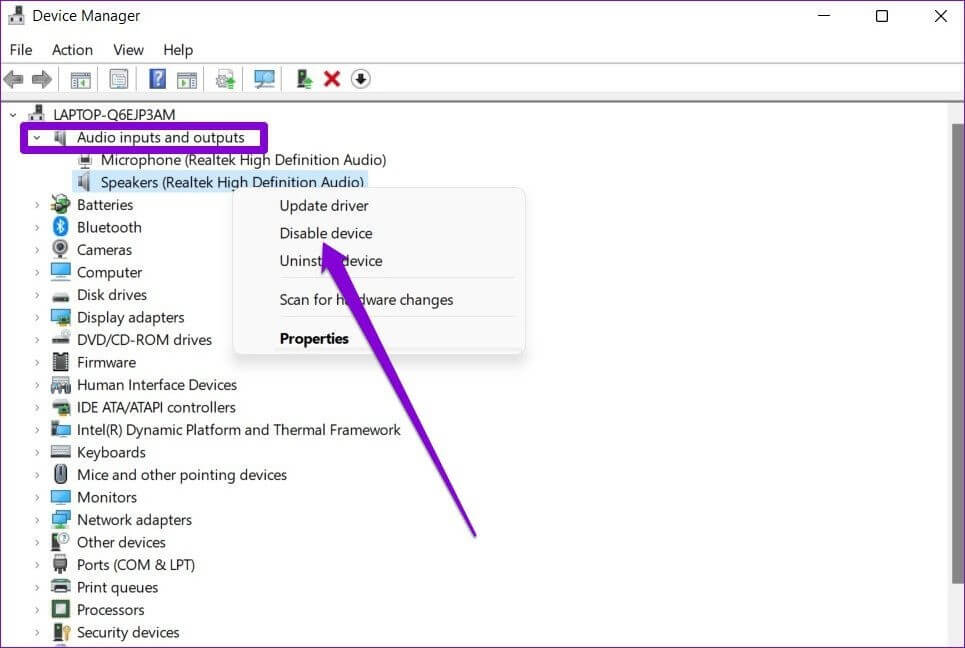
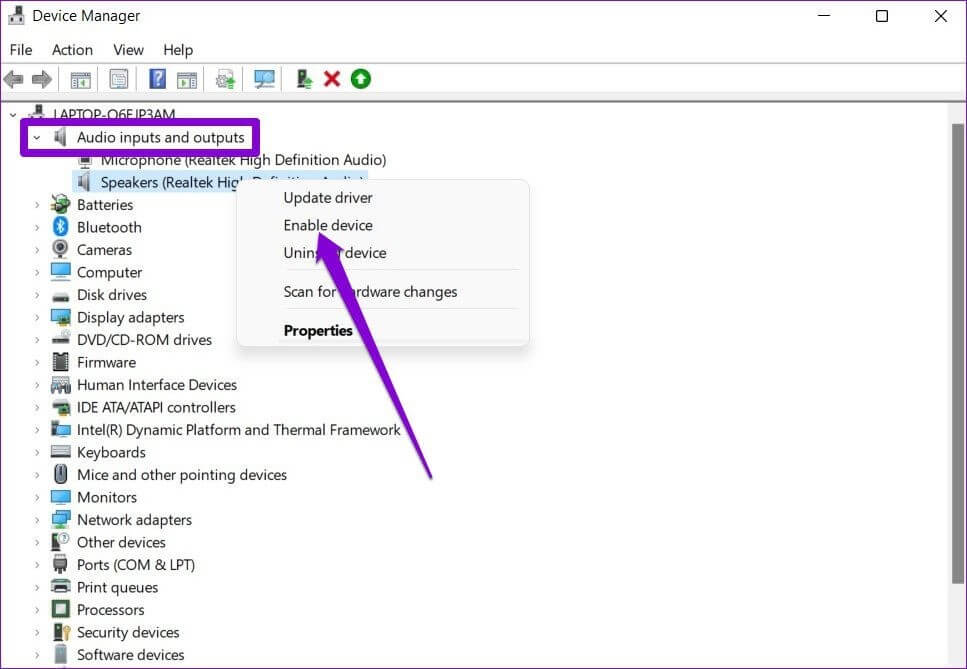
Step 3: Again, right-click on your select device a second time and choose Enable Device next.
Fix 6: Use the Windows Troubleshooter for Audio
Windows OS includes multiple pre-set troubleshooters that focus on quickly finding and fixing varying system issues. Like most fundamental components, there is a troubleshooter for audio connections. With this built-in tool, you can diagnose the software-specific issue causing the rendering problem on YouTube and automatically repair it.
How to do this?
Step 1: Press Win + R.
Step 2: When the Run dialog box opens, add the following command: ms-settings:troubleshoot.
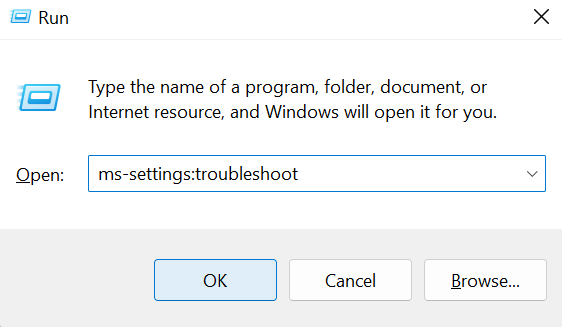
Click OK to run it.
Step 3: Choose the “Playing Audio” option in the next window.
Step 4: Click on the “Run the troubleshooter” button on the next screen. Wait for the process to complete.
Step 5: When the device options come up, choose the one you are using and click the Next button.
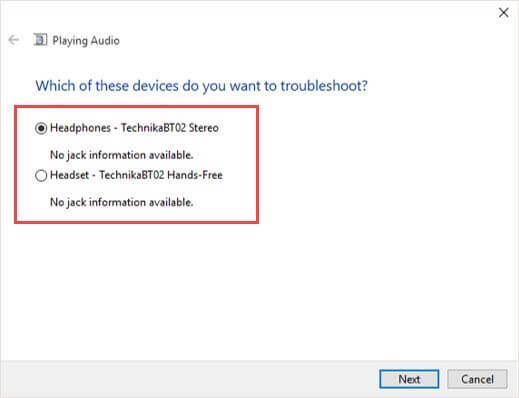
Step 6: If the device has an issue, its relevant repair strategy will come up. Press YES and continue the steps as mentioned.
Step 7: Restart the device and wait for it to complete. Open YouTube and check if the issue is still available.
Fix 7: Remove YouTube browsing data
One possible reason for the YouTube audio renderer issue is an overfilled cache folder within the app, specifically if they are corrupted. So, you should remove the store cache data on the YouTube app if the prompt comes up, and even consistently.
How to do this?
Step 1: Open the browser, i.e., Chrome.
Step 2: Press Ctrl + Shift + Delete keys on the keyboard.
Step 3: After the “Clear browsing data” panel appears, choose the Time range from the drop-down menu. Set this to the “All Time” choice.
Step 4: Find the “Cached images and files” option and check the box beside it.
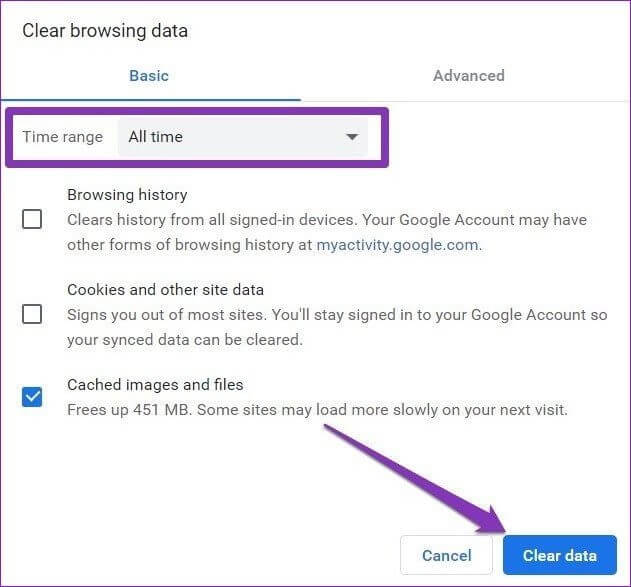
Step 5: Press the Clear Data button to remove all cached browsing data.
Fix 8: Disable Browser-based Hardware Acceleration
If the hardware acceleration feature is activated on different browsers, it can affect video streaming and playback performance. So, one way you can fix the audio renderer error on YouTube is to disable this setting, as it is a probable cause for the problem.
The following is a way to deactivate the settings in a specific browser, i.e., Google Chrome. The steps may differ for other browsers.
How to do this?
Step 1: Open the Google Chrome app on your device by clicking on it from the Desktop or searching through the Start menu.
Step 2: At the top right of the home page, you will see a three-dot icon for the menu. Click on it and choose Settings from the drop-down list.
Step 3: Expand to the left side pane for Advanced > System.
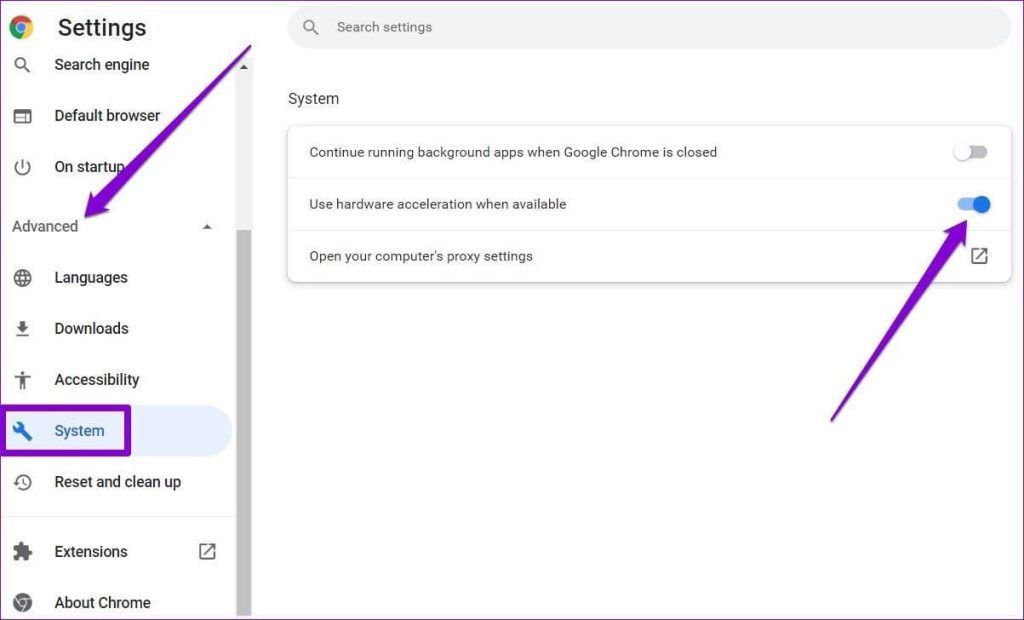
Step 4: Find the “Use hardware acceleration when available” option and turn it OFF.
Fix 9: Adjust the Settings for Audio Playback
Some Windows devices may have audio enhancement or mixing software which affects the regular functioning of the system audio playback. This may result in the error or audio rendering while using YouTube. So, it would be best if you changed the audio playback system settings to fix the problem.
How to do this?
Step 1: On the Taskbar, you will see the icon of Speaker. Right-click your cursor on it.
Step 2: Choose the “Sound Settings” option.
Step 3: Scroll through the menu and choose the Advanced section. Then, click on the “More Sound Settings” option to open its window.
Step 4: Find the audio device you use and right-click on it. Choose Properties.
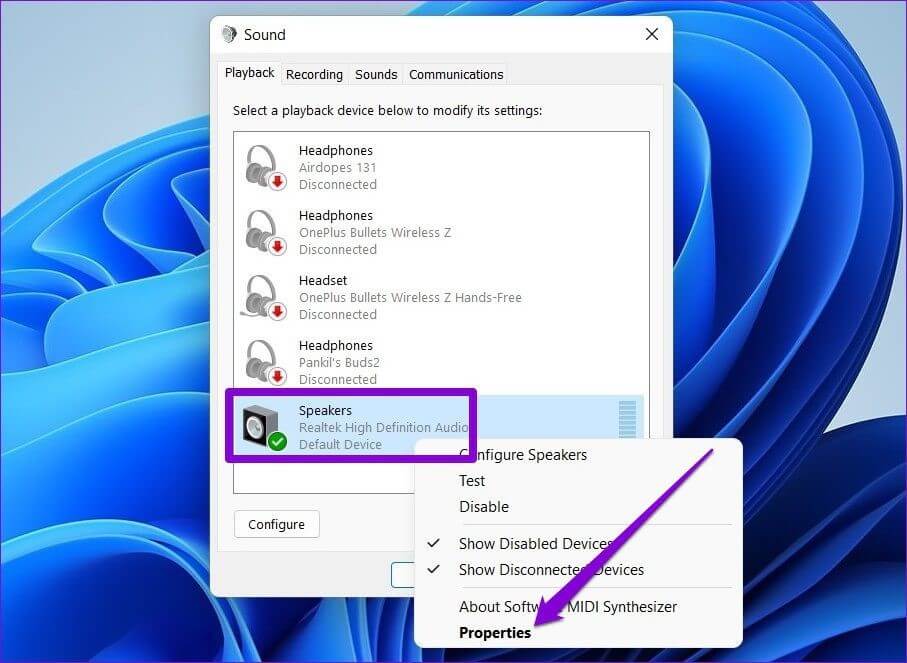
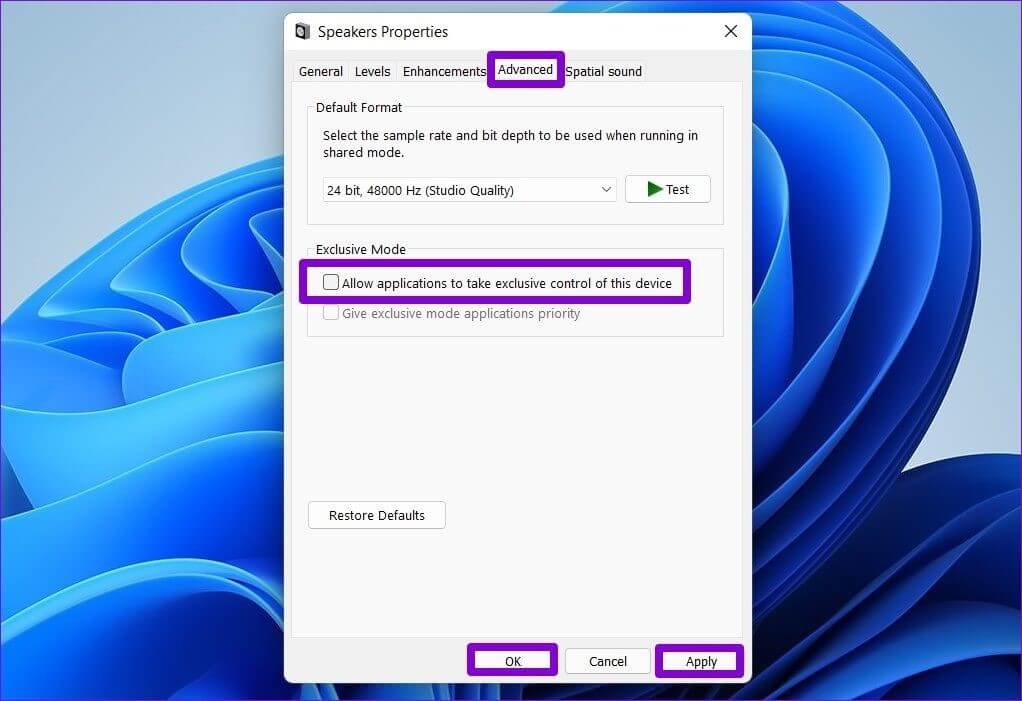
Step 5: Find the Advanced section and turn the checkmark beside the “Allow applications to take exclusive…” function to OFF.
Step 6: Click on the Apply button and then press OK.
Step 7: Restart the device and try switching YouTube to play a video.
Conclusion
Follow the given solutions to fix the audio renderer error Windows 10-based problem in your YouTube application. Typically, the fix is easy to accomplish and does not require complex technical steps. For complex problems like defective drivers, download helpful apps like IObit Driver Booster 9. If problems still persist, you can involve experts in the fixing process.
Popular Post
Recent Post
How to Troubleshoot Xbox Game Bar Windows 10: 8 Solutions
Learn how to troubleshoot and fix issues with the Xbox Game Bar not working on Windows 10. This comprehensive guide provides 8 proven solutions to resolve common problems.
How To Record A Game Clip On Your PC With Game Bar Site
Learn how to easily record smooth, high-quality game clips on Windows 11 using the built-in Xbox Game Bar. This comprehensive guide covers enabling, and recording Game Bar on PC.
Top 10 Bass Booster & Equalizer for Android in 2024
Overview If you want to enjoy high-fidelity music play with bass booster and music equalizer, then you should try best Android equalizer & bass booster apps. While a lot of these apps are available online, here we have tested and reviewed 5 best apps you should use. It will help you improve music, audio, and […]
10 Best Video Player for Windows 11/10/8/7 (Free & Paid) in 2024
The advanced video players for Windows are designed to support high quality videos while option to stream content on various sites. These powerful tools support most file formats with support to audio and video files. In this article, we have tested & reviewed some of the best videos player for Windows. 10 Best Videos Player […]
11 Best Call Recording Apps for Android in 2024
Whether you want to record an important business meeting or interview call, you can easily do that using a call recording app. Android users have multiple great options too. Due to Android’s better connectivity with third-party resources, it is easy to record and manage call recordings on an Android device. However it is always good […]
10 Best iPhone and iPad Cleaner Apps of 2024
Agree or not, our iPhones and iPads have seamlessly integrated into our lives as essential companions, safeguarding our precious memories, sensitive information, and crucial apps. However, with constant use, these devices can accumulate a substantial amount of clutter, leading to sluggish performance, dwindling storage space, and frustration. Fortunately, the app ecosystem has responded with a […]
10 Free Best Barcode Scanner for Android in 2024
In our digital world, scanning barcodes and QR codes has become second nature. Whether you’re tracking packages, accessing information, or making payments, these little codes have made our lives incredibly convenient. But with so many barcode scanner apps out there for Android, choosing the right one can be overwhelming. That’s where this guide comes in! […]
11 Best Duplicate Contacts Remover Apps for iPhone in 2024
Your search for the best duplicate contacts remover apps for iPhone ends here. Let’s review some advanced free and premium apps you should try in 2024.
How To Unsubscribe From Emails On Gmail In Bulk – Mass Unsubscribe Gmail
Need to clean up your cluttered Gmail inbox? This guide covers how to mass unsubscribe from emails in Gmail using simple built-in tools. Learn the best practices today!
7 Best Free Methods to Recover Data in Windows
Lost your data on Windows PC? Here are the 5 best methods to recover your data on a Windows Computer.


