Here’s How to Uninstall a Printer from Your Mac?
Even though digitization is the new way to operate. There are still some situations where you need a hard copy of your documents.
For example, when you need to print out your certificates for a job interview or print some photos to create an art piece for your kid’s school.
But these situations arise very rarely nowadays when you need to print something as digital documents are acceptable everywhere. In this case, there is no purpose in keeping a printer on your Mac, especially when your disk space is already running out.
In addition, if you are replacing your old printer, you need to install drivers for the new printer in System Preferences to run it. So, there is no need to keep your old printers on your system and increase their workload.
It is pretty simple to uninstall a printer from your Mac. You can both manually and automatically uninstall a printer. Let’s explore all the options in detail.
How to Remove Printer Drivers on Your Mac
If you have replaced your old printer, you should delete it from your Mac. That’s because old printer drivers can conflict with the new driver files, disturbing the printer’s features. Plus, when you have no plan to connect a printer with your Mac, what is the purpose of keeping its drivers and overloading your disk space.
So, following these steps, you can quickly delete printer drivers on your Mac:
Step 1. Go to the Apple Menu and select System Preferences.
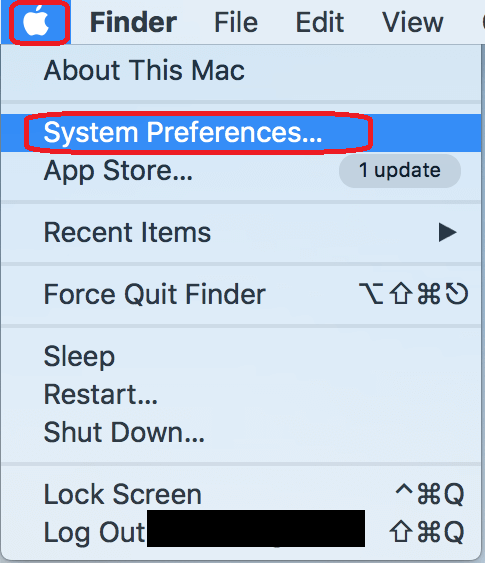
Step 2. After that, click on the Printers & Scanners pane.
Step 3. Navigate to the printer that you want to remove from the sidebar.
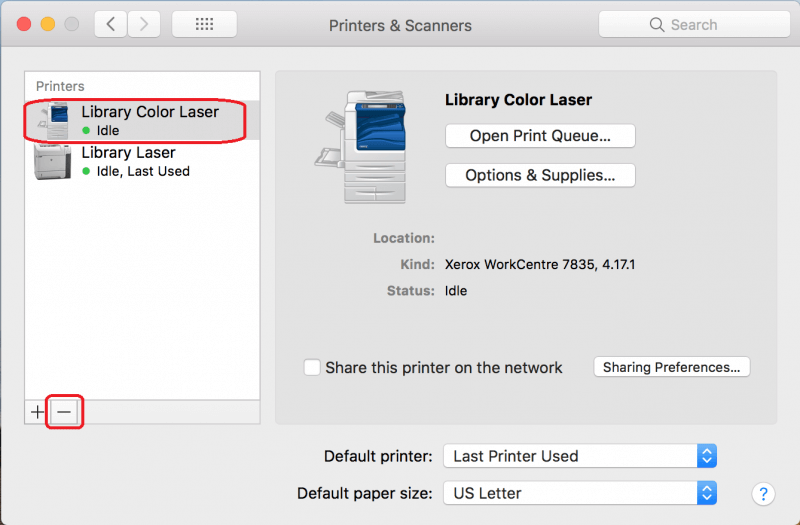
Step 4. Now, just click on the ‘-‘ sign from the bottom of the sidebar to remove printer drivers from your system.
How to Uninstall a Printer from Your Mac?
When you delete a printer in System Preferences, it becomes unavailable in the Print dialogue box. But, it doesn’t completely uninstall your system.
For that, you need to delete all the files that a printer has installed on your Mac. Below we have explained 3 easy options to uninstall a printer on your Mac:
Option 1. Use the Printer Uninstaller File
If your printer manufacturer has an uninstaller, which will probably be available in your Applications folder, it is the best way to uninstall a printer on your Mac. Here’s how this option works:
Step 1. Head over to the Application folder on your Mac. Now, look for a folder with your printer’s manufacturer name that you want to uninstall.
Step 2. After that, scroll down to the Uninstaller file and double-click to open it.
Step 3. Simply follow the on-screen instructions to remove all the printer files from your computer.
Option 2. Go to Finder
If your printer manufacturer has no uninstaller, you have to manually find and delete the printer driver. Unfortunately, it is a time-consuming task as your printer drivers have installed several files in different locations on your Mac.
So, you have to find all the possible printer driver files and manually drag them to the Trash. To complete this mammoth task, follow these steps:
Step 1. Go to the Finder icon in the Dock.
Step 2. Select the Go Menu and next click on the Go to Folder.
Step 3. Paste the following path into the text field, one by one. At every location, look for the files with your printer manufacturer’s name and drag them to the Trash folder.
~/Library/Cache
~/Library/Preferences
~/Library/Logs
~/Library/Application Support
~/Library/Containers
~/Library/Printers
Step 4. Cross-check all the folders to ensure that no printer files remain behind. Once you are sure, empty the Trash to permanently get rid of all the printer drivers.
Option 3. Use Third-party Tools
In the absence of your printer manufacturer uninstaller, it is not easy to uninstall all printer files manually. It takes time, and you can also delete the important files by mistake. Thus, the easiest solution is to get a powerful tool like CleanMyMac X.
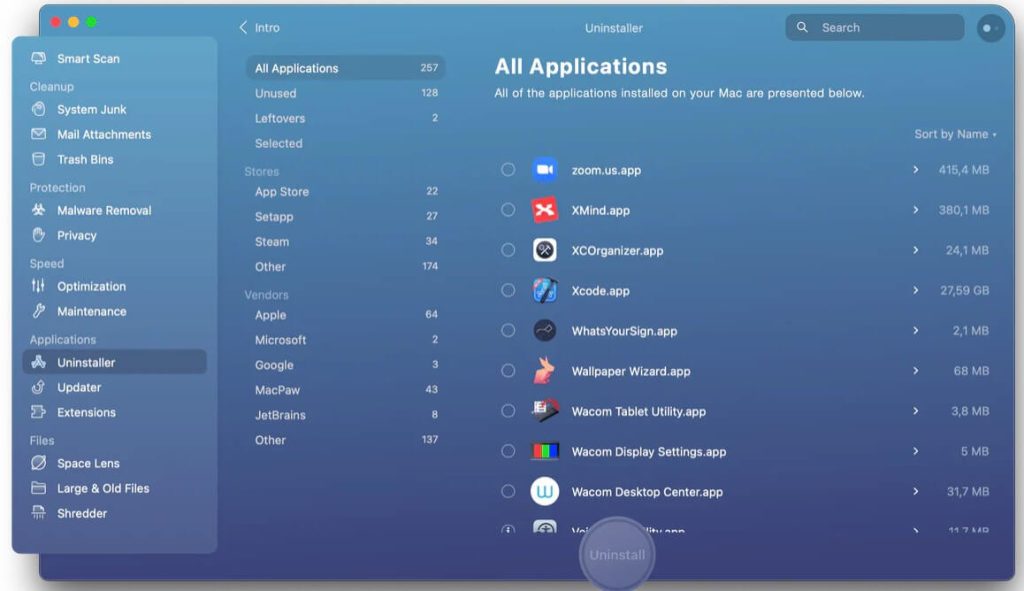
CleanMyMac X is the perfect tool to remove unwanted files from your Mac and maintain its performance. Using its Uninstaller module, you uninstall most applications, including print drivers.
Here’s how to uninstall a printer using CleanMyMac X:
Step 1. Install CleanMyMac X for free on your Mac.
Step 2. Launch the application and select the Uninstaller in the sidebar.
Step 3. Search for the printer name you want to uninstall in the search box.
Step 4. Once the drivers appear in the right-hand pane, check the box next to them and click on the Uninstall.
How to Reinstall a Printer on Your Mac?
If you have to reconnect your old printer to your Mac machine by chance, maybe your new printer is not useful or needs repair. In that case, you can easily reinstall a printer on your Mac.
There you have several options to reinstall printers to your Mac, like:
With a USB
With WiFi or network
Via IP address
Using Bluetooth
Or connecting to an AirPort Time Capsule
For this guide, let’s quickly see how to add a printer using a USB:
Step 1. Go to the Apple menu > App Store.
Step 2. Click on the Updates to install the latest software updates. If there are no updates available, your MacOS already has the latest updates on your printer’s software.
Step 3. Using the user manual, unpack your printer and install toner or ink cartridges.
Step 4. Test to ensure there are no errors.
Step 5. Connect the printer to your Mac using the USB cable. A message will prompt on your screen to download new software.
Step 6. Download and install the software.
Parting Thoughts
Uninstalling a printer in System Preferences is simple. But unfortunately, it doesn’t completely uninstall the printer from the Mac. For that, you need to uninstall every file that printer manufacturers have installed on your system.
And doing that manually will take too much time. Thus, third-party tools like CleanMyMac X are the best option. It will not only uninstall printer drivers but also helps to maintain your Mac’s health.
Now, the choice is yours. We know you will make a wise decision.
If you find this post helpful, don’t forget to check our other Mac guides.
Popular Post
Recent Post
How To Record A Game Clip On Your PC With Game Bar Site
Learn how to easily record smooth, high-quality game clips on Windows 11 using the built-in Xbox Game Bar. This comprehensive guide covers enabling, and recording Game Bar on PC.
Top 10 Bass Booster & Equalizer for Android in 2024
Overview If you want to enjoy high-fidelity music play with bass booster and music equalizer, then you should try best Android equalizer & bass booster apps. While a lot of these apps are available online, here we have tested and reviewed 5 best apps you should use. It will help you improve music, audio, and […]
10 Best Video Player for Windows 11/10/8/7 (Free & Paid) in 2024
The advanced video players for Windows are designed to support high quality videos while option to stream content on various sites. These powerful tools support most file formats with support to audio and video files. In this article, we have tested & reviewed some of the best videos player for Windows. 10 Best Videos Player […]
11 Best Call Recording Apps for Android in 2024
Whether you want to record an important business meeting or interview call, you can easily do that using a call recording app. Android users have multiple great options too. Due to Android’s better connectivity with third-party resources, it is easy to record and manage call recordings on an Android device. However it is always good […]
10 Best iPhone and iPad Cleaner Apps of 2024
Agree or not, our iPhones and iPads have seamlessly integrated into our lives as essential companions, safeguarding our precious memories, sensitive information, and crucial apps. However, with constant use, these devices can accumulate a substantial amount of clutter, leading to sluggish performance, dwindling storage space, and frustration. Fortunately, the app ecosystem has responded with a […]
10 Free Best Barcode Scanner for Android in 2024
In our digital world, scanning barcodes and QR codes has become second nature. Whether you’re tracking packages, accessing information, or making payments, these little codes have made our lives incredibly convenient. But with so many barcode scanner apps out there for Android, choosing the right one can be overwhelming. That’s where this guide comes in! […]
11 Best Duplicate Contacts Remover Apps for iPhone in 2024
Your search for the best duplicate contacts remover apps for iPhone ends here. Let’s review some advanced free and premium apps you should try in 2024.
How To Unsubscribe From Emails On Gmail In Bulk – Mass Unsubscribe Gmail
Need to clean up your cluttered Gmail inbox? This guide covers how to mass unsubscribe from emails in Gmail using simple built-in tools. Learn the best practices today!
7 Best Free Methods to Recover Data in Windows
Lost your data on Windows PC? Here are the 5 best methods to recover your data on a Windows Computer.
100 Mbps, 200 Mbps, 300Mbps? What Speed is Good for Gaming?
What internet speed is best for gaming without lag? This guide examines whether 100Mbps, 200Mbps, or 300Mbps is good for online multiplayer on PC, console, and mobile.
