How to Transfer Videos from iPhone to Mac

Last updated on August 25th, 2023 at 12:20 pm
Now that your iPhone storage is almost full and the easiest way to free up some space is to move your large files from iPhone to your Mac. Videos occupy fair share of total storage space and it is wise to move these large files to your Mac so that you give your iOS device required space to work efficiently.
In addition to cleaning up storage space on iPhone, you may also consider editing your iPhone videos on Mac using various Mac applications. Thus, it becomes necessary to transfer your media files. There are few quick methods to follow to transfer videos from your iPhone to Mac. Let’s discuss how to do it?
Four simple ways to transfer videos from iPhone to Mac
There are multiple methods available to move your videos from iPhone to Mac instantly. It primarily includes using built-in applications for effective results.
1.Using AirDrop
AirDrop is an interesting addition to Apple devices that allows you to transfer data between various Apple devices effortlessly. AirDrop works via Bluetooth. Thus, you need to enable Bluetooth before using AIrDrop to transfer files.
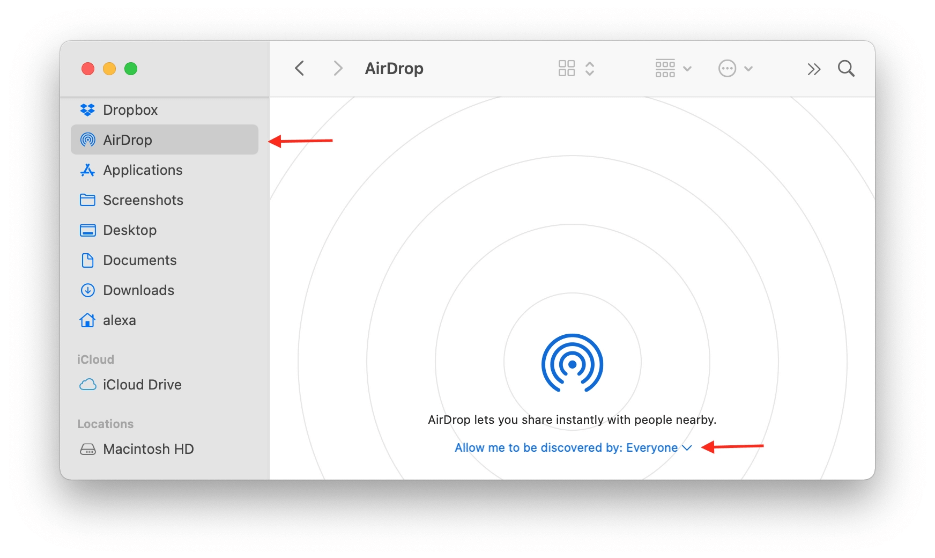
First follow these steps to enable AirDrop on Mac:
- Turn on Bluetooth on Mac.
- Select AirDrop from the Finder menu.
- From Settings, you need to set up who can discover you. Select one of these options:
- Contacts only
- Everyone
Now that AirDrop is enabled, you can import videos from iPhone to Mac easily.
How to AirDrop videos from iPhone to a Mac?
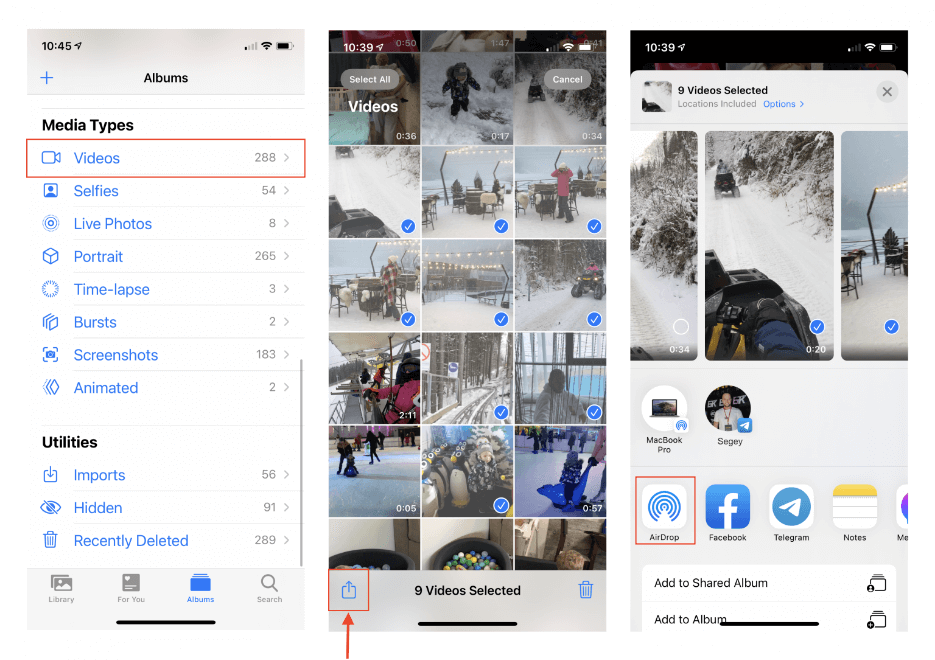
- On your iPhone open Photos app.
- Go to Albums and choose the videos you wish to import to your Mac.
- From the bottom left corner click the Share icon.
- Click the AirDrop icon and choose your Mac.
- Accept importing videos on your Mac. Be default, you can find these imports in the Downloads folder on your Mac.
2. Using iPhoto/Photos App
Using iPhoto or Photos app is the easiest solution if you want to transfer large video files from iPhone to Mac. To do this, you need to connect both devices via a USB port. Follow these steps to do it.
- Connect iPhone to Mac using USB cable.
- Here, it’ll ask you for trusting the device, tap on Trust.
- It’ll open the Photos app automatically. Alternatively open Photos app from the Launchpad.
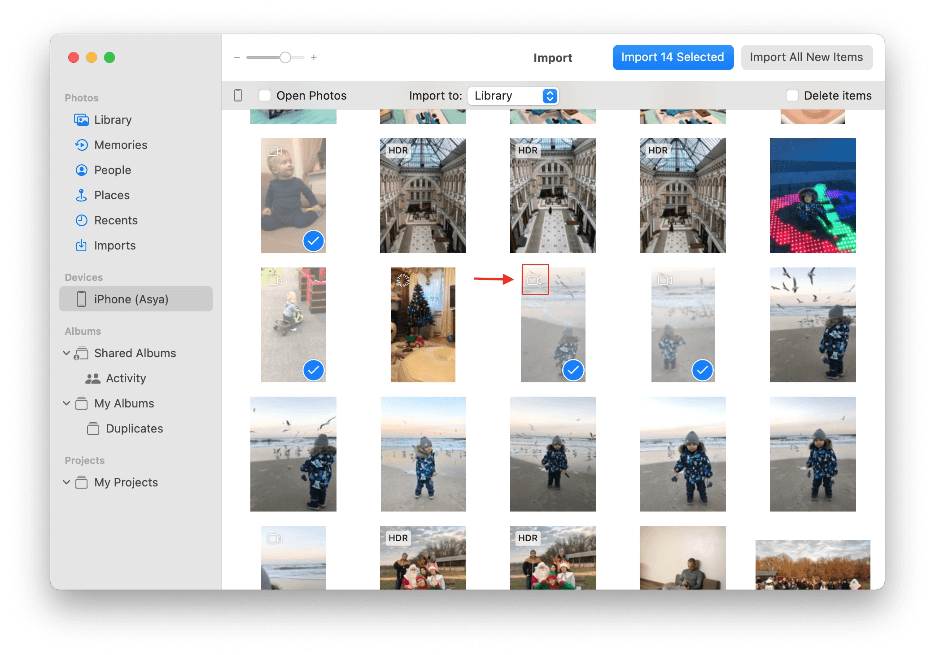
- From the Photos window’s sidebar, tap on the iPhone.
- You need to select the videos that you want to import to your Mac from iPhone. You can preview videos before importing them.
- Once all videos are selected, simply tap on Import Selected.
- That’s it! You can check imported videos in the Import section on your Mac.
3. Using Image Capture
Image Capture is a built-in app that you can find in the Launchpad. It allows you to sort your media files from your iPhone by file type before importing them to Mac. To use this feature, you need to connect your iPhone and Mac via a USB port. Follow below mentioned steps to complete the import using Image Capture.
- Connect both devices via a USB cable.
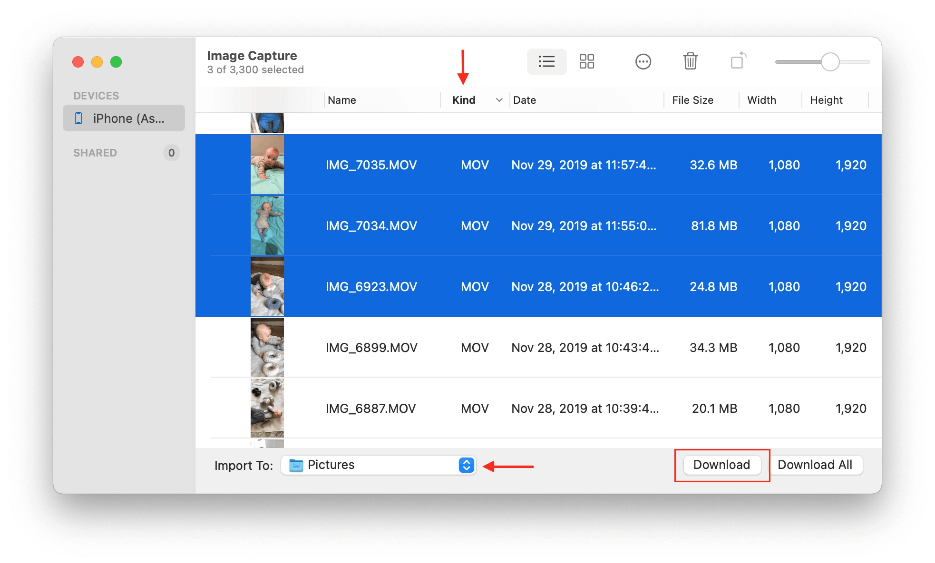
- Open Image Capture.
- Select your iPhone from the sidebar. You can preview files here before importing them.
- Scroll down to find video files. These files have the .mov extension.
- Next is to choose the video files that you want to import and select the folder on Mac where the files will be imported.
- Tap on Download button.
- That’s it! All the media files will be copied on your Mac. Transfer time may vary depending on the total size of media files.
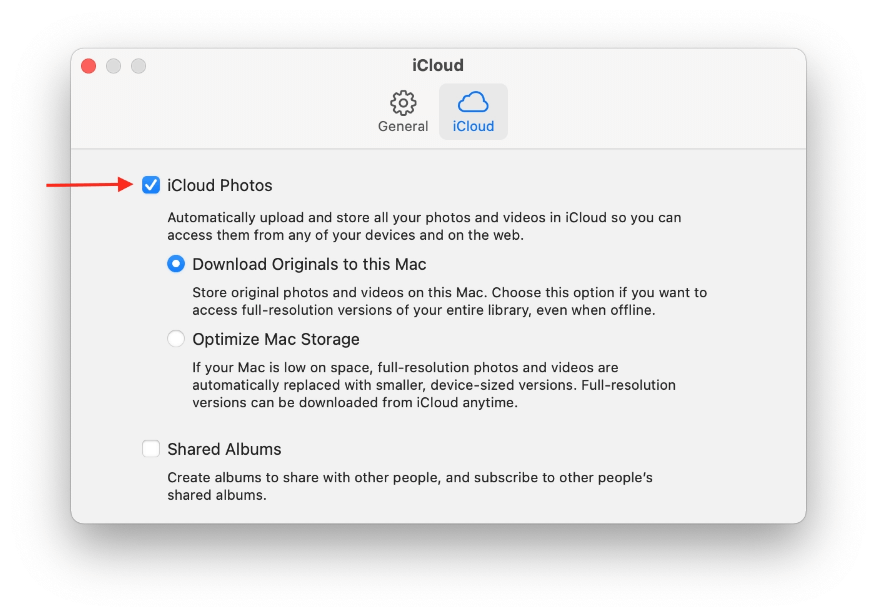
4. Using iCloud
iCloud syncs all your media files automatically between your Apple devices. It reduces the need of using wires & cables. As iCloud only offers 5GB of free storage, you may need to pay for iCloud storage to store all your files. Follow steps mentioned below to transfer videos from iPhone to Mac with iCloud.
- Go to Settings > the Photos section to enable iCloud on your iPhone.
- Enable iCloud Photo Library on your Mac. You can do this by opening Photos app > Preferences > and enable iCloud Photos option in the iCloud tab.
- Now that you’ve enabled iCloud Photo Library on both your devices, you can check all your media files including photos & videos on your Mac.
Note: If you delete any file on one device, then it’ll delete the file on another device as well.
Conclusion
The best part of using all these four options is that you don’t lose file quality while transferring your files. In addition to these built-in apps & features, you can also try third-party apps to transfer data from your iPhone to Mac. Try these simple & effective steps to transfer all your videos from iPhone to Mac instantly and don’t forget to share your experience in the comments below.
Source: Nektony Blog
Author Bio:
Dinesh Lakhwani 

Dinesh Lakhwani, the entrepreneurial brain behind “TechCommuters,” achieved big things in the tech world. He started the company to make smart and user-friendly tech solutions. Thanks to his sharp thinking, focus on quality and the motto of never giving up, TechCommuters became a top player in the industry. His commitment to excellence has propelled the company to a leading position in the industry.
Popular Post


Recent Post

How to Troubleshoot Xbox Game Bar Windows 10: 8 Solutions
Learn how to troubleshoot and fix issues with the Xbox Game Bar not working on Windows 10. This comprehensive guide provides 8 proven solutions to resolve common problems.

How To Record A Game Clip On Your PC With Game Bar Site
Learn how to easily record smooth, high-quality game clips on Windows 11 using the built-in Xbox Game Bar. This comprehensive guide covers enabling, and recording Game Bar on PC.

Top 10 Bass Booster & Equalizer for Android in 2024
Overview If you want to enjoy high-fidelity music play with bass booster and music equalizer, then you should try best Android equalizer & bass booster apps. While a lot of these apps are available online, here we have tested and reviewed 5 best apps you should use. It will help you improve music, audio, and […]

10 Best Video Player for Windows 11/10/8/7 (Free & Paid) in 2024
The advanced video players for Windows are designed to support high quality videos while option to stream content on various sites. These powerful tools support most file formats with support to audio and video files. In this article, we have tested & reviewed some of the best videos player for Windows. 10 Best Videos Player […]

11 Best Call Recording Apps for Android in 2024
Whether you want to record an important business meeting or interview call, you can easily do that using a call recording app. Android users have multiple great options too. Due to Android’s better connectivity with third-party resources, it is easy to record and manage call recordings on an Android device. However it is always good […]
10 Best iPhone and iPad Cleaner Apps of 2024
Agree or not, our iPhones and iPads have seamlessly integrated into our lives as essential companions, safeguarding our precious memories, sensitive information, and crucial apps. However, with constant use, these devices can accumulate a substantial amount of clutter, leading to sluggish performance, dwindling storage space, and frustration. Fortunately, the app ecosystem has responded with a […]

10 Free Best Barcode Scanner for Android in 2024
In our digital world, scanning barcodes and QR codes has become second nature. Whether you’re tracking packages, accessing information, or making payments, these little codes have made our lives incredibly convenient. But with so many barcode scanner apps out there for Android, choosing the right one can be overwhelming. That’s where this guide comes in! […]
11 Best Duplicate Contacts Remover Apps for iPhone in 2024
Your search for the best duplicate contacts remover apps for iPhone ends here. Let’s review some advanced free and premium apps you should try in 2024.

How To Unsubscribe From Emails On Gmail In Bulk – Mass Unsubscribe Gmail
Need to clean up your cluttered Gmail inbox? This guide covers how to mass unsubscribe from emails in Gmail using simple built-in tools. Learn the best practices today!
7 Best Free Methods to Recover Data in Windows
Lost your data on Windows PC? Here are the 5 best methods to recover your data on a Windows Computer.

