


Slow computers are a common problem for almost every Windows user. Well, yes! Over time, your PC picks up junk files. These files sit quietly in the background. They take up space and slow things down. Programs open slower. Windows takes longer to boot. Even simple tasks like opening a folder can feel sluggish. There […]
How to Share Files Over Bluetooth On Windows 11, 10 & 7 PC | An Ultimate Guide To File Transfer
With wireless file transfers, you can share multimedia files between one or more devices without requiring an actual cable or an internet connection. Bluetooth is one of the most reliable and effective ways to transfer local files, whether you’re sending little or medium-sized images, movies, or work papers.
With a range of up to 100 meters, this reliable technology is a great option for speedy and flawless transfers between adjacent devices. The best part is that Bluetooth is compatible with a wide range of devices and operating systems, unlike other file transfer methods. The functionality’s universal compatibility and ease of use make it an ideal solution for numerous users.
In today’s comprehensive guide, we will explore the step-by-step procedure on how to share files over Bluetooth on Windows 11, 10, and 7 PCs. We’ll also walk you through a few troubleshooting tips on fixing common Bluetooth file-sharing issues. Additionally, we’ll reveal some of the best methods to share files between Windows PCs and other devices in this post. So, let’s get started and begin by exploring why Bluetooth file sharing remains a relevant method among millions of users.
PART 1: Why Consider Sharing Files Over Bluetooth?
Bluetooth file sharing is still the preferred choice regardless of the widespread use of cloud storage services and other wireless transfer techniques for several reasons:
1. Offline Transfers: Bluetooth technology operates independently of the Internet. When you need to transmit a file quickly but have limited or no access to the Internet, this is the ideal answer.
2. Ease of Use: Bluetooth is a great option for novices and less tech-savvy consumers because file transfers are a very simple and easy process to perform.
3. Security: Bluetooth connections are far more secure than other online file transfer methods, as files are delivered directly to the recipient without going via any third-party servers.
4. High Compatibility: Most of the modern devices, including computers, smartphones, and tablets come equipped with built-in Bluetooth functionality, ensuring wider compatibility between different devices.
Now that you’ve been tempted to use Bluetooth, let’s get our devices ready for file sharing via Bluetooth on Windows 10, 11, and 7 PCs.
PART 2: How To Prep Up Your Device For Seamless Bluetooth File Sharing On Windows PCs?
Well before you get started, make sure that the Bluetooth feature is enabled on both your computer and the device you want to share files with and then pair the devices. The method is pretty straightforward, all you need to do is:
To switch on Bluetooth on Windows 11:
Follow these steps to enable the Bluetooth feature on your Windows 11 OS:
STEP 1: Launch the Settings app on your computer. You can do so by pressing the shortcut keys Windows key + I altogether.
STEP 2: Locate and click on the Bluetooth & devices module. You can find it on the left sidebar.

STEP 3: Now simply toggle on the switch next to the Bluetooth feature.

Alternatively, you can also consider enabling the Bluetooth functionality by navigating to the Quick Settings menu. This can be accessible by clicking on the Network icon in the Taskbar. Here, you can click on the Bluetooth icon and switch it on.
If you’re curious to learn how to use Bluetooth functionality, click here to navigate to PART 3, where we have discussed the steps for sharing files.
To switch on Bluetooth on Windows 10:
Windows 10 users can follow the instructions shared below to enable Bluetooth functionality on PCs:
STEP 1: Click on the Start menu and head towards the gear icon to open the Settings menu.
STEP 2: Now click on the Devices module on the Settings window.

STEP 3: At this point, you need to locate and click on the Bluetooth & other devices section. You will find the same on the left sidebar.

STEP 4: Now simply toggle the Bluetooth switch to right to On the feature.
Alternatively, you can also enable the Bluetooth option through the Action Center. For this, all you need to do is click on the speech bubble icon located on the Taskbar. Further, you need to look for the Bluetooth title and simply click on the same to turn it on. In case you don’t see the Bluetooth tile here at this point, then just click on the Expand icon to see more options and most likely you will see the Bluetooth feature here.
To activate Bluetooth on a Windows 7 PC:
Windows 7 users can execute the steps written below to enable the Bluetooth feature on their respective devices.
Well, before switching on Bluetooth on Windows 7 devices, you need to check if your PC has Bluetooth hardware or not. Because not all computers with Windows 7 OS come with built-in Bluetooth functionality. To see it, you need to refer to the manual and see if it has a Bluetooth adapter.
STEP 1: If your Windows 7 device has Bluetooth, all you need to do is head towards the Start menu and open the Control Panel on your device.
STEP 2: At this point, you need to click navigate to the Hardware and Sound module and click on the Bluetooth Devices option.

STEP 3: Now, on the Bluetooth Devices window, simply check the box next to the option Allow Bluetooth devices to find this computer.

STEP 4: To further check its activations, click on the Options tab and make sure the Turn on Bluetooth option is checked. Hit the OK button to save the changes!
PART 3: How To Share Files Over Bluetooth on Windows 11 PCs?
Now that you have successfully set up Bluetooth on a Windows 11 PC, it’s time to use it:
STEP 1: Before sharing files, make sure you pair the device. For this, all you need to do is click on the Add Device button on the Bluetooth & devices window.

STEP 2: A new pop-up window will appear on your screen, where you need to select what type of device would you like to connect. The functionality offers the ability to connect audio devices, mice, keyboards, phones, pens, controllers, wireless monitors, PCs, TVs, Xbox controllers and other devices.
Select any option as per your needs and follow the on-screen instructions to add the device as per your choice.

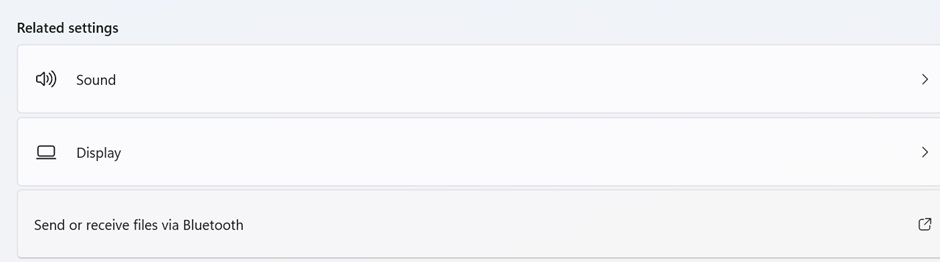
STEP 3: Once your desired device is paired, you need to scroll down the Bluetooth & devices window and under the Related settings header, select the option Send or receive files via Bluetooth.
STEP 4: On the next pop-up window, you can either select Send Files or Receive Files. Choose any of the options as per your preference.

STEP 5: Now, just select the paired device from the list of devices that appear on your screen.

STEP 6: Hit the Next button to move forward and click on the Browse button to select the files of your choice that you want to share. and that’s all! Your file transfer process will begin instantly!

On the receiving device, you need to accept the file transfer initiated from a Windows 11 PC and select the desired location to save your shared files.
PART 4: How To Share Files Over Bluetooth on Windows 10 PCs?
Now that you have successfully set up Bluetooth on a Windows 10 PC, it’s time to use it:
STEP 1: Before sharing files, make sure you pair the device. For this, all you need to do is click on the Add Bluetooth or other device button on the Bluetooth & devices window.

STEP 2: Simply select the Bluetooth option & choose the kind of device that you want to pair with from the list and follow the on-screen instructions to complete the pairing process.

STEP 3: Make sure you confirm the correct code between devices and hit the Connect in Windows option to successfully establish the connection.
STEP 4: Now open the Bluetooth Settings page and scroll down to click on the Send or receive files via Bluetooth option as shown in the screenshot attached below.

STEP 5: At this step, select whether you want to send or receive files. Upon selection, hit the Next button.

STEP 6: At this step, just browse the files you want to share and make sure you click on the Accept button on the receiving device.
Your files will be shared over Bluetooth successfully!
While transferring files, you might encounter this issue – “File is Open in Another Program” Let’s learn how to fix it!
PART 5: How To Share Files Over Bluetooth on Windows 7 PC?
Now that you have successfully set up Bluetooth on a Windows 7 PC, it’s time to use it:
STEP 1: Let’s start by pairing your device to your Windows 7 PC. For this, head towards the Devices and Printers panel. You can do so by clicking on its shortcut located in the Start Menu. Once there, just click on the Add a Device button, located at the top-left corner of the screen.

STEP 2: Upon clicking on this, you will see that your Windows 7 PC will automatically start scanning for new devices. Wait for a few seconds, and your desired device will most likely show up in the list of available devices. Simply select the desired device and click on the Next button.

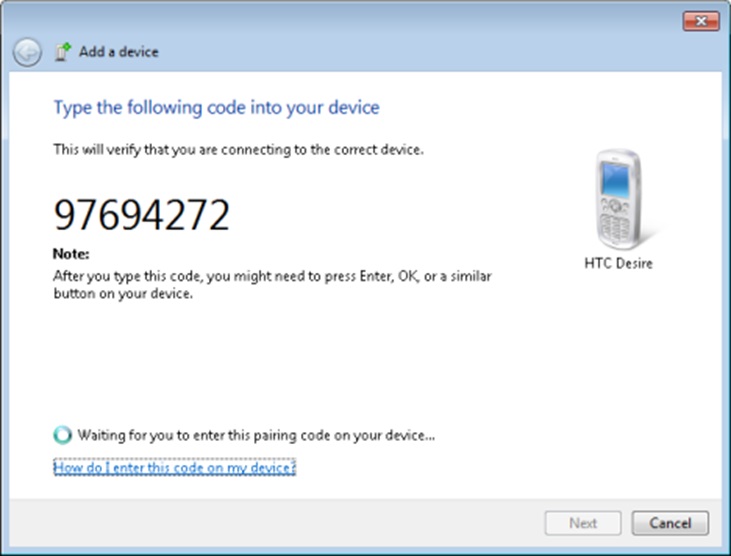
STEP 3: On the next window, you will see a code that you need to memorize and type on your receiving device so that the pairing process can be completed.
STEP 4: To send a file, just right-click on the Bluetooth icon on the notification area of your Taskbar and select the option Send a file.

STEP 5: On the next window, you will be able to see the list of Bluetooth devices paired with your Windows 7 PC. Here, you need to select the device to which you want to send the file. Hit the Next button to proceed further!

STEP 6: Browse the files on your computer, and click on the Next button to begin sharing the file effortlessly on your Windows 7 PC.

STEP 7: Wait for a few moments, and your files will be successfully transferred. You can even check the progress of file sharing as shown in the screenshot attached below!

Hit the Finish button to complete the file-sharing process on Windows 7 PC.
Additional Information:
Troubleshooting Common Bluetooth File-Sharing Issues
There are times when you might encounter issues while transferring files over Bluetooth. Listed below are some of the best tips to fix them on your computer.
PROBLEM 1: Failed File Transfers Reason:
Bluetooth file sharing can sometimes fail due to compatibility issues, unstable connections, and other technical glitches.
Fix: Ensure Bluetooth drivers on both PCs are up-to-date. Additionally, you might consider resetting the Bluetooth connection on both the sending and receiving devices.
PROBLEM 2: Slow Transfer Speeds Reason:
If you are encountering comparatively slower file sharing, then it might be happening due to the limitations of the Bluetooth protocol or interference from other wireless signals.
Fix: Simply disable other wireless connections during Bluetooth sharing. This includes Wi-Fi and Cellular Data. Moreover, you can try closing down any background processes or apps consuming excessive bandwidth on both devices.
PROBLEM 3: Device Not Pairing Reason:
If your devices are out of range or have incompatible Bluetooth drivers, chances are they might not establish a successful connection.
Fix: Try keeping both devices in proximity and ensure that they are running the latest Bluetooth drivers and firmware updates.
Conclusion: Seamless Data Exchange for Windows Users Using Bluetooth
To be honest, sharing files over Bluetooth on Windows 10, 11 and 7 is one of the most convenient and efficient ways to exchange files from one to another. By following the aforementioned steps, we hope you can send multiple types of files, including photos, videos, music files, documents, and more to your friends, colleagues, and family members without any hiccups and regardless of the Windows OS version you’re using.
If you don’t want to use Bluetooth functionality and are searching for other methods to share files, we recommend you use Cloud Storage services like Google Drive, Dropbox, and OneDrive. Additionally, you may consider taking the help of USB Flash Drives and performing Network File sharing on a local network to exchange data. If you ask one of my preferred methods for sharing files, I’ll go with using Online File Transfer Services. You may use WeTransfer, FileZilla and SendAnywhere to get the job done!
NEXT READ: How to Transfer Photos from iPhone to PC
Author Bio:
Dinesh Lakhwani 

Dinesh Lakhwani, the entrepreneurial brain behind “TechCommuters,” achieved big things in the tech world. He started the company to make smart and user-friendly tech solutions. Thanks to his sharp thinking, focus on quality and the motto of never giving up, TechCommuters became a top player in the industry. His commitment to excellence has propelled the company to a leading position in the industry.
Popular Post
Recent Post

CCleaner PC Optimizer Review: A Complete Guide for Windows Users
If your computer has started to feel slow, you are not alone. Most Windows PCs slow down over time. Junk files pile up. The registry gets messy. Too many apps open when you start your PC. All this adds up and makes even a good machine feel tired. This is where a PC cleaner tool […]

Auslogics Duplicate File Finder: Full Review and User Guide
A computer quietly gathers clutter over time. This includes duplicate photos, repeated downloads, and forgotten backups hiding in random folders. This buildup slowly eats away at storage and can make even a fast PC feel sluggish. Manually finding and deleting duplicates is tedious. It means checking every folder, comparing file names, and guessing which copies […]

CCleaner Duplicate File Finder: Key Features, Pricing, Step-by-Step Guide and More
Every computer collects junk over time. Right? Well, yes! Photos often get copied twice. Documents get saved in two folders by mistake. Old downloads pile up and never get deleted. This slowly eats up your storage space, and most people do not even notice until their drive is almost full. That is where a duplicate […]

Duplicate File Finder Pro: A Complete Review, Everything You Should Know
Computers collect thousands of files over time. Well, yes! Many of them end up being duplicates created by backups, downloads, or accidental copies. These extra files take up valuable storage space and make it harder to keep everything organized. Finding and removing them manually can take hours. Right? Duplicate File Finder Pro is a tool […]
Top 3 Duplicate File Finder for Windows 11 & Windows 10
If your PC storage keeps filling up even after you delete big files, duplicate files could be the real reason. Most of us save the same photo twice, download a document more than once, or copy a whole folder by mistake. Over months and years, these duplicate files pile up quietly. You do not even […]

Monitor Screen Calibration Guide: Everything You Should Know
Your monitor shows colors every single day. But are those colors actually correct? Most people never stop to check this. They just use the screen as it comes out of the box. This habit can lead to wrong colors in photos, videos, and work files. Colors may look too warm or too cold without you […]

How To Check Installed RAM and RAM Slots [Complete Guide]
RAM plays an important role in how smoothly a computer runs. Short for Random Access Memory, it stores the data and instructions that Windows and active applications need at any given moment. From opening multiple browser tabs to running games and productivity software, RAM helps keep everything responsive. A system with limited memory may experience […]

What is Microsoft Autopilot Everything You Need To Know
Technology has changed the way companies manage computers. Well, yes! Employees now work from offices, homes, and remote locations. Setting up devices manually for every worker takes time and effort. It can also create mistakes that slow down productivity. This is where Microsoft Autopilot becomes useful. It helps businesses prepare and deploy Windows devices with […]

Enable Automatic Device Locking Feature Windows: Complete Guide
Introduction: Your computer stores important information such as emails, documents, passwords, and personal photos. Leaving it unlocked can put that data at risk. Thankfully, Windows includes built-in features that can automatically lock your device when you are away. Setting up automatic device locking is quick and does not require any extra software. In this guide, […]

