










Imagine this. You spend hours perfecting a video project. You hit save. Then your laptop freezes, reboots, and when the screen comes back. The file is gone. Your stomach sinks. It’s not just you. Lost files happen all the time. A dropped hard drive, a bad update, an accidental delete, or a corrupted partition can […]
How to Set Your Preferred Default Printer On Windows 11/10
Introduction
Printing documents should be simple. But many users struggle with their printer settings. Windows often picks the wrong printer as the default. This creates delays and wastes paper.
Setting up your preferred printer as the default saves time. It prevents printing errors. This guide shows you how to set your preferred default printer on Windows systems easily. We cover methods for Windows 11 and Windows 10.
What Is a Default Printer?
A default printer is the printer your computer uses automatically when you give a print command. You do not have to pick a device each time. The system sends the file to this printer by default, which makes daily printing quick and simple.
In Windows 11 and Windows 10, you can choose any installed printer as your default. This can be a physical printer connected by USB or Wi-Fi, or a virtual option like “Print to PDF.” Once you set it, most apps, such as Word, browsers, and image viewers, will follow this choice. You can still change the printer for a single job if needed.
What Users Often Ask About Default Printers:
How do I stop Windows from automatically changing my default printer?
Windows can automatically switch your default printer to the one you used most recently. To prevent this, open Settings > Bluetooth & devices > Printers & scanners, then turn off the option labeled “Let Windows manage my default printer.” This allows you to keep your preferred printer selected at all times.
Why is my printer not staying as the default printer?
This issue often occurs when Windows is managing your default printer automatically or when printer drivers are outdated. Disabling automatic printer management and updating printer drivers usually resolves the problem and helps maintain your selected default printer.
Can I set a wireless printer as my default printer in Windows?
Yes. Any installed printer, including Wi-Fi and network printers, can be set as the default printer. Once the printer is connected and recognized by Windows, you can select it as the default device through the Printers & scanners settings page.
What happens when I change the default printer in Windows?
When you set a new default printer, Windows automatically sends print jobs to that printer unless you manually choose a different one. This saves time and reduces the chance of accidentally printing documents on the wrong device.
_________________________________________________________________________________
Things to Check Before Changing Your Default Printer
Changing your default printer is usually a simple process, but a few precautions can help you avoid printing errors, wasted paper, and connectivity issues. Keeping these points in mind ensures that your preferred printer works as expected every time you print a document.
- Verify Printer Connectivity
Make sure the printer is powered on and properly connected through USB, Wi-Fi, or Ethernet before selecting it as the default device.
- Disable Automatic Printer Management
Turn off the “Let Windows manage my default printer” option if you want Windows to stop changing your default printer automatically.
- Confirm the Correct Printer Selection
Double-check the printer name before setting it as the default, especially if multiple printers are installed on the same computer.
- Keep Printer Drivers Updated
Outdated or corrupted drivers can cause printing problems. Install the latest drivers provided by the printer manufacturer.
- Test with a Sample Print
After changing the default printer, print a test page to confirm that jobs are being sent to the correct device.
- Check Network Printer Availability
If you use a network printer, ensure it is connected to the network and accessible before making it your default printer.
- Avoid Removing the Default Printer
Uninstalling or disconnecting the default printer may force Windows to select another printer automatically.
- Monitor Shared Printer Permissions
- For shared printers in offices or organizations, verify that you have the necessary permissions to print and manage printer settings
Top Reasons You Need To Set a Default Printer on Windows 11/10
Having a default printer makes your workflow smoother. It saves clicks and reduces mistakes. Here are the main benefits:
- Faster printing: You don’t have to choose a printer every time. Just hit print and go.
- Fewer errors: Your documents won’t accidentally end up on the wrong printer.
- Better workflow: Daily tasks become more efficient when printing is predictable.
- Saves paper It prevents printing to faraway printers that no one checks, reducing waste.
- Reduces frustration: You spend less time troubleshooting failed or misdirected print jobs.
- Improves office efficiency: Teams can work faster when everyone uses the right printer by default.
- Cost savings: Less wasted ink and paper mean lower printing costs over time.
- Consistent results: Using the same printer ensures your documents look the same every time.
7 Best Ways To Change/Setup Default Printer on Windows 11/10
This section covers all methods to set your preferred default printer in Windows. Each method works for different situations.
Method 1: Using Windows Settings App
The Settings app is the easiest way to change your default printer. It works on both Windows 11 and Windows 10. This method is perfect for beginners. The interface is modern and user-friendly.
Most users prefer this method. It has a clean interface. The steps are simple to follow. You don’t need technical knowledge. Windows guides you through each step. The settings are clearly labeled. This method rarely causes errors. It’s the safest option for home users.
Precautions to take:
- Make sure your printer is connected and working
- Check that printer drivers are installed properly
- Ensure the printer is turned on before starting
- Close all print jobs before changing settings
Step 1. Open Settings by pressing Windows key + I. Click on “Devices” in Windows 10 or “Bluetooth & devices” in Windows 11.
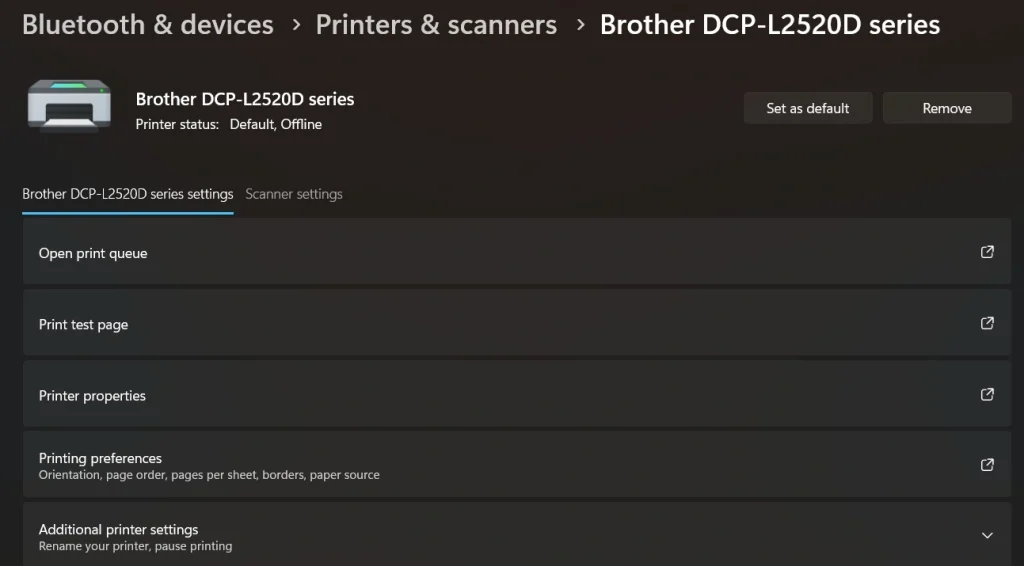
Step 2. Find the “Printers & scanners” section. Click your preferred printer name. Click the “Set as default” button.
Method 2: Through Control Panel
Control Panel offers more detailed printer options. This method works well for advanced users. It gives you full control over printer settings. The interface looks traditional but powerful. You can access all printer properties here.
The Control Panel method is reliable. It works the same way in both Windows versions. This makes it a safe choice for IT professionals. The options are comprehensive. You can troubleshoot problems easily. Many settings aren’t available elsewhere. This method handles complex printer configurations.
Precautions to take:
- Run as administrator if you face permission issues
- Don’t change other printer settings accidentally
- Keep printer documentation handy for reference
- Backup current settings before making changes
Step 1. Type “Control Panel” in the search bar. Click on the “Devices and Printers” option.
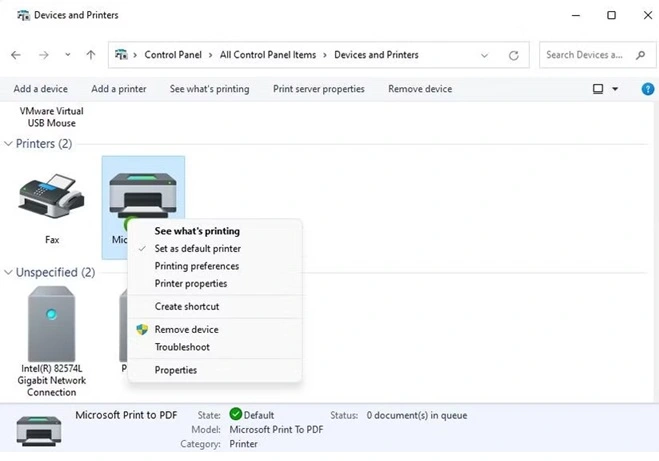
Step 2. Right-click your preferred printer icon. Select “Set as default printer”.
Method 3: Using Print Dialog Box
You can change the default printer while printing. This method is quick and convenient. It works from any application that prints. You don’t need to open separate windows. The change happens instantly. This saves valuable time during work.
This approach saves time during urgent printing tasks. You don’t need to exit your current work. The change applies system-wide immediately. Most programs support this feature. It’s perfect for busy offices. You can test different printers easily. The method works across all applications.
Precautions to take:
- Make sure the document is ready to print
- Check that the printer has enough paper and ink.
- Verify printer connection before proceeding
- Save your work before changing printer settings
Step 1. Open any document and press Ctrl + P. Look for the printer selection dropdown menu.
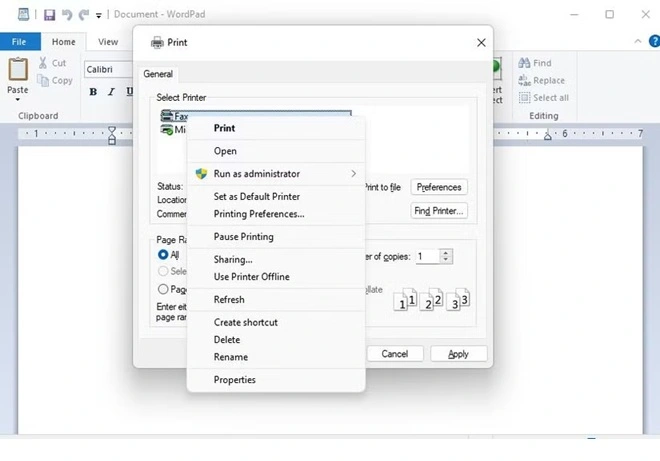
Step 2. Choose your preferred printer. Click “Set as default” if available, then print or cancel.
Method 4: Let Windows Manage Automatically
Windows 11 and 10 offer a smart feature that automatically sets your default printer based on the one you use most frequently. This is especially helpful if you move between locations or use multiple printers—Windows will choose the most recently used printer at your current location as the default. It’s a hands-off way to simplify printing without manually changing settings each time.
This method is ideal for users who don’t want to worry about printer preferences. It’s built into the system and works quietly in the background. However, it’s not perfect for every situation, especially in offices with shared printers or when consistency is critical.
Precautions to take:
- It may switch your default printer unexpectedly if you use multiple printers.
- Not ideal for shared workspaces where consistency matters.
- It can cause confusion if you print from different locations often.
- You’ll lose manual control over which printer is set as the default.
Step 1. Go to Settings> Bluetooth & devices. Select Printers & scanners.
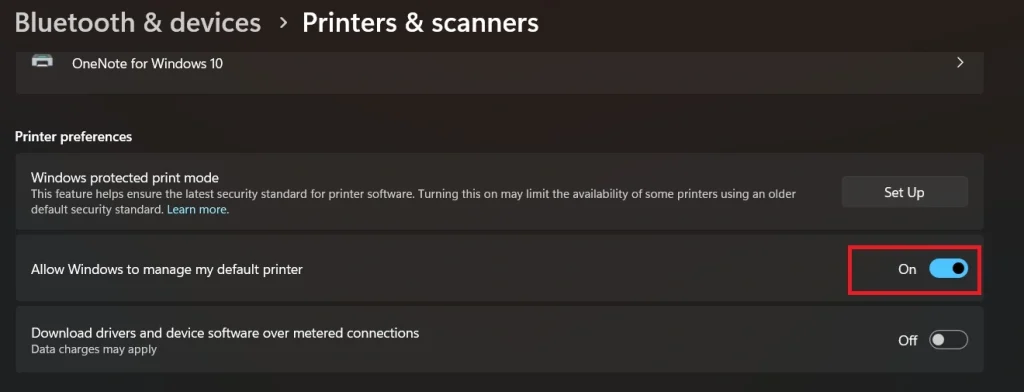
Step 2. Scroll down and toggle “Allow Windows to manage my default printer” to On.
Method 5: Using Command Prompt
Command Prompt offers quick printer management. This method works great for IT professionals. You can script these commands for multiple computers. The commands are fast and reliable. No mouse clicks are needed. Everything happens through text commands.
Power users prefer command-line tools. They’re faster once you know the commands. This method works remotely too. You can automate printer setup tasks. Commands work across different Windows versions. The results are immediate. IT departments love this method for bulk changes.
Precautions to take:
- Run Command Prompt as administrator
- Type commands exactly as shown
- Know your printer’s exact name first
- Keep backup commands ready for reverting changes
Step 1. Press Windows + R. Type “cmd”. Press Enter. Type command to list printers: wmic printer get name
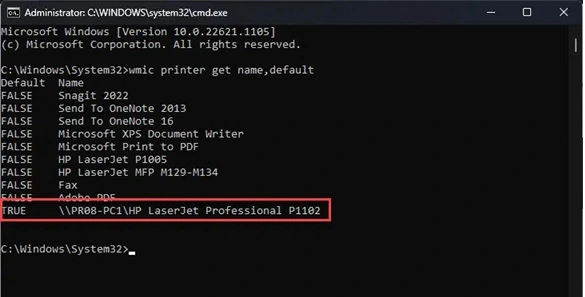
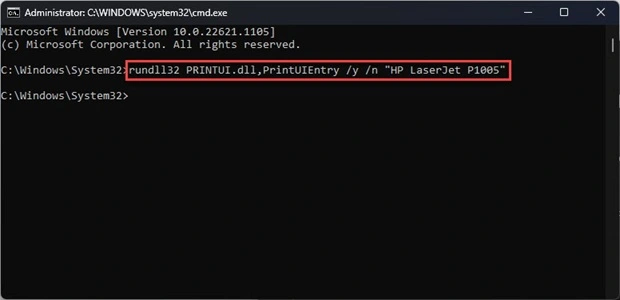
Step 2. Note your printer name. Type: rundll32 printui.dll,PrintUIEntry /y /n “PrinterName” (replace PrinterName with actual name).
Method 6: Through PowerShell
PowerShell gives advanced control over printer settings. This method is perfect for system administrators. You can manage multiple printers easily.
PowerShell commands are more reliable than older methods. They work across different Windows versions. This makes them ideal for business environments.
Precautions to take:
- Always run PowerShell as administrator
- Double-check printer names before running commands
- Test commands on a single computer first
- Document commands for future reference
Step 1. Right-click the Start button and select “PowerShell (Admin)”. Type: Get-Printer to see all printers.
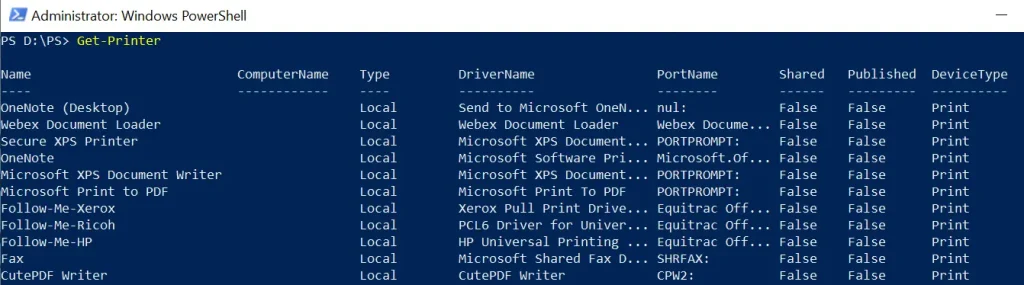
Step 2. Find your preferred printer name. Type: Set-PrintConfiguration -PrinterName “YourPrinterName” -DefaultPrintTicketXml $null to set your preferred default printer in Windows PowerShell.
Method 7: Registry Editor Method
Registry Editor gives the deepest control over printer settings. This method fixes stubborn printer issues. Only experienced users should try this.
Registry changes affect system behavior directly. They can solve complex printer problems. This method works when others fail.
Precautions to take:
- Create a full system backup before editing the registry
- Export current registry keys before changes
- Follow instructions exactly – mistakes can break Windows
- Have Windows installation media ready for emergency repairs
Step 1. Press Windows + R. Type “regedit“. Press Enter. Navigate to: HKEY_CURRENT_USER\Software\Microsoft\Windows NT\CurrentVersion\Windows
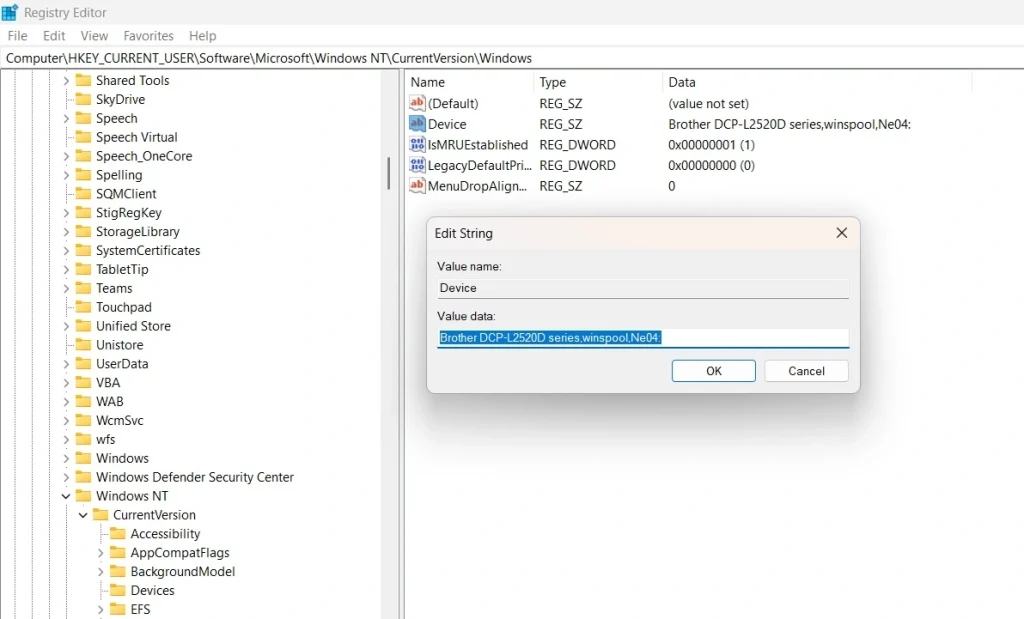
Step 2. Find the “Device” entry in the right panel. Double-click and change the value to your printer name. Restart the computer to apply the changes.
Advanced Tips By Author
These expert tips help you master printer management. They solve common problems users face daily. Use these to become a printer setup expert.
- Create printer shortcuts – Pin frequently used printers to the taskbar for quick access
- Use printer groups – Set different defaults for different document types
- Monitor print queues – Check for stuck jobs that block new prints
- Update drivers regularly – New drivers fix bugs and add features
- Set print preferences – Configure quality, paper size, and color settings
- Enable printer sharing – Let other computers use your printer over the network
- Schedule maintenance – Clean printer heads and check ink levels weekly
- Keep spare cartridges – Avoid printing delays when ink runs low
Fix Default Printer Keeps Changing
This issue is quite common in Windows systems. Many users notice that their selected printer keeps changing without warning. This usually happens because Windows tries to manage printers automatically based on recent usage.
When this feature is active, the system sets the last used printer as the default. While this may help some users, it often creates confusion. Turning off this setting and choosing your own default printer solves the problem in most cases.
Step 1: Turn off automatic printer management
Open Settings and go to “Bluetooth & devices.” Click on “Printers & scanners.” Look for the option “Let Windows manage my default printer.” Turn this option off so the system stops changing your choice.
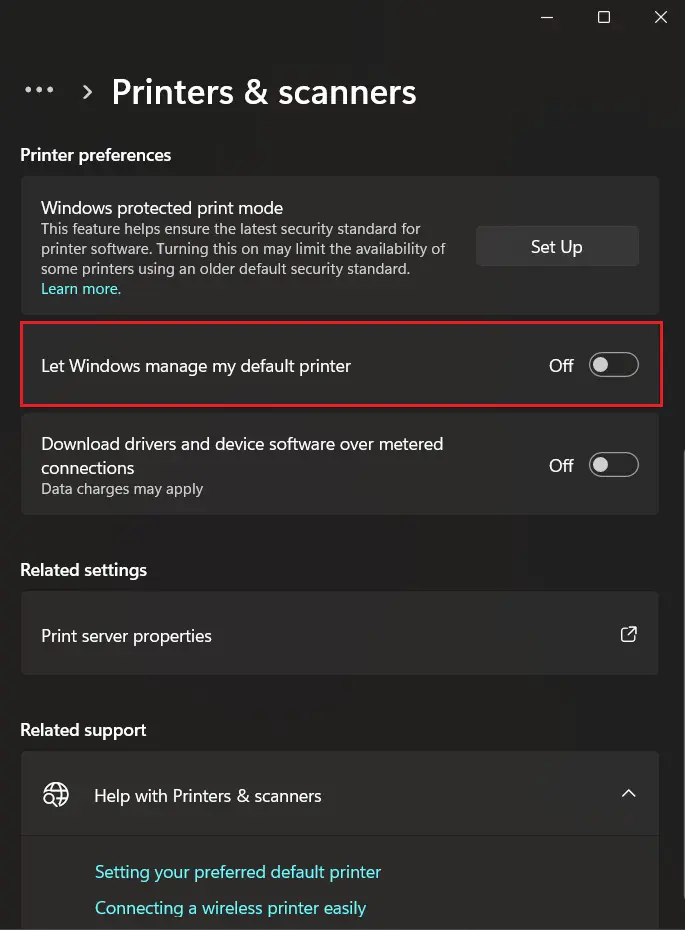
Step 2: Set your preferred printer manually
In the same section, find your printer from the list. Click on it and select “Set as default.” Once done, Windows will keep this printer as your main device unless you change it again yourself.
Why You May Want to Change Your Default Printer?
Your printing needs do not stay the same. You may move between locations, use different devices, or prefer better quality for certain tasks. Changing the default printer helps match your current setup and avoids small errors.
- Switch between home and office
You may use different printers in different places. Changing the default keeps things aligned with where you are working. - Improve print quality
Some printers produce clearer text or richer colors. You may prefer one device for documents and another for images. - Save ink and cost
A printer with lower ink usage can reduce expenses, especially for regular printing. - Faster output for large jobs
Some printers handle big files or bulk printing more efficiently. - Avoid sending files to the wrong device
This is common in shared setups. A correct default reduces mix-ups. - Access special features
Certain printers offer duplex printing, borderless prints, or high resolution. - Use shared or network printers
In offices, switching to a shared printer can be more practical. - Handle temporary changes
If your main printer is offline or under maintenance, you can switch easily.
Advantages of Setting the Right Default Printer
Using the correct default printer can make your daily tasks smoother. It removes small delays and helps you stay focused on your work.
- Saves time on every print job
You do not need to select a printer again and again. - Reduces printing mistakes
Files go to the correct device without confusion. - Creates a smoother workflow
Printing becomes a simple and predictable step. - Convenient for regular tasks
Daily printing needs are handled without extra effort. - Less manual selection
Fewer clicks mean faster actions. - Better productivity
You spend less time fixing small issues. - Supports multiple printer setups
You can still switch when needed, but keep one main device. - Works across most apps
Almost all programs follow the same default setting.
Disadvantages of Using a Default Printer
Even though it is useful, a default printer can create problems if not managed properly.
- Prints may go to the wrong device
This can happen if you forget which printer is set as the default. - Issues with offline printers
If the default printer is not available, printing may fail. - Frequent switching in multi-printer setups
Users with many printers may need to change settings often. - Windows may auto-change the printer
The system can switch based on recent use, which can confuse users. - Delays with shared printers
A shared device may be busy when you need it. - Less flexibility for some users
Some prefer choosing a printer each time. - Initial setup confusion
New users may find the settings unclear at first. - Driver or software issues
Outdated drivers can cause incorrect printer behavior.
Conclusion
Learning to set your preferred default printer in Windows is essential. This skill saves time and prevents printing frustrations. The methods in this guide work for all Windows versions.
Start with the Settings app method for simplicity. Try other methods if you need more control. Remember to check your printer drivers regularly. With practice, managing printers becomes second nature.
FAQs:
Q: Why does Windows keep changing my default printer?
Windows has a feature called “Let Windows manage my default printer” that automatically changes defaults based on your location. Turn this off in Settings > Devices > Printers & scanners. This stops automatic changes and lets you set your preferred default printer that Windows keeps permanently.
Q: Can I set different default printers for different programs?
Windows uses one system-wide default printer for all programs. However, many applications remember your last printer choice. Some professional software lets you set program-specific defaults. Check your application’s print settings for these options.
Q: What should I do if my preferred printer doesn’t appear in the list?
First, check if the printer is powered on and connected properly. Then update or reinstall printer drivers through Device Manager. Run the Windows printer troubleshooter if the printer still doesn’t appear. Sometimes restarting both the computer and the printer solves connection issues.
Dinesh Lakhwani
Author Bio:
Dinesh Lakhwani 

Dinesh Lakhwani, the entrepreneurial brain behind “TechCommuters,” achieved big things in the tech world. He started the company to make smart and user-friendly tech solutions. Thanks to his sharp thinking, focus on quality and the motto of never giving up, TechCommuters became a top player in the industry. His commitment to excellence has propelled the company to a leading position in the industry.
Popular Post
Recent Post

5 Best Data Recovery Software For Windows 11 and Windows 10
A crashed drive can ruin a whole day. One minute your photos, work files, and tax records sit safe on your PC. The next minute they are gone. A power cut, a bad update, or one wrong click can wipe out years of memories and months of work in seconds. That sinking feeling is why […]
How To Update NVIDIA Drivers On Windows 11/10 PC
Learn how to update NVIDIA drivers on Windows 11/10 with simple methods, safety tips, and easy steps for smoother gaming and better PC performance.

Top AI Features Hidden Inside Windows 11
Explore the top AI features in Windows 11, from Copilot to Recall, plus safety tips and simple steps to use each tool the right way.

Customize Your Screen Saver Settings in Windows [Easy Steps]
Learn how to customize screen saver settings in Windows 11 with easy steps, safety tips, and simple tricks to personalize your PC screen.
Driver Easy Windows Driver Updater Tool Review: Tried & Tested
In-depth information about Driver Easy’s functions and features can be found in our review. Learn how to update drivers more easily with this tool for a more seamless computer experience.

Is Avast Driver Updater Worth It? A Hands-On Analysis
A full review of Avast Driver Updater covering features, setup steps, pricing, pros and cons, and real PC results, to help you decide if it is worth buying.
IObit Driver Booster 13 (PRO) Review: [Tried & Tested]
IObit Driver Booster 13 is built for one purpose: keeping your PC drivers up to date. Well, yes! Outdated drivers can cause crashes, slowdowns, and hardware issues. This tool scans fast and updates with one click. The interface is simple. Even beginners can use it without confusion. Updates are pulled from a huge database, covering […]

Auslogics Driver Updater: A Detailed Walkthrough [2026]
This comprehensive review covers the key features, pros, and cons, pricing, and a final verdict on Auslogics’ driver update utility. Learn how it stacks up against manual driver maintenance.
5 Best Driver Updater Tools for Windows to Use (Free and Paid)
Introduction: Most people blame their PC for problems that a driver caused. A driver works like a bridge between your hardware and your operating system. When this bridge cracks, strange things start to happen. Screens flicker without reason. Printers go silent mid-task. Games freeze or crash out of nowhere. Manually finding the right driver is […]

