










It always shows up at the worst time. You are halfway through a report, or about to join a video call. Then you spot it in the bottom right corner of the screen. Activate Windows. Go to Settings to activate Windows. Initially, an unactivated copy of Windows may seem like a minor inconvenience. Over time, […]
Customize Your Screen Saver Settings in Windows [Easy Steps]
Step away from your desk for a minute. Come back, and your screen has changed. Maybe it’s gone black. Maybe bubbles are floating across it. Maybe a favorite photo is smiling back at you. Small thing.
But it says something about how a PC gets used every day. Isn’t it?
Well, most people never touch this setting. They just keep whatever came with the system. That’s a missed chance. A screen saver can do more than look nice. It can protect your screen. It can save power. It can even keep your work private while you’re away.
Good news: customizing it is easy. No long process.
Windows Screen Saver Settings: Easy Ways to Personalize Your PC
Just a few clicks, and your screen finally looks the way you want it to. This article covers four simple methods to customize screen saver settings in your Windows 11 PC.
Part 1: Is it Possible to Easily Customize Your Screen Saver Settings in Windows?
Yes, it is fully possible. Windows gives every user the freedom to change how their screen saver looks and works. You can pick from built-in options like Ribbons, Bubbles, or Photos. You can also set a timer that tells Windows when to start the screen saver. This feature has been part of Windows for many years, and it still works well in Windows 11.
You are not limited to the default choices either. You can add your own picture folder as a screen saver. You can turn on a password lock for extra safety. You can even turn the screen saver off completely if you prefer a simple black screen or nothing at all.
Windows puts you in full control, and the process takes only a few minutes.
Part 2: Simple Precautions Before You Change Your Screen Saver Settings
Before you dive in and customize screen saver settings on your PC, it helps to slow down for a moment. A few small checks can save you trouble later. Here are eight things to keep in mind.
- Back up personal photos first. If you plan to use a photo folder as your screen saver, make sure those photos are backed up somewhere safe. This protects your memories in case a file gets corrupted or deleted by mistake.
- Check your power settings. Some screen savers use more power than others. If you use a laptop, pick a setting that does not drain your battery too fast.
- Avoid heavy image folders. Using a folder with hundreds of large photos can slow down your screen saver. Keep the folder size reasonable for smooth performance.
- Set a strong password if you enable lock on wake. This step keeps your files safe from anyone who tries to use your PC while you are away.
- Test your changes before you close the settings window. Windows lets you preview the screen saver. Always check the preview so you know exactly how it will look.
- Keep your Windows updated. An outdated system can sometimes cause the screen saver feature to act strangely. A quick update can fix many small bugs.
- Choose a timer that fits your habits. If you leave your desk often, a short timer works better. If you sit at your PC most of the day, a longer timer may suit you more.
- Avoid third-party screen saver apps from unknown sources. Stick to trusted apps or the built-in Windows options. This keeps your system safe from harmful software.
Part 3: How to Customize Screen Saver Settings in Windows 11: 4 Methods
Windows 11 gives you more than one way to change your screen saver. Some methods are quick, while others give you more control over every detail.
Below are four simple methods you can try today.
Method 1: Using the Settings App
The Settings app is the easiest place to start. It is built right into Windows 11, so you do not need to install anything extra. This method works well for beginners who want a quick and clean way to make changes.
Most users prefer this method because it feels familiar. The layout is simple, and every option is labeled clearly. You can move through each screen without confusion.
This method also lets you jump straight into more settings if you need them. It connects to the older screen saver panel, which still holds every classic option Windows has offered for years.
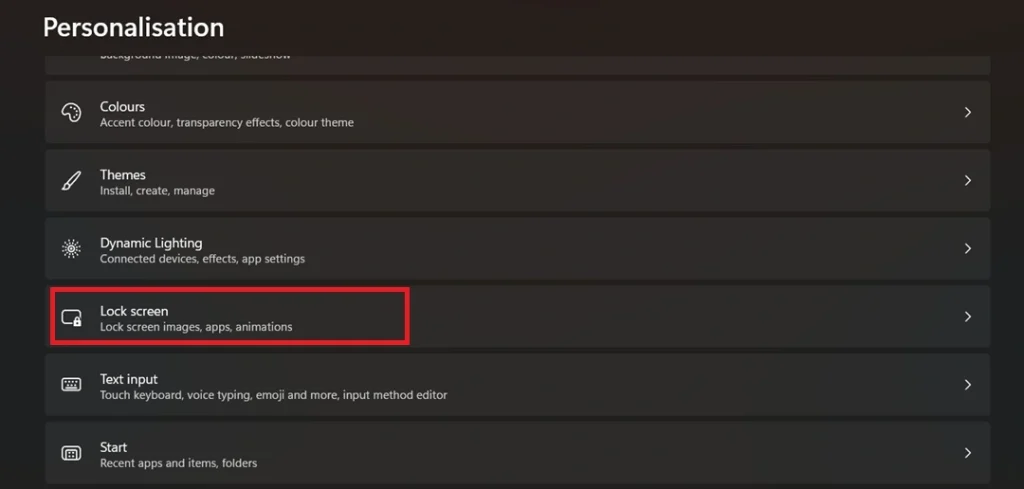
Step 1: Click on the Start menu and open Settings. Go to Personalization, then click on Lock screen.
Step 2: Scroll down and click on Screen saver. A small window will open. Choose your screen saver style from the drop-down menu.
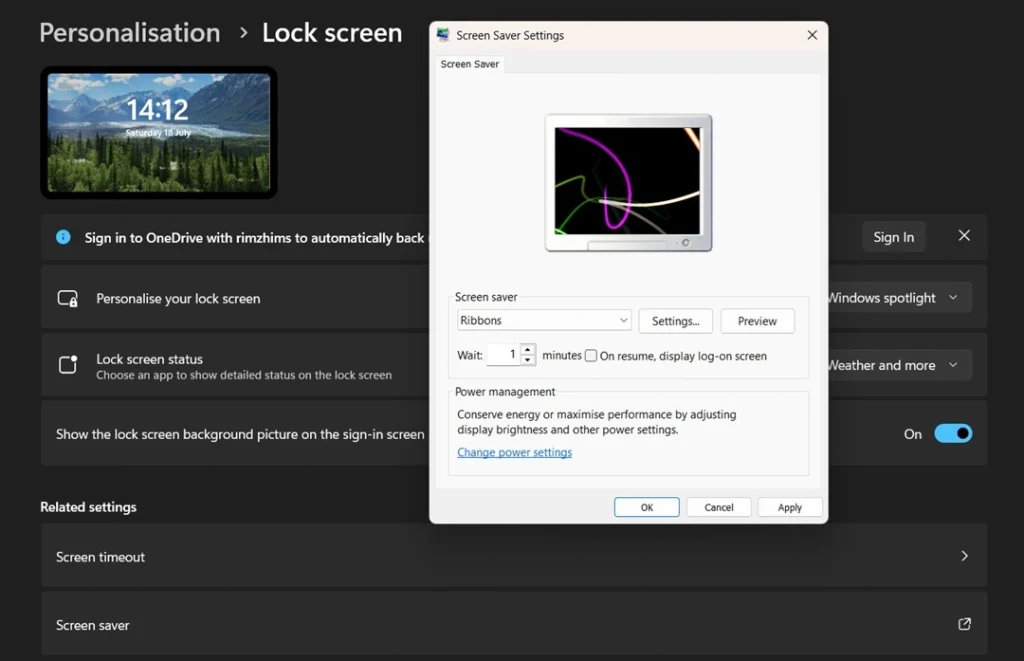
Step 3: Set the wait time and check the box for “On resume, display logon screen” if you want a password lock. Click Apply, then click OK to save your changes.
Method 2: Using the Control Panel
The Control Panel is an older tool, but it still works great in Windows 11. Some users like this method because it feels more direct and does not involve extra menus.
This method is useful if you already have Control Panel open for other tasks. It saves you time since you do not need to search through the Settings app.
It also gives you the exact same screen saver options as the Settings app, so you are not missing anything by using this path instead.
Step 1: Open the Start menu and type Control Panel, then open it. Click on Appearance and Personalization.
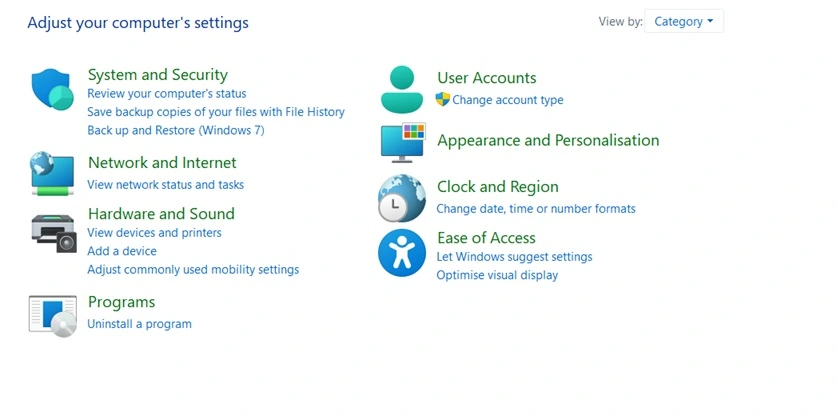
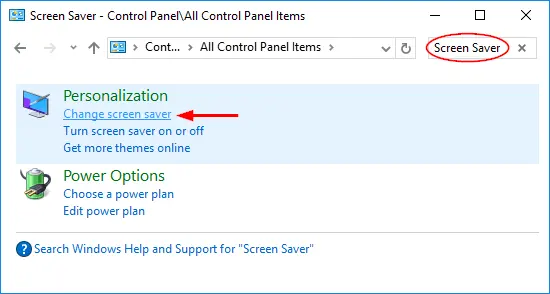
Step 2: Click on Change screen saver, found under Personalization. Pick your screen saver from the drop-down list. Adjust the wait time using the small arrows. Click Apply, then click OK.
Method 3: Using a Photo Slideshow as Your Screen Saver
If you want something more personal, this method lets you use your own pictures. It turns your screen into a slideshow filled with your favorite memories.
This method works well for people who love to see photos of family, pets, or travel every time they step away from the desk. It adds a personal touch to your PC.
Setting this up takes just a bit more time than the other methods, but the result feels much more special and unique to you.
Step 1: Open Settings, then go to Personalization and Lock screen. Click on Screen saver. From the drop-down menu, choose Photos.
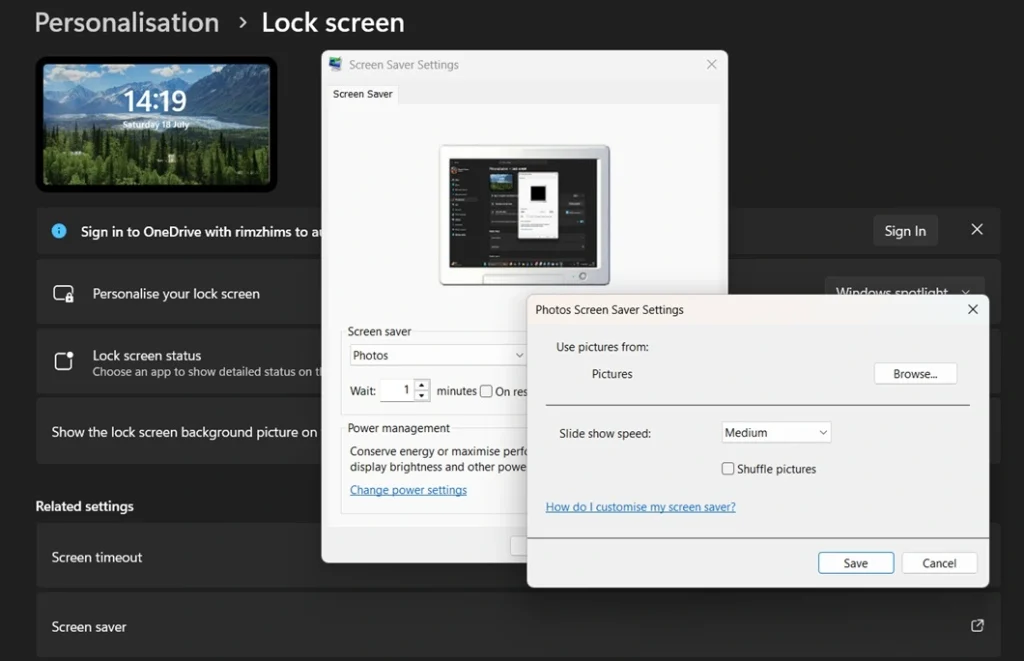
Step 2: Click on Settings next to the drop-down menu. Click Browse and select the folder with your photos. Choose your slideshow speed and pattern, then click Save. Click Apply, then click OK.
Method 4: Using Group Policy Editor for Advanced Control
This method is best for users who want deeper control over their screen saver. It is often used on shared computers, office PCs, or family devices where extra rules help keep things secure.
Group Policy Editor lets you lock certain screen saver settings so they cannot be changed by other users. This is helpful for parents, small business owners, or anyone who shares a PC with others.
Keep in mind that this method is only available on Windows 11 Pro or higher. Home users will not see this tool by default.
Step 1: Press the Windows key and R together to open the Run box. Type gpedit.msc and press Enter. Go to User Configuration, then Administrative Templates, then Control Panel, then Personalization. Look for the screen saver options listed there.
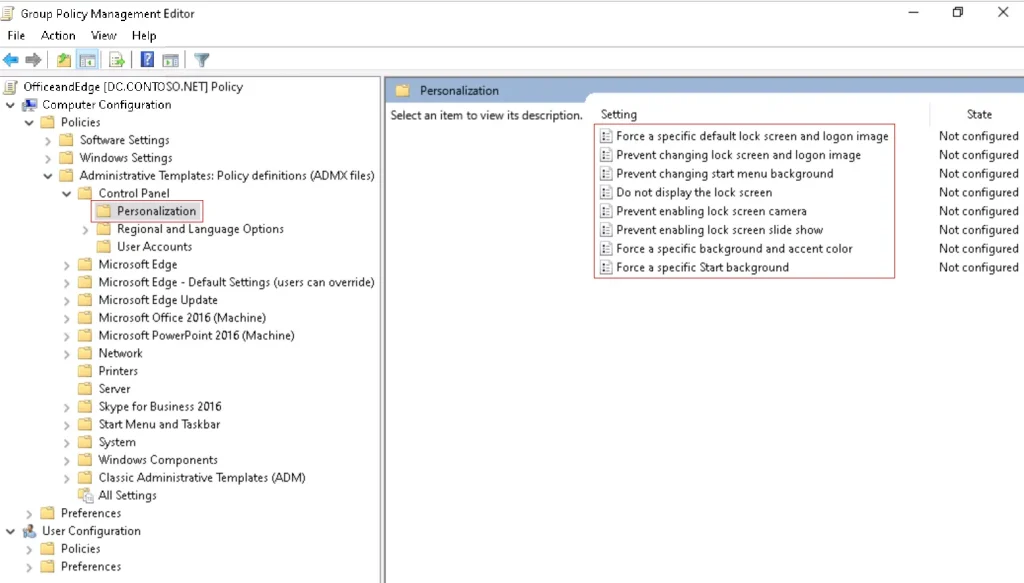
Step 2: Double-click on the setting you want to change, such as “Screen saver timeout.” Choose Enabled, then set your preferred time in seconds. Click Apply, then click OK.
Part 4: Pro Tips to Get the Most Out of Your Screen Saver Settings
Once you know how to customize screen saver settings, a few extra tips can help you get even better results. These tips come from real habits that make screen savers more useful and more fun.
- Match your screen saver to your mood. Choose calm patterns like Ribbons if you want something relaxing to look at during breaks.
- Use short timers on shared computers. This keeps your screen locked quickly, which adds a layer of privacy in busy spaces.
- Rotate your photo folder often. Add new pictures every few weeks to keep your slideshow feeling fresh and fun.
- Turn off the screen saver on gaming PCs. Some games run background tasks that can conflict with screen savers, so turning it off avoids interruptions.
- Use dark screen savers to save battery on OLED laptops. Dark colors use less power on these screens, which helps your battery last longer.
- Pair your screen saver with sleep settings. This way your PC saves even more energy after long periods of inactivity.
- Avoid flashy animations if you get tired eyes easily. Simple, slow-moving patterns are gentler on the eyes during long work days.
- Check your screen saver after every major Windows update. Updates sometimes reset personalization settings, so a quick check keeps everything the way you like it.
Conclusion
Changing your screen saver may seem like a small task. But it adds a nice personal touch to your PC. It makes your screen feel like yours. Whether you like simple patterns or your own photos, Windows gives you many ways to make it your own. There is no single right choice. It all comes down to what fits your style.
We walked through four different methods. These ranged from the Settings app to Group Policy Editor. Each method works well in its own way. It depends on your comfort level. It also depends on how much control you want over your screen. Beginners may prefer the simple options. Advanced users may enjoy the extra settings.
With the tips and precautions shared above, you can now customize screen saver settings the smart way. The process only takes a few minutes. But the result stays with you. You will notice it every time you step away from your desk. A small change like this can make your PC feel more personal.
FAQs
1. Does a screen saver protect my screen from damage?
Older screens like CRT monitors needed screen savers to prevent image burn-in. Modern LCD and LED screens do not have this issue as much, but a screen saver still helps by giving your screen a rest and adding a bit of visual variety during idle time.
2. Can I use a video as my screen saver?
Windows does not support videos as a screen saver by default. You would need a trusted third-party app to make this work. Always download such apps from safe and well-known sources to avoid harming your PC.
3. Why does my screen saver not start even after I set it up?
This usually happens because of power settings that keep your screen always on, or because another app is running in the background and stopping the screen saver from starting. Check your power plan and close unnecessary background apps to fix this issue.
Author Bio:
Dinesh Lakhwani 

Dinesh Lakhwani, the entrepreneurial brain behind “TechCommuters,” achieved big things in the tech world. He started the company to make smart and user-friendly tech solutions. Thanks to his sharp thinking, focus on quality and the motto of never giving up, TechCommuters became a top player in the industry. His commitment to excellence has propelled the company to a leading position in the industry.
Popular Post
Recent Post
Is Easy Duplicate Finder Worth It? Honest Review
The photos folder looked normal at first glance. Then the storage warning popped up. One trip photo appeared four times. A tax PDF sat in three different folders. Two old setup files were still in Downloads, and each one was over 500 MB. Nobody plans this mess. Copies pile up slowly. A download runs twice. […]
Wise Duplicate Finder Review: Real Results from Wise Duplicate Finder
Read my honest Wise Duplicate Finder review. See features, pricing, pros and cons, and real PC test results. Find out if this free duplicate cleaner can free up your Windows storage.
How to Recover Deleted Files from Pen drive, USB Drive, SD Card
Introduction: On tech forums, you’ll often see posts like this: “I connected my pen drive to my laptop this morning, but the folder was empty. All my college project files had vanished. I don’t have a backup. Can someone help me?” Stories like this are very common. Pen drives, USB drives and SD cards are […]

How To Recover Files Deleted from the Recycle Bin [Windows 11]
Losing a file can happen in seconds. You clear your desktop, hit Delete, and empty the Recycle Bin. Then, just when you need that file again, it seems to have vanished. This guide will walk you through ways to restore files removed from the Recycle Bin. We will begin with simple fixes, then look at […]

Disk Drill Data Recovery Tool Explained: Full Review and Guide
It happens in a split second. You delete a folder by mistake. Your drive stops showing up. A photo album from your last trip just vanishes. And your stomach drops. Lost files feel personal. They are not just data. They are memories, work hours, and sometimes years of effort packed into a few gigabytes. When […]
Recover Deleted Files In Windows 11 With Software & Without
Introduction What is the first thing that goes through your mind the second an important file vanishes from a Windows 11 PC? For most people, it is a mix of panic and disbelief, followed by a frantic click through every folder that file could possibly be hiding in. It happens in a split second: one […]

EaseUS Data Recovery Wizard: Everything To Know
Data loss does not always come from a big disaster either. Most cases start small and boring. A drive gets formatted by mistake. A laptop freezes mid-save and restarts on its own. A memory card stops showing up after being pulled out too fast. None of these feel like emergencies at first, until you realize […]

Recuva Data Recovery Tool: Is it Actually Worth it?
When I first tried Recuva Data Recovery, I wanted to see if it could really bring back lost files. The tool is free, small in size, and promises quick recovery, which made me curious enough to test it on my own PC. The setup was fast, and the wizard guided me step by step. I […]

GetData Recover My Files Data Recovery Tool: Honest Review
A hard drive error brings a special kind of silence. Well, yes! The screen freezes, then a message appears saying the drive can’t be found or must be formatted. In that moment, years of photos and work files feel at risk. It never happens at a good time. Coffee spills near a laptop, a memory […]

