How to Import Photos from iPhone to Windows 11 [Ultimate Guide]

Last updated on May 10th, 2025 at 2:46 pm
iPhone cameras are simply stunning. They let you click high-resolution photos to post on your social media accounts or cherish your special moments.
However, when you want to import photos from iPhone to Windows 11, that’s a bit of a problem. As we already know, Apple devices are not friendly enough. There is no direct way to connect iOS to Windows OS.
But this doesn’t mean you can not transfer your iPhone photos to Windows. There are still ways to connect iOS to Windows and transfer data between them. Some of those best ways are disclosed ahead. So, keep on scrolling.
Does Windows 11 Support iPhone Photo Formats?
iPhone supports multiple image formats, including JPG, PNG, MOV, HEIF and HEVC. The standard formats you can find on your Windows 11 PC are JPG, PNG and MOV.
Thus, if your iPhone photos are in Windows-compatible formats, you can easily sync and view them. But unfortunately, if your photos are in HEIF and HEVC formats, you need a photo format converted to turn them into Windows-compatible formats.
If you don’t want to get a third-party photo format converter, you can ask your iPhone to convert photos before importing.
To do so, open the Settings app on your iPhone and scroll down to Photos.
Under the Photos settings, tick on the Automatic option located below TRANSFER TO MAC OR PC.
If you have selected the Keep Originals options, iPhone will not convert HEIF and HEVC formatted photos to JPEG, PNG or MOV while importing to your PC. This will increase your workload for converting photos after importing them from iPhones.
4 Ways to Import Photos from iPhone to Windows 11
Despite what you have heard about Apple devices, they can pair well with Windows. Thus, it is not that hard to import photos from iPhone to Windows 11. In fact, it is easy to transfer all types of data between iOS and Windows OS.
Here are some simple ways to move iPhone photos to Windows 11:
1. Import Photos from iPhone to Windows 11 using iTunes
iTunes is the default software to transfer data from iPhones. However, setting up a new iTunes account or finding your way around it is not easy for Windows users. One wrong move, and you might end up deleting all your iOS data.
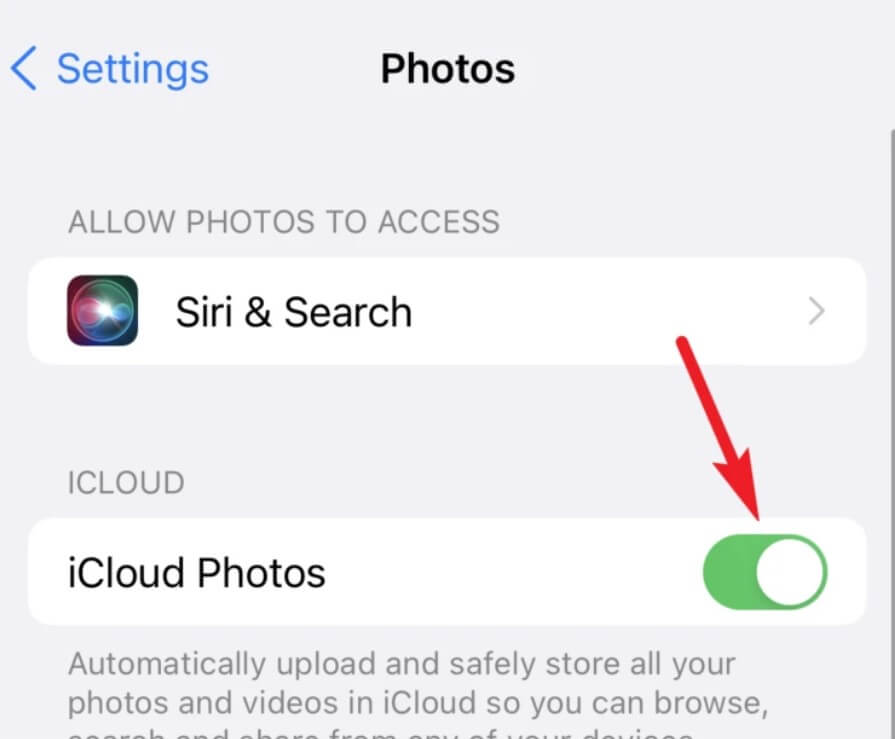
Before moving ahead, ensure that the iCloud Photo Library is turned on your iPhone. To do so, go to the Settings app > Photos > Enable the toggle next to iCloud Photos on your iPhone. Also, your iCloud account must have sufficient storage for your photos.
After that, follow these steps to transfer iPhone photos via iTunes:
Step 1. Using the cable, connect your iPhone to your computer.
Step 2. Open the iTunes app on your Windows > Click the Device button > Photos.
Step 3. Check the Sync Photos option and choose photos you want to move from the Copy photos from option.
Step 4. Hit the Apply button, and you are done.
2. Import Photos from iPhone to Windows 11 using iCloud
iCloud is Apple’s cloud service, making it super easy to store and transfer data from iPhones to PCs. For this, ensure iCloud Photos is enabled on your device. This will automatically upload all your photos and videos to the cloud.
After that, you also have to download and set up the iCloud app. You can download the iCloud app from your Windows App Store and set it up using your iCloud ID and password.
Up next, follow these steps:
Step 1. Open File Explorer on your Windows 11 computer. Alternatively, you can press Windows + E keys to open the File Explorer app.
Step 2. From the left navigation menu, go to iCloud Photos.
Step 3. This will give you access to all your photos and videos on your iPhone. If you have kept all your photos updated in iCloud Photos, you can quickly copy them to Windows 11 PC. Simply double-click on the photo, and when a green tick comes on the photo’s background, it means the photo is downloaded on your PC.
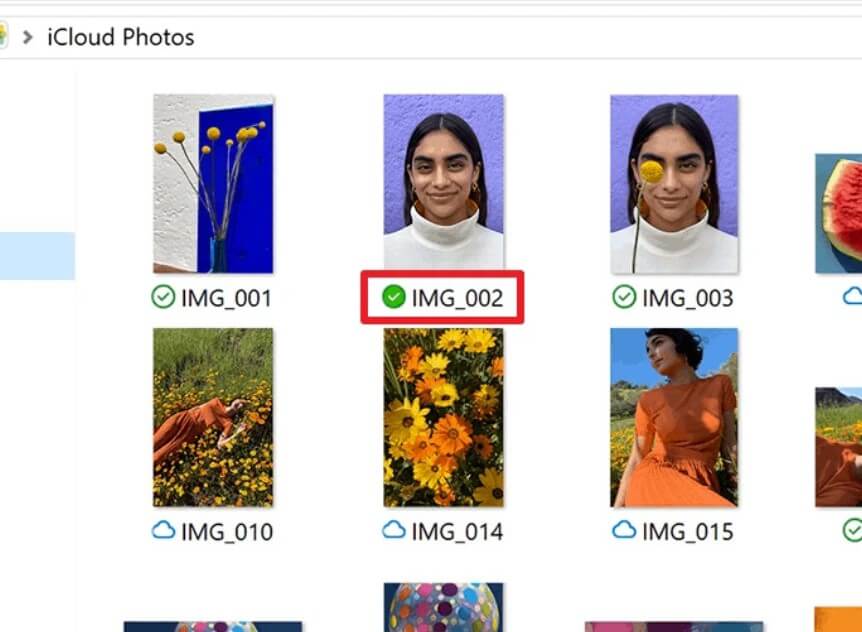
Alternatively, you can right-click on the photo and click on the copy from the pop-up menu. After that, go to a location where you want to save photos on your computer and hit the paste button.
Besides iCloud, if you use another cloud service to store your iPhone photos, download it on your Windows 11 PC and directly transfer iPhone photos.
3. Import Photos from iPhone to Windows 11 using Photo App
Suppose you don’t have sufficient free space left on iCloud to update photos; there is no need to worry about it. Instead, you can use the Windows Photos app to import photos from iPhone to Windows 11.
You need a USB cable and iTunes app on your computer for this method. Here’s what next to do:
Step 1. Using a USB cable, connect your iPhone to the Windows 11 computer. If a prompt comes with a message that says you trust this computer appears on your iPhone, tap on Trust.
Step 2. Enter your iPhone passcode.
Step 3. Another prompt might appear stating that the computer can access all your photos and videos, tap on the Allow.
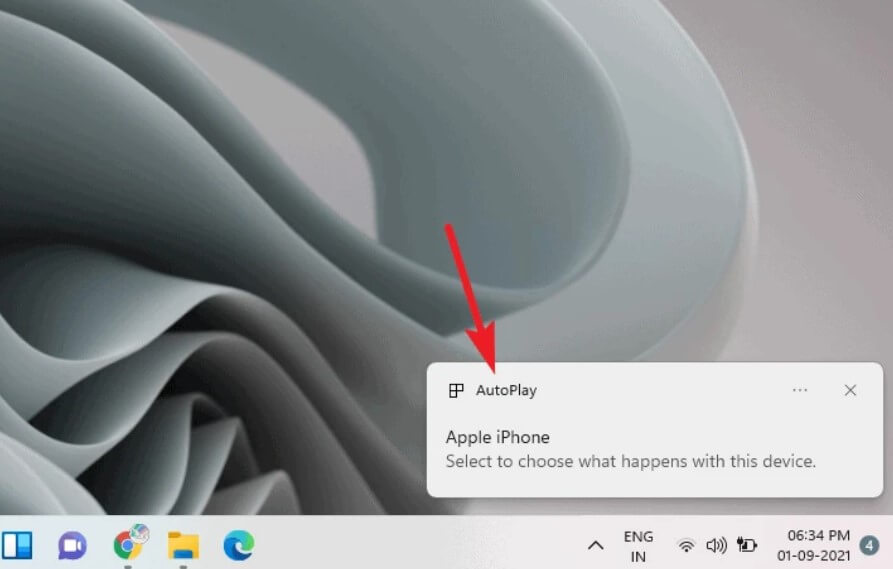
Step 4. After that, an autoplay notification will appear on the notification area of your computer. Click to open it. If you miss the notifications, open the Windows Photos app from the Start menu.
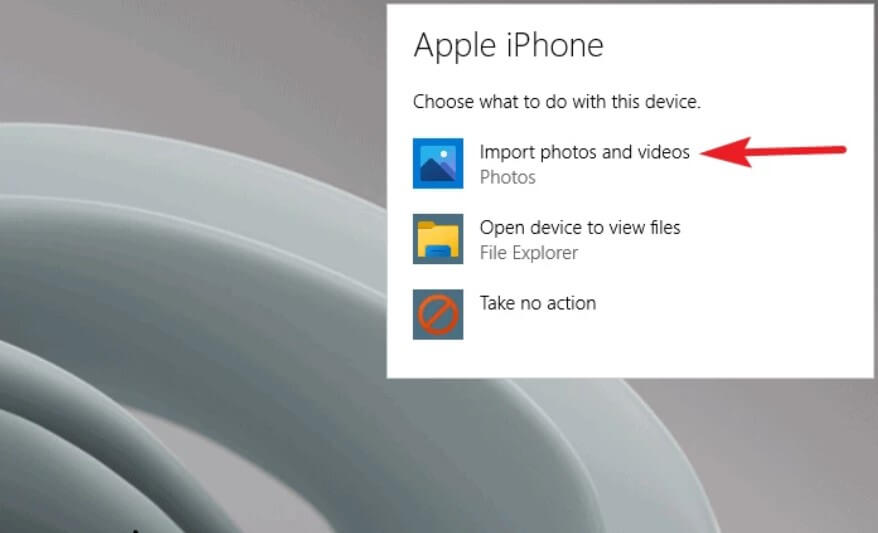
Step 5. From there, click on Import photos and videos. Now, the Import Items overlay window will appear on your screen.
Step 6. Select the photos that you want to import by clicking on their thumbnails.
Step 7. You can also click on the dropdown menu to select photos since the last import.
Step 8. By default, the photos will be imported to the Pictures folder. But you can click on the Change destination to select another location.
Step 9. You can also click on the option — Delete original items after import. This will automatically delete photos from your iPhone once they are imported to your computer.
Step 10. Finally, click on the Import [number] items button. And that’s it!
4. Import Photos from iPhone to Windows 11 using File Explorer
If you don’t use the Windows Photos app much, you can also use the File Explorer to import photos from iPhone to Windows 11. Again for this approach, you need a USB cable and the latest iTunes version.
After that, follow these steps to import photos:
Step 1. Connect your iPhone to your PC using a USB cable and click on the File Explorer app.
Step 2. Navigate to This PC from the left pane. Alternatively, you can search for This PC from your Start Menu.
Step 3. Under the Devices and Drivers, your iPhone will appear as an Apple iPhone or with your device’s name. Double-click to open it.
Step 4. Click on Internal Storage and look for a folder named DCIM.

Step 5. Click open the DCIM folder and open a folder containing your photos and videos. You can copy/paste individual photos or the entered folder to import photos to your computer. Alternatively, you can simply drag and drop photos on your Windows 11.
Let’s Import Photos Now!
So, there you go. iPhone and Windows 11 OS are fully compatible with one another. There are so many easy ways to import photos from iPhone to Windows 11 like File Explorer, iCloud or iTunes.
That’s it for now! Just select the easy solution and start importing your photos now!
Author Bio:
Dinesh Lakhwani 

Dinesh Lakhwani, the entrepreneurial brain behind “TechCommuters,” achieved big things in the tech world. He started the company to make smart and user-friendly tech solutions. Thanks to his sharp thinking, focus on quality and the motto of never giving up, TechCommuters became a top player in the industry. His commitment to excellence has propelled the company to a leading position in the industry.
Popular Post


Recent Post

How To Change Default Apps For File Types In Windows
Windows is designed to make using your computer easy. One way it does this is by assigning default apps to different file types. This means when you open a file, Windows automatically opens it with a specific program. For example, photos may open with Photos, music with Groove Music, and PDFs with Edge. These default […]

How To Adjust The Mouse Pointer Speed: Complete Guide
Using a computer every day means you use the mouse a lot. The mouse pointer moves on the screen and helps you click, scroll, and select items. Many people never think about the speed of the mouse pointer. They have used the default setting for years. This can cause small problems over time. A slow […]

How to Change Mouse Scrolling Settings In Windows
A mouse is one of the most used computer tools. People use it every day. They scroll through emails. They scroll through documents. They scroll through websites and images. The movement becomes automatic. Most users do not notice it. That is why problems often go unnoticed. Scrolling problems show up slowly. At first, it feels […]

Keyboard Light Settings: Keyboard Lighting Control [Complete Guide]
Keyboards are no longer simple typing tools. Well, yes! Over time, they have evolved to include features that improve comfort, visibility, and overall experience. One of the most useful features today is keyboard lighting. It helps users work comfortably in low-light conditions. It also reduces strain when typing for long hours. Many users first notice […]

Customizing Pointer Appearance: Complete Guide
The way your mouse pointer looks on your computer may seem like a small detail. But customizing pointer appearance can make using your PC more comfortable and visually appealing. Many users do not realize that they can change the pointer size, color, and style to fit their needs. Whether you want a bigger pointer for […]

How To Choose a Computer Monitor: Monitor Buying Guide
Buying a monitor looks easy. Many people think all screens are the same. That belief causes regret later. A monitor is not just a display. It is a daily tool. You read on it. You work on it. You relax with it. Small problems become big over time. Poor brightness hurts eyes. Bad size causes […]

How To Get Help With File Explorer in Windows 11 [Complete Guide]
File Explorer is one of the most important tools in Windows 11. It is used to open folders, view files, and manage stored data. Almost every action on a Windows computer depends on it in some way. When users open documents, save downloads, or organize photos, File Explorer is always involved. Because it is used […]

How To Fix A Frozen Computer: Complete Guide [Windows 11/10]
A frozen computer is one of the most common problems Windows users face. The screen stops responding. The mouse pointer does not move. Keyboard inputs do nothing. You may hear the fan running loudly. Sometimes the system looks alive, but nothing works. This situation often happens when you are busy or working on something important. […]

How to Upgrade Computer RAM: Complete Guide
Upgrading RAM is one of the simplest ways to improve a computer. It helps the system feel faster and smoother. Apps open quicker. Browsers handle more tabs. Games and tools run with less delay. Many users search for how to upgrade computer RAM because it gives real results without high cost. You do not need […]

How To Clean Your Computer Keyboard: Complete Guide
A computer keyboard is touched more than almost any other device you own. It is used during work, study, gaming, and casual browsing. Fingers carry natural oils, sweat, and dirt. Small food crumbs fall between keys without notice. Dust settles each day slowly. Over time, this creates a hidden layer of grime. Many users do […]

