


Every computer collects junk over time. Right? Well, yes! Photos often get copied twice. Documents get saved in two folders by mistake. Old downloads pile up and never get deleted. This slowly eats up your storage space, and most people do not even notice until their drive is almost full. That is where a duplicate […]
How to Fix Virus Scan Failed Error in Google Chrome?
Google Chrome includes a file downloader module that allows you to download various types of files (images, documents, zips, executables, audio files, and so on) from the internet.
Chrome not only downloads files but also performs a quick virus and malware scan on them. Unfortunately, the virus scan feature can begin to behave strangely and generate errors for unknown reasons. As a result, it might not download even clean files you are confident do not contain any threats.
Thankfully, some quick fixes can resolve the “Virus Scan Failed” error in Google Chrome on Windows 10 and 11. And we will discuss all those possible solutions in this post. So, let’s get started.
What is a Virus Scan Failed Error?
Under usual circumstances, a browser like Chrome would immediately detect a virus in a downloaded file and notify you. However, if you download a file and a browser, such as Google Chrome, is unable to verify the source of that downloaded file, such as its security certificate or publisher’s details, you may receive a “Failed virus detected error” or a “Virus scan failed error.”
To ensure that the downloaded file is risk-free, try the workarounds discussed in the post to keep you safe.
Why Am I Seeing a Virus Scan Failed Error?
Chrome has its malware detection system that guards against threats. If the software determines that the file is dangerous, it will stop downloading and display the error message.
Sometimes, your antivirus may block the download, so you may need to adjust a few settings to resolve this.
How do I run a malware scan in Chrome?
Step 1. Select Settings from the menu in the top right corner.
Step 2. Navigate to Reset and clean up in the left pane.
Step 3. Select Clean up computer.
Step 4. Wait for the scan to complete before removing any malicious software extensions discovered.
8 Ways to Fix Virus Scan Failed Error in Chrome
If the virus scan failed error is not letting you download files on your Chrome browser, don’t get annoyed. Instead, just follow any or all of these solutions to fix the problem on your Windows 10 or 11.
Way 1. Clear Web Browser Cache
An out-of-date or corrupted cache causes most browser issues and errors. For example, the virus scan fails when your old or corrupt cache data interferes with Chrome’s scanning operations. Therefore, purging old cache data will be beneficial.
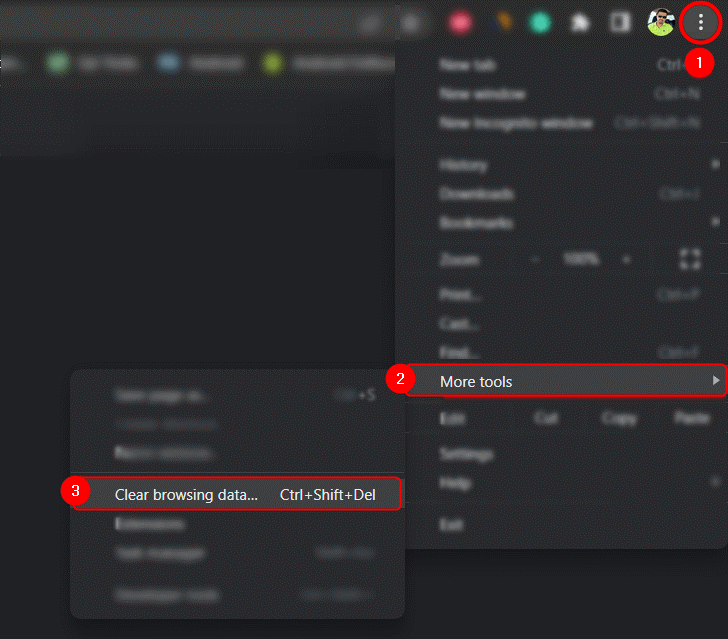
Step 1. Open Chrome. Click on the three-dot menu from the top corner, then More tools, and then Clear browsing data. Alternatively, you can open the Clear Browsing Data panel by pressing Ctrl + Shift + Del.
Step 2. Select All time from the drop-down menu under Time range. Next, check the boxes for ‘Cookies and other site data’ and ‘Cached images and files.’
Step 3. Finally, press the Clear data button. Then, restart Google Chrome to see if that fixes the problem.
Way 2. Uninstall Your Browser Extensions
We sometimes need to extend the functionality of our web browsers. Browsers such as Chrome, Opera, and Microsoft Edge have dedicated extension stores where you can install extensions for various purposes.
While the majority of these browser extensions are applicable, thousands of them contain adware and malware. If you cannot download files or the virus scan fails while doing so, a malicious extension may be to blame. As a result, perhaps it’s time to take a closer look at the extensions you’ve installed and uninstall any that appear suspicious.
Step 1. Launch Google Chrome, Microsoft Edge, or Opera.
Step 2. Enter the following URL into the browser’s URL bar by typing or pasting it.
Google Chrome: Chrome://extensions
Microsoft Edge: edge://extensions
Opera: opera://extensions
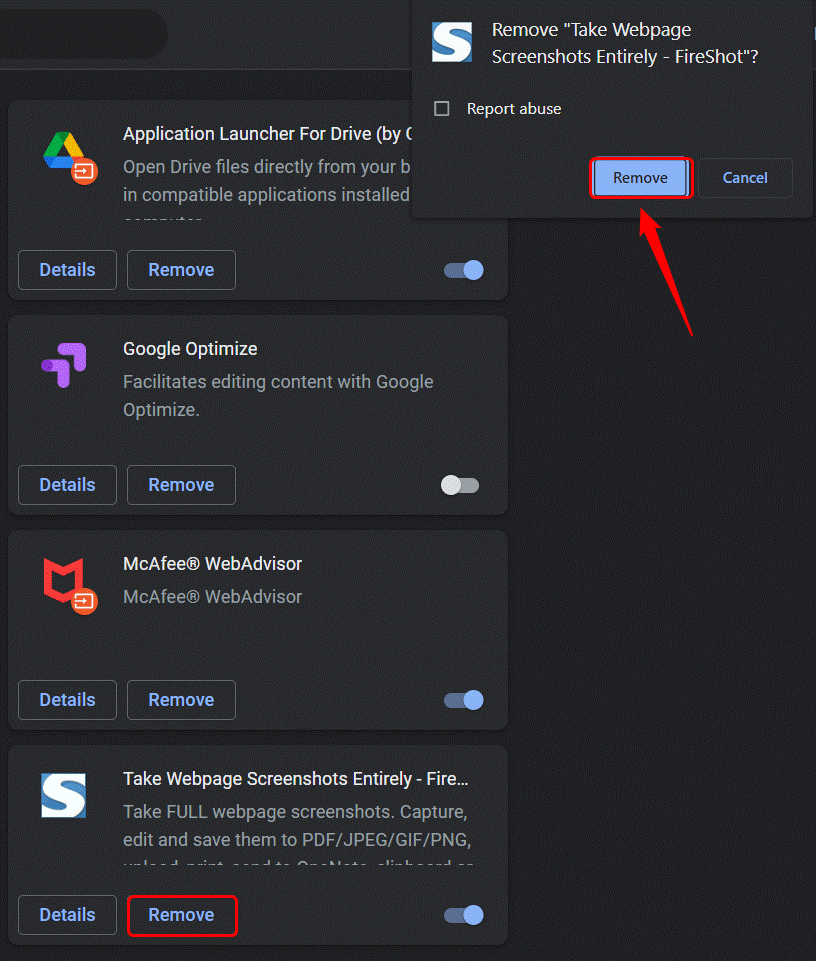
Step 3. You will now have access to all of the extensions that have been installed in your browser.
Step 4. Click on the Remove button next to the extension you want to remove.
Way 3. Use Chrome’s Malware Scanner
Few people know that Chrome has a useful built-in feature that can scan and clean your computer for viruses and malware. You can use the browser’s scanner to ensure that your computer does not contain any malicious files that could be causing the virus scan failed error. To run a cleaning process, follow the steps outlined below.
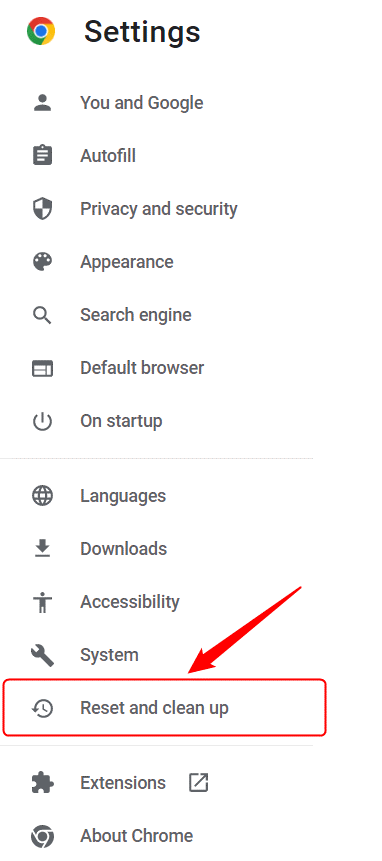
Step 1. Select Settings from the 3-dot menu icon in the top-right corner of the browser window.
Step 2. Click the Reset and clean-up option on the Settings page.
Step 3. Select Clean up computer now.
Step 4. Click the Find button.
Step 5. Wait for the scan to finish before closing and relaunching Chrome.
Way 4. Reset Your Web Browser
Resetting your web browser to its default settings may aid in the resolution of the virus scan failure issue in Chrome, Edge, and Opera.
Step 1. Type the following URLs into the search bar of your web browser and press the Enter key.
chrome:/settings/reset
edge:/settings/reset
opera:/settings/reset
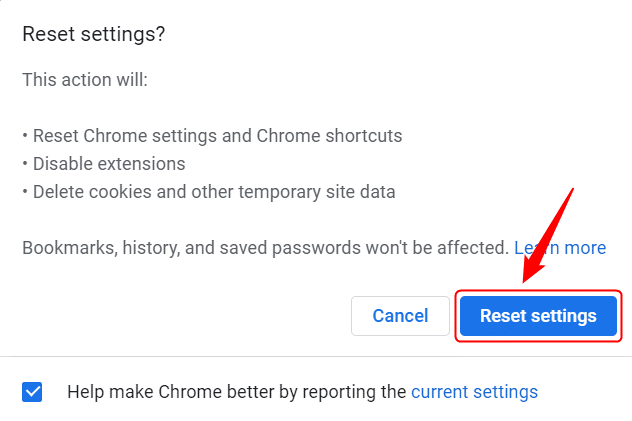
Step 2. Click the Restore settings, followed by the Reset settings button.
Way 5. Switch Off Your Antivirus Program
Windows Defender and antivirus software can be susceptible and strange at times. However, this proactive behavior on the part of antivirus software may block both malicious and safe files. Try turning it off to ensure that your antivirus program is not causing you confusion with the virus scan failed error.
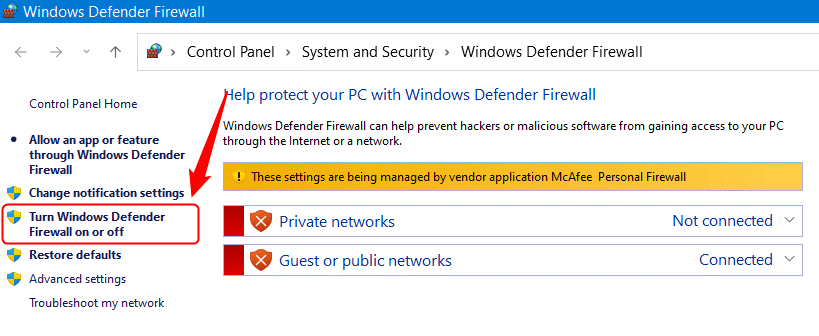
If you rely entirely on Windows Defender for your PC’s security, navigate to Control Panel > System and Security > Windows Defender Firewall and select Turn Windows Defender Firewall on or off. Then, turn it off and attempt to download a file in your web browser.
If you use an antivirus program like McAfee, right-click on the antivirus icon in the Taskbar and choose Change Settings. Then, choose Real Scanning and Firewall options and turn them off.
Way 6. Tweak with the Registry Editor
Numerous Registry Editor tweaks and hacks allow you to customize various aspects and settings on your Windows PC. However, the Registry tweak listed below is one of the most effective methods for resolving the virus scan failed error in Google Chrome, Microsoft Edge, and Opera. First, create a system restore point and make a backup of the Registry Editor and then follow these steps.
Step 1. Start the Registry Editor program. To do so, type “registry editor” into the Windows search box and select Registry Editor.
Step 2. Now, navigate to the following location.
Computer\HKEY_LOCAL_MACHINE\SOFTWARE\Microsoft\Windows\CurrentVersion\Policies\Attachments
Step 3. If you don’t want attachments, follow this path.
Computer\HKEY_LOCAL_MACHINE\SOFTWARE\Microsoft\Windows\CurrentVersion\Policies
Step 4. Right-click on Policies and select New > Key.
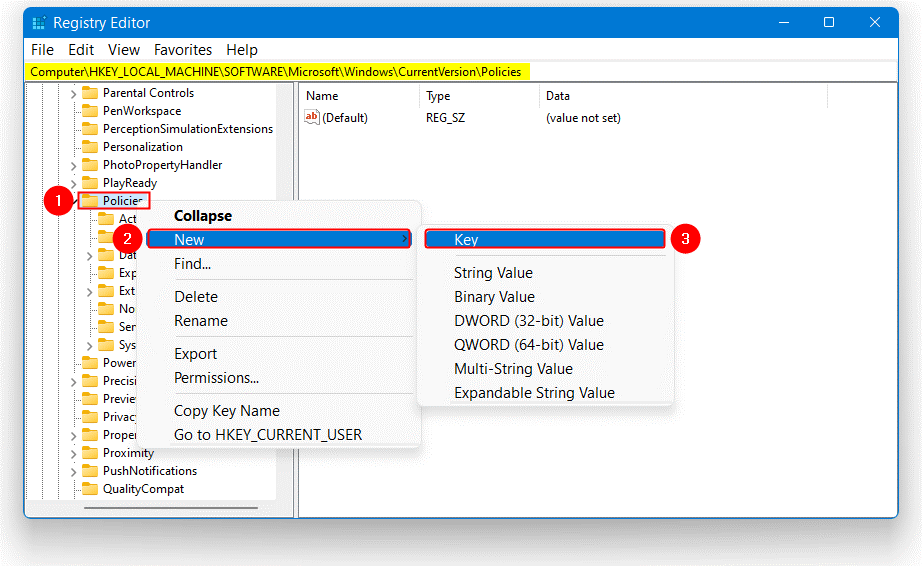
Step 5. Change the name of this new key to Attachments.
Step 6. Right-click on Attachments and select New > DWORD (32-bit) Value.
Step 7. Change the name of this new DWORD file to ScanWithAntivirus.
Step 8. Right-click ScanWithAntivirus and choose Modify.
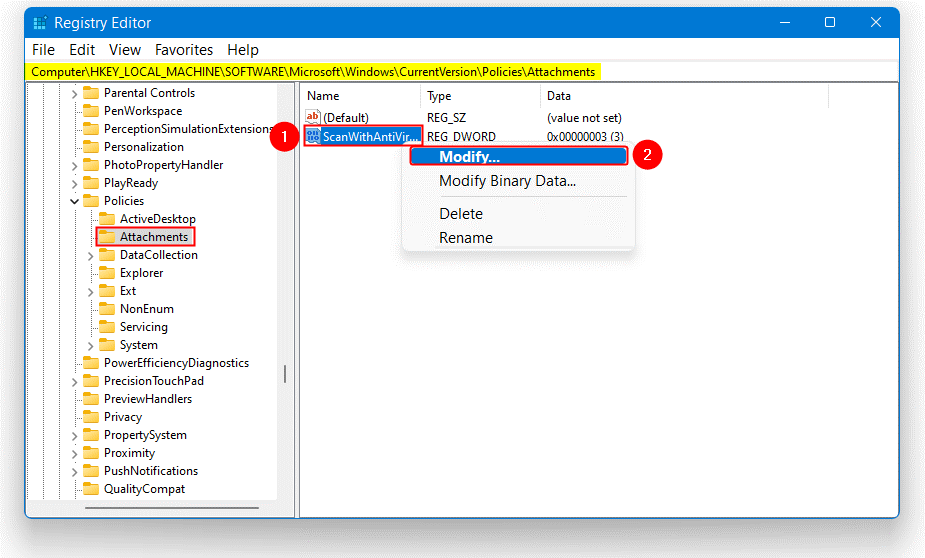
Step 9. This file’s Value data is set to 3 by default. Set it to 1 and click OK.
That’s all. Restart your computer once you close the Registry Editor window. The fix virus scan failed error should now be resolved.
Way 6. Use the Internet Properties
Many Microsoft users have suggested that tweaking with the Internet Properties has fixed the virus scan failed error for them. So, you can also try this method and see if that works for you.
Step 1. Type CPL into the Windows search bar and press the Enter key.
Step 2. When the Internet Properties window appears, navigate to the Security tab and select the Internet zone represented by the globe icon.
Step 3. Select the Custom level option.
Step 4. Scroll down in the Security Settings window to Downloads > File download.
Step 5. Click Enable.
Step 6. Scroll down to Miscellaneous, then select Launching applications and unsafe files.
Step 7. Choose Prompt (recommended)
Step 8. Press the OK button.
Way 7. Use PUP scanner
The security extensions installed on Chrome will never be as effective as a full-fledged antivirus program.
We recommend checking for PUPs to ensure there are no hidden, rogue extensions that download something without your permission.
A PUP, as opposed to cute puppies. But, in the computer context, PUP is an add-on or software wrapper you most likely did not want to have installed on your computer. It is also known as junkware. It is a third-party tool that downloads the desired product while installing optional extras such as toolbars or adware.
Those add-ons may also modify your web browser’s homepage and search settings. Many dedicated PUP scan tools are available that you can use to fix the problem. Common tools like PUP scan, PUP smart scan, etc.
Way 8. Unblock Chrome and Restore Files
You can also exempt certain files from the Windows Defender to prevent the virus scan failed error.
Step 1. On your computer, launch Windows Defender.
Step 2. Click on Protection history from the main window.
Step 3. Locate and expand the application that has been blocked in the list.
Step 4. Click Allow after expanding the Actions menu.
You can now add a specific exclusion within Windows Defender to ensure that this file is not detected as potentially malicious software, which should help with the virus scan failed message in Chrome.
You can also permanently disable Windows Defender, which we recommend.
Of course, you must then choose to install a new security program to keep everything safe and secure at all times.
However, this time choose a better security solution that receives daily updates and can correctly identify the files that are a threat to your computer.
Parting Note
Although it is not common, you may encounter a “virus scan failed error” while downloading a file in Chrome or any other browser. If you have encountered this problem and found the solutions listed above helpful, please let us know in the comments section below. Continue reading BCC for more such content, and don’t forget to share the blog with your friends.
Author Bio:
Dinesh Lakhwani 

Dinesh Lakhwani, the entrepreneurial brain behind “TechCommuters,” achieved big things in the tech world. He started the company to make smart and user-friendly tech solutions. Thanks to his sharp thinking, focus on quality and the motto of never giving up, TechCommuters became a top player in the industry. His commitment to excellence has propelled the company to a leading position in the industry.
Popular Post
Recent Post

Duplicate File Finder Pro: A Complete Review, Everything You Should Know
Computers collect thousands of files over time. Well, yes! Many of them end up being duplicates created by backups, downloads, or accidental copies. These extra files take up valuable storage space and make it harder to keep everything organized. Finding and removing them manually can take hours. Right? Duplicate File Finder Pro is a tool […]

Monitor Screen Calibration Guide: Everything You Should Know
Your monitor shows colors every single day. But are those colors actually correct? Most people never stop to check this. They just use the screen as it comes out of the box. This habit can lead to wrong colors in photos, videos, and work files. Colors may look too warm or too cold without you […]

How To Check Installed RAM and RAM Slots [Complete Guide]
RAM plays an important role in how smoothly a computer runs. Short for Random Access Memory, it stores the data and instructions that Windows and active applications need at any given moment. From opening multiple browser tabs to running games and productivity software, RAM helps keep everything responsive. A system with limited memory may experience […]

What is Microsoft Autopilot Everything You Need To Know
Technology has changed the way companies manage computers. Well, yes! Employees now work from offices, homes, and remote locations. Setting up devices manually for every worker takes time and effort. It can also create mistakes that slow down productivity. This is where Microsoft Autopilot becomes useful. It helps businesses prepare and deploy Windows devices with […]

Enable Automatic Device Locking Feature Windows: Complete Guide
Introduction: Your computer stores important information such as emails, documents, passwords, and personal photos. Leaving it unlocked can put that data at risk. Thankfully, Windows includes built-in features that can automatically lock your device when you are away. Setting up automatic device locking is quick and does not require any extra software. In this guide, […]

How to Update Wireless Network Driver in Windows 11 and 10
Your Wi-Fi keeps dropping. Pages load slowly. The connection feels unstable? Well, you are not alone. Most of the time, the problem is not with your internet plan. It is with your wireless network driver. A driver is a small piece of software that helps your computer talk to its hardware. When it gets outdated, […]

Common Windows 11 Problems and Solutions (2026 Version)
Windows 11 has become more polished over the years, but it is still not completely free from problems. Even after regular updates from Microsoft, many users continue to face issues like lagging performance, failed updates, audio troubles, random crashes, and network errors. Some problems appear after installing new features, while others develop gradually as the […]

Fortect Driver Updater Review: Features, Steps, Pros, and Cons.
A new PC usually feels quick and responsive. Applications open instantly, games run smoothly, and everything works as expected. As time passes, however, you may notice slower performance, system crashes, hardware glitches, or devices that stop working properly. While many people assume malware or low storage space is to blame, outdated drivers are often the […]

New Features Coming in Windows 11 This Year [2026]
Microsoft is always working to make Windows better. This year is no exception. The company has announced and rolled out several exciting updates for its users. These updates touch almost every part of the operating system. From the Start menu to system settings, changes are arriving fast. If you use Windows daily, you will want […]

