How to Fix No Startup Disk on Mac? [8 Methods]
Last updated on November 3rd, 2024 at 1:28 pm
In computers, the startup disks are one of the most important parts of the device. Also known as the internal hard drive, the startup disks hold most of the OS data and system files. However, in some cases, the issue of no startup disk on a Mac can come up, which may affect the steady performance of the Mac device.
You should use different methods to fix the Mac OS startup disk not showing problem before losing any data or files. That is what we discuss in this post. Read to know more.
Ways to Fix the No Startup Disk Error on Mac/Macbook
The problem of no startup disk on Mac can appear in the Desktop/Finder or during the booting period. It is difficult to access the stored data without fixing the issue, or it can stop the device from switching on. We went through the various methods that can rectify this issue and presented the right methodologies here.
Fix 1: Reset the NVRAM
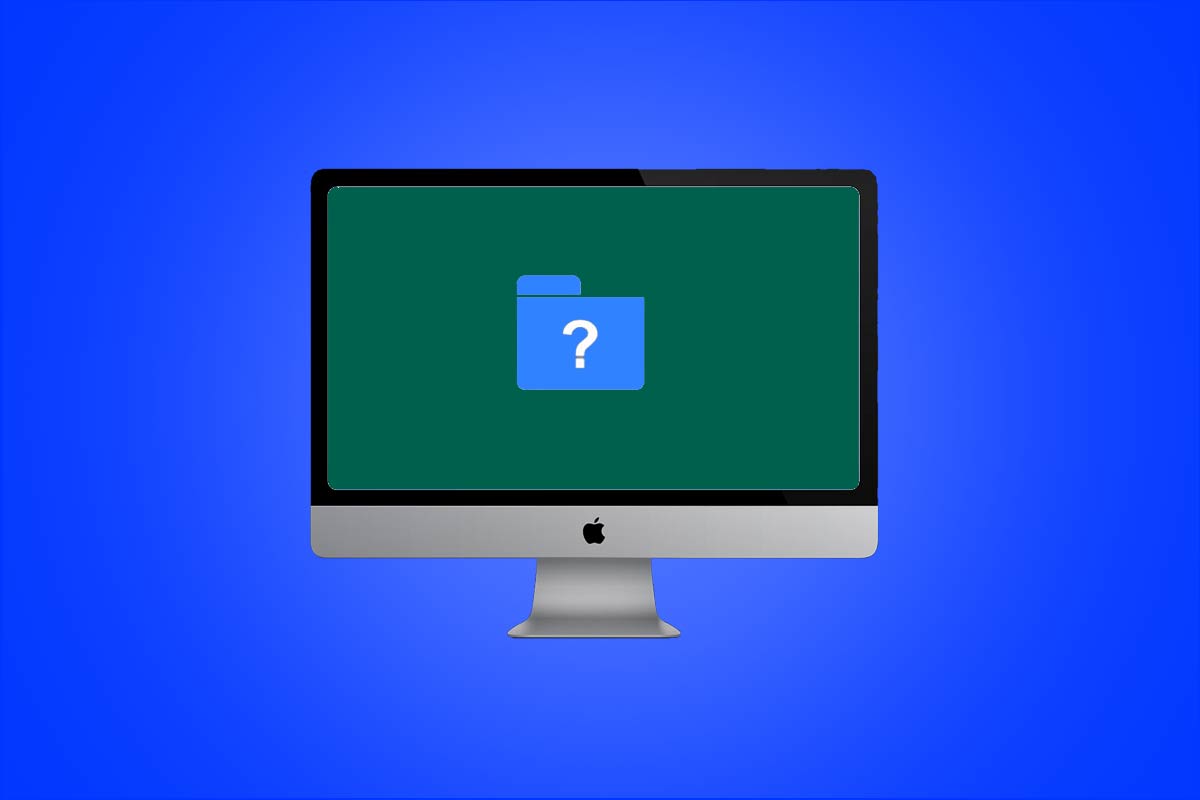
One of the common signs of an issue of no startup disk on Mac is the appearance of the question mark for some seconds. You can reset the NVRAM in Mac devices to fix the problem when you see this part. That would rectify the issue.
How to do this?
Step 1: Shut your Mac device down.
Step 2: Click the power button and then hold your finger down on Command-Options-P-R on the keyboard.
Step 3: The Mac device would start playing the sound for the startup. You should stop pressing down on the keys before the second sound replay when it does so.
For models with a T2 Security chip, wait for the Apple logo to appear twice. After the second time that it disappears, release your hold on the keys.
Step 4: Choose the right startup disk after the system boots up.
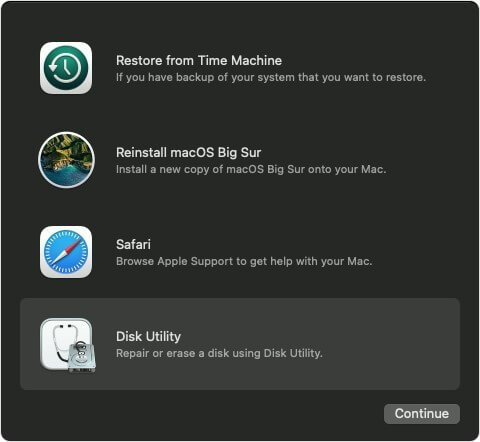
Fix 2: Use the Disk Utility to boot Mac in the Recovery mode
It is possible to use the Disk Utility to repair the startup disk. If the question mark for the startup disk keeps appearing continuously, it should boot up the device in the pre-set Recovery Mode.
With no startup disk on Mac, likely, you cannot access the Disk Utility tab through the Applications folder at all. Here, you can use the Recovery Mode function of MacOS to access the Disk Utility option.
How to do this?
Step 1: Shut your system down.
Step 2: Click on the Power button while also holding down the Command-R keys.
Step 3: The Apple logo, a spinning globe, or a secondary startup screen can appear. Release the keys and type your pre-set admin password in the text field when they do.
Step 4: Open the Utilities tab and select Disk Utility. Then, press your cursor on the “View” option.
Step 5: Select the option- Show all Devices.
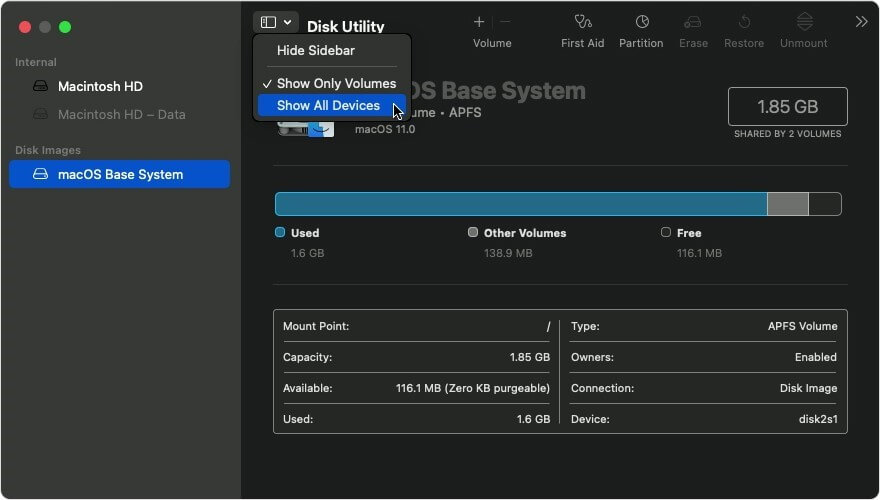
Step 6: When you see Macintosh HD, click your cursor on top of the arrow beside. Choose the volume and then opt for the First Aid option from the toolbar.
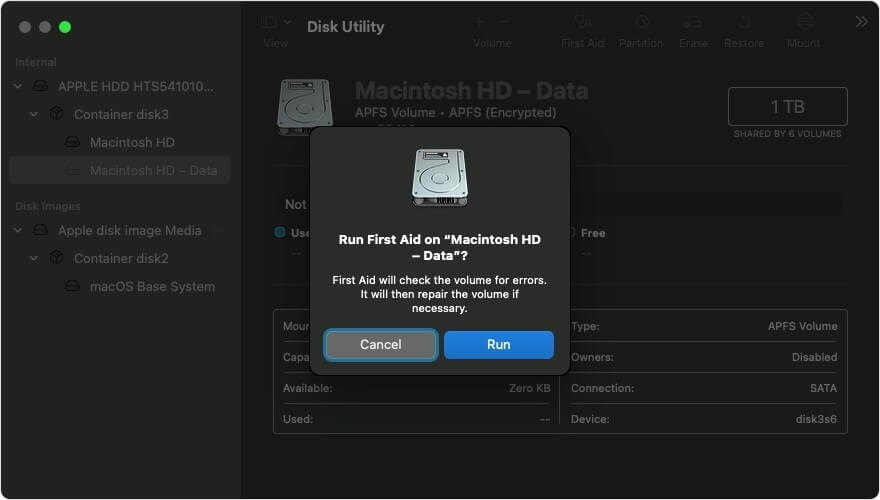
Step 7: Select Run.
Do these steps for the following volume as well. If this process is successful and the disk repairs, you should restart the Mac device. Then, the Mac OS startup disk missing prompt or the question mark would not appear.
However, if it does not work, you have to reinstall the macOS on your device.
Fix 3: Adjust The Internal Hard Drive with Another Startup Disk
One of the reasons for the Mac OS startup disk missing issue is that the existing startup disk is damaged or does not work. Therefore, the MacOS software cannot recognize it. If you do not have external storage material at the time, like another disk, one network volume, or a CD/DVD, you change the startup disk.
How to do this?
Step 1: Switch your Mac device off.
Step 2: Then, press down and keep your hold on the Mac power button to start the device up.
For users operating with Apple silicon, it is better to press down on the power button until they see the “Loading Startup Options” dialog box.
Step 3: Click on the Up arrow on your device. Or press the Continue button (Apple silicon devices).
Step 4: Choose the new startup disk to add from the next list.
Fix 4: Change settings on the Mac device to fix the issue on Desktop/Finder.
Sometimes, the no startup disk on Mac prompt comes up where the users cannot see the startup disk on the Finder/Desktop. In this situation, there is no error in the system performance of the Mac device. The startup up is not set for showing the hard drive content on desktop or Finder. Users must change the settings to rectify this problem.
How to do this?
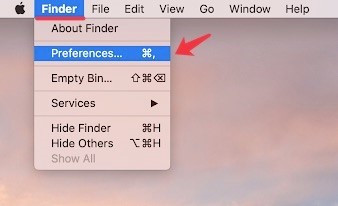
Step 1: Open the “Finder” section. Click on the Apple icon for the menu bar on the top left part of the screen. Choose the Finder option.
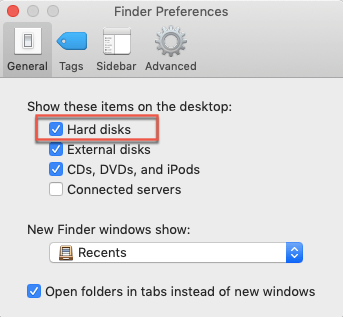
Step 2: Then, click on the Preferences option and then choose General from the next list that appears.
Step 3: Press the checkmark beside the “Hard Disks” choice under the General tag.
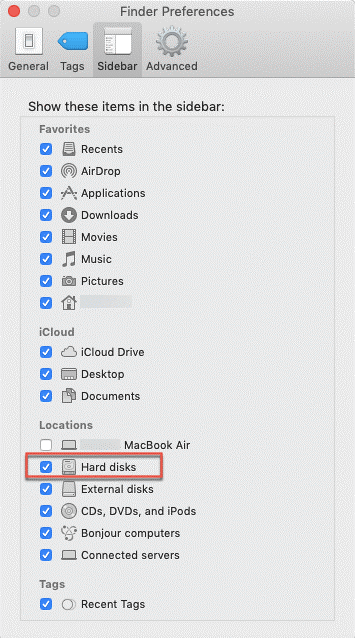
Step 4: Then, open Finder Preferences > Sidebar > Hard Disks (check the choices).
Step 5: If there “Hard Disks” selection is already ticked, but still the internal hard drive is not opening, you should open the “Finder” option.
Step 6: On the left-hand sidebar, you will see Locations. Put the mouse on top of it. It might show the “Hide” or “Show” terms.
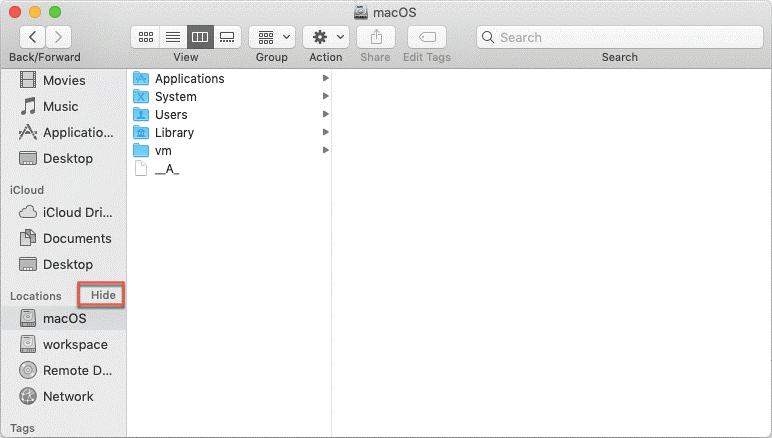
Click on it and adjust the state. You would know if the Finder is hiding the startup disk/internal hard drive or not.
Fix 5: Check for Software Updates to fix Startup Disk Not Showing on Mac
Regularly checking for software updates ensures your Mac’s operating system and installed apps are equipped with the latest enhancements, security patches, and bug fixes. This practice helps maintain system stability and resolves potential conflicts caused by outdated software versions.
How to do this?
Here are the steps to check for software updates to fix the No startup disk Mac issue:
Step 1: Click on the Apple menu in the top left corner of the screen.
Step 2: Select “System Preferences” from the menu.
Step 3: Click on the “Software Update” icon in System Preferences.
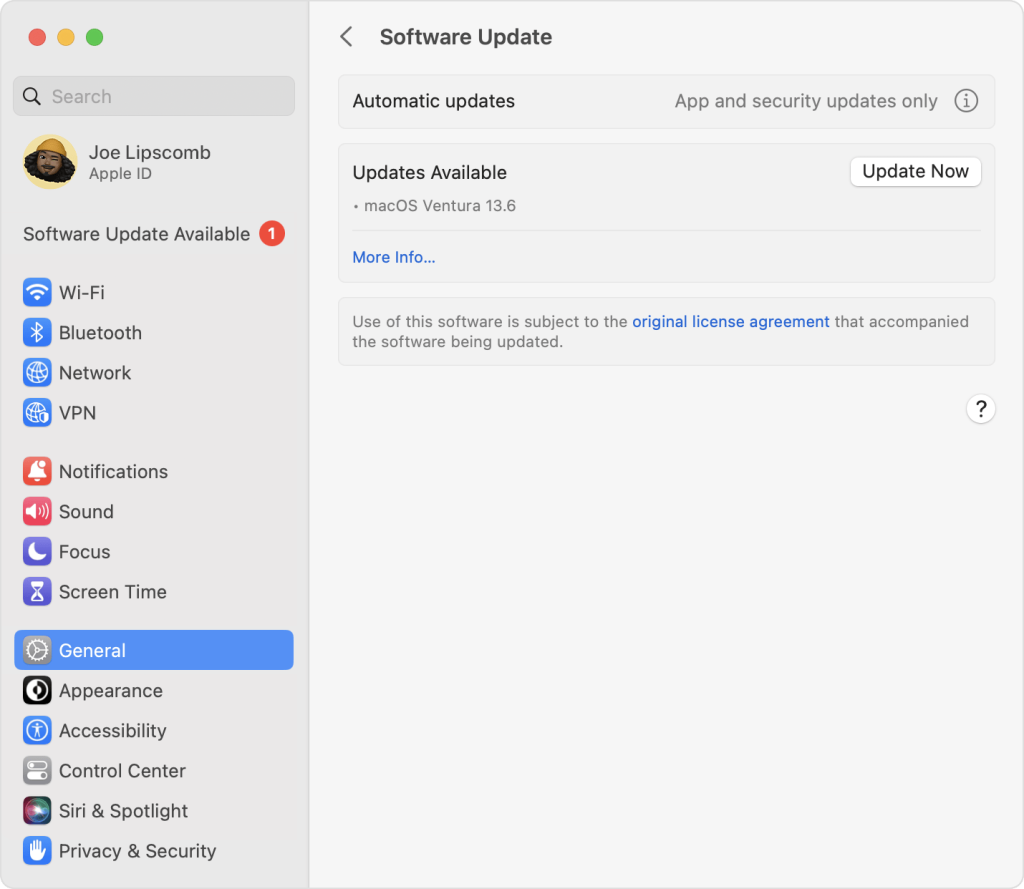
Step 5: If any updates are available, they will appear with an option to install them. Click the “Update Now” or “Install Now” button to install any available updates.
Step 6: Enter your administrator password if prompted to authorize the installation of the update.
Step 7: Allow your Mac to restart if required to complete the installation of the updates.
Fix 6: Check for Hardware Issues
Conducting hardware diagnostics is crucial to identify and address potential underlying hardware problems affecting your Mac’s performance. Running comprehensive tests enables the detection of faulty components, ensuring timely maintenance or replacement to maintain optimal system functionality. Checking hardware issue could fix no startup disk on Mac.
How to do this?
Here are the steps to check for hardware issues to fix the MacBook no startup disk issue:
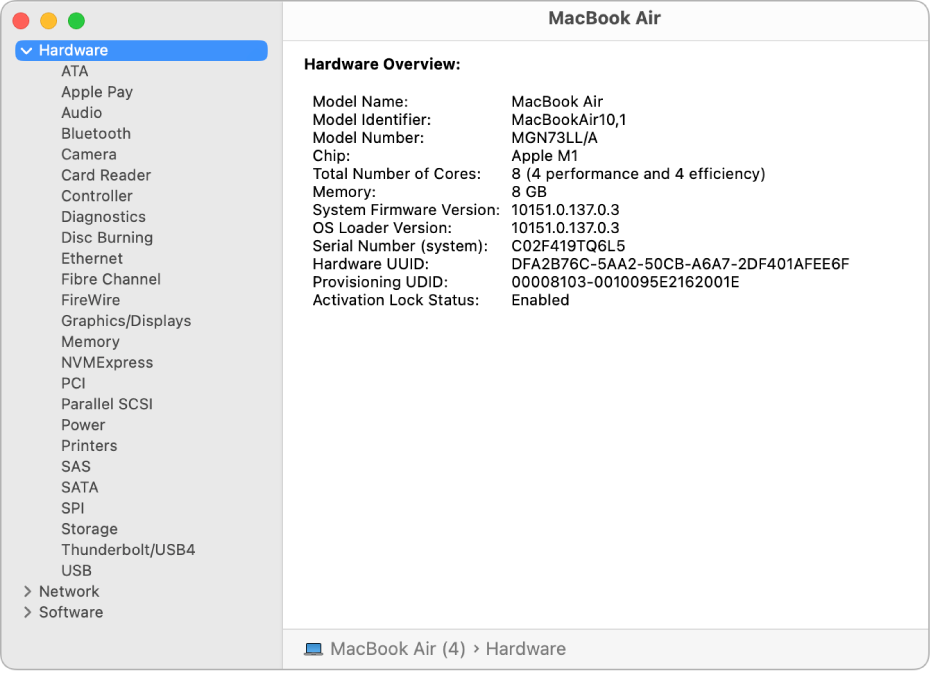
Step 1: Click the Apple menu and select “About This Mac.”
Step 2: Click the “System Report” button.
Step 3: In the sidebar of System Information, select “Hardware.”
Step 4: Review the information about your Mac’s hardware components such as memory, storage, USB devices, and graphics.
Step 5: Check for issues like not enough RAM, low disk space, problems with connected devices, overheating, etc.
Step 6: Run checks on hardware components like storage drives and memory by clicking the “Check S.M.A.R.T. Status” or “Scan for Problems” buttons.
Step 7: If any hardware issues are detected, make a note of the alert messages and details provided.
Step 8: Compare the reported hardware configuration against expected or intended hardware to detect faults, mismatches or changes.
Step 9: If hardware faults are suspected, get further troubleshooting or repairs done by an Apple technician.
Fix 7: Boot your Mac in Safe Mode
Safe Mode provides a troubleshooting environment, allowing your Mac to start with essential software and drivers only. By bypassing non-essential elements, Safe Mode helps isolate software-related issues, facilitating the identification and resolution of conflicts or problematic software causing startup difficulties.
How to do this?
Here are the steps to boot a Mac in Safe Mode:
Step 1: Restart your Mac. As it reboots, press and hold the Shift key immediately after you hear the startup sound.
Step 2: Keep holding Shift until you see the login window or your desktop appear with “Safe Boot” text in the upper right corner.
Step 3: Enter your admin name and password to log in like normal.
Step 4: Use your Mac carefully while in Safe Mode. Don’t save anything important as some features/apps won’t work.
Step 5: Check if issues persist in Safe Mode. If they don’t, it may be related to software/login items.
Step 6: To exit Safe Mode, restart your Mac as normal without holding any keys during boot.
Step 7: Once logged back in normally, troubleshoot software and login items further.
Step 8: If issues still occur outside Safe Mode, they are likely hardware or system-related. Seek Apple Support for the next troubleshooting step.
Fix 8: Re-install macOS
Reinstalling macOS involves refreshing the entire operating system, and resolving persistent software-related issues that might be impacting your Mac’s startup. This process reinstalls the system files and software components, offering a clean slate and potentially resolving underlying software conflicts or corruption causing the no startup disk issue on mac.
How to do this?
Here are the step-by-step instructions to reinstall macOS:
Step 1: Back up your Mac data, including photos, documents, etc. to ensure you don’t lose important files.
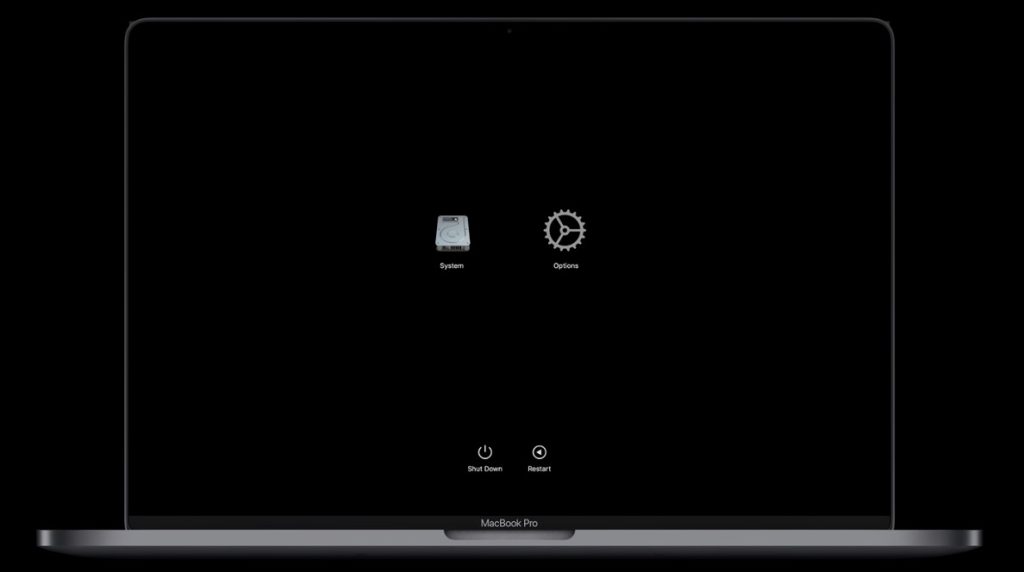
Step 2: Restart your Mac and press the Command + R keys simultaneously after you hear the startup chime. This will boot your Mac into Recovery mode.
Step 3: When the macOS utilities window appears, select and click on the “Reinstall macOS” option.
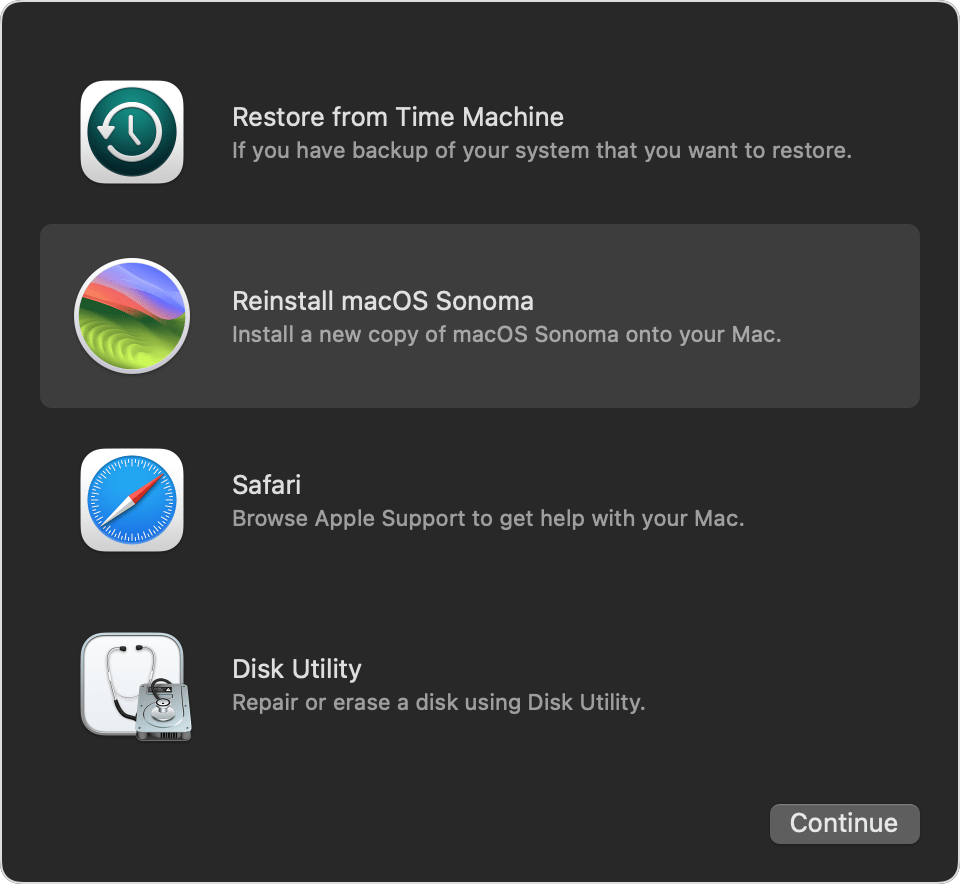
Step 4: On the next screen, click “Continue” and follow the onscreen instructions to commence the installation process.
Step 5: Agree to the software license agreement by clicking “Agree” to proceed.
Step 6: Select the disk where you want to install macOS. Typically, you’ll see only one disk option.
Step 7: Click “Install” to continue with the installation. This process may take a while to complete.
Step 8: After installation, your Mac will restart. Set it up as new or restore data from your backup.
Step 9: Once done, install other software programs you need and restore data as desired.
Conclusion
Use these methods to fix the issue of no startup disk on your Mac device. You can directly change the startup disk option or go through the MacOS Recovery function to configure the settings accurately. Before choosing any of the steps, you should understand the main cause for the error and select accordingly.
Additionally, use the CleanMyMac X software to optimize the condition of your device and remove any malware that may cause this issue. With this app, you can handle continuous maintenance of your system ahead of time.
FAQs:
1. What to do if my Mac doesn’t have a startup disk?
If your Mac doesn’t have a startup disk, it could indicate a serious issue with your internal drive or operating system. Try troubleshooting steps like resetting the NVRAM/PRAM, running Disk Utility to check for disk errors, or reinstalling macOS using Recovery Mode.
2. How do I install a startup disk on a Mac?
A startup disk is typically the internal drive that contains your macOS. To install or reinstall it, use macOS Recovery by restarting your Mac while holding Command + R keys. From there, follow the prompts to reinstall macOS on your startup disk.
3. How to fix “startup disk is no longer available” or “doesn’t contain a working Mac operating system”?
If you encounter these errors, it might mean your Mac cannot find a valid startup disk. Check your connections, ensure the drive is properly connected and recognized, and consider using Disk Utility or macOS Recovery to repair or reinstall the operating system on the startup disk.
4. What does it mean if my startup disk is no longer available?
If your startup disk is no longer available, it indicates that your Mac cannot locate a valid macOS installation to boot from. This could be due to disk failure, disconnection, or corruption. Troubleshoot by checking the drive’s connection, repairing the disk using Disk Utility or macOS Recovery, or reinstalling macOS on the startup disk.
Author Bio:
Dinesh Lakhwani 

Dinesh Lakhwani, the entrepreneurial brain behind “TechCommuters,” achieved big things in the tech world. He started the company to make smart and user-friendly tech solutions. Thanks to his sharp thinking, focus on quality and the motto of never giving up, TechCommuters became a top player in the industry. His commitment to excellence has propelled the company to a leading position in the industry.
Popular Post


Recent Post
![Adjusting Audio Output Settings Complete Guide [2026]](https://www.techcommuters.com/wp-content/uploads/2026/03/Adjusting-Audio-Output-Settings-Complete-Guide.webp)
Adjusting Audio Output Settings: Complete Guide [2026]
Sound is part of almost everything we do on a computer. It lets you watch videos, join calls, play music, and hear alerts. When the audio stops working the right way, it can interrupt both work and daily use. That is why adjusting audio output settings matters for every user. Many people get unsure when […]

Artificial Intelligence Explained: Concepts, Terminology, Benefits, and Future Trends
Artificial Intelligence, or AI, is basically computers doing things that usually need a human brain. We’re talking about stuff like learning from experience, figuring out problems, understanding language, and making decisions. It’s not magic, just a lot of data, pattern-spotting, and math behind the scenes. Now, AI doesn’t actually think or feel like we do. […]
Resolving Microphone Detection Problems: Latest Guide [2026]
Microphones are important tools in daily life. People use them for office meetings, online classes, interviews, gaming, customer support, and content creation. When a system fails to detect a microphone, communication stops at once. This situation can cause stress and confusion. Many users believe the microphone is damaged. In reality, most problems are simple and […]
How To Switch To A Dark Background Theme In Windows [2026]
Most people spend many hours each day in front of a computer screen. Office work, online classes, editing, browsing, and streaming all require long screen time. A bright white background may look clean at first. However, over time, it can feel sharp and tiring. The strong contrast between white backgrounds and black text may cause […]
How to Switch From Local To Microsoft Account On Windows
Many users begin with a local account when they set up a new Windows computer. A local account works only on that single device. It stores settings, files, and preferences locally. It does not connect to online Microsoft services. For basic offline use, it works well. However, as digital needs grow, many users want better […]

How to Switch Windows 10 to a Local Account: Complete Guide
Windows 10 allows users to sign in with either a Microsoft account or a local account. When you set up a new computer, the system often suggests using a Microsoft account. This account connects your device to Microsoft services such as Outlook, OneDrive, and the Microsoft Store. It also syncs settings, themes, and passwords across […]

How To Change Default Apps For File Types In Windows
Windows is designed to make using your computer easy. One way it does this is by assigning default apps to different file types. This means when you open a file, Windows automatically opens it with a specific program. For example, photos may open with Photos, music with Groove Music, and PDFs with Edge. These default […]

How To Adjust The Mouse Pointer Speed: Complete Guide
Using a computer every day means you use the mouse a lot. The mouse pointer moves on the screen and helps you click, scroll, and select items. Many people never think about the speed of the mouse pointer. They have used the default setting for years. This can cause small problems over time. A slow […]

How to Change Mouse Scrolling Settings In Windows
A mouse is one of the most used computer tools. People use it every day. They scroll through emails. They scroll through documents. They scroll through websites and images. The movement becomes automatic. Most users do not notice it. That is why problems often go unnoticed. Scrolling problems show up slowly. At first, it feels […]

Keyboard Light Settings: Keyboard Lighting Control [Complete Guide]
Keyboards are no longer simple typing tools. Well, yes! Over time, they have evolved to include features that improve comfort, visibility, and overall experience. One of the most useful features today is keyboard lighting. It helps users work comfortably in low-light conditions. It also reduces strain when typing for long hours. Many users first notice […]

