


A slow computer makes it hard to focus. Programs take too long to open. Free space keeps shrinking until the disk is almost full. This happens to most PC owners at some point. Even new machines can slow down after a while. That is the exact problem cleanup tools are built to solve. They comb […]
How to Disable the Lock Screen on Windows 11
Introduction:
In the world of productivity, every single second counts. The last thing anyone wants is to be hindered by unnecessary obstacles while using their computer. One such obstacle is the lock screen that appears every time you wake up your Windows device. Though it may appear as a minor inconvenience, those valuable seconds spent bypassing the lock screen can accumulate over time and may impact your efficiency and disrupt your workflow.
Thankfully, Windows provides a solution by offering the ability to disable the lock screen, enabling you to dive straight into your desktop environment without any avoidable delays. In this blog post, we will walk you through a simple, step-by-step process to disable lock screen on Windows 11.
Why Disable Lock Screen on Windows 11?
Disabling the lock screen on Windows 11 can have its own set of pros and cons. So, when it comes to faster access, the lock screen serves as an additional step in the login process, requiring users to click or swipe to access the login screen. Disabling the lock screen eliminates this extra step and allows users to directly access the login prompt, saving a few seconds in the login process.
In fact, some users simply prefer a streamlined login experience and find the lock screen to be an unnecessary feature that adds little value to their workflow. So, whatever the reason may be, in this post we will be covering various methods of removing the lock screen on a Windows PC.
Advantages of Disabling the Lock Screen
Disabling the lock screen can make your system feel quicker and more direct. It removes one extra step during startup and wake-up. This is helpful if you use your PC many times a day.
- Faster login time
You skip the lock screen and go straight to the login page. It saves a few seconds every time you start or wake your PC. - Better workflow
It helps when you restart or lock your system often. You get back to work without delay. - Less interruption
No need to press a key or click the screen to move forward. The process feels smoother. - Useful for personal PCs
Works well if only one person uses the computer. It avoids unnecessary steps. - Cleaner experience
Removes extra visuals and keeps the screen simple. You see only what you need. - Good for work setups
In busy work environments, small time savings add up. It improves daily efficiency. - Easy system access
You can reach your desktop faster. This is helpful during urgent tasks. - Reduces minor lag
Some systems feel slightly quicker without loading the lock screen visuals.
Disadvantages of Disabling the Lock Screen
While it improves speed, it also removes a basic security layer. This can create small risks, especially if others have access to your device.
- Lower security
Anyone can reach the login screen instantly. It reduces one level of protection. - No quick alerts view
You will not see notifications like emails or reminders on the lock screen. - Less privacy
Your account name and login screen are visible right away. - Not ideal for shared PCs
Multiple users may face confusion. It also increases the risk of unwanted access. - Removes visual appeal
You lose wallpapers, tips, and useful information shown on the lock screen. - Accidental access risk
Someone may try to log in without your knowledge. - Policy issues in offices
Some companies require lock screens for safety rules. Disabling it may not be allowed. - May not suit laptops
Laptops are often used in public places. Extra security is important in such cases.
Important Precautions Before You Disable It
Before making any changes, take a few simple steps. This helps avoid errors and keeps your system secure.
- Create a restore point
This allows you to return to a safe state if something goes wrong. - Back up your data
Save important files to avoid any accidental loss during changes. - Use a strong password
A secure password or PIN is still important for protection. - Avoid on shared devices
Do not disable it on office or public computers. - Check system version
Some methods work only on certain editions of Windows 11. - Follow steps carefully
Incorrect settings can affect system performance or features. - Keep admin access ready
You may need administrator rights to apply changes. - Update Windows first
A fully updated system reduces the chances of errors or conflicts.
How to Disable Lock Screen on Windows 11?
Without further ado, let’s explore how you can unlock the full potential of your Windows device by eliminating the lock screen using different methods.
Method 1: Edit the Registry
To disable the lock screen on Windows by adjusting the registry settings, you need to follow these steps while keeping your registry data safe:
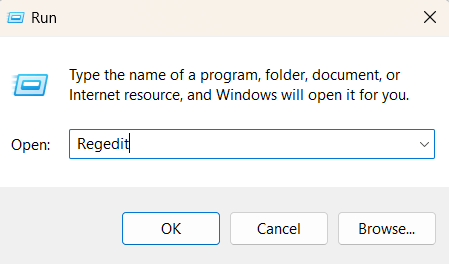
- Press the Win key + R, type “regedit” and hit Enter. This action will open the Registry Editor.
- In the Registry Editor window, navigate to the following folder location:
Computer\HKEY_LOCAL_MACHINE\SOFTWARE\Policies\Microsoft\Windows
- Right-click on the Windows folder from the left menu pane and select New> Key. Rename the new key as “Personalization”.

- Now, right-click on “Personalization” and select New> D-WORD (32-Bit) Value. Name the new key as “NoLockScreen”.
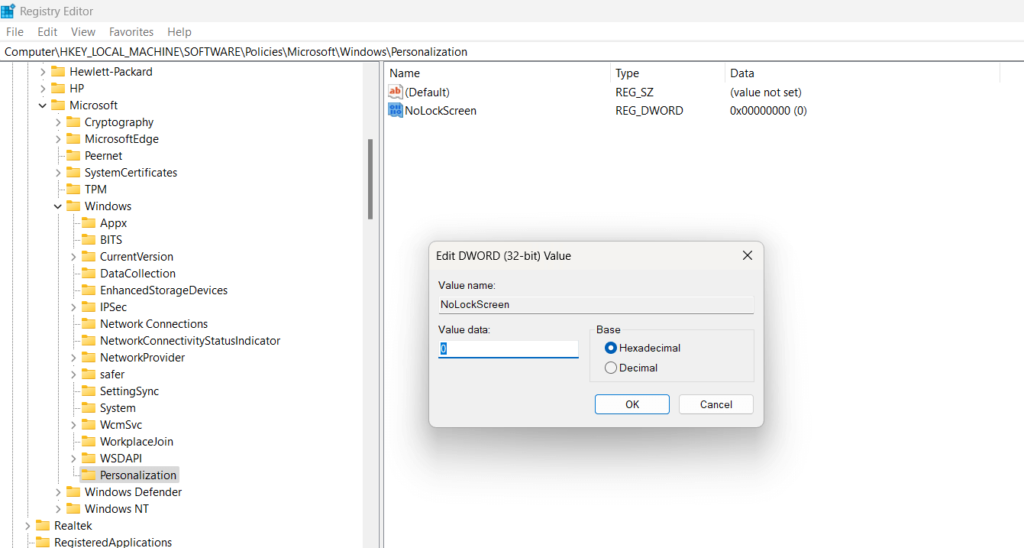
- Here comes the final step. Double-tap on NoLockScreen and set the Value Data to 1. Hit on the OK button to save the recent changes.
By following these steps, you will be able to disable lock screen on Windows. However, in the future in case you ever need to re-enable it then set the Value Data of NoLockScreen to 0 to revert changes.
Method 2: Use the Group Policy Editor
If you using the Professional, Ultimate, or Enterprise version of Windows on your device then you can also use the Local Group Policy Editor to eliminate the lock screen. Here are the step-by-step instructions to do so:
To disable the lock screen on Windows using the Local Group Policy Editor, follow these steps:
- Open the Local Group Policy Editor by pressing the Win key + R to launch the Run command box. Type “gpedit.msc” and hit Enter.
- In the Local Group Policy Editor window, navigate to the following path on the left-hand side:
Computer Configuration -> Administrative Templates -> Control Panel -> Personalization

- On the right-hand side, locate the policy named “Do not display the lock screen”. Double-click on it to open the policy settings.

- In the policy settings window, select the “Enabled” option and click on “Apply” or “OK” to save the changes.
- Close the Local Group Policy Editor and reboot your computer to apply the changes.
Method 3: Use a Third-Party Tool
Yes, you can use Winaero Tweaker to disable the lock screen on your Windows system. Winaero Tweaker is a third-party software tool that provides a user-friendly interface to customize various aspects of the Windows operating system.
To disable the lock screen using Winaero Tweaker, follow these steps:
- Open any preferred web browser and then download and install Winaero Tweaker from the official website.
- Launch Winaero Tweaker on your Windows system.
- In the left-hand navigation pane, switch to the “Appearance” category.
- Under the “Appearance” category, click on the “Boot and Logon” option.
- In the right-hand pane, locate the option to disable the lock screen. It is labeled as “Disable Lock Screen”.
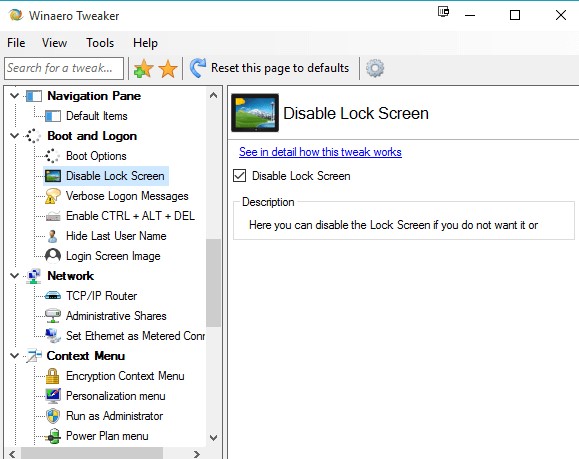
- Check on the option to disable the lock screen. Once the lock screen is disabled, close Winaero Tweaker.
- Restart your computer to apply the changes.
By using Winaero Tweaker to disable the lock screen, you can conveniently customize your Windows system without directly modifying system settings or configurations.
Author’s Tip
Begin with the easiest option first. Try built-in settings or Group Policy if your system allows it. Do not jump directly to registry changes. A small mistake there can create problems. Move step by step and check each change.
Consider how you use your device. If it stays in a safe place, disabling the lock screen may be fine. If you take your laptop outside, it is better to keep it enabled. A few extra seconds of wait can help protect your data.
Conclusion
In this blog post, we have explored various methods to disable lock screen on Windows 11, providing you with the flexibility to streamline your computing experience and optimize productivity. Whether you prefer using the Local Group Policy Editor, tweaking registry settings, or utilizing third-party tools like Winaero Tweaker, you can pick any of these methods to get the job done.
By disabling the lock screen, you can eliminate the additional step of bypassing it every time you wake up your Windows 11 device. This can save you valuable seconds that add up over time, ensuring a smoother workflow and enhanced efficiency.
FAQs
1. Is it safe to disable the lock screen on Windows 11?
It is generally safe for personal computers used by a single user. However, it is not recommended for shared or office systems. Always keep a strong password or PIN to protect your data, even if the lock screen is disabled.
2. Will disabling the lock screen remove my password?
No, it will not remove your password or PIN. It only skips the lock screen step. You will still need to enter your login details to access your desktop and files.
3. Can I enable the lock screen again later?
Yes, you can enable it again at any time. You just need to reverse the steps you followed earlier. Once enabled, your system will show the lock screen as usual before the login screen.
Author Bio:
Dinesh Lakhwani 

Dinesh Lakhwani, the entrepreneurial brain behind “TechCommuters,” achieved big things in the tech world. He started the company to make smart and user-friendly tech solutions. Thanks to his sharp thinking, focus on quality and the motto of never giving up, TechCommuters became a top player in the industry. His commitment to excellence has propelled the company to a leading position in the industry.
Popular Post
Recent Post

Fortect Software Review: The Ultimate PC & Mobile Cleaning, Optimization & Security Tool
Slow computers are a common problem for almost every Windows user. Well, yes! Over time, your PC picks up junk files. These files sit quietly in the background. They take up space and slow things down. Programs open slower. Windows takes longer to boot. Even simple tasks like opening a folder can feel sluggish. There […]

CCleaner PC Optimizer Review: A Complete Guide for Windows Users
If your computer has started to feel slow, you are not alone. Most Windows PCs slow down over time. Junk files pile up. The registry gets messy. Too many apps open when you start your PC. All this adds up and makes even a good machine feel tired. This is where a PC cleaner tool […]

Auslogics Duplicate File Finder: Full Review and User Guide
A computer quietly gathers clutter over time. This includes duplicate photos, repeated downloads, and forgotten backups hiding in random folders. This buildup slowly eats away at storage and can make even a fast PC feel sluggish. Manually finding and deleting duplicates is tedious. It means checking every folder, comparing file names, and guessing which copies […]

CCleaner Duplicate File Finder: Key Features, Pricing, Step-by-Step Guide and More
Every computer collects junk over time. Right? Well, yes! Photos often get copied twice. Documents get saved in two folders by mistake. Old downloads pile up and never get deleted. This slowly eats up your storage space, and most people do not even notice until their drive is almost full. That is where a duplicate […]

Duplicate File Finder Pro: A Complete Review, Everything You Should Know
Computers collect thousands of files over time. Well, yes! Many of them end up being duplicates created by backups, downloads, or accidental copies. These extra files take up valuable storage space and make it harder to keep everything organized. Finding and removing them manually can take hours. Right? Duplicate File Finder Pro is a tool […]
Top 3 Duplicate File Finder for Windows 11 & Windows 10
If your PC storage keeps filling up even after you delete big files, duplicate files could be the real reason. Most of us save the same photo twice, download a document more than once, or copy a whole folder by mistake. Over months and years, these duplicate files pile up quietly. You do not even […]

Monitor Screen Calibration Guide: Everything You Should Know
Your monitor shows colors every single day. But are those colors actually correct? Most people never stop to check this. They just use the screen as it comes out of the box. This habit can lead to wrong colors in photos, videos, and work files. Colors may look too warm or too cold without you […]

How To Check Installed RAM and RAM Slots [Complete Guide]
RAM plays an important role in how smoothly a computer runs. Short for Random Access Memory, it stores the data and instructions that Windows and active applications need at any given moment. From opening multiple browser tabs to running games and productivity software, RAM helps keep everything responsive. A system with limited memory may experience […]

What is Microsoft Autopilot Everything You Need To Know
Technology has changed the way companies manage computers. Well, yes! Employees now work from offices, homes, and remote locations. Setting up devices manually for every worker takes time and effort. It can also create mistakes that slow down productivity. This is where Microsoft Autopilot becomes useful. It helps businesses prepare and deploy Windows devices with […]

