


A slow computer makes it hard to focus. Programs take too long to open. Free space keeps shrinking until the disk is almost full. This happens to most PC owners at some point. Even new machines can slow down after a while. That is the exact problem cleanup tools are built to solve. They comb […]
How to Create a Windows 10 Bootable USB Drive (3 Methods)
Alone the word “Windows 10 bootable USB” sounds daunting. Creating a Windows 10 installation media with lots of steps and terminal commands seems like a complicated thing.
But, let’s break a myth – it is not hard to create a Windows 10 bootable flash drive. In fact, it takes up a few simple steps to install a Windows 10 package on an external drive for easy access.
Our team has laid down the quickest and easiest methods to create a Windows 10 bootable USB drive for your convenience. So, let’s get moving.
Why Create a Windows 10 Installation Media?
A Windows 10 bootable USB drive means copying your Windows 10 environment to a portable flash drive. This will enable Windows 10 users to:
- Clean install Windows 10 operating system to the new or old computer if your system corrupts.
- If you want to upgrade from older Windows versions or downgrade from Windows 11, having a portable Windows 10 in your pocket can be extremely helpful.
- Mac users can leverage bootable Windows 10 USB to create a Windows environment on MacOS.
- Having a bootable workstation can eliminate the need to carry a laptop everywhere.
Precautions Before Creating a Windows 10 Bootable USB:
Creating a bootable USB is simple, but small mistakes can cause failure or data loss. The process formats the USB drive and writes system files to it. Taking basic precautions ensures the installer works correctly and avoids unnecessary problems later. These checks help the process stay smooth and reliable.
- Backup USB data first
The USB drive will be erased completely during creation. - Use a USB drive with enough space
At least 8 GB is required for Windows 10 installation files. - Choose a good-quality USB drive
Cheap or old drives may fail during the process. - Ensure a stable internet connection
Downloads can corrupt if the connection drops. - Use official tools or trusted software
This reduces the risk of errors or malware. - Plug the USB directly into the PC
Avoid USB hubs during the creation process. - Check system architecture
Confirm whether you need 32-bit or 64-bit Windows. - Disable antivirus temporarily if needed
Some security tools interrupt boot file creation.
How to Easily Create a Windows 10 Bootable USB
Windows users have multiple options to create a Windows 10 installation media today. But the three prominent ones are:
Method 1. Create a Windows 10 Bootable USB with Media Creation Tool
Media Creation Tool is a free and easy solution for Windows 10 users to create a bootable USB drive. To follow this method, all you need is an 8 GB USB and these steps:
Step 1. Connect a USB drive to your Windows 10 computer. Ensure the drive is formatted to Windows compatible file format.
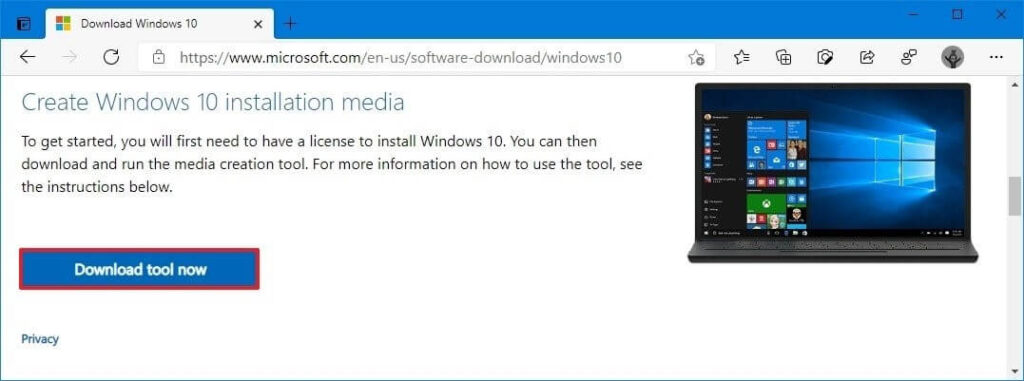
Step 2. Go to Microsoft’s official website to install the Media Creation Tool. Click on the Download tool now and follow the installation wizard steps.
Step 3. Double-click to launch the MediaCreationToolxxxx.exe file.
Step 4. Click on the Accept in the popup window.
Step 5. Choose the Create installation media option and click on the Next.
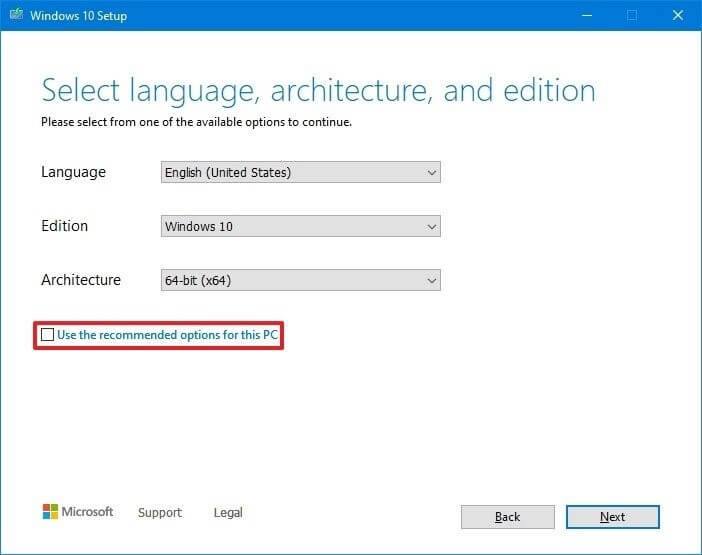
Step 6. Now, you have to define the language, edition, and architecture that you prefer to create a bootable USB. Or, you can select the option “Use the recommended options for this PC.”
Step 7. After that, select the USB flash drive and click Next to continue. If you have more than one removable drive connected to your computer, disconnect all other drives that you don’t need for the process.
Step 8. Finally, click on the Finish and wait for the process to complete. It might take a few minutes.
Method 2. Create a Windows 10 Bootable USB with Rufus
If you don’t want to use the Media Creation Tool to create a Windows 10 installation media drive, you can use Rufus. It is also a free and open-source application for Windows that can help you format and create bootable USB or Live USBs.
If you want to create a bootable media with an existing Windows 10 ISO file, follow these steps with Rufus:
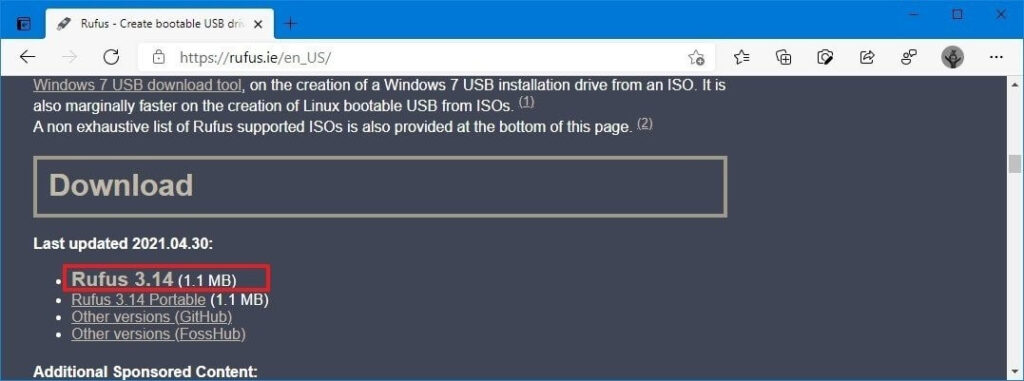
Step 1. Go to the Rufus website, and under the download section, click on the latest release to download Rufus on your computer.
Step 2. Launch the Rufus-x.xx.exe file using double-clicking.
Step 4. Select the USB flash drive from under the Device tab.
Step 5. From the Bootable section, click on the Select button.
Step 6. Choose the Windows 10 ISO file and click on the Open button.
Step 7. Select the Standard Windows installation option from the Image option drop-down menu.
Step 8. After that, use the Partition scheme drop-down menu to select the GPT option.
Step 9. Then, select the UEFI option to use the Target system.
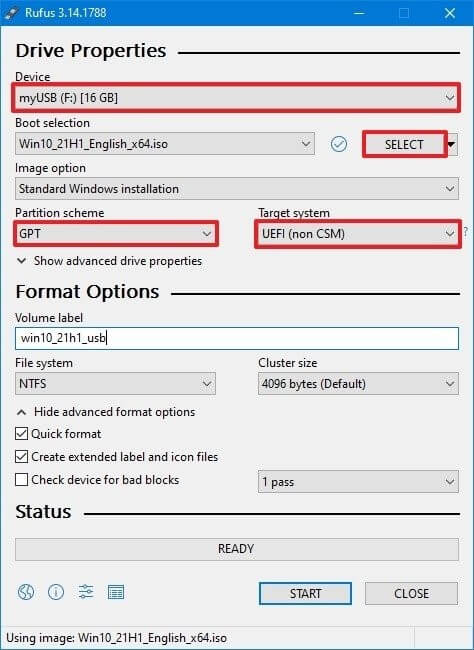
Step 10. Keep the default settings under the Show Advanced drive properties section unless you know what you are doing.
Step 11. Under the Volume label field, confirm the name of your drive.
Step 12. Also, don’t change the default settings for the File system and Cluster size options.
Step 13. Now, click on the Show advanced format options button to check the Quick format and Create extended label and icon files options.
Step 14. Click on the Start, OK, and finally, on the Close button to create a bootable USB drive from Windows 10 ISO.
Using the Rufus, you can also download the Windows 10 ISO file and then create a bootable drive. For that, steps will be slightly different, such as:
Step 1. Download the latest Rufus version on your computer and open the Rufus-x.xx.exe file.
Step 2. Go to Settings button > Click on the Check for updates drop-down menu > Select the Daily option > Close.
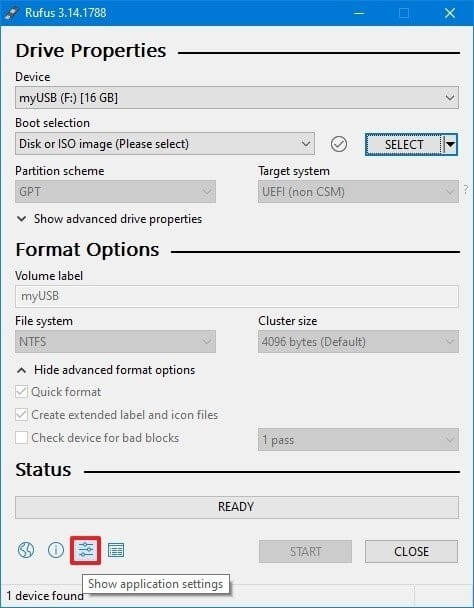
Step 3. Reopen the Rufus-x.xx.exe file.
Step 4. Go to the Device section > Select the USB drive.
Step 5. Under the Boot selection,> Click on the arrow next to the Select option > Select the Download option > Download button.
Step 6. Under the Version drop-down menu, select the Windows 10 option > Continue button.
Step 7. Choose the 21H1 (Build 19043.xxx – xxxx.xx) option to download the latest Windows updates.
Step 8. Select the “Language” drop-down menu and select your installation language.
Step 9. Select the 32-bit or 64-bit option under the Architecture drop-down menu > Click on the Download button.
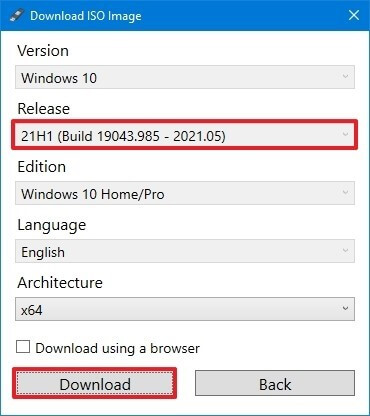
Step 10. Select a folder to save the Windows ISO file > Save.
Step 11. Now, simply follow Step 7 to Step 14 as per above.
Method 3. Create a Windows 10 Bootable USB with EaseUS Partition Master
Rufus might be a great app, but it requires high technical skills to use this program. Thus, if you want to create a Windows 10 installation media within only 3 steps and with no technical hassle, EaseUS Partition Master is the best tool.
This tool can help you create a bootable USB drive, migrate Windows 11 to a new SSD, convert MBR to GPT disk, rescue data, and more. In addition, it is a free tool with an intuitive interface, perfect for novice users.
Here’s how to create a Windows 10 bootable USB using EaseUS Partition Master:
Step 1. Go to the EaseUS website to download the Partition Master on your computer using the automatic wizard. Also, prepare a USB drive.
Step 2. Open EaseUS Partition Master > Click on the WinPE Creator.
Step 3. Select your USB drive and install Windows 10 on it by clicking on the Proceed button.
Sum Up
There you have it, people! You have learned the three simple solutions to create a bootable USB. All the steps are discussed in full detail, so you will not face any problem using these methods.
But anyhow, if you get stuck somewhere, write it down in the comments, and we will surely help you. Also, if you find this post useful, please share it and follow us on social networks for more interesting guides.
FAQs
Will creating a bootable USB delete my files?
Yes, all data on the USB drive will be erased. The process formats the drive before copying Windows files. Always back up important files first. Once created, the USB works only as an installer. Normal storage use requires reformatting again.
Can I create a Windows 10 bootable USB without internet?
Yes, but you must already have the Windows 10 ISO file. Tools like Rufus can work offline using the ISO. Without the ISO, internet access is required to download installation files. Offline creation still needs a working PC.
Why is my PC not booting from the USB drive?
This usually happens due to an incorrect boot order. BIOS or UEFI may not be set to boot from USB. Secure Boot settings can also block it. Try changing boot priority or recreating the USB. Using a different USB port may also help.
Author Bio:
Dinesh Lakhwani 

Dinesh Lakhwani, the entrepreneurial brain behind “TechCommuters,” achieved big things in the tech world. He started the company to make smart and user-friendly tech solutions. Thanks to his sharp thinking, focus on quality and the motto of never giving up, TechCommuters became a top player in the industry. His commitment to excellence has propelled the company to a leading position in the industry.
Popular Post
Recent Post

Fortect Software Review: The Ultimate PC & Mobile Cleaning, Optimization & Security Tool
Slow computers are a common problem for almost every Windows user. Well, yes! Over time, your PC picks up junk files. These files sit quietly in the background. They take up space and slow things down. Programs open slower. Windows takes longer to boot. Even simple tasks like opening a folder can feel sluggish. There […]

CCleaner PC Optimizer Review: A Complete Guide for Windows Users
If your computer has started to feel slow, you are not alone. Most Windows PCs slow down over time. Junk files pile up. The registry gets messy. Too many apps open when you start your PC. All this adds up and makes even a good machine feel tired. This is where a PC cleaner tool […]

Auslogics Duplicate File Finder: Full Review and User Guide
A computer quietly gathers clutter over time. This includes duplicate photos, repeated downloads, and forgotten backups hiding in random folders. This buildup slowly eats away at storage and can make even a fast PC feel sluggish. Manually finding and deleting duplicates is tedious. It means checking every folder, comparing file names, and guessing which copies […]

CCleaner Duplicate File Finder: Key Features, Pricing, Step-by-Step Guide and More
Every computer collects junk over time. Right? Well, yes! Photos often get copied twice. Documents get saved in two folders by mistake. Old downloads pile up and never get deleted. This slowly eats up your storage space, and most people do not even notice until their drive is almost full. That is where a duplicate […]

Duplicate File Finder Pro: A Complete Review, Everything You Should Know
Computers collect thousands of files over time. Well, yes! Many of them end up being duplicates created by backups, downloads, or accidental copies. These extra files take up valuable storage space and make it harder to keep everything organized. Finding and removing them manually can take hours. Right? Duplicate File Finder Pro is a tool […]
Top 3 Duplicate File Finder for Windows 11 & Windows 10
If your PC storage keeps filling up even after you delete big files, duplicate files could be the real reason. Most of us save the same photo twice, download a document more than once, or copy a whole folder by mistake. Over months and years, these duplicate files pile up quietly. You do not even […]

Monitor Screen Calibration Guide: Everything You Should Know
Your monitor shows colors every single day. But are those colors actually correct? Most people never stop to check this. They just use the screen as it comes out of the box. This habit can lead to wrong colors in photos, videos, and work files. Colors may look too warm or too cold without you […]

How To Check Installed RAM and RAM Slots [Complete Guide]
RAM plays an important role in how smoothly a computer runs. Short for Random Access Memory, it stores the data and instructions that Windows and active applications need at any given moment. From opening multiple browser tabs to running games and productivity software, RAM helps keep everything responsive. A system with limited memory may experience […]

What is Microsoft Autopilot Everything You Need To Know
Technology has changed the way companies manage computers. Well, yes! Employees now work from offices, homes, and remote locations. Setting up devices manually for every worker takes time and effort. It can also create mistakes that slow down productivity. This is where Microsoft Autopilot becomes useful. It helps businesses prepare and deploy Windows devices with […]

