


A computer quietly gathers clutter over time. This includes duplicate photos, repeated downloads, and forgotten backups hiding in random folders. This buildup slowly eats away at storage and can make even a fast PC feel sluggish. Manually finding and deleting duplicates is tedious. It means checking every folder, comparing file names, and guessing which copies […]
How To Backup & Sync Device Contacts With Google Accounts
It’s hard to manage multiple Android devices or if you’re planning to go for a new smartphone in the near future, Do you know that all your contacts can be synced with Google contacts? You can find all your Google contacts on any Android device you associate with your Google account? But what about isolated contacts which are left on your phone’s local storage?
Since those aren’t stored in your Google account, you won’t be able to access them on other devices. If you are wondering how to get them all in one place, we have got the solution for you.
It’s Easy! You can backup & sync device contacts with Google account and keep all your contacts at one place. We’ll show you how to do that in a few easy steps. We assume that you have a smartphone device that is configured with a Google account, and it contains all your contacts on the local storage.
EXPORT OR BACK UP CONTACTS
Android Device
Step 1. Open the ‘Contacts App’ on your Android smartphone or tablet.
Step 2. Tap the app’s Overflow menu (Three horizontal lines in the upper left corner). Tap ‘Menu’ and then ‘Settings’ and then ‘Export’.
Step 3. Select one or more accounts from where you want to export contacts.
Step 4. Tap ‘Export to .VCF file’.
Turn Automatic Backup Off or On
When you set up your Google Account for the first time on your device, it asks you if you want to back up your data. You can turn ON automatic updates or you can change this setting at any time.
Step 1. Open your device’s ‘Settings’ App.
Step 2. Tap ‘System’ and then tap ‘Backup’.
Step 3. Turn On or Off ‘Back up to Google Drive’ as per your preference.
Computer Settings
If you want to add your contacts to another email account, you need to first download them as a ‘.CSV’ or ‘vCard’ file on your PC.
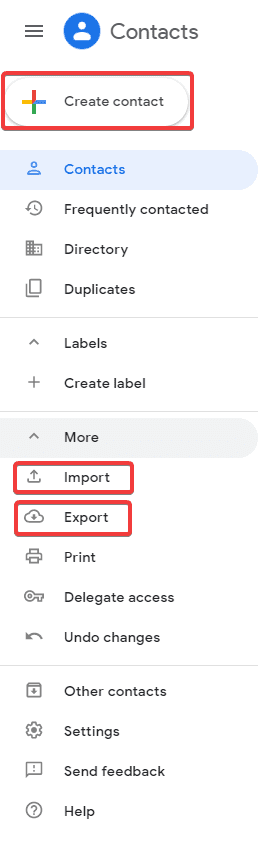
Step 1. Go to Google Contacts.
Step 2. Put a check on the boxes that appear next to their names to select contacts.
Step 3. Click More and then Export.
Step 4. To back up your contacts, select Google CSV.
Step 5. To save your file, click Export.
Backup Android Phone’s Contacts to Gmail Account
You must be delighted to know that it is invariably possible to backup or sync Android contacts to your Gmail account using your computer or a laptop. Simply follow these instructions properly and you should be able to back up your contacts to Gmail at the end of this guide.
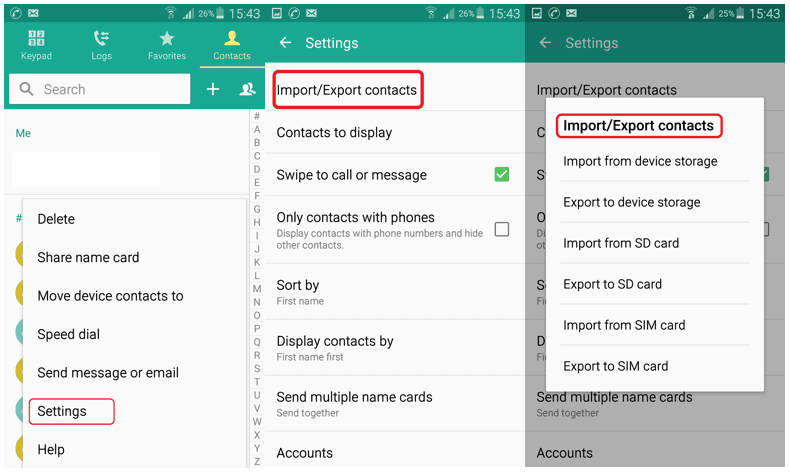
Firstly, you need to open contacts application on your Android phone then tap on the menu button and click on ‘Import/Export’. Tap on ‘Export to Storage’ and save all the contacts to your phone’s storage device or memory card. Next, connect your phone to PC and copy the ‘.VCF’ file on your computer. Or, you may keep the phone connected and use the following steps.
Step 1. Go to Gmail.com and login with your email ID and password.
Step 2. From the top left corner that says ‘Gmail’, click on the drop-down icon.
Step 3. Click on ‘Contacts’ followed by ‘More’ and then click on ‘Import Contacts’ from the drop-down options.
Step 4. Browse and select the ‘.VCF’ file which is saved on your phone storage or PC and click on ‘Open’ to initiate the process. (If the file is saved on your phone then choose the file from your phone storage path or email it to yourself and download the file on the system before following this step.)
Step 5. Now check for all your Android contacts on your Gmail contacts folder and they should be there on your Gmail account.
Also Read: Duplicate Contacts Remover Apps For iPhone
Backup and Sync on iPhone
You can backup and sync all your Google Contacts on your phone, tablet, and computer simultaneously. If you edit a contact on one device, the contact details are changed and saved on all the devices.
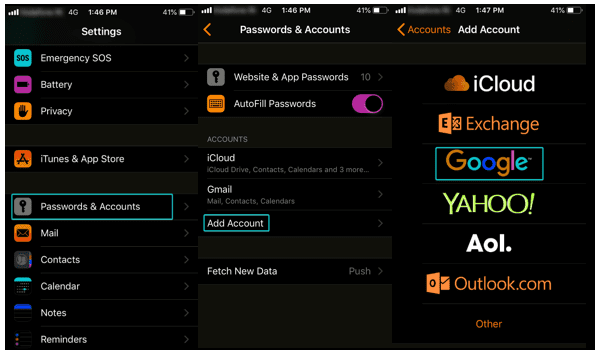
Step 1. Open ‘Settings App’ on your iPhone or iPad.
Step 2. Go to ‘Passwords & Accounts’ and then under ‘Add Accounts’, Select ‘Google’.
Step 3. Enter your credentials (Email ID & Password), Complete 2-Step verification if prompted.
Step 4. When you go next, enable ‘Contacts’ sync and Tap on ‘Save’.
Note: To start syncing, you will need to open your iPhone or iPad’s ‘Contacts App’.
Windows 10 Computer
Configuring a Google account to Sync contacts is absolutely easy on your Windows computer.
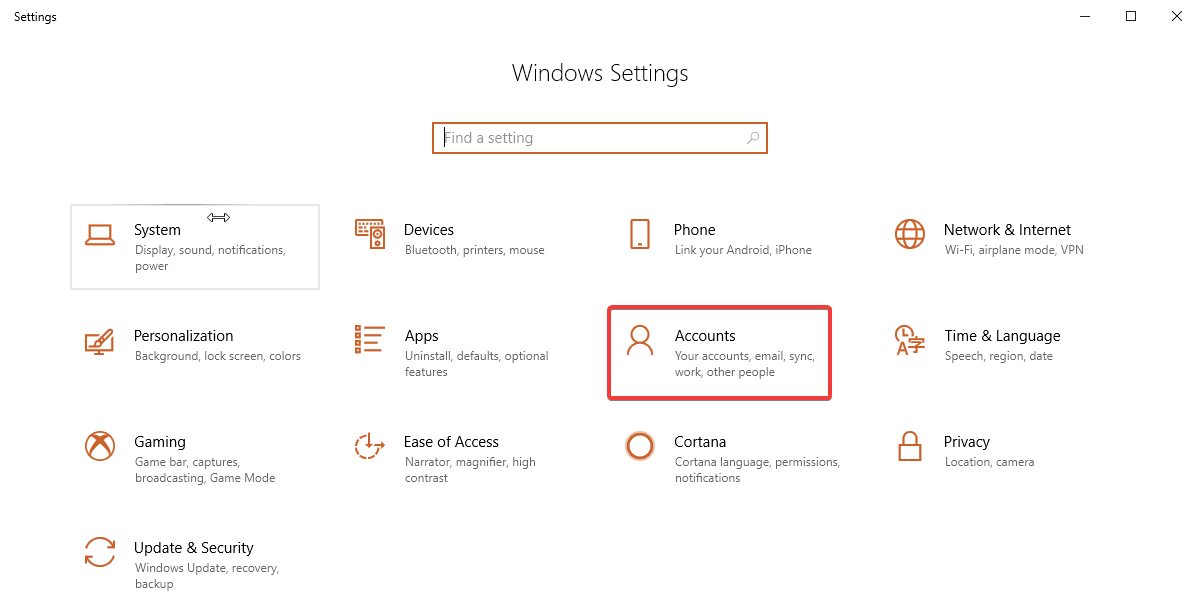
Step 1. Click on ‘Start Button’ and go to ‘Settings’.
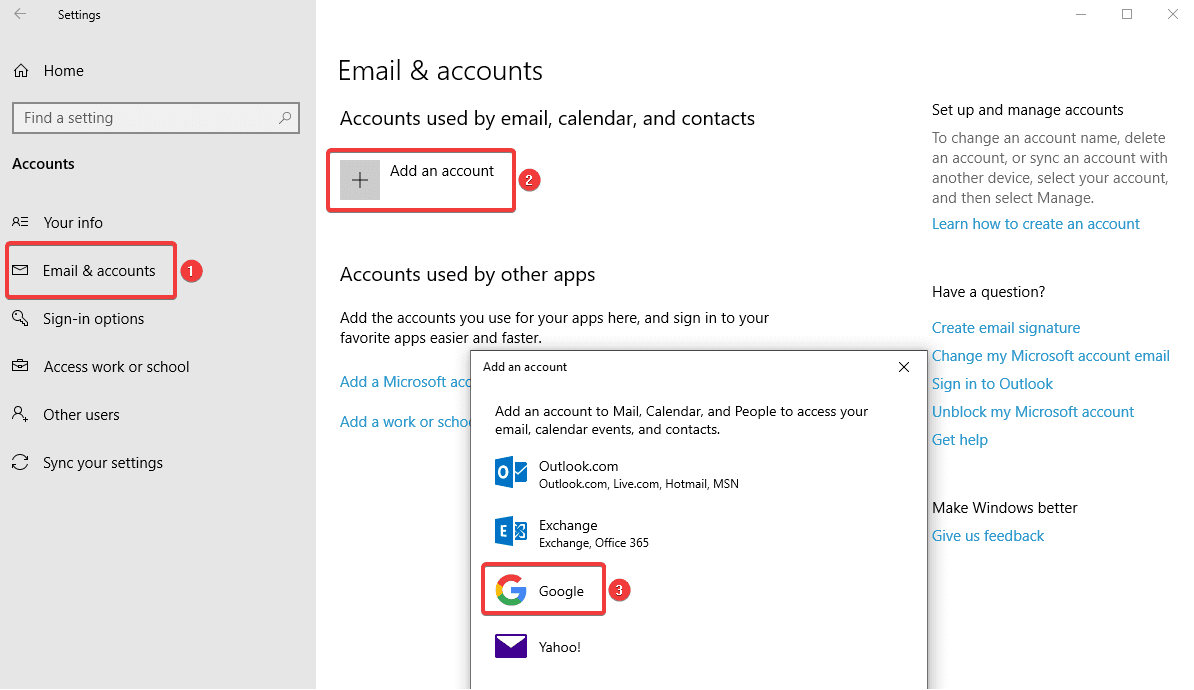
Step 2. Under ‘Windows Settings’ box, Click on ‘Accounts’ click on ‘Email & Accounts’ on the left-hand side panel Click on (+ sign to ‘Add an Account’). Select ‘Google’.
Step 3. Enter your credentials (Email Address & password) and click on ‘Next’.
Step 4. Review permissions and then click on ‘Allow’ and ‘Done’.
RESTORE CONTACTS FROM BACKUPS
Step 1. Open your device’s Settings App.
Step 2. Tap Google.
Step 3. Under ‘Services’ tap ‘Restore Contacts’.
Step 4. If you have multiple ‘Google Accounts’ to choose from which account’s contacts you want to restore, tap ‘From Account’.
Step 5. Tap the device with the contacts to copy.
Step 6. If you don’t wish to copy or sync contacts from your SIM card or device storage, you can turn off sync with SIM card or Device storage.
Step 7. Tap Restore, and wait until you see ‘Contacts restored’.
Step 8. To avoid duplicate contacts, your device only restores contacts that don’t exist. Your restored contacts automatically get synced with Google Account and all other devices.
Unable to Sync Contacts?
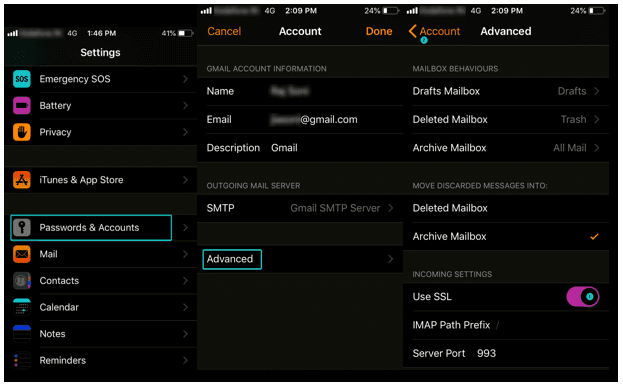
You need to ensure that your Google Account is configured on your iPhone or iPad using (SSL), It is recommended and secure connection for additional security.
Step 1. Open ‘Settings App’ on your iPhone or iPad.
Step 2. Go to ‘Contacts’ ‘Default Account’
Step 3. Tap on your Google Account.
Step 4. Put a tick on selected accounts and switch ‘Contacts’ ON.
Step 5. Tap ‘Password & Account’ ‘Advanced’ switch ‘Use SSL’ ON Tap ‘Account’ again Tap ‘Done’.
Note: You can try adding your account after configuring these settings and it should be done.
Import Contacts
Step 1. Open the Contacts app.
Step 2. Tap the app’s Overflow menu.
Step 3. Tap ‘Settings’ Tap ‘Import’ Tap ‘Google’.
Step 4. Select Import ‘vCard’ file.
Step 5. Locate and select the ‘vCard’ file which you want to import.
Step 6. Allow the import process to complete.
Step 7. By default, all the contacts on your device will be automatically synced with your Google account, so there is no further action required.
Conclusion
We have collated steps on how to sync Google contacts with Android / iPhone / Computers and other devices, now you can ensure that all your contacts are synced and backed up at one place. You can view/edit any contact on any device and all devices will have the updated details.
You can add a contact on any device and all the devices will have that contact added in the contacts list. So now stay assured about keeping all your contacts in one place and backup & sync device contacts with Google account so that you never miss out on any of your contacts on any of your devices.
If you know more such interesting ways to backup & sync device contacts with Google Accounts, then feel free to share in the comments below.
Author Bio:
Dinesh Lakhwani 

Dinesh Lakhwani, the entrepreneurial brain behind “TechCommuters,” achieved big things in the tech world. He started the company to make smart and user-friendly tech solutions. Thanks to his sharp thinking, focus on quality and the motto of never giving up, TechCommuters became a top player in the industry. His commitment to excellence has propelled the company to a leading position in the industry.
Popular Post
Recent Post

CCleaner Duplicate File Finder: Key Features, Pricing, Step-by-Step Guide and More
Every computer collects junk over time. Right? Well, yes! Photos often get copied twice. Documents get saved in two folders by mistake. Old downloads pile up and never get deleted. This slowly eats up your storage space, and most people do not even notice until their drive is almost full. That is where a duplicate […]

Duplicate File Finder Pro: A Complete Review, Everything You Should Know
Computers collect thousands of files over time. Well, yes! Many of them end up being duplicates created by backups, downloads, or accidental copies. These extra files take up valuable storage space and make it harder to keep everything organized. Finding and removing them manually can take hours. Right? Duplicate File Finder Pro is a tool […]

Monitor Screen Calibration Guide: Everything You Should Know
Your monitor shows colors every single day. But are those colors actually correct? Most people never stop to check this. They just use the screen as it comes out of the box. This habit can lead to wrong colors in photos, videos, and work files. Colors may look too warm or too cold without you […]

How To Check Installed RAM and RAM Slots [Complete Guide]
RAM plays an important role in how smoothly a computer runs. Short for Random Access Memory, it stores the data and instructions that Windows and active applications need at any given moment. From opening multiple browser tabs to running games and productivity software, RAM helps keep everything responsive. A system with limited memory may experience […]

What is Microsoft Autopilot Everything You Need To Know
Technology has changed the way companies manage computers. Well, yes! Employees now work from offices, homes, and remote locations. Setting up devices manually for every worker takes time and effort. It can also create mistakes that slow down productivity. This is where Microsoft Autopilot becomes useful. It helps businesses prepare and deploy Windows devices with […]

Enable Automatic Device Locking Feature Windows: Complete Guide
Introduction: Your computer stores important information such as emails, documents, passwords, and personal photos. Leaving it unlocked can put that data at risk. Thankfully, Windows includes built-in features that can automatically lock your device when you are away. Setting up automatic device locking is quick and does not require any extra software. In this guide, […]

How to Update Wireless Network Driver in Windows 11 and 10
Your Wi-Fi keeps dropping. Pages load slowly. The connection feels unstable? Well, you are not alone. Most of the time, the problem is not with your internet plan. It is with your wireless network driver. A driver is a small piece of software that helps your computer talk to its hardware. When it gets outdated, […]

Common Windows 11 Problems and Solutions (2026 Version)
Windows 11 has become more polished over the years, but it is still not completely free from problems. Even after regular updates from Microsoft, many users continue to face issues like lagging performance, failed updates, audio troubles, random crashes, and network errors. Some problems appear after installing new features, while others develop gradually as the […]

Fortect Driver Updater Review: Features, Steps, Pros, and Cons.
A new PC usually feels quick and responsive. Applications open instantly, games run smoothly, and everything works as expected. As time passes, however, you may notice slower performance, system crashes, hardware glitches, or devices that stop working properly. While many people assume malware or low storage space is to blame, outdated drivers are often the […]

