


Every computer collects junk over time. Right? Well, yes! Photos often get copied twice. Documents get saved in two folders by mistake. Old downloads pile up and never get deleted. This slowly eats up your storage space, and most people do not even notice until their drive is almost full. That is where a duplicate […]
Fix: Mac External Hard Drive Not Mounting
Introduction
Most people typically keep their data and files on the computer, like images, pictures, songs, documents, and so on. Mac devices’ hard drives and SSDs assure high-quality performance and data storage benefits. However, in some cases, users do notice some issues here, like the drives not appearing on Disk Utility, Finder, or Desktop section when one plugs the device into the Mac.
One common reason for the error is Mac external hard drive not mounting. To explain, the process allows users access to the file system in the computer where all directories and files within the storage device are present. If the external hard drive available is not mounting, the operating system cannot recognize it.
Therefore, finding the best solution to fix the issue is highly crucial.
Common Reasons for The External Hard Drive Not Mounting Prompt on Mac
There are specific situations that result in users getting the “external hard drive not mounting Mac” message. Before figuring out the solutions to the problem, you should understand the common causes. These include causes like:
- Issues in the disk drive
- Unsuitable preferences
- Malfunction in the hardware
- Corruption in the SMC data
- An outdated operating system for the device
- Incompatible external hard drive format
Depending on the main cause of the mounting issues on your Mac device, you must proceed with the best solution.
Best Methods to Fix the Mac External Hard Drive Not Mounting Issues
Indeed, if you notice the prompt for Mac external hard drive not mounting on your system, that will affect your regular processes heavily. The following are the best solutions to fix the problem directly after checking your hardware first.
Fix 1: Connect the External Hard Drive Device Again
In some cases, the problem of the external hard drive not mounting Mac occurs due to the wrong way the drive is connected. The best solution is to unplug the hard drive and insert it into the system again. This can kickstart the connection properly again.
Fix 2: Restart the Mac Device
Another quick fix for Mac users to try for the mounting problem with the external hard drive is to restart the device. This is useful when the issues occur due to some configuration or loading issues when you activate some function on the computer.
After rebooting the system, that problem will block the action causing the error in the first user session midway. Then, the other system functions will restart health functioning fully.
Fix 3: Force Quit the Finder App
While you are restarting the MacBook device and reconnecting the hard drive, it will remove any underlying glitches or bugs from the previous user session and allow the system to start again. Then, you must reconnect the external hard drive.
In this period, the external hard drive not mounting Mac-based issue can be removed if you force quit the Finder app. Doing this step will restart your file explorer section, allowing the hard drive to mount safely.
How to proceed:
Step 1: Unplug the external hard drive.
Step 2: Restart the Mac > Access Finder.
Step 3: Hold the Shift key and choose the Apple icon from the menu bar.
Step 4: Tap on the “Force Quit Finder” option.
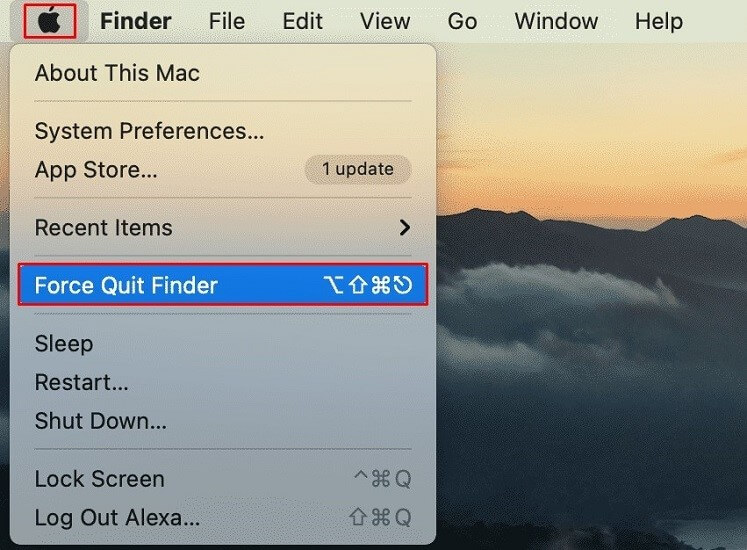
Step 5: Reconnect the external hard drive.
Fix 4: Adjust the macOS Settings
Another way to fix the Mac external hard drive not mounting problem is to fix the preferences set in the system as default. This is because some of the preset preferences in the Settings section can block the regular viewing of the external hard drives through the device file system.
So, you must go to the Finder app and make changes to the Settings for your Mac device.
How to proceed:
Step 1: From the Dock section, go to Finder, available on the top-most menu bar. Next, click on Preferences.
Step 2: In the next window, tap on the General tab.
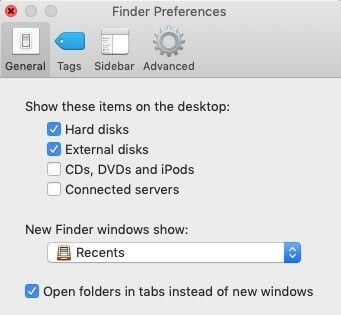
Step 3: Click the tickmark beside the “External drives” option under the “Show these items on the desktop” section.
Step 4: Tap on the Sidebar tab through the Location section. In the Sidebar tab, click the checkmark beside “External Drive”.
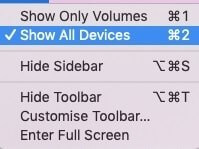
Step 5: Hit the Command + Space keys and access Spotlight > type Disk Utility.
Step 6: Choose “Show All Devices” for the view menu of Disk Utility. Now, the external drives will become visible in the sidebar.
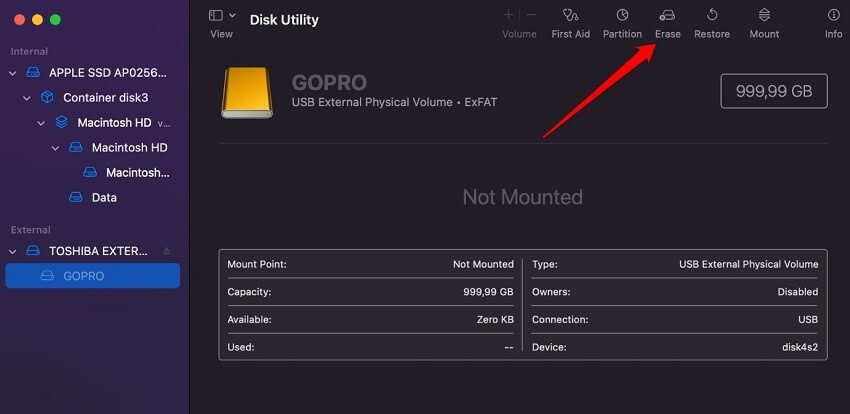
Fix 5: Reformat the External Hard Drive
One of the best solutions to fix the external hard drive not mounting Mac issue is to reformat the main drive completely. This is suitable if you have a corrupted filesystem in your hard drive.
Of course, this is a complex choice for most to take since reformatting the hard drive will remove all data from it. It would be best to use capable software like EaseUS Data Recovery Wizard for Mac to restore your lost files later.
How to proceed:
Step 1: Access Disk Utility and tap on your preferred disk drive that is hard to mount.
Step 2: Tap on the Erase button.
Fix 6: Remount the External Disk via Disk Utility
If you face the external hard drive not mounting on your Mac computer, try to remount it via Disk Utility. The steps for it are as follows.
How to proceed:
Step 1: Access the Disk Utility from the Spotlight.
Step 2: Choose the relevant disk drive from the list that appears.
Step 3: Tap the Mount button.

Fix 7: Use the First Aid Feature
In some cases, the Mac external hard drive not mounting problem occurs due to software issues inside the internal hard disk. If you are unsure of the main cause of the problem, utilizing the First Aid tool to test the system is a good solution.
This is a utility that Mac users can work with that scans the device for disk health issues and then handles any problems affecting its functionality. Users can typically access this function through the Disk Utility program.
How to proceed:
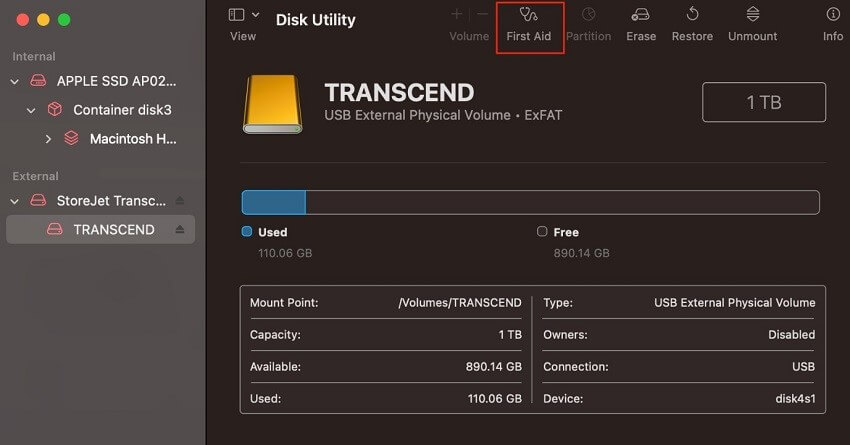
Step 1: Connect your external hard drive to the Mac computer.
Step 2: Tap on the Command + Space keys to access Spotlight.
Step 3: Type in “Disk Utility” and click on the option that appears.
Step 4: Choose the connected hard drive from the sidebar.
Step 5: Then press the First Aid icon and run it.
Fix 8: Reset the PRAM/NVRAM
In the situation where you are unaware of what is causing the mounting problem for your hard drives, you can focus on the NVRAM and PRAM functions on your device. You should reset the configurations in place for these programs to handle the problem.
How to proceed:
Step 1: Shut your Mac device down.
Step 2: Then hold the Power button down for 10 seconds. Check if the problem is resolved or not- if not, shut the Mac down again.
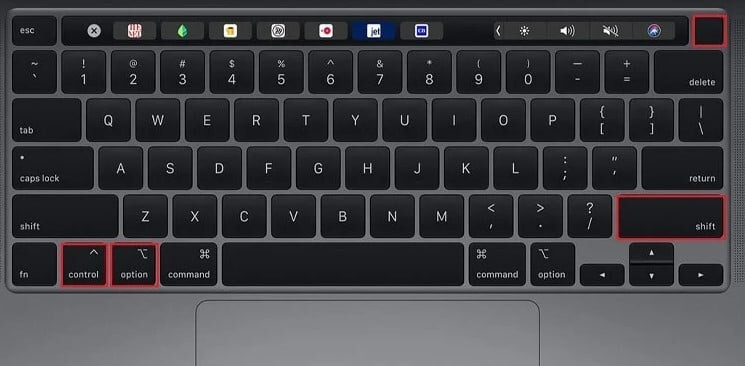
Step 3: Hold down on the right-side Shift + left-side Option + left-side Ctrl keys for 7 seconds. Then, hold down the Power button as well for 7 seconds.
Fix 9: Reset the SMC
In Mac devices, the SMC helps users see that all of the available hardware within the Mac device is working properly and at full capacity. If your device has unwanted problems, like an external hard drive not mounting Mac, reconfiguring the SMC function on your computer can help.
How to proceed:
To note, there are different ways to reset the SMC function on Mac devices concerning their system specifications. The following are the different versions.
Macs running with T2 chipset:
Step 1: Shut the Mac device down and unplug your power cable and external hard drive.
Step 2: Hold down the left-side Ctrl + left-side Option + right-side Shift keys on your keyboard for around 7-10 seconds.
Step 3: Keep holding the keys in place and then hold down the Power button for 10 seconds.
Step 4: Power the Mac device and plug in the external hard drive again.
Macs running with M1 chipset:
Step 1: Shut Mac down and unplug the cable for power and the external hard drive.
Step 2: iMac users should keep the device turned off for around 30 seconds, while Macbook users must keep the lid close for around 30 seconds.
Step 3: Start the Mac computer and plug in your external hard drive.
Macs running without M1/T2 chipset:
Step 1: Shut the Mac device and unplug the power cable/external hard drive.
Step 2: On the keyboard, hold down the left-side Ctrl + left-side Option + left-side Shift + Power buttons for around 10 seconds simultaneously.
Step 3: Restart the Mac computer and plug in your external hard drive again.
Macs running with any removable battery:
Step 1: Shut off the Mac computer. Unplug the external hard drive and power cable.
Step 2: Take the battery out from the back-side panel.
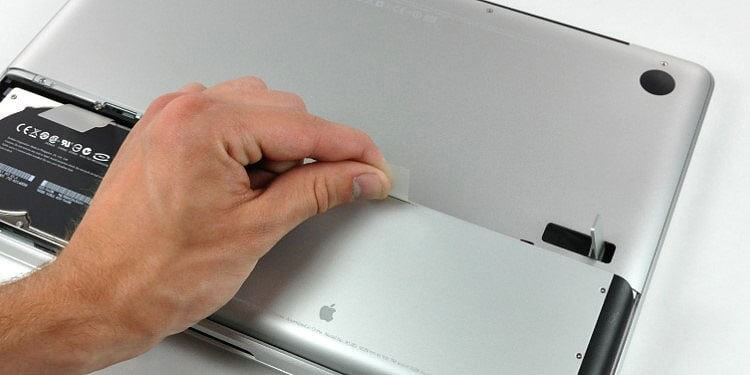
Step 3: Press down on the Power button for around 5 seconds.
Step 4: Power the Mac device up again and plug in your external drive.
Fix 10: Forcefully Mount the Hard Drive via Terminal
Another complex method for fixing the issue of external hard drives not mounting on Mac devices is to handle some Terminal command lines. These specific commands can remove the files blocking the regular mounting of the external hard drive.
However, this is not the go-to fix since it is relatively complicated for most beginner-level users. Plus, it is not a full-proof solution for all undetected disks. So, use this solution if no other process performs suitably.
How to proceed:
Step 1: On your Mac device, connect the external hard drive.
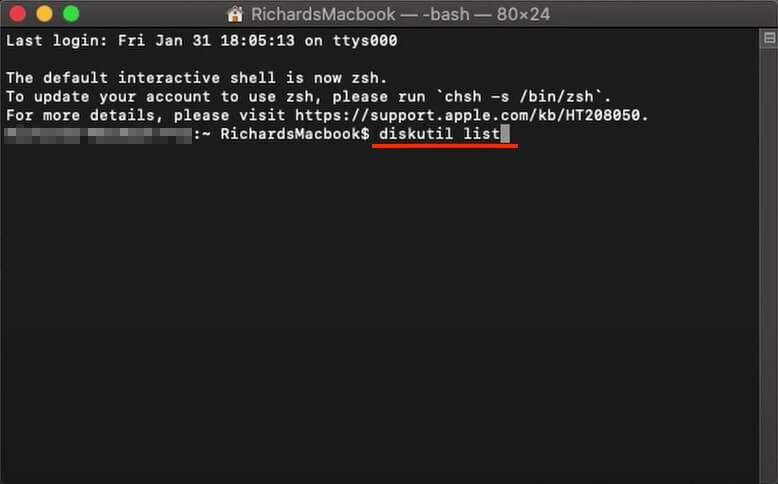
Step 2: Go to the Spotlight Search and launch the Terminal app.
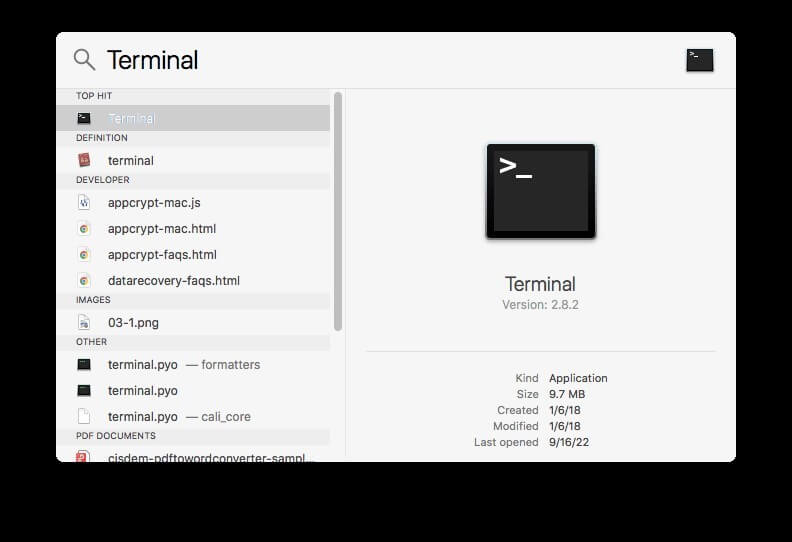
Step 3: Next, type the following command line and then press the Enter button:
diskutil list
Step 4: Look for the external drive not mounting issue from the next list. The internal appearance of the macOS drive will get mentioned as disk2. The “2” numerical in this term can change for different users depending on the external hard drive they are focusing on
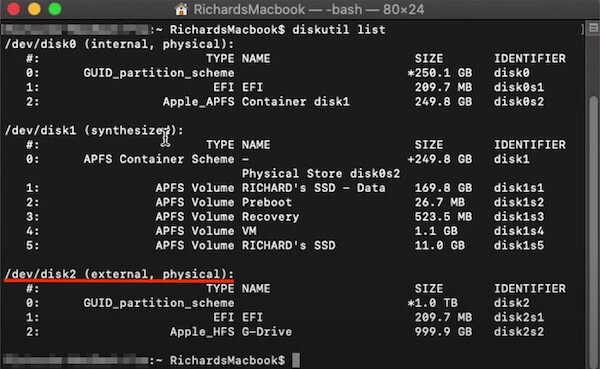
Step 5: Add the command mentioned below and hit the Enter button.
diskutil eject disk2
Step 6: Pull the drive from the Mac device and reconnect it again. The external hard drive should appear in the list this time.
Conclusion
Certainly, all of the methods mentioned are high-grade options for rectifying the unmountable external hard drive issue in Mac devices. Take time to understand the cause of the issue after trying out the standard fixes, like restarting the device, since the issue requires more focused work for the former.
Found this post helpful? Check out other such content available here, detailing solutions for many more system issues.
Author Bio:
Dinesh Lakhwani 

Dinesh Lakhwani, the entrepreneurial brain behind “TechCommuters,” achieved big things in the tech world. He started the company to make smart and user-friendly tech solutions. Thanks to his sharp thinking, focus on quality and the motto of never giving up, TechCommuters became a top player in the industry. His commitment to excellence has propelled the company to a leading position in the industry.
Popular Post
Recent Post

Duplicate File Finder Pro: A Complete Review, Everything You Should Know
Computers collect thousands of files over time. Well, yes! Many of them end up being duplicates created by backups, downloads, or accidental copies. These extra files take up valuable storage space and make it harder to keep everything organized. Finding and removing them manually can take hours. Right? Duplicate File Finder Pro is a tool […]

Monitor Screen Calibration Guide: Everything You Should Know
Your monitor shows colors every single day. But are those colors actually correct? Most people never stop to check this. They just use the screen as it comes out of the box. This habit can lead to wrong colors in photos, videos, and work files. Colors may look too warm or too cold without you […]

How To Check Installed RAM and RAM Slots [Complete Guide]
RAM plays an important role in how smoothly a computer runs. Short for Random Access Memory, it stores the data and instructions that Windows and active applications need at any given moment. From opening multiple browser tabs to running games and productivity software, RAM helps keep everything responsive. A system with limited memory may experience […]

What is Microsoft Autopilot Everything You Need To Know
Technology has changed the way companies manage computers. Well, yes! Employees now work from offices, homes, and remote locations. Setting up devices manually for every worker takes time and effort. It can also create mistakes that slow down productivity. This is where Microsoft Autopilot becomes useful. It helps businesses prepare and deploy Windows devices with […]

Enable Automatic Device Locking Feature Windows: Complete Guide
Introduction: Your computer stores important information such as emails, documents, passwords, and personal photos. Leaving it unlocked can put that data at risk. Thankfully, Windows includes built-in features that can automatically lock your device when you are away. Setting up automatic device locking is quick and does not require any extra software. In this guide, […]

How to Update Wireless Network Driver in Windows 11 and 10
Your Wi-Fi keeps dropping. Pages load slowly. The connection feels unstable? Well, you are not alone. Most of the time, the problem is not with your internet plan. It is with your wireless network driver. A driver is a small piece of software that helps your computer talk to its hardware. When it gets outdated, […]

Common Windows 11 Problems and Solutions (2026 Version)
Windows 11 has become more polished over the years, but it is still not completely free from problems. Even after regular updates from Microsoft, many users continue to face issues like lagging performance, failed updates, audio troubles, random crashes, and network errors. Some problems appear after installing new features, while others develop gradually as the […]

Fortect Driver Updater Review: Features, Steps, Pros, and Cons.
A new PC usually feels quick and responsive. Applications open instantly, games run smoothly, and everything works as expected. As time passes, however, you may notice slower performance, system crashes, hardware glitches, or devices that stop working properly. While many people assume malware or low storage space is to blame, outdated drivers are often the […]

New Features Coming in Windows 11 This Year [2026]
Microsoft is always working to make Windows better. This year is no exception. The company has announced and rolled out several exciting updates for its users. These updates touch almost every part of the operating system. From the Start menu to system settings, changes are arriving fast. If you use Windows daily, you will want […]

