How To Fix 100% Disk Usage on Windows 11 [7 Ways]
Last updated on December 17th, 2024 at 5:58 am
Introduction
The upgraded version of Windows 11 has reported the computer’s slow response. Using the Task Manager helps identify the problem’s cause to some extent. The Task Manager provides information on all the processes on your computer.
One common reason for slow performance is because of reaching 100% disk usage on Windows 11. This high disk usage results in a slowdown of the computer and delays in opening applications. Further in this article, we will discuss the possible solutions to fix 100 percent disk usage in Windows 11.
How To Identify The Reasons Of 100% Usage?
A common problem confronted by Windows 11 users is the high disk usage, referred to as 100% disk usage in the Windows Task Manager. This problem makes it difficult to manage applications, and the PC slows down and takes a long time to open the applications. Here are some of the aspects:
- Close any unwanted programs and their linked procedures by pressing the Ctrl, Alt, and Del keys simultaneously and then access Task Manager. Here, you can observe the specific programs using excess disk power in the process segment.
- In the disk column, the orange fields denote certain potential issues. It is a critical stage if any process runs above the rate of 1 to 2 megabytes per second (MB/s).
- It is necessary to deactivate the Windows Search service, which is quite demanding and takes too much space on disk. You can turn it off by pressing the Windows and R keys and entering “net.exe stop superfetch” into the input field.
- If your PC’s hard drive is not labeled C:, substitute the “C:” in the “chkdsk C: /f /r” prompt with the appropriate letter. It is also important to verify that your drivers are up to date, as outdated drivers can also contribute to high disk usage.
Methods To Fix 100% Disk Usage Issue On Windows 11:
1. Remove The Temporary Files:
Temporary files are hidden entries of the applications on your computer used to store user data for a specific session. While some applications delete these files after the session, some are stored in Windows applications. Removing these temporary files can help to free the disk space.
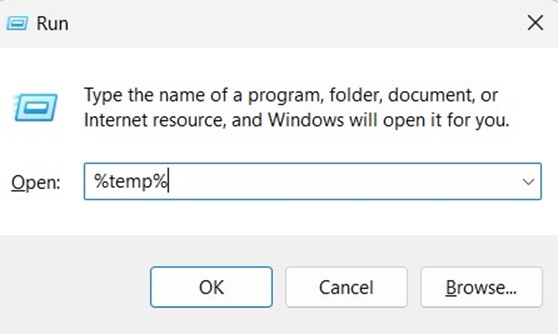
- To delete temporary files from your PC, press Windows + R for opening the Run search box, then enter “%temp%” and enter. It will take you to the folder containing all temporary files.
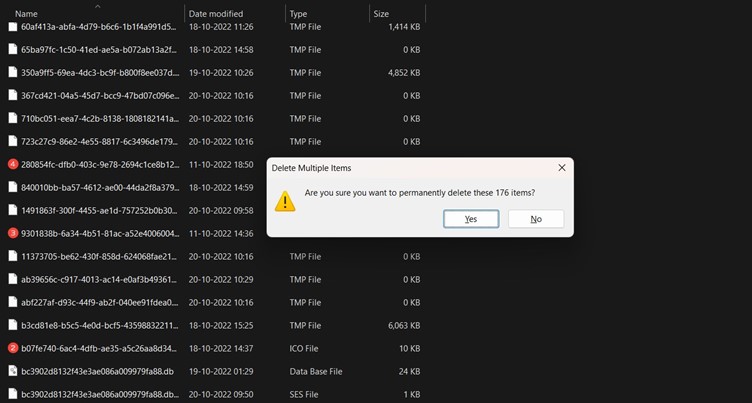
- Use Ctrl+A to select all the files and then press Shift + Delete to remove them. It is recommended to restart your PC after deleting the files. After restarting the computer, there is a decrease in disk usage.
2. Disable SysMain Superfetch Service:
Superfetch is a service in Windows Vista now called Sysmain in Windows 11 and 10. It is designed to improve and maintain the system’s Performance. It operates silently in the background and preloads the applications into the PC’s memory, which helps load heavy applications more quickly.
However, there are certain observations of high disk usage caused by the Sysmain service. In this situation, turning off the SysMain service will fix 100 percent disk usage in Windows 11.
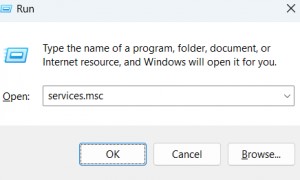
- To open the Run Box on your computer, simply press the Windows and R keys. Then, type in “services.msc” and press enter.
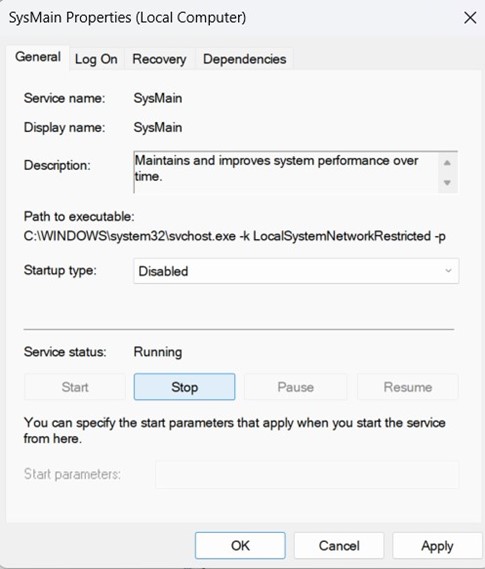
- This action will direct you to a list of available services on your PC. Find the SysMain service and double-click it to open its properties. Within the properties window, turn off the startup option and immediately stop the service by clicking the stop button.
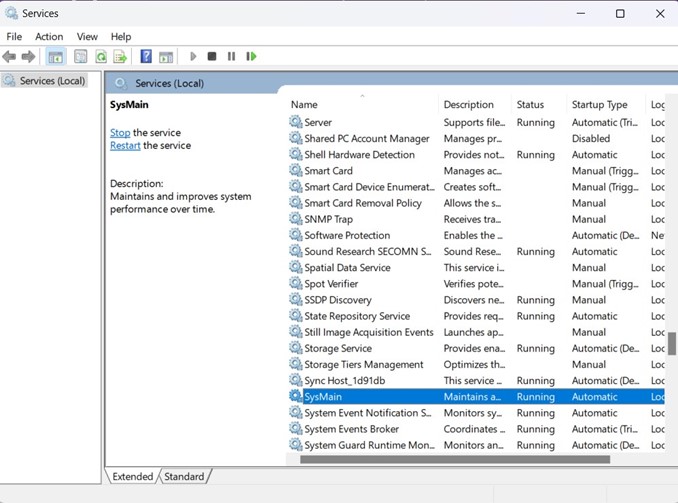
- Save your changes, exit the window, and proceed to restart your computer. After your PC has rebooted, open the task manager to verify if the disk usage has decreased. You will observe a noticeable reduction of approximately 10-15%.
3. Utilize Task Manager For Decreasing Startup Application:
Startup applications are automatically launched when the computer starts by eliminating the need for manual startup or stopping the system. However, these applications can reduce the computer’s speed because they start the computer processes before the system manages the input.
Thus, the applications lead to 100% disk usage on Windows 11. Reducing the number of startup applications is an effective solution to fix 100 percent disk usage in Windows 11. You can achieve this by following these steps:
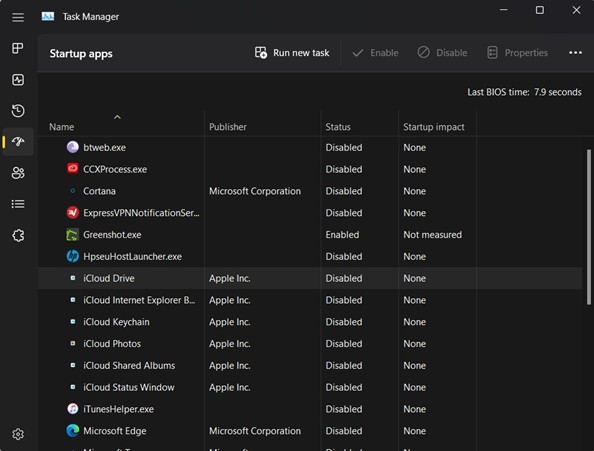
- Press the Ctrl+Shift+Esc keys to open the Task Manager and Click on the three-lined button located at the top of the menu and look for the “Startup Applications” option in the side panel.
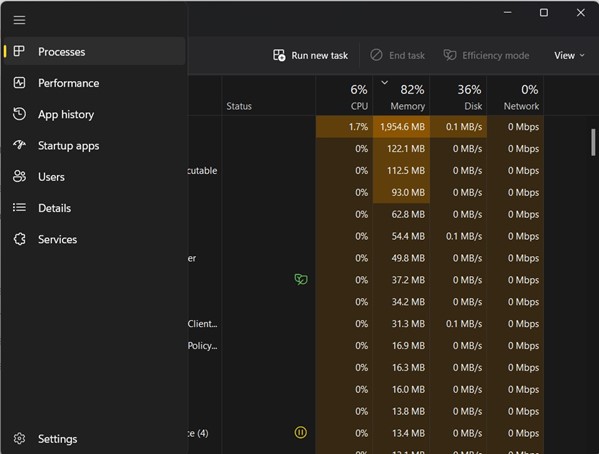
- Select each application individually and change its status to “disable” to minimize its impact on your computer’s startup process.Once you have turned off these applications, restart your computer and monitor the disk usage during the boot process.
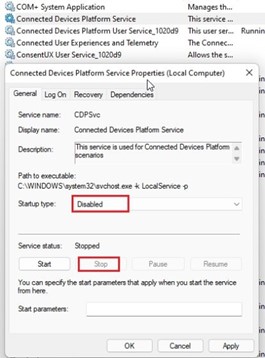
4. Stop The Connected Telemetry and User Experiences
Connected User Experiences and Telemetry service is one of the major causes of high disk usage in Windows 11. Its primary use is to track diagnostic data and send it to Microsoft’s servers.
- To address this issue, you can open the Run prompt by pressing the “Windows + R” shortcut. Then, type “services.msc” and press Enter. In the Services window, locate “Connected User Experiences and Telemetry” and double-click on it to open the settings.
- Set the Startup type to “Disabled” and stop the service immediately. Click on Apply, then OK to save the changes.
- It is also advisable to disable the “Connected Devices Platform Service” by changing its Startup type to “Disabled” and stopping the service. Deactivating both services should significantly reduce disk usage on your Windows 11 PC.
5. Disable The MSI Mode In Windows:
According to Microsoft, in certain cases, the high disk usage is because of a firmware incompatibility with AHCI PCIe (Advanced Host Controller Interface PCI-Express) controllers. If your PC uses the “StorAHCI.sys” driver, this issue will probably affect you.
Also, Microsoft suggests turning off the Message Signaled Interrupt (MSI) mode can greatly improve disk usage. Here are the steps to fix 100 percent disk usage in Windows 11:
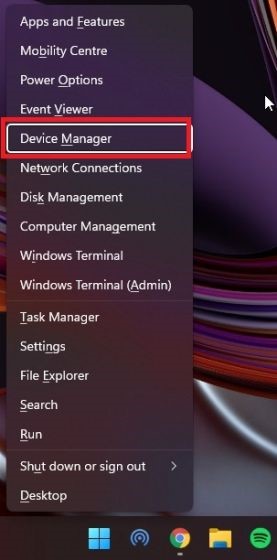
- With the keyboard shortcut “Windows + X” to use the Quick Links menu. Then, start Device Manager from there.
- Afterward, expand the “IDE ATA/ATAPI controllers” section and click right tab on the corresponding item. From the options displayed, choose “Properties.
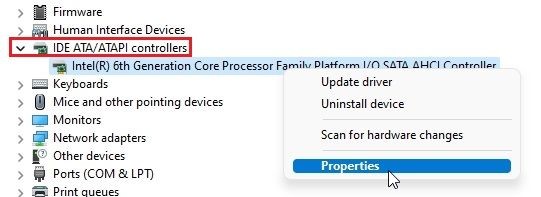
- In the resulting pop-up option, navigate to the “Driver” and select “Driver Details.”

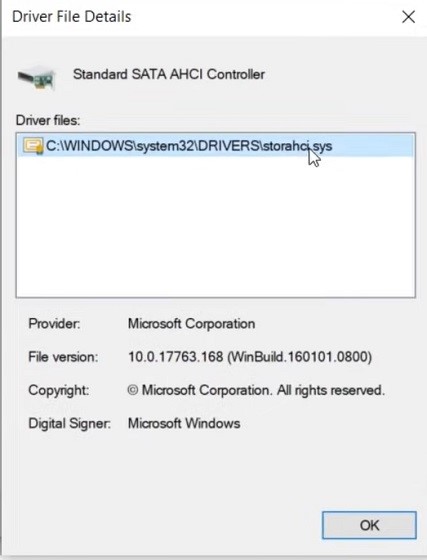
- You can proceed to the next step of the file “StorAHCI.sys” in the specified path. However, if another driver term is shown on your PC, there is no need to continue, as this solution will not help resolve the 100% disk usage on Windows 11.
- Next, head over to the “Details” tab and modify the Property to “Device instance path” with the help of drop-down menu provided. Lastly, right-click the “Value” mentioned here and make a copy of it.
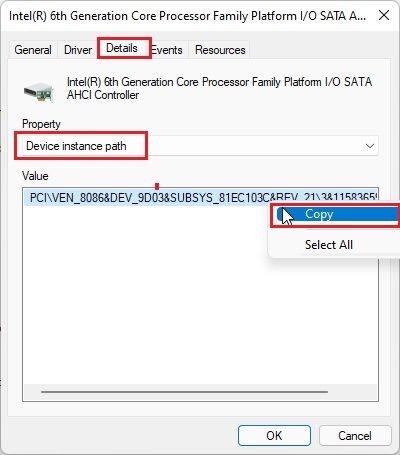
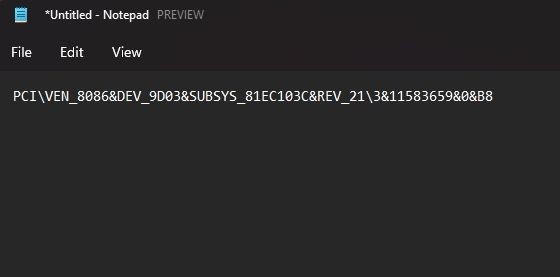
- Copy the value and paste it into a Notepad folder for later use.
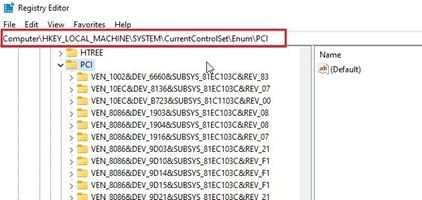
- Then, stop the Device Manager and start the Registry Editor by pressing the Windows key and searching for “registry.”

- After that, navigate to the specified path in the Registry Editor.
- Compare the entry with the pasted value in the Notepad folder and increase it.
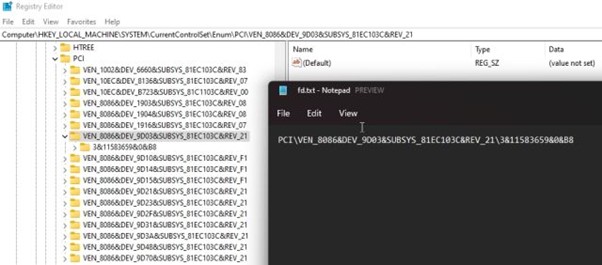
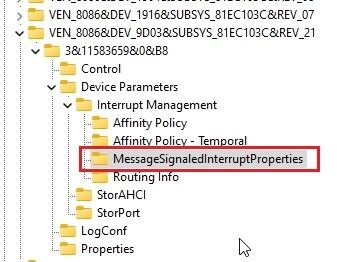
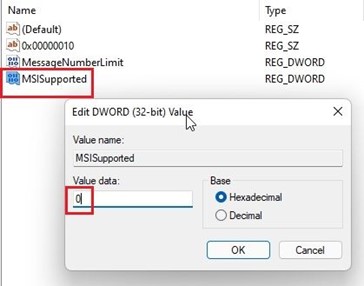
- Then, go to Device Parameters -> Interrupt Management ->MessageSignaledInterruptProperties. Find “MSISupported” and open it.
- Alter the value data to 0. Disable the Registry Editor and restart the system. From now on, you’ll notice that your disk usage won’t exceed 10-20%.
6. Stop The Windows Search:
Windows Search can be a major reason for excessive disk usage in Windows 11. To fix this, disable Windows Search, but it can impact your PC’s ability to search for files and folders.
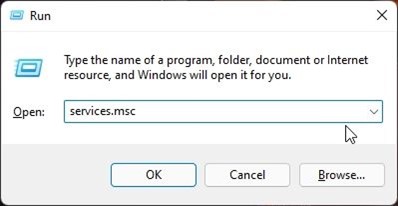
- To disable Windows Search, open the Run window by pressing the keyboard shortcut “Windows + R” and then type in “services.msc”.
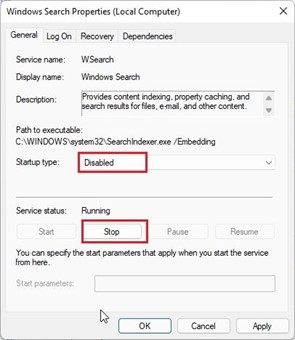
- Once the Services window appears, find “Windows Search” and double-click on it. In the new window that opens, change the Startup type to “Disabled” and immediately stop the service. Select apply, followed by OK, and restart your PC. After the reboot, you should see reduced disk usage on Windows 11.
7. Reset The Virtual Memory Of The System:
If your PC has less capacity RAM, it can use the hard disk as a backup for storing the files and programs in memory.It can lead to a significant increase in disk space usage. To avoid this issue, you can either reset the virtual memory or expand its size. This way, the operating system won’t constantly occupy the hard disk, allowing it to have more availability for other tasks.
- To open the “System Properties” window directly, use the “Windows + R” shortcut option on the keyboard to open the Run window. Type “sysdm.cpl” in the Run window.\
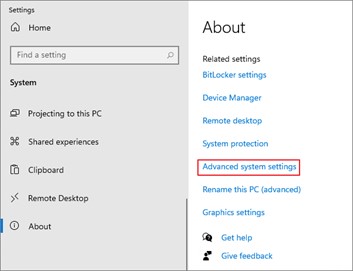
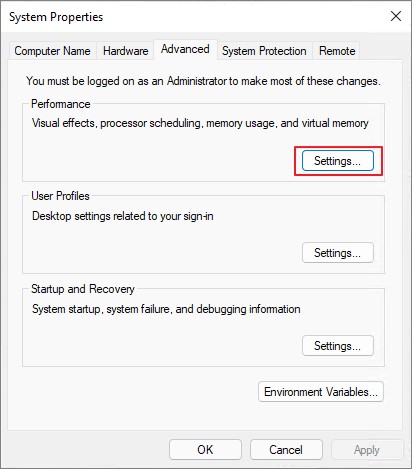
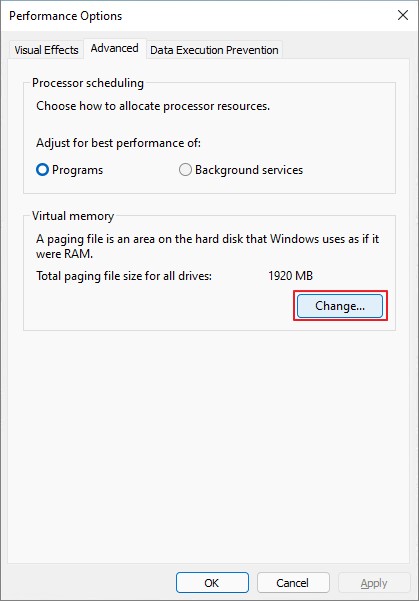
- Then, go to the “Advanced” key and select “Settings” present under Performance. Once the “Performance Options” opens, go to the “Advanced” key and select “Change”.
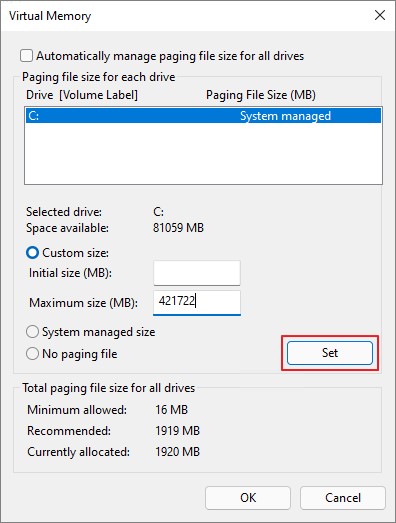
- In the “Change Virtual Memory” window, uncheck the box “Repeatedlycontrol paging of file size for all drives” and select the “Custom size” option.
- Next, click the “Suggested” size from the screenshot in the “Original size” field. Then, in the “Largest size” field, input a value that is 1.5 times the size of your RAM in megabytes.
Conclusion:
Here are various methods to fix 100 percent disk usage on Windows 11 PC, even when unused. In addition to adjusting software settings, you might consider upgrading from a hard disk drive (HDD) to a solid-state drive (SSD) for your Windows 11 desktop or laptop.
An SSD will provide faster loading times and improved overall Performance. Switching to an SSD also resolves the 100% disk usage issue on Windows 11 PCs. To effectively implement any of the mentioned techniques, it is important to identify the cause of your hard drive operating at maximum capacity.
FAQ:
1. What is the major risk of using 100% disk usage in Windows?
If your hard drive is used to its maximum capacity, it can significantly decrease your computer’s speed or freeze it, and it can also damage the hard drive. As your computer tries to read or write files, other tasks or applications will also keep running, causing a significant delay in response times.
2. What is the simplest way to fix the slow PC issue due to the disk usage issue?
One way to easily fix a slow computer caused by high disk usage is by finding and stopping the problematic process through the Task Manager. Sometimes, Windows reminds us of the disk capacity and suggests possible solutions.
3. How can we avoid the 100% disk usage problem?
To avoid the issue, restarting your PC can be an effective solution as it cleans the RAM. Several factors can cause your computer’s hard drive to reach maximum usage, including running multiple programs in the background, a defective hard drive, or the presence of background malware.
4. What is the role of antivirus software in fixing the maximum disk usage?
To prevent maximum disk usage caused by viruses, Trojans, and other harmful software, it is important to run a virus scan on your PC regularly. Depending solely on the preinstalled Windows Defender is not sufficient, as modern virus scanners are designed to protect Windows PCs against various malware and effectively tackle the latest cyber dangers.
Author Bio:
Dinesh Lakhwani 

Dinesh Lakhwani, the entrepreneurial brain behind “TechCommuters,” achieved big things in the tech world. He started the company to make smart and user-friendly tech solutions. Thanks to his sharp thinking, focus on quality and the motto of never giving up, TechCommuters became a top player in the industry. His commitment to excellence has propelled the company to a leading position in the industry.
Popular Post


Recent Post
Windows Sound Settings – Sound Control Panel: Complete Guide
Sound plays an important role in how we use a computer every day. It supports both work and leisure. You need it for meetings, videos, music, and alerts. When audio fails, even simple tasks become difficult. Many users feel stuck when sound issues appear. This usually happens because they are not familiar with Windows Sound […]

Run a Troubleshooter For PC Issues Windows: Complete Guide
A computer plays an important role in everyday life. People use it for work, study, communication, and entertainment. When a problem appears, it can interrupt everything. Even a small issue can waste time and create frustration. Many users feel unsure about how to fix such problems. They often think they need expert help. In reality, […]
![Adjusting Audio Output Settings Complete Guide [2026]](https://www.techcommuters.com/wp-content/uploads/2026/03/Adjusting-Audio-Output-Settings-Complete-Guide.webp)
Adjusting Audio Output Settings: Complete Guide [2026]
Sound is part of almost everything we do on a computer. It lets you watch videos, join calls, play music, and hear alerts. When the audio stops working the right way, it can interrupt both work and daily use. That is why adjusting audio output settings matters for every user. Many people get unsure when […]

Artificial Intelligence Explained: Concepts, Terminology, Benefits, and Future Trends
Artificial Intelligence, or AI, is basically computers doing things that usually need a human brain. We’re talking about stuff like learning from experience, figuring out problems, understanding language, and making decisions. It’s not magic, just a lot of data, pattern-spotting, and math behind the scenes. Now, AI doesn’t actually think or feel like we do. […]

Resolving Microphone Detection Problems: Latest Guide [2026]
Microphones are important tools in daily life. People use them for office meetings, online classes, interviews, gaming, customer support, and content creation. When a system fails to detect a microphone, communication stops at once. This situation can cause stress and confusion. Many users believe the microphone is damaged. In reality, most problems are simple and […]
How To Switch To A Dark Background Theme In Windows [2026]
Most people spend many hours each day in front of a computer screen. Office work, online classes, editing, browsing, and streaming all require long screen time. A bright white background may look clean at first. However, over time, it can feel sharp and tiring. The strong contrast between white backgrounds and black text may cause […]
How to Switch From Local To Microsoft Account On Windows
Many users begin with a local account when they set up a new Windows computer. A local account works only on that single device. It stores settings, files, and preferences locally. It does not connect to online Microsoft services. For basic offline use, it works well. However, as digital needs grow, many users want better […]

How to Switch Windows 10 to a Local Account: Complete Guide
Windows 10 allows users to sign in with either a Microsoft account or a local account. When you set up a new computer, the system often suggests using a Microsoft account. This account connects your device to Microsoft services such as Outlook, OneDrive, and the Microsoft Store. It also syncs settings, themes, and passwords across […]

How To Change Default Apps For File Types In Windows
Windows is designed to make using your computer easy. One way it does this is by assigning default apps to different file types. This means when you open a file, Windows automatically opens it with a specific program. For example, photos may open with Photos, music with Groove Music, and PDFs with Edge. These default […]

How To Adjust The Mouse Pointer Speed: Complete Guide
Using a computer every day means you use the mouse a lot. The mouse pointer moves on the screen and helps you click, scroll, and select items. Many people never think about the speed of the mouse pointer. They have used the default setting for years. This can cause small problems over time. A slow […]

