How To Check Installed RAM and RAM Slots [Complete Guide]
RAM plays an important role in how smoothly a computer runs. Short for Random Access Memory, it stores the data and instructions that Windows and active applications need at any given moment. From opening multiple browser tabs to running games and productivity software, RAM helps keep everything responsive. A system with limited memory may experience slower performance, longer loading times, and reduced multitasking capabilities.
There are many reasons to check the amount of RAM installed in a computer. You may be considering a memory upgrade, comparing hardware specifications, troubleshooting performance issues, or simply learning more about the system. Knowing how many RAM slots are available can also help determine whether additional memory can be added in the future.
Windows includes built-in tools that make it easy to view memory information. There is no need to install extra programs or open the computer case. This guide explains how to check installed RAM, find out how many memory slots are available, and see which slots are currently occupied.
Precautions Before You Begin:
Before you check the installed RAM and RAM slots, keep a few things in mind:
- Save any open work before launching system tools. Some tools may need a restart.
- Do not download unknown software to check your RAM. Windows has built-in tools for this.
- If you plan a physical RAM upgrade after this check, shut down your PC fully and unplug it before touching any hardware.
- Avoid touching RAM sticks with your bare hands. Static electricity can damage memory modules.
- Do not force RAM sticks out or in. They fit only one way.
- If you are on a laptop, check the manufacturer’s website before buying new RAM. Many modern laptops have soldered RAM that cannot be upgraded.
- Always note down your current RAM specs before buying new sticks. Mixing wrong RAM types can cause boot issues.
How To Check Installed RAM and RAM Slots
There are two reliable ways to check installed RAM and RAM slots on Windows. Both use tools that come built into the operating system. And the best part? No downloads are needed.
Method 1: Check Installed RAM Using Task Manager
Task Manager is one of the fastest ways to check installed RAM and RAM slots on a Windows PC.
Step 1: Press Ctrl + Shift + Esc on your keyboard. This opens Task Manager directly. Click on the Performance tab at the top.
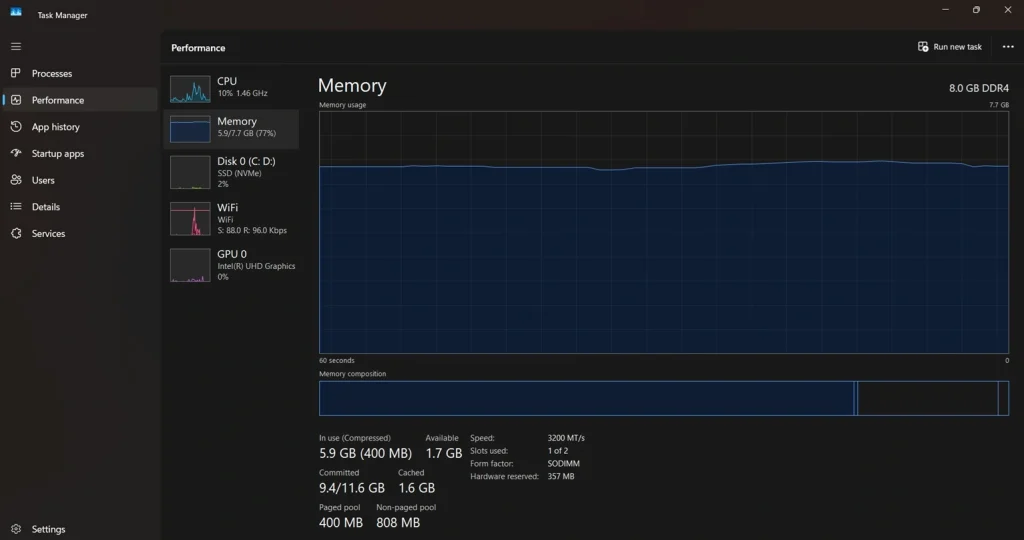
Step 2: On the left side, click Memory. You will now see a detailed view of your RAM usage.
Here is what each detail means on this screen:
- The top of the screen shows your total installed RAM. For example, it may say 8 GB or 16 GB. Below the graph, you will see details like Speed, Slots used, Form factor, and Hardware reserved.
- The Slots used field is especially helpful. It tells you how many RAM slots are currently in use. For example, it may show 2 of 4. This means two slots have RAM sticks and two are empty. This is useful when planning an upgrade.
- The Speed field tells you the clock speed of your RAM in MHz. The Form factor tells you whether it is SODIMM (used in laptops) or DIMM (used in desktops).
Task Manager gives you a clear overview. It is the easiest way to check installed RAM and RAM slots without using any commands.
Method 2: Check RAM Details Using Command Prompt
Command Prompt gives you even more detailed information about your memory. This method is useful if you want to know the exact RAM type, manufacturer, part number, and individual stick sizes.
Step 1: Press the Windows key on your keyboard. Type cmd in the search bar. Right-click on Command Prompt and select Run as administrator.
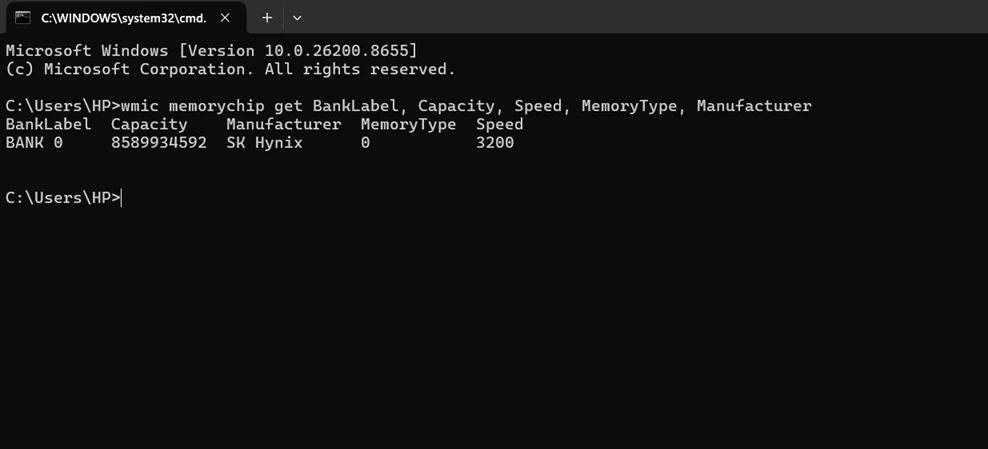
Step 2: In CMD window, execute this command:
wmic memorychip get BankLabel, Capacity, Speed, MemoryType, Manufacturer
Wait a moment. The results will appear in rows.
Here is what each column tells you:
- BankLabel shows which slot the RAM stick is in, such as BANK 0 or BANK 2. Capacity shows the size of each stick in bytes. Divide the number by 1,073,741,824 to get the value in GB. Speed shows the clock speed of that individual stick. The manufacturer shows the brand name of the RAM.
- To check how many RAM slots your motherboard has in total, type this command:
- wmic memphysical get MaxCapacity, MemoryDevices
- The MemoryDevices field shows the total number of RAM slots on your motherboard. MaxCapacity shows the maximum RAM your system can support, displayed in kilobytes.
This step helps you understand not just how much RAM is installed but also how it is distributed across slots. It is one of the most complete ways to check installed RAM and RAM slots using only built-in Windows tools.
Bonus: How To Check RAM Slots Physically Inside Your PC
Sometimes you may want to see your RAM slots with your own eyes. This is helpful when you are planning an upgrade and want to confirm how many slots are free. It is also useful if your PC is not detecting all the RAM correctly.
Follow these steps carefully:
What you need:
- A screwdriver (Phillips head)
- An anti-static wrist strap (recommended)
- A clean, flat surface to work on
Steps:
- Power off and unplug your PC. Press the power button once to remove any leftover charge.
- Locate the memory slots on the motherboard and check how many are available. Then identify which slots already contain RAM modules and which ones are empty.
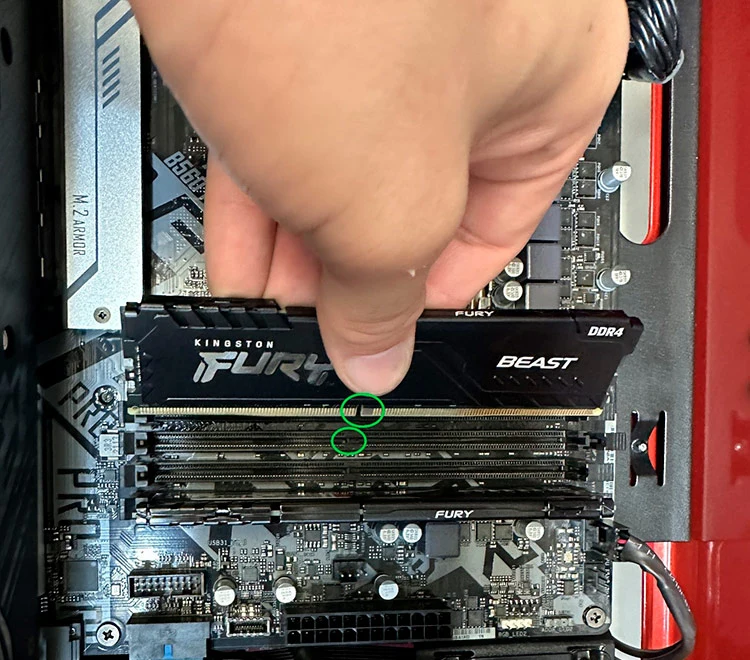
- Note any empty slots available for upgrades. Close the case, reconnect the power cable, and turn the PC back on.
What to look for inside:
The RAM sticks themselves are green or black rectangular boards with chips on them. Each stick sits flat in its slot and is held in place by small plastic clips on either side. If a clip is not fully locked, the RAM may not be detected by the system.
If a slot looks damaged, discolored, or has bent pins, do not insert RAM into it. A damaged slot can cause boot failures or system errors.
Checking your RAM slots physically gives you the most accurate count of total and available slots. It also lets you spot any physical damage that software tools cannot detect.
Tips To Get the Most Out of Your RAM Check
- Use Task Manager for a quick overview and Command Prompt for full details.
- If your slots used show 2 of 2, your motherboard is full. You will need to replace existing sticks to upgrade.
- Running RAM in pairs (dual channel) improves performance. If you have two slots free, add two matching sticks instead of one.
- Check the maximum supported RAM before buying. Adding more than your motherboard supports will not help.
- Match the RAM speed of your existing sticks when upgrading. Mismatched speeds can cause the system to run all sticks at the lowest speed.
- If your system shows less RAM than installed, check if any is reserved by the hardware. You can see this under Hardware Reserved in Task Manager.
- Use the MemoryType number from the Command Prompt to identify your RAM type. For example, 24 means DDR3 and 26 means DDR4.
- Restart your PC after any RAM upgrade and check again using these same steps to confirm the new RAM is detected.
Conclusion
Checking your RAM details does not have to be complicated. Windows gives you everything you need right out of the box. Task Manager shows you total RAM, slot usage, speed, and form factor in just a few clicks. Command Prompt goes deeper and shows individual stick details, manufacturer info, and total slot count. Both tools are free, fast, and reliable.
Whether you are planning an upgrade or just curious about your system, knowing how to check installed RAM and RAM slots is a useful skill. It takes less than two minutes and does not require opening your computer or installing anything extra. Use these steps any time you need a clear picture of your memory setup.
Frequently Asked Questions
Q1. Can I check RAM slots without opening my PC?
Yes, you can check the installed RAM and RAM slots without physically opening your computer. Windows Task Manager shows how many slots are in use under the Memory section in the Performance tab. Command Prompt can also show the total slot count and individual slot details using the wmic command. These tools give you all the information you need without touching any hardware.
Q2. How do I know if I have free RAM slots for an upgrade?
The easiest way is through Task Manager. Open it with Ctrl + Shift + Esc, go to the Performance tab, and click Memory. Look for the Slots used field. It will show something like 2 of 4, meaning two slots are occupied, and two are free. You can also use Command Prompt with the wmic memphysical get MemoryDevices command to see the total slot count and compare it with the number of sticks detected.
Q3. Why does my PC show less RAM than what is installed?
This is usually because some RAM is reserved by the hardware or the operating system. You can see the Hardware Reserved value in Task Manager under the Memory section. In some cases, a 32-bit version of Windows can only use up to 4 GB of RAM regardless of how much is installed. Switching to a 64-bit version of Windows fixes this. Also, check your BIOS settings to make sure all RAM sticks are properly recognized.
Author Bio:
Dinesh Lakhwani 

Dinesh Lakhwani, the entrepreneurial brain behind “TechCommuters,” achieved big things in the tech world. He started the company to make smart and user-friendly tech solutions. Thanks to his sharp thinking, focus on quality and the motto of never giving up, TechCommuters became a top player in the industry. His commitment to excellence has propelled the company to a leading position in the industry.
Popular Post


Recent Post

How To Check Installed RAM and RAM Slots [Complete Guide]
RAM plays an important role in how smoothly a computer runs. Short for Random Access Memory, it stores the data and instructions that Windows and active applications need at any given moment. From opening multiple browser tabs to running games and productivity software, RAM helps keep everything responsive. A system with limited memory may experience […]

What is Microsoft Autopilot Everything You Need To Know
Technology has changed the way companies manage computers. Well, yes! Employees now work from offices, homes, and remote locations. Setting up devices manually for every worker takes time and effort. It can also create mistakes that slow down productivity. This is where Microsoft Autopilot becomes useful. It helps businesses prepare and deploy Windows devices with […]

Enable Automatic Device Locking Feature Windows: Complete Guide
Introduction: Your computer stores important information such as emails, documents, passwords, and personal photos. Leaving it unlocked can put that data at risk. Thankfully, Windows includes built-in features that can automatically lock your device when you are away. Setting up automatic device locking is quick and does not require any extra software. In this guide, […]

How to Update Wireless Network Driver in Windows 11 and 10
Your Wi-Fi keeps dropping. Pages load slowly. The connection feels unstable? Well, you are not alone. Most of the time, the problem is not with your internet plan. It is with your wireless network driver. A driver is a small piece of software that helps your computer talk to its hardware. When it gets outdated, […]

Common Windows 11 Problems and Solutions (2026 Version)
Windows 11 has become more polished over the years, but it is still not completely free from problems. Even after regular updates from Microsoft, many users continue to face issues like lagging performance, failed updates, audio troubles, random crashes, and network errors. Some problems appear after installing new features, while others develop gradually as the […]

Fortect Driver Updater Review: Features, Steps, Pros, and Cons.
A new PC usually feels quick and responsive. Applications open instantly, games run smoothly, and everything works as expected. As time passes, however, you may notice slower performance, system crashes, hardware glitches, or devices that stop working properly. While many people assume malware or low storage space is to blame, outdated drivers are often the […]

New Features Coming in Windows 11 This Year [2026]
Microsoft is always working to make Windows better. This year is no exception. The company has announced and rolled out several exciting updates for its users. These updates touch almost every part of the operating system. From the Start menu to system settings, changes are arriving fast. If you use Windows daily, you will want […]

Top 14 Duplicate Photo Finder and Remover For Windows [2026]
Introduction: Photos pile up fast. Well, yes! You take ten shots of the same moment. You download the same image twice. You back up your folder and forget you already did it. Before you know it, your storage is packed with copies. A good duplicate photo finder helps you take back that space without losing […]

Advanced System Settings on Windows 11: Complete Guide
Windows 11 is a powerful operating system. It comes with many features that most users never explore. One of the most useful areas is the System Properties panel. This is where you can control how your computer performs, starts up, and handles memory. Many users only change basic settings like wallpaper or display options. But […]

21 Advanced Windows Security Settings: Latest Updates
Introduction: Your computer holds a lot of important data. From personal photos to work files, everything sits on your Windows system. That is why protecting it properly matters more than ever. Windows security settings have come a long way. Microsoft keeps adding stronger layers of protection with every update. Most users never go beyond the […]

