











The photos folder looked normal at first glance. Then the storage warning popped up. One trip photo appeared four times. A tax PDF sat in three different folders. Two old setup files were still in Downloads, and each one was over 500 MB. Nobody plans this mess. Copies pile up slowly. A download runs twice. […]
Enable Automatic Device Locking Feature Windows: Complete Guide
Introduction:
Your computer stores important information such as emails, documents, passwords, and personal photos.
Leaving it unlocked can put that data at risk. Thankfully, Windows includes built-in features that can automatically lock your device when you are away.
Setting up automatic device locking is quick and does not require any extra software. In this guide, you will learn three simple ways to enable this feature, along with helpful tips and solutions to common issues.
What Nobody Is Asking Could Change Everything:
Does Windows lock the screen automatically by default?
Windows does have a default screen timeout setting, but it is not always turned on from the start. It depends on how your device was set up and your power plan settings. Some devices come with a screen timeout of a few minutes, while others may have it disabled. You should check your settings to make sure the screen timeout is active. If it is not set, your computer will stay unlocked no matter how long you are away. Taking a moment to configure this can save you from a serious security risk.
Will automatic locking affect my work or open programs?
No, it will not close or stop anything you are working on. Automatic locking only locks the screen. Your apps, browser tabs, and downloads continue to run in the background. When you come back and unlock your device, everything will be exactly as you left it. There is no data loss or interruption to active processes. You can set a longer timeout if you need more time before the screen locks, so it does not interrupt you during active use.
What happens if someone tries to unlock my locked screen?
If someone tries to access your locked device, they will need your password, PIN, or fingerprint, depending on what you have set. Without the correct credentials, they cannot get past the lock screen. Windows also logs failed attempts. This is why it is important to use a strong PIN or password. A weak password defeats the purpose of locking the screen. Make sure your lock screen credentials are something only you know, and avoid using obvious combinations like “1234” or your birthdate.
Can I enable the automatic device locking feature that Windows has on a shared computer?
Yes, you absolutely can. In fact, it is even more important on a shared computer. Each user account on Windows can have its own lock screen and timeout settings. So when one user locks their screen, only their account is protected. Other users need to sign in separately. Setting up automatic locking on shared devices ensures that one user cannot accidentally leave another user’s session open. It is a simple way to keep everyone’s data on the same device, separate and safe.
3 Reliable Ways to Set Up Auto-Lock on Windows
There are multiple methods built into Windows that let you configure automatic screen locking. Each one works slightly differently, and some give you more control than others. Here is a look at three of the most effective and easy-to-use options.
Method 1: Use Screen Saver Settings to Lock Automatically
The screen saver method is one of the oldest tricks in the book. It is still fully supported in Windows 10 and Windows 11. You can set a screen saver to activate after a set time, and then enable a password prompt when the screen saver turns off. This way, your device locks itself after you step away.
Step 1: Right-click on the desktop and select Personalize. Go to Lock Screen and scroll down to find Screen Saver Settings. Set a screen saver of your choice and enter the number of minutes before it starts.
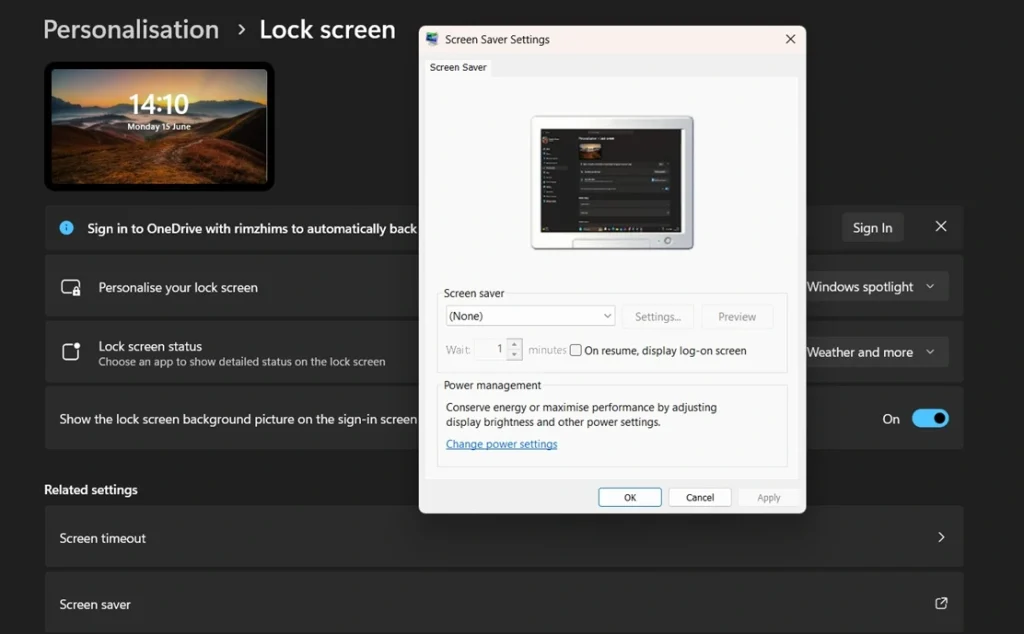
Step 2: Check the box that says “On resume, display logon screen.” Click Apply and then OK. Now your screen will lock automatically after the set time.
Method 2: Set Up a Screen Timeout via Power and Sleep Settings
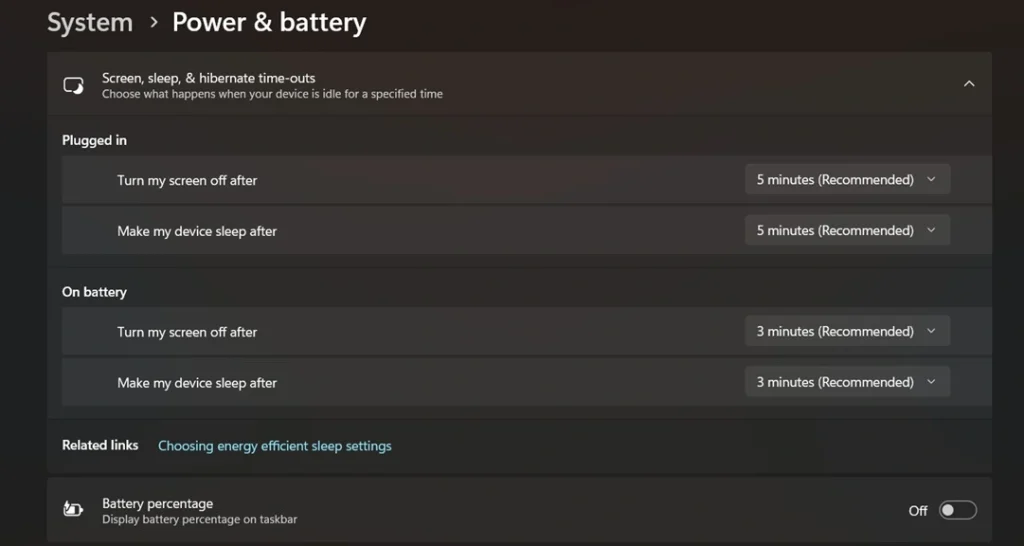
This is the most straightforward way to enable automatic device locking feature that Windows provides. You simply set how long the screen should stay on when the computer is not being used. After that time, the screen turns off, and the lock screen appears when you return.
Step 1: Open Settings and go to System. Click on Power and Sleep. Under the Sleep section, choose a time for when the screen should turn off.
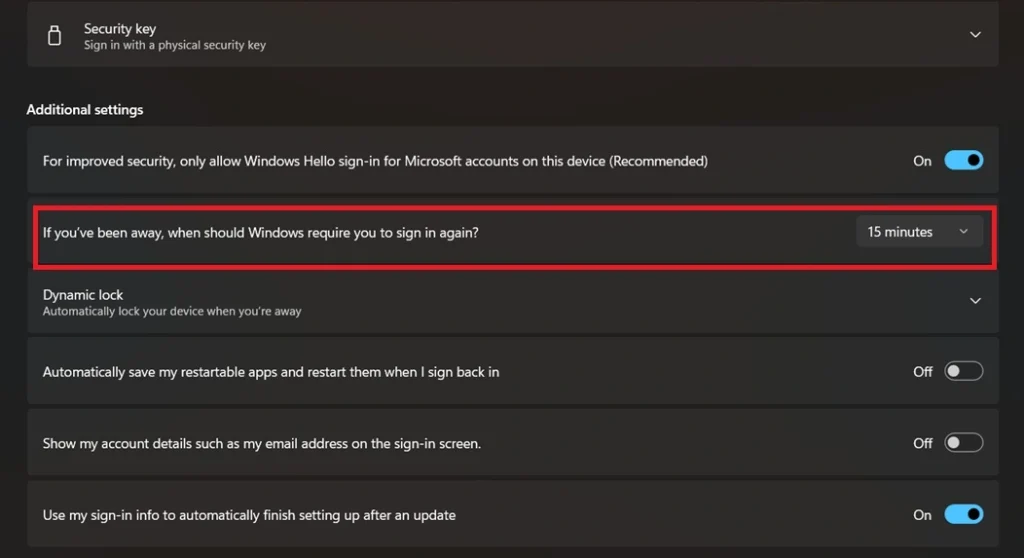
Step 2: Open Accounts and select Sign-in options. Under Additional settings, find If you’ve been away, when should Windows require you to sign in again? and choose When PC wakes up from sleep. This makes Windows show the lock screen whenever the computer wakes from sleep mode.
Method 3: Use Dynamic Lock with a Bluetooth Device
Dynamic Lock is a clever feature. It uses your paired Bluetooth device, usually your phone, to detect when you walk away. When your phone moves out of Bluetooth range, Windows locks the screen automatically. This is a hands-free way to keep your device secure without setting timers.
Step 1: Pair your phone with your Windows PC using Bluetooth. Go to Settings, then Devices (or Bluetooth and Devices on Windows 11), and pair your smartphone with the computer.
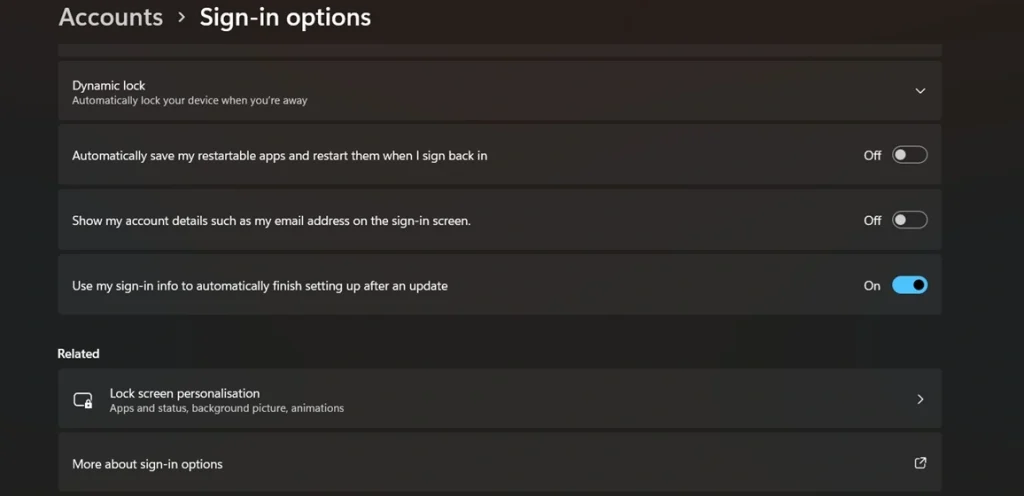
Step 2: Go to Settings, then Accounts, then Sign-in Options. Scroll down to Dynamic Lock. Check the box that says “Allow Windows to automatically lock your device when you are away.” Windows will now detect when your phone is out of range and lock the screen.
When Auto-Lock Does Not Work: Common Problems to Know
Even after you configure the settings, sometimes auto-lock does not behave as expected. This can be frustrating, especially if you think your device is protected but it actually is not. Here is a quick overview of the most common issues people face, along with what causes them.
- Screen timeout is set, but the screen never turns off: This often happens because a full-screen app or video is running. Windows treats these as active sessions and delays the timeout to avoid interrupting playback.
- Dynamic Lock stops working after a while: Bluetooth connections can drop or be unstable. If your phone’s Bluetooth turns off to save battery, Dynamic Lock will not function as expected.
- The lock screen appears but does not require a password: This means the “Require sign-in” option is not set correctly. Go to Sign-in Options and make sure it is set to trigger when the PC wakes from sleep.
- Group Policy settings are not applying: On Windows Home editions, the Local Group Policy Editor is not available. This method only works on Windows Pro, Enterprise, and Education editions.
- Auto-lock turns off after a Windows update: Some updates can reset power and sleep settings. After updating, it is worth checking your settings again to make sure everything is still configured correctly.
- The screen dims but does not lock: Dimming and locking are two separate settings. Dimming is controlled by display settings, while locking is tied to sleep and sign-in options. Make sure both are configured.
- Multiple monitors cause issues: In some multi-monitor setups, only the primary screen may dim. The lock screen might not appear on all displays simultaneously, making it look like the device is unlocked.
- Screensaver lock is bypassed on some keyboards: Certain keyboards with media keys or backlit keys can send signals to Windows that reset the inactivity timer, preventing the screensaver or sleep from activating on time.
Smart Habits: Advanced Tips and Tricks for Better Auto-Lock Security
Once you have the basics set up, there are some extra steps you can take to make your auto-lock even more reliable. These tips go beyond the default settings and help you get the most out of your Windows security tools. Knowing these will help you stay one step ahead.
- Use Windows Hello for faster unlocking: Set up fingerprint or face recognition through Windows Hello. This way, you can unlock quickly without typing a password every time, making auto-lock less of an inconvenience.
- Shorten your lock timeout for high-risk environments: If you work in an open office or a public space, reduce your screen timeout to 1 or 2 minutes. The shorter the timeout, the smaller the window of vulnerability.
- Use Win + L as a quick manual lock shortcut: You do not always have to wait for the auto-lock to kick in. Pressing Windows key + L instantly locks your screen whenever you step away. It takes less than a second and is a great habit to build.
- Enable PIN instead of a full password for faster access: A PIN is device-specific and encrypted locally. It is often more secure than a regular account password and is faster to type when you return to your desk.
- Test your Dynamic Lock setup before relying on it: After setting up Dynamic Lock, walk away from your computer with your phone and check whether the screen actually locks. Do not assume it is working without verifying it first.
- Check your power plan settings regularly: Some power plans, especially high-performance ones, disable sleep settings entirely. Make sure your plan is not overriding your auto-lock configuration.
- Turn off “Allow the computer to turn off this device to save power” for Bluetooth adapters: In Device Manager, go to your Bluetooth adapter properties. Disable the power management option so the adapter stays active and Dynamic Lock keeps working.
Conclusion
Keeping your Windows device secure does not have to be complicated. Auto-lock is one of the easiest protections you can put in place. It works silently in the background and requires almost no effort once it is set up. Whether you prefer a simple timer or a smart Bluetooth-based lock, Windows gives you the flexibility to choose what works best for you.
Each method covered in this guide has its own strengths. The screen timeout method is simple and reliable. The Dynamic Lock feature adds a smart, hands-free layer of security. The Group Policy option is perfect for managed environments. And the screen saver method is a classic that still works well. Try the one that fits your routine and stick with it.
Security is a habit, not a one-time setup. Make sure to review your settings after major Windows updates. Keep your PIN or password strong. And whenever you step away from your desk, let your device lock itself or use Win + L to do it manually. Once you enable automatic device locking feature Windows provides, you will have peace of mind every time you walk away.
FAQs
How do I know if my Windows screen is set to lock automatically?
Go to Settings, then System, then Power and Sleep. Check the screen and sleep timeout values. If they are set to a specific number of minutes, your screen will turn off after that time. Then go to Accounts and Sign-in Options to confirm that “Require sign-in” is set to activate when the PC wakes from sleep. If both settings are in place, your device is configured to lock automatically. You can also test it by simply waiting and seeing if the lock screen appears.
Is there a way to lock Windows automatically without using sleep or a screen saver?
Yes, Dynamic Lock does exactly this. It does not rely on a timeout at all. Instead, it detects your Bluetooth-paired device and locks the screen when you walk out of range. This means the screen can stay on if needed, but the moment you leave with your phone, the PC locks itself. It is one of the most seamless ways to stay protected without worrying about sleep settings or timers interfering with your work.
Does auto-lock work differently on Windows 10 versus Windows 11?
The core functionality is the same on both versions. Power and sleep settings, Dynamic Lock, and screen saver-based locking all work on Windows 10 and Windows 11. The difference is mainly in where you find the settings. Windows 11 has a redesigned Settings app, so some options are in slightly different locations. The steps may look a little different, but the end result is the same. Both operating systems fully support everything covered in this guide.
Author Bio:
Dinesh Lakhwani 

Dinesh Lakhwani, the entrepreneurial brain behind “TechCommuters,” achieved big things in the tech world. He started the company to make smart and user-friendly tech solutions. Thanks to his sharp thinking, focus on quality and the motto of never giving up, TechCommuters became a top player in the industry. His commitment to excellence has propelled the company to a leading position in the industry.
Popular Post
Recent Post
Wise Duplicate Finder Review: Real Results from Wise Duplicate Finder
Read my honest Wise Duplicate Finder review. See features, pricing, pros and cons, and real PC test results. Find out if this free duplicate cleaner can free up your Windows storage.
How to Recover Deleted Files from Pen drive, USB Drive, SD Card
Introduction: On tech forums, you’ll often see posts like this: “I connected my pen drive to my laptop this morning, but the folder was empty. All my college project files had vanished. I don’t have a backup. Can someone help me?” Stories like this are very common. Pen drives, USB drives and SD cards are […]

How To Recover Files Deleted from the Recycle Bin [Windows 11]
Losing a file can happen in seconds. You clear your desktop, hit Delete, and empty the Recycle Bin. Then, just when you need that file again, it seems to have vanished. This guide will walk you through ways to restore files removed from the Recycle Bin. We will begin with simple fixes, then look at […]

Disk Drill Data Recovery Tool Explained: Full Review and Guide
It happens in a split second. You delete a folder by mistake. Your drive stops showing up. A photo album from your last trip just vanishes. And your stomach drops. Lost files feel personal. They are not just data. They are memories, work hours, and sometimes years of effort packed into a few gigabytes. When […]

Recover Deleted Files In Windows 11 With Software & Without
Introduction What is the first thing that goes through your mind the second an important file vanishes from a Windows 11 PC? For most people, it is a mix of panic and disbelief, followed by a frantic click through every folder that file could possibly be hiding in. It happens in a split second: one […]

EaseUS Data Recovery Wizard: Everything To Know
Data loss does not always come from a big disaster either. Most cases start small and boring. A drive gets formatted by mistake. A laptop freezes mid-save and restarts on its own. A memory card stops showing up after being pulled out too fast. None of these feel like emergencies at first, until you realize […]

Recuva Data Recovery Tool: Is it Actually Worth it?
When I first tried Recuva Data Recovery, I wanted to see if it could really bring back lost files. The tool is free, small in size, and promises quick recovery, which made me curious enough to test it on my own PC. The setup was fast, and the wizard guided me step by step. I […]

GetData Recover My Files Data Recovery Tool: Honest Review
A hard drive error brings a special kind of silence. Well, yes! The screen freezes, then a message appears saying the drive can’t be found or must be formatted. In that moment, years of photos and work files feel at risk. It never happens at a good time. Coffee spills near a laptop, a memory […]
Windows File Recovery: A Complete Review [Tried & Tested]
Imagine this. You spend hours perfecting a video project. You hit save. Then your laptop freezes, reboots, and when the screen comes back. The file is gone. Your stomach sinks. It’s not just you. Lost files happen all the time. A dropped hard drive, a bad update, an accidental delete, or a corrupted partition can […]

