How to Change and Customize Screen Saver on Mac
Introduction
While operating on different systems, you can use various tactics to improve the overall user experience. Many users assume that activating the screen saver is not helpful on your Mac device. In reality, there are benefits to keeping it as a fun element on the screen when the computer is idle. Also, it works as a security measure if you activate the password protocol here.
Using the default screen saver on your system or keeping a custom screensaver Mac is possible. In this context, there are specific steps that you have to carry out. Know the step-by-step sequence and follow through with the process.
What is a Mac Screen Saver?
The screen saver on Mac computers are programs that create a blank display screen and includes moving patterns or images on a screen. It activates automatically on computers like Macbooks, etc., if you enable the function, and it occurs after a decided period of the idle screen.
The initial use of these programs was to safeguard the plasma/CRT-based computer screens from phosphor burn-in. Now, Mac users can use this program to keep the desktop closed off when they are away from the system for more privacy.
How to Change the Screen Saver on Mac?
The process users have to follow to change the screen saver on Mac is not complicated. There are also customization options available for keeping different patterns in the screen saver, changing images, adjusting time settings, and activating password protection. Here are the many methods you can handle on your device to customize this program to your liking.
Method 1: Go through System Settings on macOS Ventura Devices
In terms of how to change the screen saver function on Mac devices, it is essential to consider the version of macOS running on the computer first. For the latest Mac devices, the version is macOS Venture 13. The way to access and change screen savers here is through System Settings. Let’s proceed with the steps.
How to do this?
Step 1: On the Mac device, click on the Apple icon to open the menu.
Step 2: Next, tap on System Settings.
Step 3: Scroll down the left panel and choose Screen Saver.
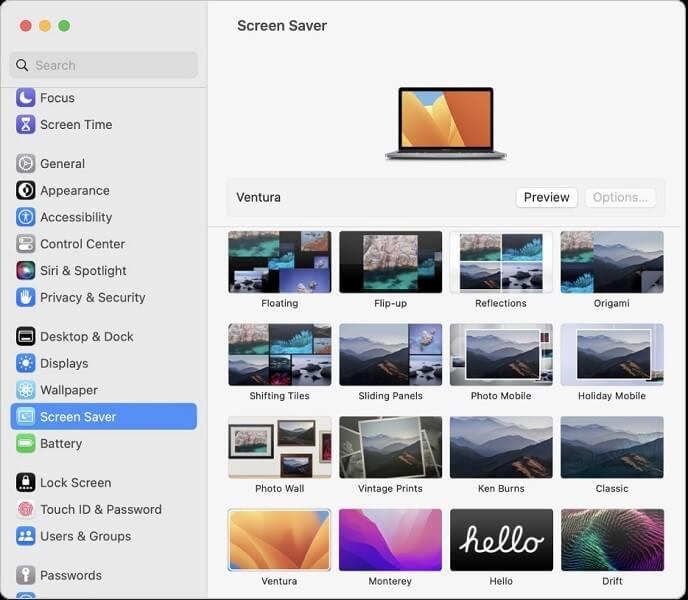
Step 4: Choose the thumbnail for the screen saver style you want to change to from the right section and press the Options icon above.
Step 5: Select your Options parameters next, like the speed, color, etc. In case you add a slideshow, choose “Shuffle slide order” for the device to adjust the pictures in random order.
Step 6: Under Source, tap the pop-up menu and choose the images present in this section or from a Photo Library folder on Mac.
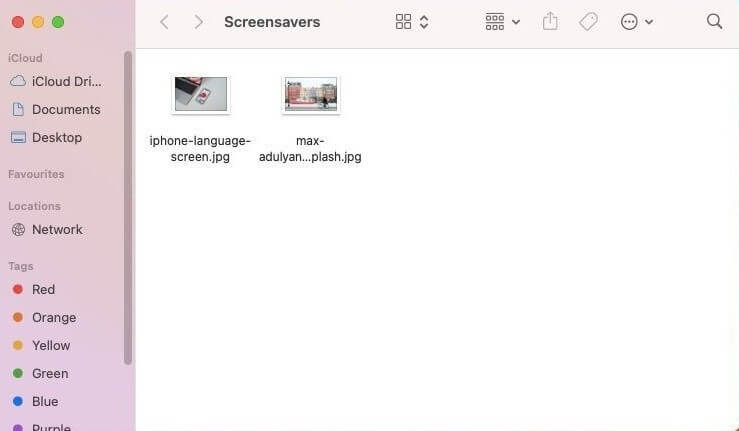
Step 7: See the top thumbnail for a minimized look of the final screen saver look, or click the Preview button to see it full-screen.
Step 8: Hit OK at the end if all the changes suit your taste.
Method 2: Go through the Desktop & Screen Saver Program on Mac
For Mac devices before macOS 13, the Desktop & Screen Saver program is the section to enter. There, it is possible to make different changes to the custom screensaver Mac users choose. Typically, the device versions that this relates to are macOS 10.14 (Mojave), macOS 11 (Big Sur), macOS 10.15 (Catalina), and macOS 12 (Monterey).
The steps here for adjusting screen saver settings are relatively simple of different than the macOS 13 Ventura version users will use. Still, the interface design of this app is slightly different, so know the specific steps for that.
How to do this?
Step 1: On the Mac computer, click on System Preferences.
Step 2: From the options, choose Desktop & Screen Saver.
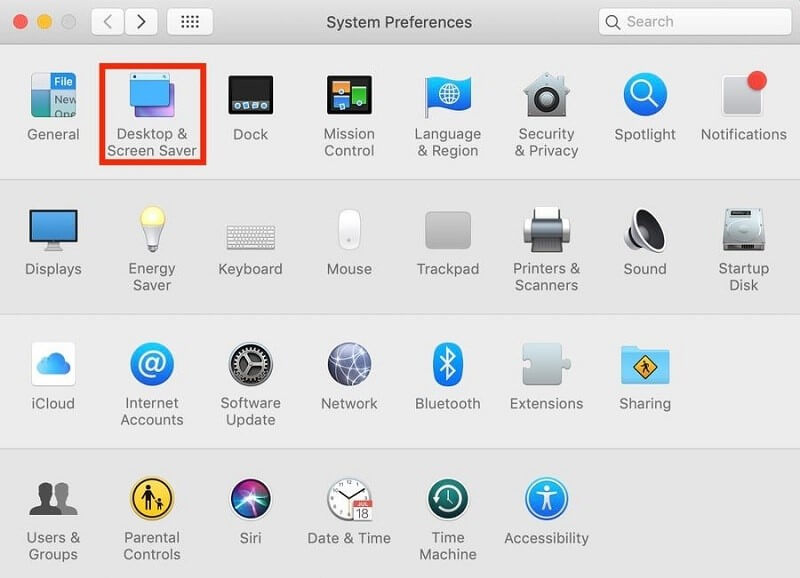
Step 3: In the next window, choose the Screen Saver tab on the upper part beside the Desktop option.
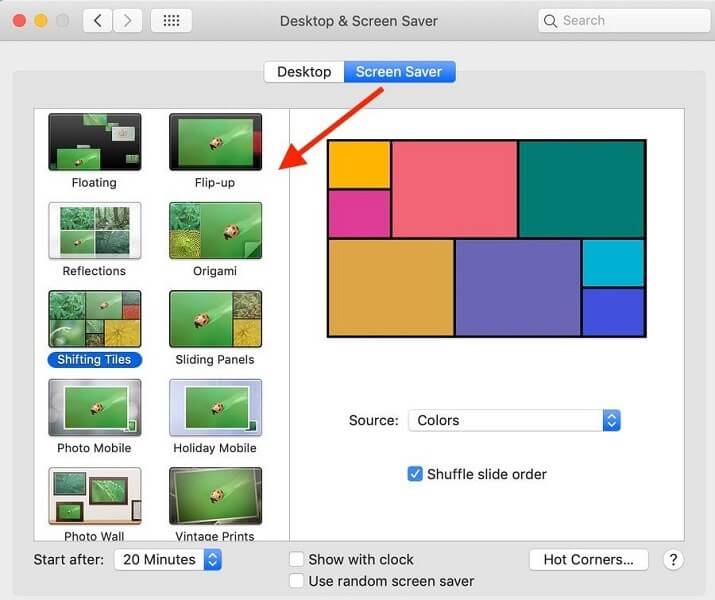
Step 4: Multiple screen saver styles will appear in the left section. Select the one you prefer- a miniature representation of that will appear on the right.
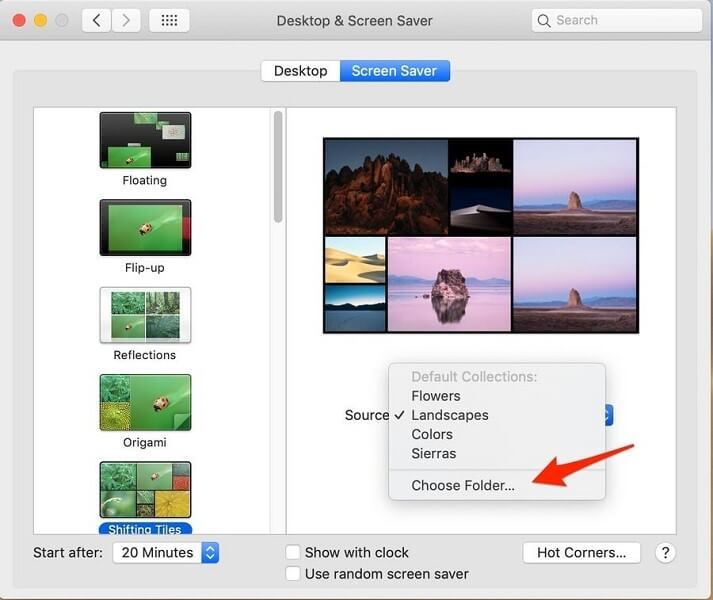
Step 5: Tap on the Source option and select a style like Landscapes. Then hit the “Choose Folder…” section to add your images from the device storage.
Step 6: Hover your mouse over the right-side screen-saver template you made and choose Preview.
Method 3: Password Protect the Mac Screen Saver
You can set a password when you change the screen saver on Mac. This will assure better security for your files when you are away from the screen so other people cannot access and view the screen in your absence. With a pre-saved password, only the device owner can reaccess the Mac device.
How to do this?
Step 1: On Mac, click on System Preferences.
Step 2: Next, choose Security & Privacy and open the General option.
Step 3: You can activate “Require Password” by clicking the checkmark beside it. Set the duration to Immediately.
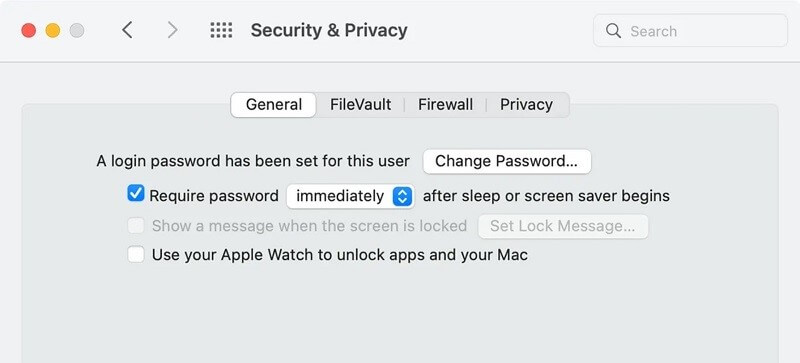
Step 4: When the screen goes idle, and the screen saver activates, the device screen will password lock automatically.
Method 4: Set up the Timer Function for the Screen Saver on Mac
It is possible to set up a screen saver timer if you want to device exactly when the screen saver activates. For example, if a person leaves the system unattended for 5 minutes occasionally, it is better to save the timer accordingly.
However, if one does it regularly, unlocking the screen each time, it locks will get stressful. So, set a customized timing for Screen Saver settings.
How to do this?
Step 1: On your Mac device, click on System Preferences > Desktop & Screen Saver. Then, tap on the Screen Saver tab. On the other hand, on the macOS 13 computer, click on the Apple menu > System Settings > Screen Saver.
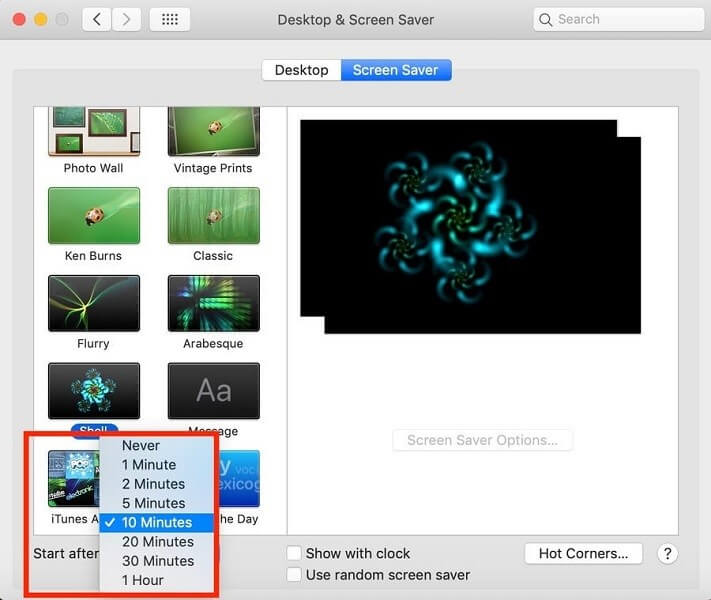
Step 2: Find the “Start After” drop-down menu and click on it.
Step 3: Choose your preferred duration for the screen to stay inactive, after which the screen saver will automatically enable, e.g., 10 minutes.
Conclusion
To sum up, the processes related to making changes to the Mac screen saver are relatively simple. At the same time, you should make sure to follow the steps for each feature adjustment, like adding a password function, feature images/patterns, or setting the timer correctly.
Alternatively, you can use a third-party screen saver program on your computer if you prefer. But these apps are not always safe, so you should use a tool like CleanMyMac X to keep track of your device’s performance, maintenance, and protection work.
Popular Post
Recent Post
How to Upgrade Computer RAM: Complete Guide
Upgrading RAM is one of the simplest ways to improve a computer. It helps the system feel faster and smoother. Apps open quicker. Browsers handle more tabs. Games and tools run with less delay. Many users search for how to upgrade computer RAM because it gives real results without high cost. You do not need […]
How To Clean Your Computer Keyboard: Complete Guide
A computer keyboard is touched more than almost any other device you own. It is used during work, study, gaming, and casual browsing. Fingers carry natural oils, sweat, and dirt. Small food crumbs fall between keys without notice. Dust settles each day slowly. Over time, this creates a hidden layer of grime. Many users do […]
Computer Mouse Buying Guide for Beginners and Advanced Users
Buying a mouse looks easy at first. Many people think all mouse work the same way. Well, that idea often leads to regret later. A mouse affects comfort, speed, and daily work. It matters for office tasks, gaming, design, and study. The right choice reduces strain and improves control. The wrong one feels annoying every […]
How To Overclock a Computer: A Complete Guide
Overclocking is the process of making your computer run faster than its factory settings. It mainly affects the processor, graphics card, and sometimes memory. Many people choose this method to improve performance without buying new hardware. It is popular among gamers, video editors, and users who run heavy software. When done properly, overclocking can give […]
How To Find Password Saved on This Computer: Complete Guide
Many people forget their login details at some point. It happens often. We create many accounts every year. Each one needs a username and a password. Over time, it becomes hard to remember all of them. That is why computers offer ways to store login details. These saved details help users sign in faster. They […]
How To Open/Access Computer Management & Advanced Tips
Every Windows computer has many hidden tools. Most users never see them. They only use basic settings. They change wallpapers. They install apps. They adjust sound and display. That is enough for daily work. But problems still happen. The system slows down. Storage fills up. Errors appear without warning. At this stage, normal settings do […]
How To Transfer Photos From Android Phone To PC/Laptop [2026]
Moving photos from a phone to a computer is something most people need to do often. Phones fill up fast. Photos also matter more than apps. You may want a safe backup. You may want to edit images on a bigger screen. This guide explains how to transfer photos from Android to PC without stress. […]
Top 9 Browsers With Built-In VPN – VPN Browser
Online browsing is no longer private by default. Every website collects data in some form. This includes location details, device information, and browsing habits. Over time, this data builds a clear picture of user behavior. Many people are now uncomfortable with this level of tracking. A VPN browser helps reduce this exposure. It adds a […]
AI In Cyber Security: Who is Winning, Hackers or Security Companies
Cybersecurity once followed clear rules. Companies built firewalls. Users created passwords. Antivirus tools scanned files and removed known threats. When an attack happened, security teams studied it and added new rules. This method worked for many years. It created a sense of control and stability. That sense is gone today. Artificial intelligence has changed how […]
The Biggest AI-Run Cyber Attacks Of All Time
Artificial intelligence is now part of everyday technology. It helps people search faster. It improves medical research. It supports businesses in making better choices. But AI is not used only for good purposes. Cyber criminals have also learned how to use it. This has changed the nature of cyber attacks across the world. In the […]
