










So, search for a pair of shoes once online. Close the tab. By evening, those same shoes are sitting on your news site, your video app, and even your recipe blog. Nobody placed them there by chance. A cookie did. Well, yes! Cookies are small files that websites place on your device while you browse. […]
Fix Overscaling Or Overscan in Windows 10 and Windows 11: 10 Ways
Imagine you are all set for a family movie night. But when you connect your TV to your laptop to broadcast a movie on a bigger screen, it doesn’t fit your TV screen. All you could see is the movie taking up a smaller area on your TV, and the rest of the screen is plain black space.
Guys, this is an Overscreen issue. Mostly, your monitors, TV screens, and all Windows 10 devices can auto-detect display settings and resolutions. Sometimes, simple miscommunication between Windows 10 PC and other connected display devices can cause an overscan problem.
To be honest, Windows 10 overscan isn’t a big issue. With a little tweak here and there, you can fix overscan Windows 10. For your ease, the TC team has found ten ways to fix Windows 10 overscan issue.
Advantages: Why Fixing Overscaling Improves Your Display Experience
Fixing overscaling or overscan issues can make a clear difference in how your screen looks and feels. When your display is properly adjusted, everything fits perfectly within the screen. This improves both usability and comfort during daily tasks.
- Full screen visibility
You can see all edges of the display without missing icons, taskbars, or content. - Better text clarity
Proper scaling makes text sharper and easier to read, reducing eye strain. - Improved productivity
You spend less time adjusting windows or guessing hidden elements. - Accurate display output
Images and videos appear in correct proportions without stretching or cropping. - Enhanced gaming experience
Games run in the correct resolution, giving a more immersive and balanced view. - Cleaner interface layout
Desktop elements stay aligned, giving a more organized and neat appearance. - Reduced frustration
No more dealing with cut-off menus or misaligned apps. - Better compatibility with apps
Applications display correctly, especially those that depend on exact screen scaling.
Disadvantages: Potential Drawbacks to Consider Before Adjusting Overscan
While fixing overscaling is helpful, there can be a few minor challenges during the process. These mostly depend on your system setup and display type.
- Time-consuming setup
Some fixes require trial and error before finding the correct setting. - Confusing display settings
Advanced options in graphics panels can feel complex for beginners. - Temporary display issues
Screen flickering or resolution changes may occur during adjustments. - Driver dependency
Outdated graphics drivers can limit available scaling options. - Multiple monitor complications
Fixing scaling on one screen may affect settings on another. - TV display limitations
Some TVs have fixed overscan settings that cannot be fully disabled. - Risk of incorrect settings
Wrong adjustments may distort the display further before fixing it. - Frequent resets after updates
Windows updates can sometimes revert display settings back to the default.
How to Fix Overscaling & Overscan Windows 10 and Windows 11
Whether your TV or Windows 10 device is causing the overscan issue, you can try the following ten methods to fix overscan:
1. Fix Overscan on Windows 10 & 11 by Changing the Screen Resolution
Once you have connected your laptop to your TV screen, you should experiment with different screen resolutions to adjust the screen. To tweak with Windows 10 screen resolution, go to:
- Control Panel from the Start Menu or using Win+X keyboard shortcut.
- Click open the Appearance and Personalisation.
- Select Display and then click on the Change Display Settings. Also, select the Advanced Display Settings link.
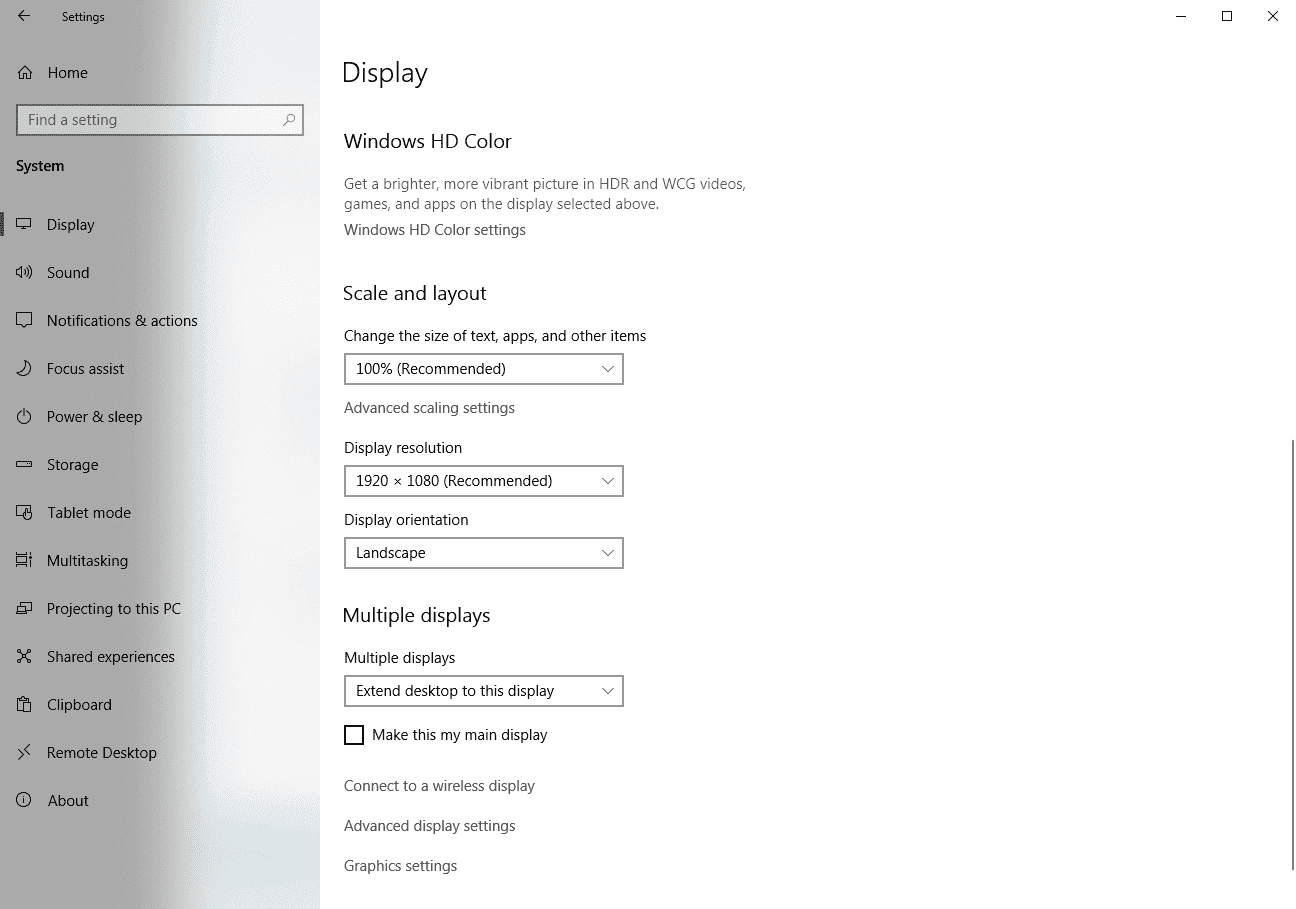
- From the drop-down menu next to Resolution, select a different resolution setting.
- Once you find the preferred screen resolution, click to Apply.
2. Fix Overscan Windows 10 and 11 by Adjusting Display Scaling
If the resolution setting change didn’t work for you, the next step is to check out Windows 10 display scaling. Almost every desktop over scaling issues can be fixed by:
- Go to Start Menu > Settings > System > Display.
- Under the Scale and Layout section, look for the Change the size of text, apps, and other items. Here, you can select different options like 125% or 150% to increase the display items scale.
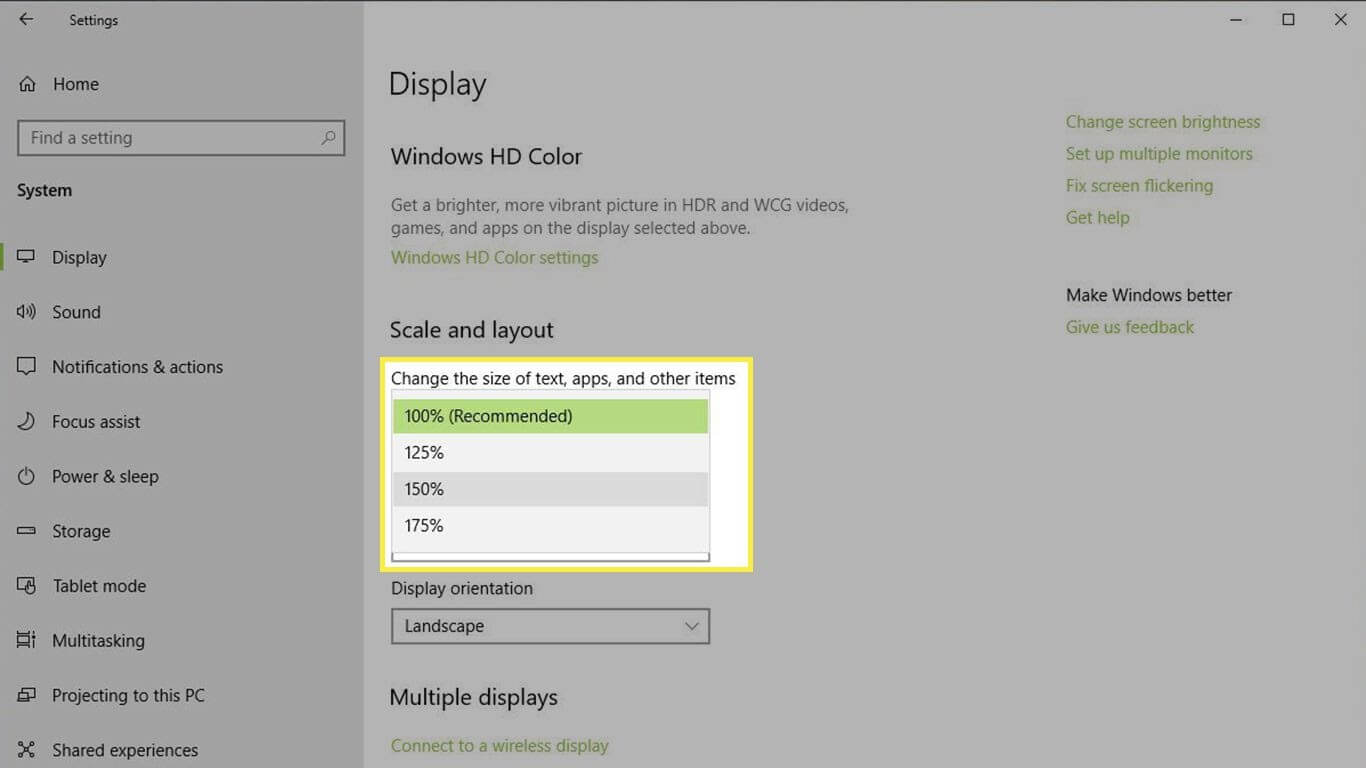
- To customize the display scale size, you can select the Advanced scaling settings.
3. Fix Overscaling Windows 10 and 11 Using the Intel Graphics Control Panel
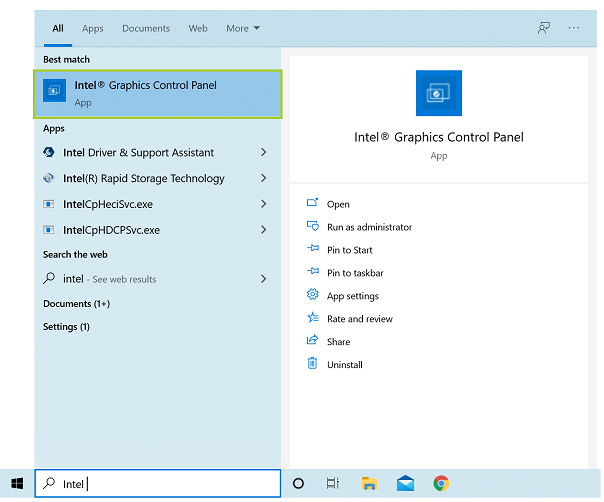
If you have a traditional Windows 10 PC running on an Intel CPU, you can use the Intel Graphics Control Panel to fix overscan on Windows 10. You can experiment with numerous options until you get a desirable screen preview, such as:
- Open the Windows search box and enter Intel. You can press CTRL+ALT+F12 keys to launch the Intel Graphics Control Panel.
- On the Intel Graphics Control Panel screen, you have multiple options to adjust your screen size.
4. Fix Overscan Windows 11 & 10 with the Nvidia Control Panel
If you aren’t an Intel CPU user, you will probably be the Nvidia CPU user. In that case, you have to modify Nvidia Control Panel settings to solve the overscan problem. To do so:
- Open the Windows search box and type Nvidia in it.
- Click on the Display and Adjust desktop size and position.
- Check off the Enable desktop resizing option and then select Resize while connected to the monitor.
5. Fix Windows 10 Overscan by Calibrating your Monitor
To fix various display issues, Windows 10 comes with a built-in calibration tool. There’s always the option to use third-party calibration tools, too. If you want to move ahead with Windows 10 calibration tool, you simply have to:
- Open the Windows 10 Settings and then System.
- Select the Display tab, scroll down to the Advanced display settings.
- Click open the Display adapter properties for the display that you want to calibrate.
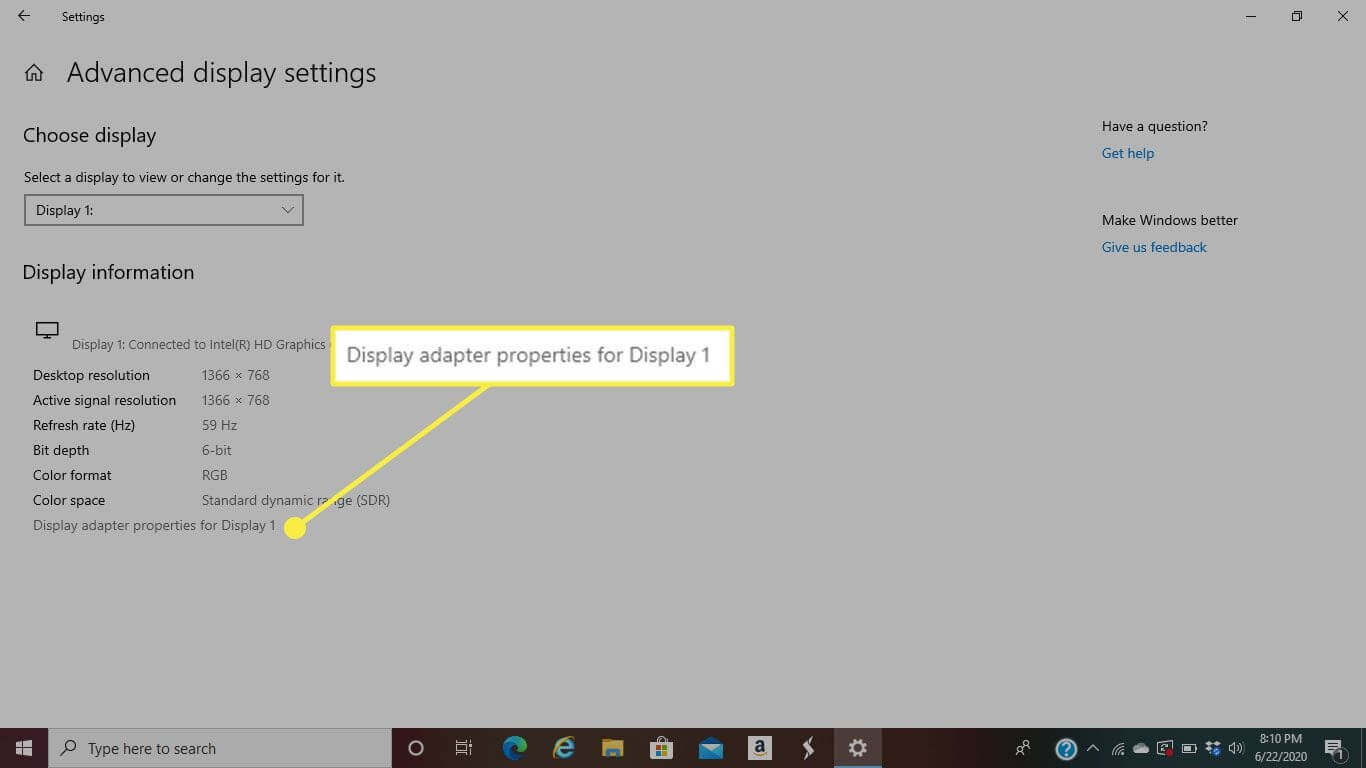
- Go to the Color Management > Advanced > Calibrate Display.
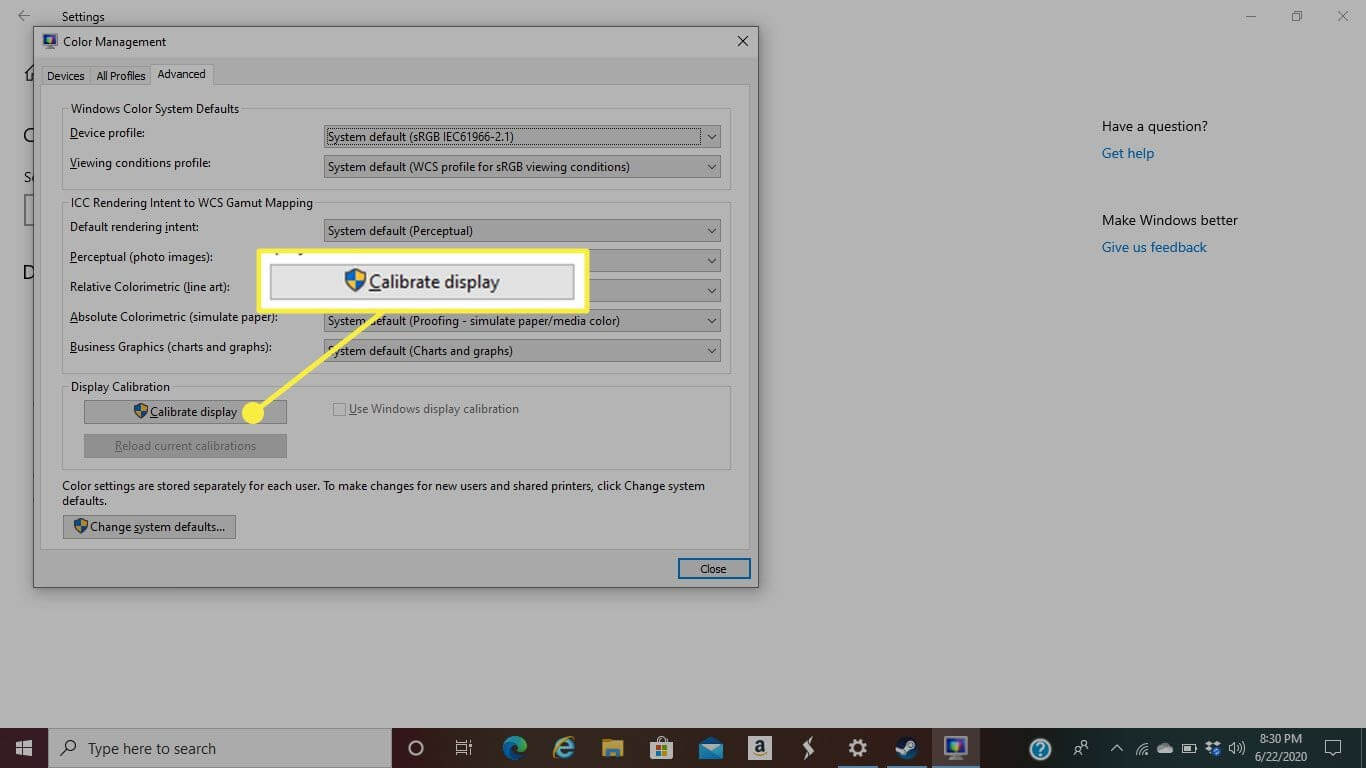
- Simply follow the on-screen instructions to complete the calibration process.
6. Fix Windows 10 & 11 Overscaling by Updating OS
Updating Windows 10 OS can almost fix all the bugs-related issues. So, if your overscan issue has something to do with outdated OS and bugs, you gotta update your system. You can check system updates from:
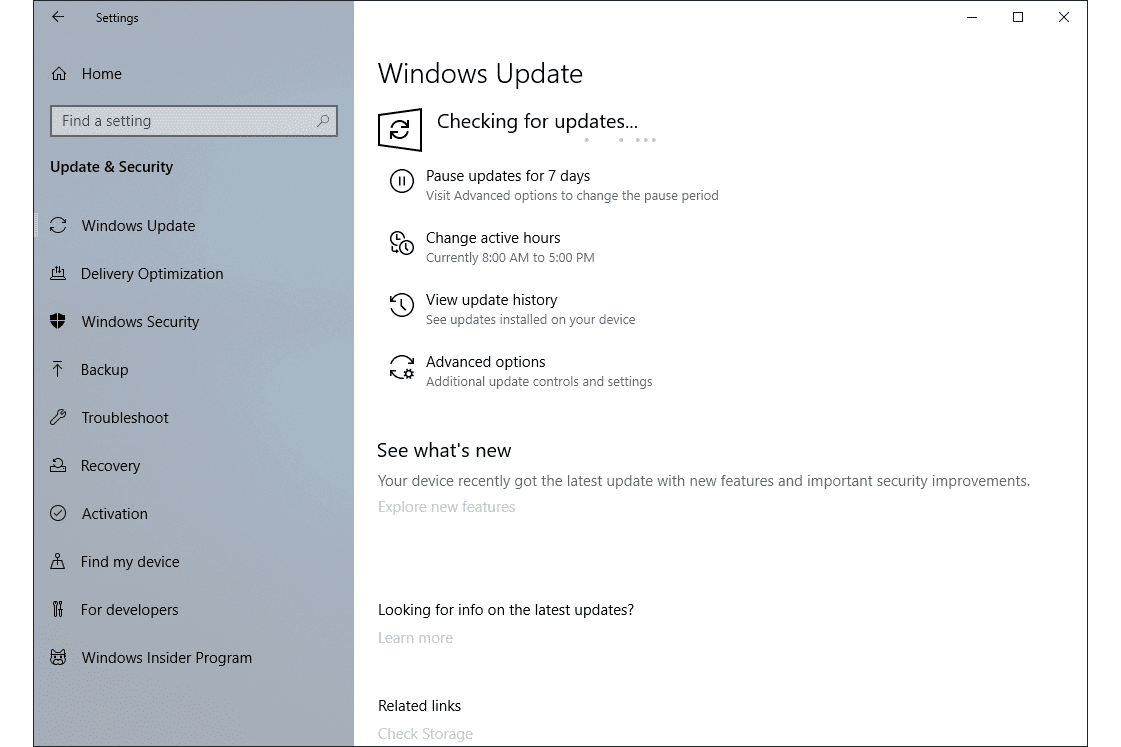
- Open Settings > Update & Security > Windows Update.
- Click on Check for updates to find new Windows 10 updates for your PC.
- If there’s an update available for you, download and install it immediately. It might take some time to update OS, so be patient.
7. Fix Overscan Windows 10 and Windows 11 by Updating Drivers
Another way to squash bugs and glitches in Windows 10 is by updating the system drivers. If your monitors and display adapter drivers are outdated or unreliable, you need to fix them.
To update drivers, you can opt for a straight manual method. However, locating an outdated driver, finding the latest one, and updating it could be a slightly technical and time-consuming task. Therefore, many people prefer to use automatic driver updater to ease their workload. There are plenty of different driver updates available in the market that you can select as per your requirements.
For this guide, we will show you how to update drivers using AVG Driver Updater:
- You can quickly download AVG Driver Updater online. If you already have a tool downloaded on your system, launch it.
- Click on the Scan Drivers.
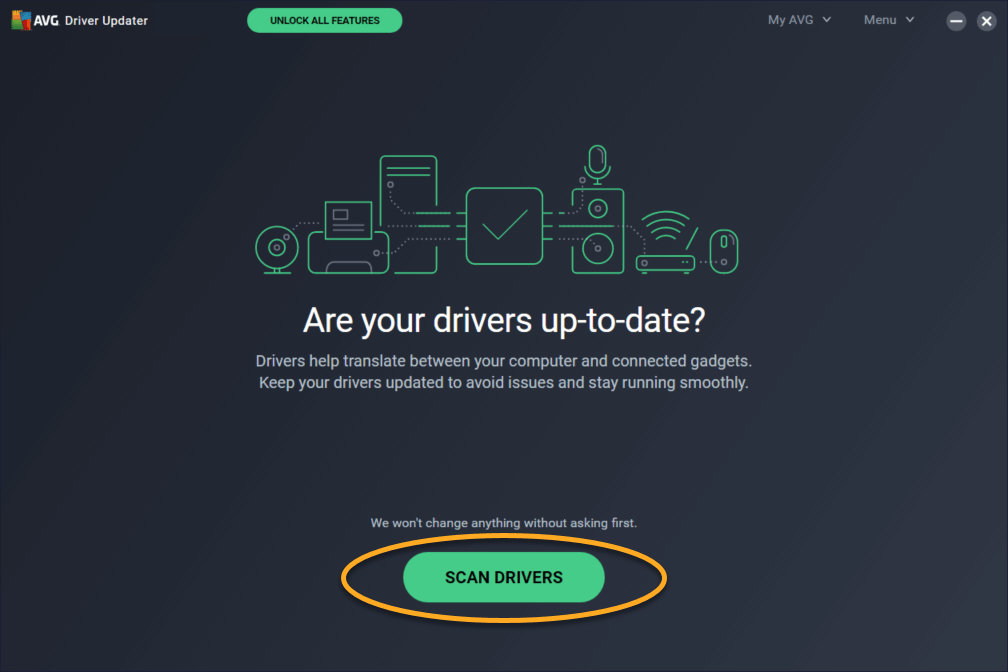
- Now, AVG Driver Updater will scan your entire system and detect outdated drivers.
- Select the monitors and display adapter if it is on the list.
- Click Update Selected, and the software will automatically update the driver for you.
8. Fix Overscaling On Windows 11 and Windows 10 Using Registry
If you have full confidence in your technical abilities, you can adjust Registry settings to fix the overscan Windows 10 problem. Remember one thing, tweaking with Registry can cause irrecoverable damage to your PC, so be cautious. You can follow these steps to safely edit the Registry on your computer:
- Click on the Start button, write regedit, and enter.
- On the Registry Editor, follow this path — HKEY_LOCAL_MACHINE\SYSTEM\CurrentControlSet\Control\Video
- Here, you will see a few Registry keys. Expand all the keys and look for keys that have 0000 and 0001, 0002, and video subkeys together.
- Take 0000 0001 and 0002 keys backup.
- Choose the 0000 key and search HDMI resolution in the right pane.
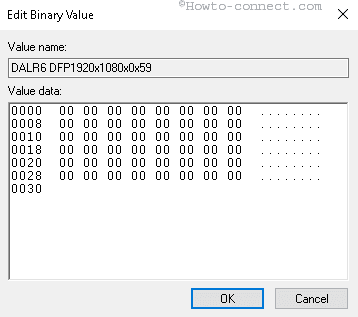
- Now, select the key that matches your resolution, right-click, and select Modify binary data.
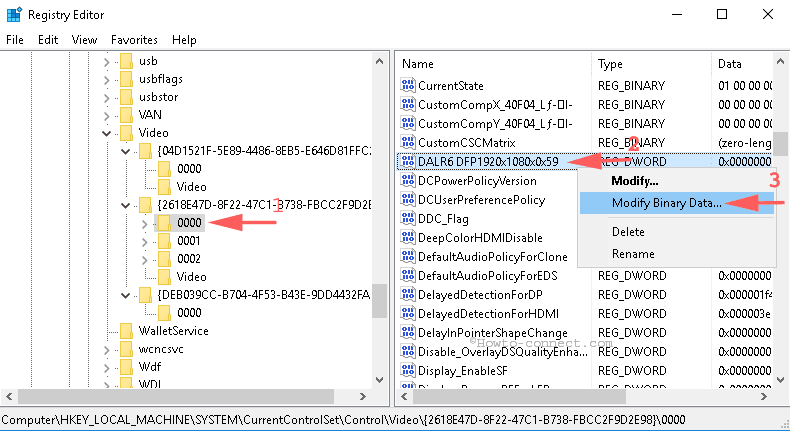
- Change all binary values to zero and click OK. Do the same with 0001 and 0002 subkeys and change binary data to zero.
- Next, go to Settings > System > Advanced display settings.
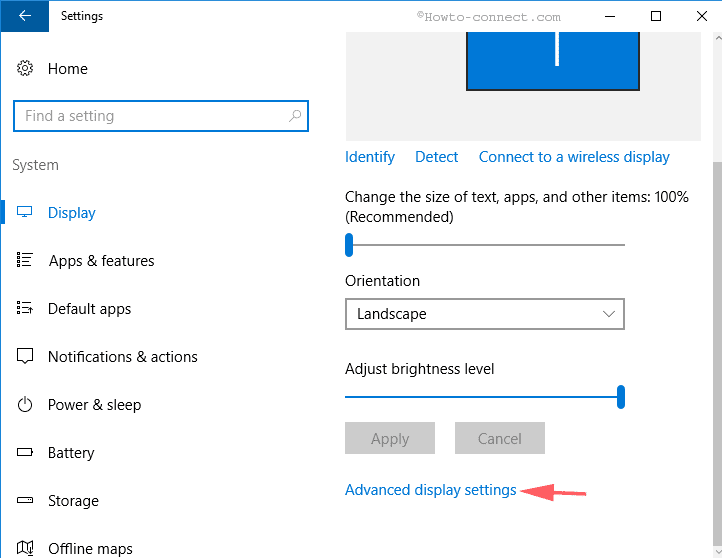
- From the Resolution drop-down menu, first, change resolution other than 1920×1080 and then change back again. Now, when you start TV, the overscan problem won’t annoy you.
9. Fix Overscan Windows 10 from the Monitor’s or TV’s Settings
You can tweak your monitor’s and TV’s display settings to resize the screen. For every TV and monitor brand, the display settings menu functions differently. So, you should go through your device’s manual before adjusting the display settings.
10. Fix Windows 11 and Windows 10 Overscaling with HDMI Cable
You can always use the good old disconnecting and reconnecting the HDMI cable method to fix overscan on Windows 10. Sometimes, when the HDMI cable isn’t properly plugged in, it can disturb the connection between your TV and computer. So, recheck the HDMI cable connection to fix the problem. Also, try to use a different HDMI cable to connect display devices.
Conclusion
Fixing overscaling or overscan in Windows 10 and Windows 11 is an important step toward improving your overall display quality. It helps you regain full control over how content appears on your screen. Once the issue is resolved, daily tasks feel smoother and more comfortable. From reading text to watching videos, everything looks properly aligned and easy to manage.
At the same time, it is worth taking a careful approach while applying fixes. Start with basic settings and move step by step. This reduces the chance of errors and helps you understand what works best for your system. With a little patience, you can achieve a clean and well-balanced display that supports both work and entertainment without distraction.
FAQs:
1. Why does overscaling happen in Windows 10 or Windows 11?
Overscaling usually happens due to incorrect resolution or scaling settings. It can also occur when using a TV as a monitor, as many TVs apply overscan by default. Graphics driver settings may also override system display settings, leading to a mismatched screen size.
2. Can I fix overscan without installing extra software?
Yes, most overscan issues can be fixed using the built-in Windows display settings. You can adjust resolution, scaling, and screen alignment directly from system settings. In many cases, this is enough to solve the problem without needing third-party tools.
3. Why does overscan return after a Windows update?
Windows updates can reset display or driver settings to default values. This may reintroduce overscaling issues. Updating your graphics drivers again or reapplying your previous settings usually resolves the problem quickly.
Author Bio:
Dinesh Lakhwani 

Dinesh Lakhwani, the entrepreneurial brain behind “TechCommuters,” achieved big things in the tech world. He started the company to make smart and user-friendly tech solutions. Thanks to his sharp thinking, focus on quality and the motto of never giving up, TechCommuters became a top player in the industry. His commitment to excellence has propelled the company to a leading position in the industry.
Popular Post
Recent Post
How To Disable Background Apps In Windows: 4 Quick Methods
A slow PC rarely gives a warning. One day, it simply takes longer to start. Apps open late. The fan runs loud, even when the screen is almost empty. Most people blame old hardware. Often, that is not the real reason. The real reason is hiding in plain sight. Windows keeps many apps active in […]
How to Activate Windows with a Product Key for Windows 11 & Windows 10
It always shows up at the worst time. You are halfway through a report, or about to join a video call. Then you spot it in the bottom right corner of the screen. Activate Windows. Go to Settings to activate Windows. Initially, an unactivated copy of Windows may seem like a minor inconvenience. Over time, […]
Is Easy Duplicate Finder Worth It? Honest Review
The photos folder looked normal at first glance. Then the storage warning popped up. One trip photo appeared four times. A tax PDF sat in three different folders. Two old setup files were still in Downloads, and each one was over 500 MB. Nobody plans this mess. Copies pile up slowly. A download runs twice. […]
Wise Duplicate Finder Review: Real Results from Wise Duplicate Finder
Read my honest Wise Duplicate Finder review. See features, pricing, pros and cons, and real PC test results. Find out if this free duplicate cleaner can free up your Windows storage.
How to Recover Deleted Files from Pen drive, USB Drive, SD Card
Introduction: On tech forums, you’ll often see posts like this: “I connected my pen drive to my laptop this morning, but the folder was empty. All my college project files had vanished. I don’t have a backup. Can someone help me?” Stories like this are very common. Pen drives, USB drives and SD cards are […]

How To Recover Files Deleted from the Recycle Bin [Windows 11]
Losing a file can happen in seconds. You clear your desktop, hit Delete, and empty the Recycle Bin. Then, just when you need that file again, it seems to have vanished. This guide will walk you through ways to restore files removed from the Recycle Bin. We will begin with simple fixes, then look at […]
Disk Drill Data Recovery Tool Explained: Full Review and Guide
It happens in a split second. You delete a folder by mistake. Your drive stops showing up. A photo album from your last trip just vanishes. And your stomach drops. Lost files feel personal. They are not just data. They are memories, work hours, and sometimes years of effort packed into a few gigabytes. When […]
Recover Deleted Files In Windows 11 With Software & Without
Introduction What is the first thing that goes through your mind the second an important file vanishes from a Windows 11 PC? For most people, it is a mix of panic and disbelief, followed by a frantic click through every folder that file could possibly be hiding in. It happens in a split second: one […]
EaseUS Data Recovery Wizard: Everything To Know
Data loss does not always come from a big disaster either. Most cases start small and boring. A drive gets formatted by mistake. A laptop freezes mid-save and restarts on its own. A memory card stops showing up after being pulled out too fast. None of these feel like emergencies at first, until you realize […]

