


A computer quietly gathers clutter over time. This includes duplicate photos, repeated downloads, and forgotten backups hiding in random folders. This buildup slowly eats away at storage and can make even a fast PC feel sluggish. Manually finding and deleting duplicates is tedious. It means checking every folder, comparing file names, and guessing which copies […]
How to Trim Videos in Windows 10?
Timing is everything while editing a video clip or movie. Once you trim unwanted parts from the video and put them in the right sequence, you can easily gag out the desired emotions from your viewers.
Adjusting timing in a video is referred to as trimming. Now, if you are wondering that video trimming is a difficult job, you are wrong. There’s nothing easier than trimming a video in Windows 10.
On Windows 10, you can use the default Photos app along with various other third-party video editing tools to get perfectly edited videos. Today, we will talk all about how to trim videos in Windows 10 in a breeze. Brace up, and let’s trim videos in Windows 10.
How to Trim a Video in Window 10 Using Photos App
Whether you wish to crop off unwanted footage or adjust the timing of your video, Windows 10 Photos app is the best solution for you. It is the default Windows 10 video editor with powerful features to trim videos. You can seamlessly trim a video in Windows 10 using the Photos app as:
- Launch the video clip that you want to trim.
- By default, the video will play in Windows 10 Photos app if you haven’t changed default settings.
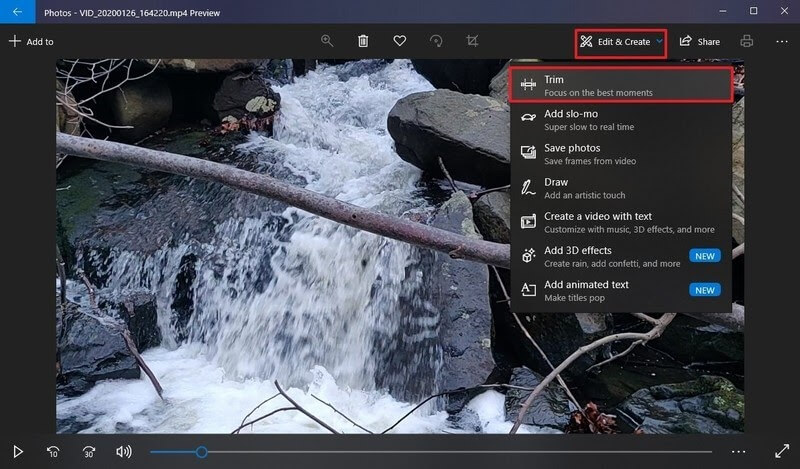
- On the Photos window, click on the Edit & Create button located in the top-right corner and click on the Trim option.
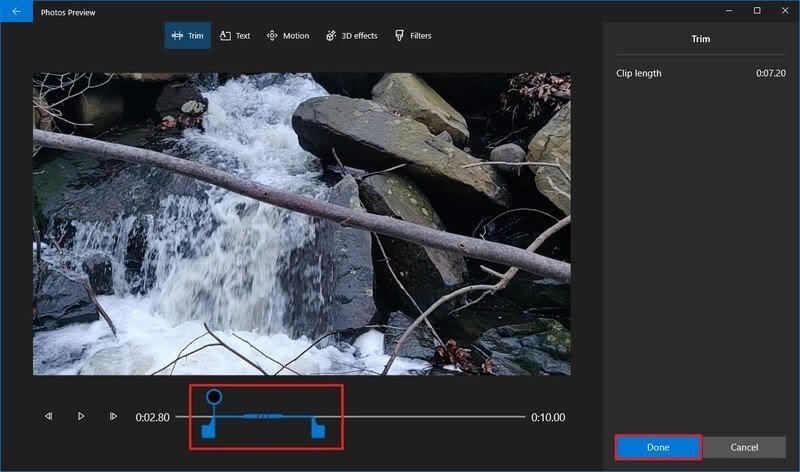
- Now, you have to use white pins — start and end pins to trim the video on Windows 10. When you drag the Start pin to the right, you are trimming away parts to its left. Similarly, you can drag the End pin to cut out undesirable parts toward the video’s end.
- You can use the Blue pin to scrub the footage to trim the right parts.
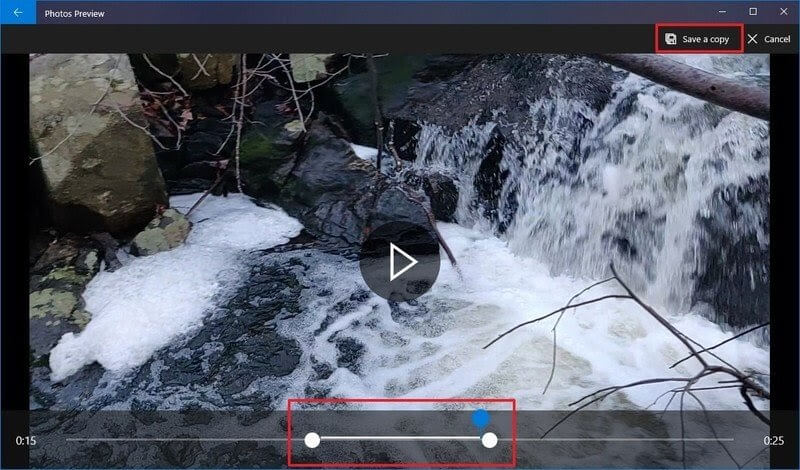
- Once you are satisfied with your trimming, click on the Save a copy button, and the Photos app will save your trimmed video in a new file. Good thing, editing won’t delete the original video from your computer, so you can anytime re-edit it.
How to Trim Multiple Parts of a Video in Windows 10 Using Photos
If you want to trim multiple parts of a video in Windows 10, the Photos app will also allow it. To trim multiple parts of a video clip, you have to follow these steps:
- Launch the Photos app.
- From the top-right corner, click the Select button.
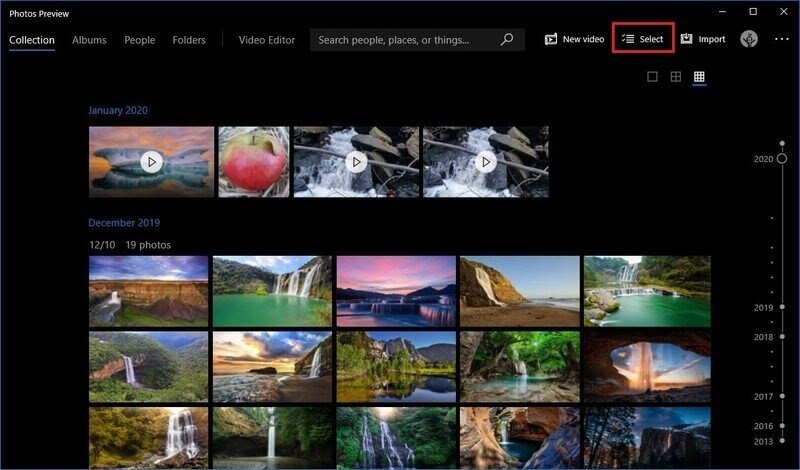
- Check the video that you want to trim and click on the New Video button.
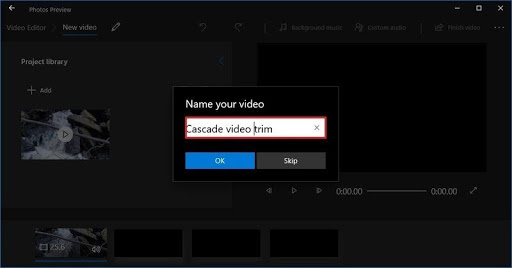
- Select the New Video Project option and give your project a name.
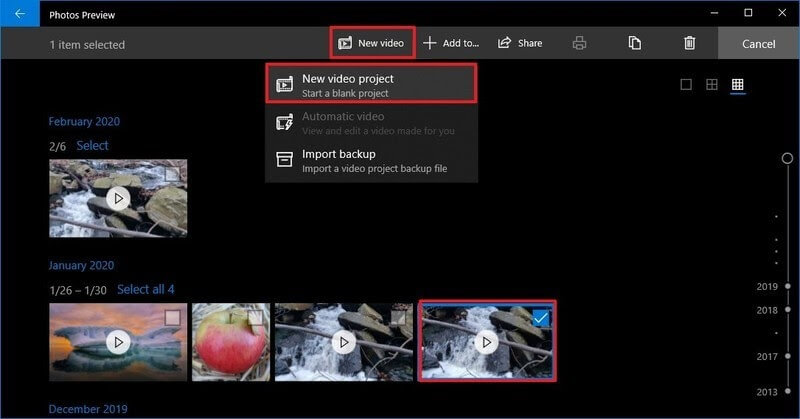
- Click on the OK button.
- Select the video clip from the Storyboard and click on the Split button from the toolbar.
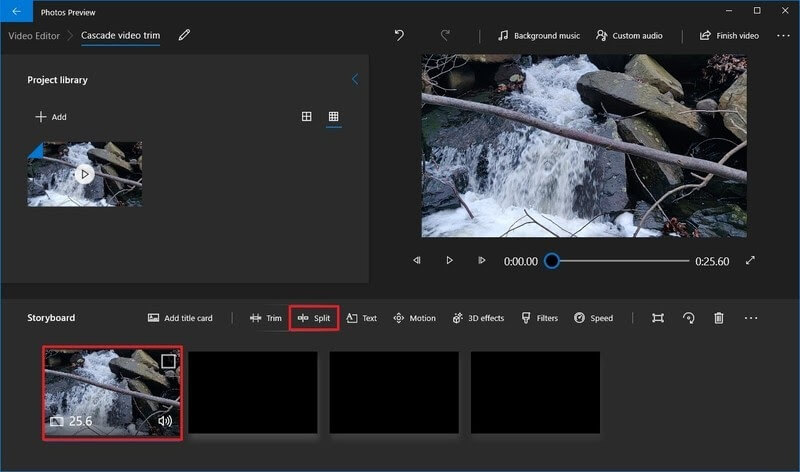
- Choose the section that includes the first part of the video that you want to trim.
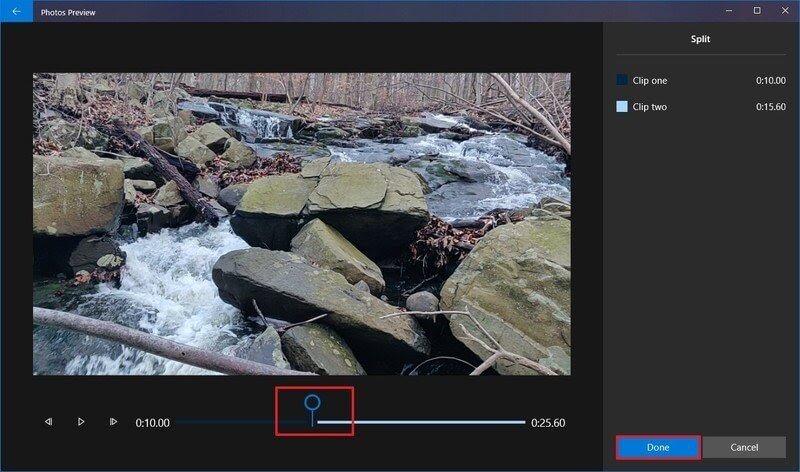
- Click on the Done option.
- Next, select the remaining part of the video and again click on the Split button.
- Now, you have to select the second part of the video that you want to trim and click on the Done button.
- Keep on repeating the steps until you trim all the unwanted parts from the video.
- Once you are done trimming, select the first split clip from the Storyboard.
- Click on the Trim button from the toolbar.
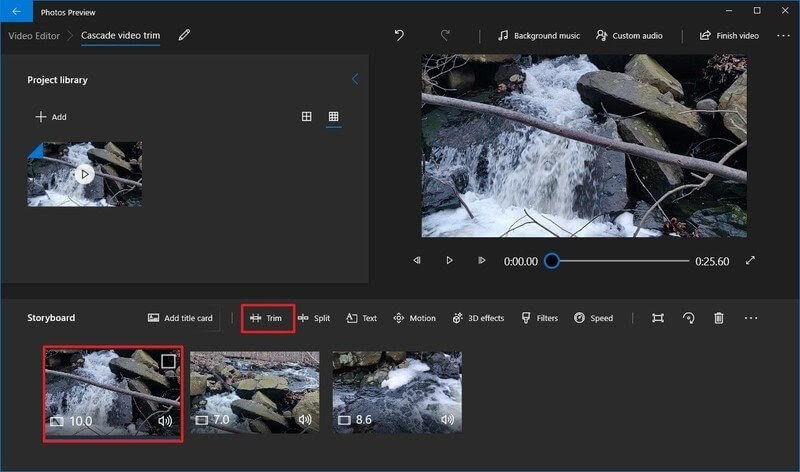
- Using the Blue pin, scrub the section of the video to trim. Only move the pins inwards as outwards movement can modify the previous split settings of the video.
- Repeat the steps to trim all the remaining clips.
- You can use the Play button to preview your trimming work.
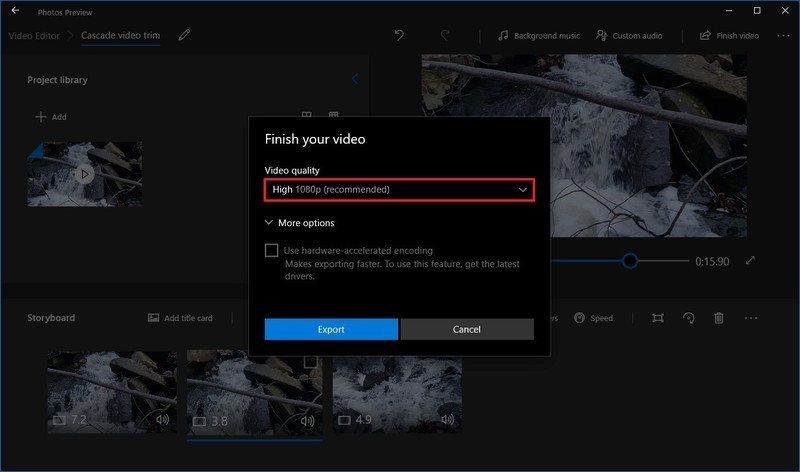
- Once you are satisfied with the video, click on the Finish video button from the top-right corner.
- To check video quality, use the Video quality option from the drop-down menu and fix it to High 1080p (recommended).
- Check the Use hardware-accelerated encoding option under the Move Options section.
- Finally, click on the Export button and select the destination folder and export your trimmed video clip there. And, you can anytime access the video from the Photos app by your given project name.
How to Trim a Video in Windows 10 Using Third-party Tools
If you don’t want to trim a video in Windows 10 using the Photos app, you can download any third-party video editor. Go to Microsoft App Store, and there you will find a plethora of amazing video trimming tools. You can download any tool as per your requirements and start trimming your masterpiece.
Every tool has different steps and features to trim videos in Windows 10. So, you have to explore that out before trimming your videos. Since Adobe has a large legacy of photo and video editing tools, we will give a small demo on how to trim a video in Windows 10 using Adobe Premiere Pro.
- Launch the Premiere Pro on your computer.
- Click on the New Project in the Start screen. You can also select File > New > Project from the main menu.
- Give a name to your project, click Browse to select the save destination, and click on the OK.
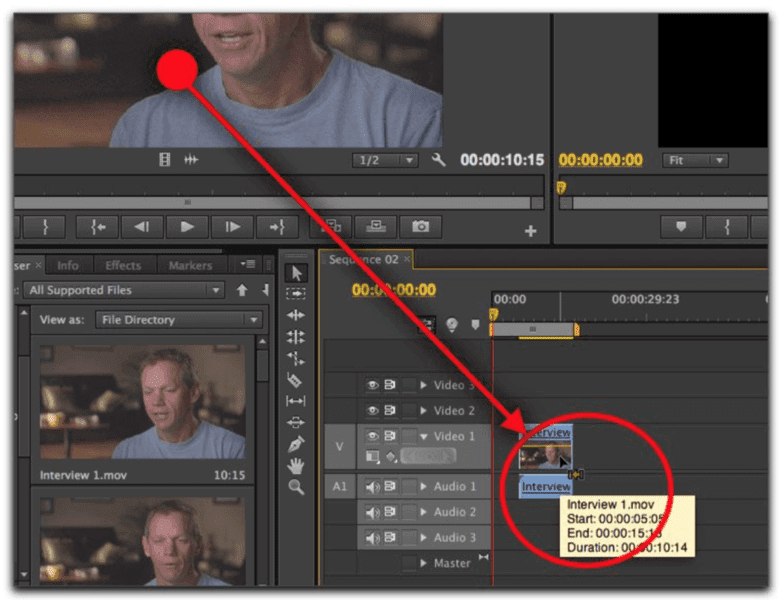
- Now, add your video clip to the project. To do so, go to Select File > Import from Media Browser or drag and drop files from the Media Browser to the Project panel.
- You have two options to trim a video clip — Ripple edit and Rolling edit. Ripple edit lets you shorten the whole video. When you want to shorten a clip while extending the next one, you should use the Rolling edit option.
- Interestingly, Premiere Pro allows you to lock tracks you don’t want to change, so you won’t cut the best part of your video.
If Adobe Premiere Pro isn’t something you want, you can also get other editing tools for Windows 10 like VSDC, Avidemux, Bandicut, and more.
Parting Thoughts
After reading different ways to trim videos in Windows 10, you must have gotten a fair idea about how to trim videos in Windows 10. Also, you have realized how easy and simple it is to trim videos without any technical jargon.
Whether you want to edit your homemade videos or professional clips for your clients, you can easily do it in Windows 10. So, pick your preferred way to trim videos in Windows 10 and get started.
And, don’t forget to follow the TC for more interesting guides and hacks.
Author Bio:
Dinesh Lakhwani 

Dinesh Lakhwani, the entrepreneurial brain behind “TechCommuters,” achieved big things in the tech world. He started the company to make smart and user-friendly tech solutions. Thanks to his sharp thinking, focus on quality and the motto of never giving up, TechCommuters became a top player in the industry. His commitment to excellence has propelled the company to a leading position in the industry.
Popular Post
Recent Post

CCleaner Duplicate File Finder: Key Features, Pricing, Step-by-Step Guide and More
Every computer collects junk over time. Right? Well, yes! Photos often get copied twice. Documents get saved in two folders by mistake. Old downloads pile up and never get deleted. This slowly eats up your storage space, and most people do not even notice until their drive is almost full. That is where a duplicate […]

Duplicate File Finder Pro: A Complete Review, Everything You Should Know
Computers collect thousands of files over time. Well, yes! Many of them end up being duplicates created by backups, downloads, or accidental copies. These extra files take up valuable storage space and make it harder to keep everything organized. Finding and removing them manually can take hours. Right? Duplicate File Finder Pro is a tool […]

Monitor Screen Calibration Guide: Everything You Should Know
Your monitor shows colors every single day. But are those colors actually correct? Most people never stop to check this. They just use the screen as it comes out of the box. This habit can lead to wrong colors in photos, videos, and work files. Colors may look too warm or too cold without you […]

How To Check Installed RAM and RAM Slots [Complete Guide]
RAM plays an important role in how smoothly a computer runs. Short for Random Access Memory, it stores the data and instructions that Windows and active applications need at any given moment. From opening multiple browser tabs to running games and productivity software, RAM helps keep everything responsive. A system with limited memory may experience […]

What is Microsoft Autopilot Everything You Need To Know
Technology has changed the way companies manage computers. Well, yes! Employees now work from offices, homes, and remote locations. Setting up devices manually for every worker takes time and effort. It can also create mistakes that slow down productivity. This is where Microsoft Autopilot becomes useful. It helps businesses prepare and deploy Windows devices with […]

Enable Automatic Device Locking Feature Windows: Complete Guide
Introduction: Your computer stores important information such as emails, documents, passwords, and personal photos. Leaving it unlocked can put that data at risk. Thankfully, Windows includes built-in features that can automatically lock your device when you are away. Setting up automatic device locking is quick and does not require any extra software. In this guide, […]

How to Update Wireless Network Driver in Windows 11 and 10
Your Wi-Fi keeps dropping. Pages load slowly. The connection feels unstable? Well, you are not alone. Most of the time, the problem is not with your internet plan. It is with your wireless network driver. A driver is a small piece of software that helps your computer talk to its hardware. When it gets outdated, […]

Common Windows 11 Problems and Solutions (2026 Version)
Windows 11 has become more polished over the years, but it is still not completely free from problems. Even after regular updates from Microsoft, many users continue to face issues like lagging performance, failed updates, audio troubles, random crashes, and network errors. Some problems appear after installing new features, while others develop gradually as the […]

Fortect Driver Updater Review: Features, Steps, Pros, and Cons.
A new PC usually feels quick and responsive. Applications open instantly, games run smoothly, and everything works as expected. As time passes, however, you may notice slower performance, system crashes, hardware glitches, or devices that stop working properly. While many people assume malware or low storage space is to blame, outdated drivers are often the […]

