How to Set Up Dual Monitors on a Mac?
Last updated on October 16th, 2025 at 3:38 pm
While using a computer system, some users notice a limitation with the amount of display they can rely on. For example, if you are creating and editing a live stream video simultaneously, only depending on multiple windows or tabs is not enough. In fact, switching continuously between the files constantly can get tiring, lead to wrong data input if you read the wrong information, etc.
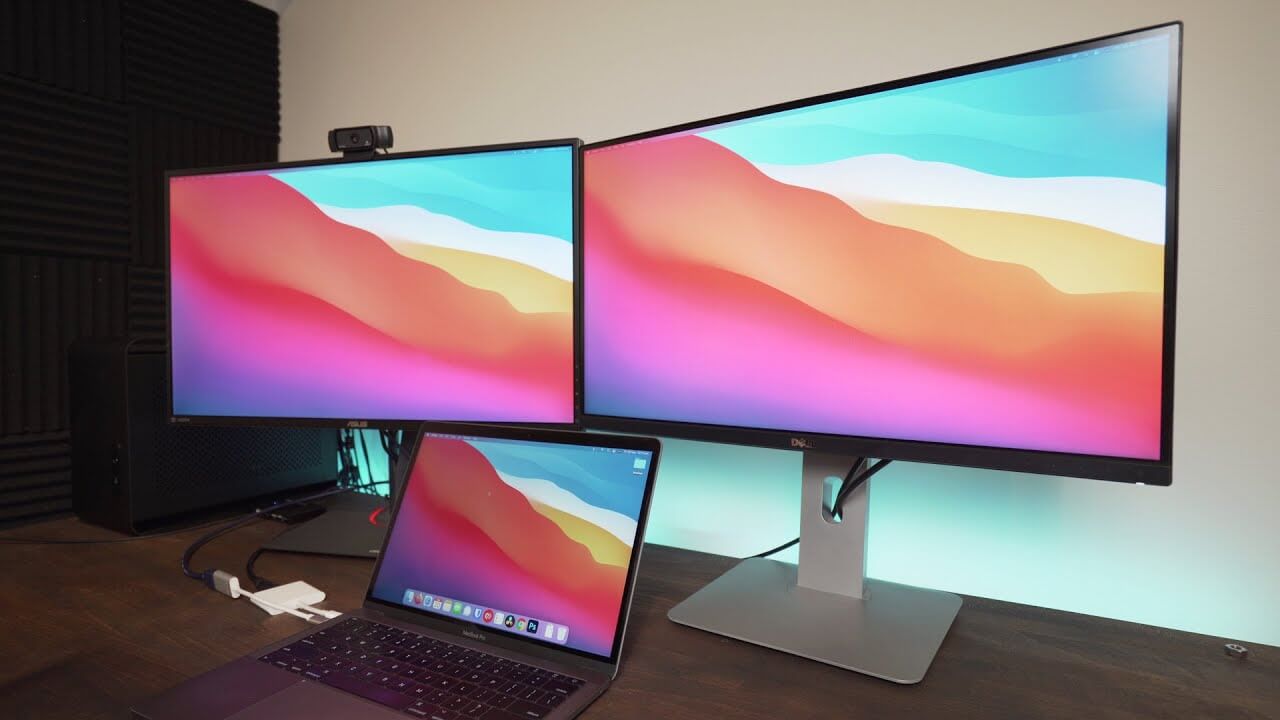
In this situation, it is better to set up dual monitors on the Mac that you currently use. Then, you can view the secondary information on the second display, handling your tasks more productively. Let’s learn the ways to make the connection here.
How to select the right technological products for a dual monitor setup?
Mac computer models do allow connectivity with one external display or multiple ones. However, for the best performance, you must closely consider the monitor options available to choose the one compatible with your existing Mac system.
Here are the main points to consider:
- Size– Typically, the display sizes of dual monitors on Mac can extend to 32 inches in size, which is useful for professionals with ultra-wide support. On the other hand, users with smaller desk spaces or who mostly focus on gaming can make do with 24-inch displays. On that note, 27 inches is the average option.
- Display Resolution– The monitors with higher resolutions like 1920 x 1080 pixels, have higher-quality image and video visuals. However, if your system supports 4K/5K level resolution, you must invest in a higher-powered
- Display/panel type– Options include LCD paneling with TN, IPS, and VA tech support ,which assures a high-performance OLED Display for Mac.
- Pixel density- This involves the PPI calculation, which accounts for the amount of the closeness of the display pixels. Image quality is high if you see a higher pixel density.
- Color accuracy– Check the color profiles compatible with the monitor options. For users with creative work needs, like video editing, a higher capacity of color accuracy is necessary for monitors.
- Refresh rate- While choosing the best option for a MacBook Pro dual monitor setup, check that it has at least a 60 Hz refresh rate. This is suitable for basic-level web browsing and office work. On the other hand, gamers with high graphics-related requirements can use monitors with a 144 Hz refresh rate.
- Additional features– Check what additional benefits to expect from the monitor option. For example, check for advanced feature support, like portrait mode, VESA mounting support, or curved monitor.
Moreover, choosing compatible dongles and adapters for the best quality MacBook Pro dual monitor setup would be best.
- DisplayPort- This is a standard type of connection for display monitors that support audio and video. To note, gamers can use this due to the higher refresh rates supported, strong bandwidth connection, and more FPS.
- HDMI– The HDMI 1.4 version can support 4K or lower resolution at 30 FPS. Following that, the HDMI 2.0 can support 4K video resolution at 60 FPS.
- Thunderbolt- This is an active connection from Apple and Intel for high-speed connection support, USB-based power delivery for charging devices, etc.
Best Methods to Set Up Dual Monitors on Mac
Different methods are available for the MacBook Pro dual monitor setup process, depending on the model you are using. Here are the detailed steps for each version.
Solution 1: Connecting Dual Monitors Wirelessly
It is possible to sync the macOS computer system you are using wirelessly. But this is only available as an accepted feature on certain Mac versions, namely the new macOS 13 (Ventura). Here, users can utilize the wireless connection to support another Mac laptop and some compatible Smart TV types.
The process of handling this MacBook Pro dual monitor setup is not highly complex for users. To note, it is compatible with different Apple products like Apple TV and iPads.
How to proceed?
Step 1: Access the Apple Menu on the main screen of your Mac device.
Step 2: Then tap on the System Settings option.
Step 3: Choose to open the Displays window.
Step 4:Hit the plus (+) icon beside the display monitor name to open the drop-down menu.
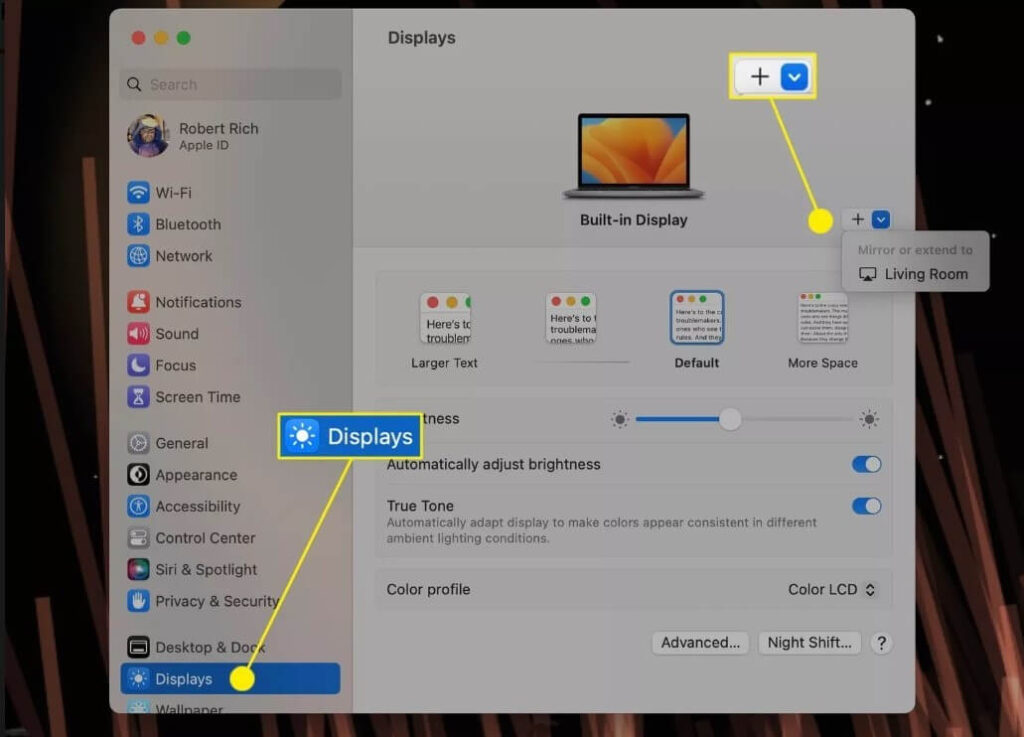
Step 5: Select the Apple device you will use as one of the dual monitors on Mac from the list.
Solution 2: Use adapters and cables to connect the secondary monitors to the Mac
You can activate the connection of two or more monitors suitable for macOS technology with wired devices for an easy process. However, before that, check that the adapter/cable type is suitable for enabling the dual monitor system in your device type.
For example, Mac Mini operating with Apple M1 chipset allows connection with one Thunderbolt/USB 4 monitor only per session. So, if you need to set up another monitor with this Mac computer, you must connect it to the HDMI port in Mac Mini.
Moreover, MacBook Pro and MacBook Air models that run with the M1 chipset can connect with only one external display. Then, you can view the display content on both screens simultaneously. Other models like Mac devices with HDMI/ Thunderbolt 4 (USB-C) ports can allow up to four external monitors to sync with Mac.
How to Proceed?
Step 1: Study your options and get your Mac device’s compatible cable, adapter, and external monitor type. Then, attach the cables to connect the monitor to Mac.
For desktop Mac system users, one has to link both dual monitors to the system.
Step 2: Properly position the devices as needed and switch the Mac device to the ON state. The system will automatically start detecting the connected monitor and activate it. However, some users need to change the default settings here in specific cases. For example, enable the monitor connection manually if the automated process fails to work.
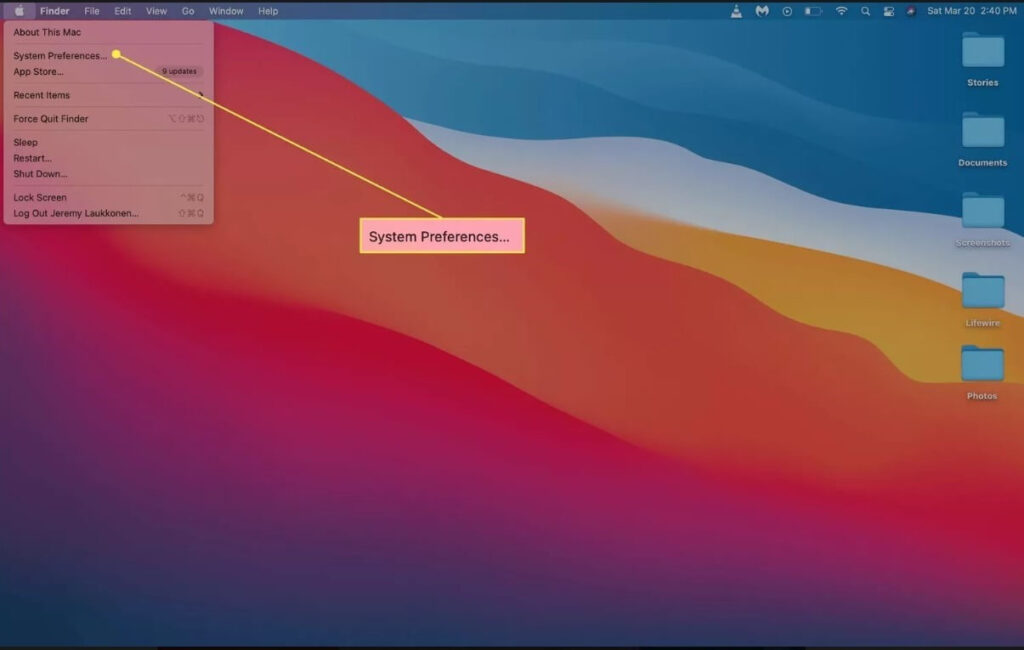
Step 3: Then, tap on the Apple menu on the top taskbar from your homepage and tap on the System Preferences option from the drop-down menu.
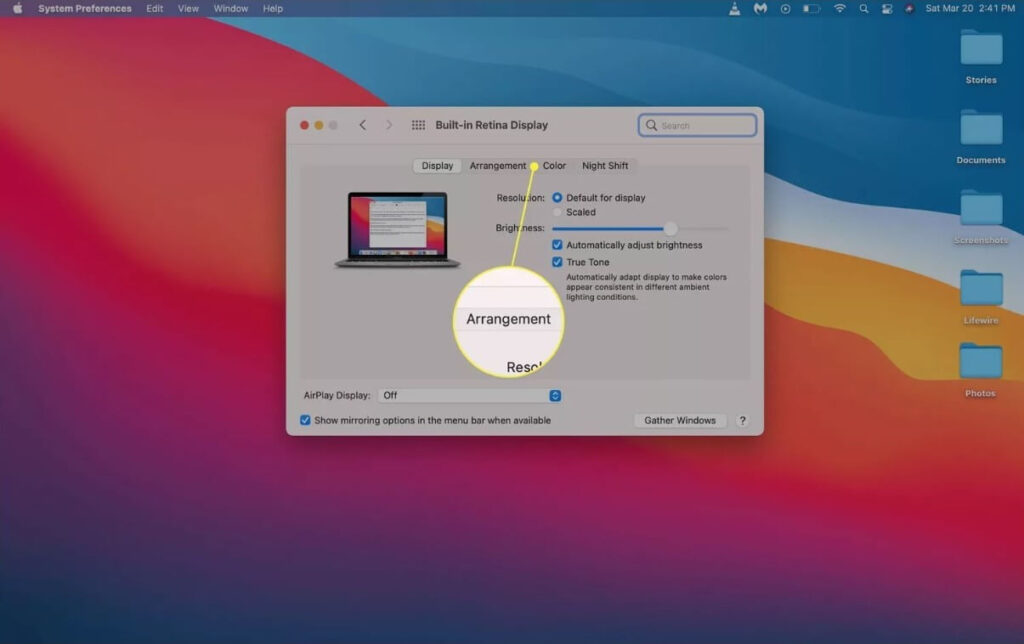
Step 4: In the next pop-up window, tap on the Displays option.
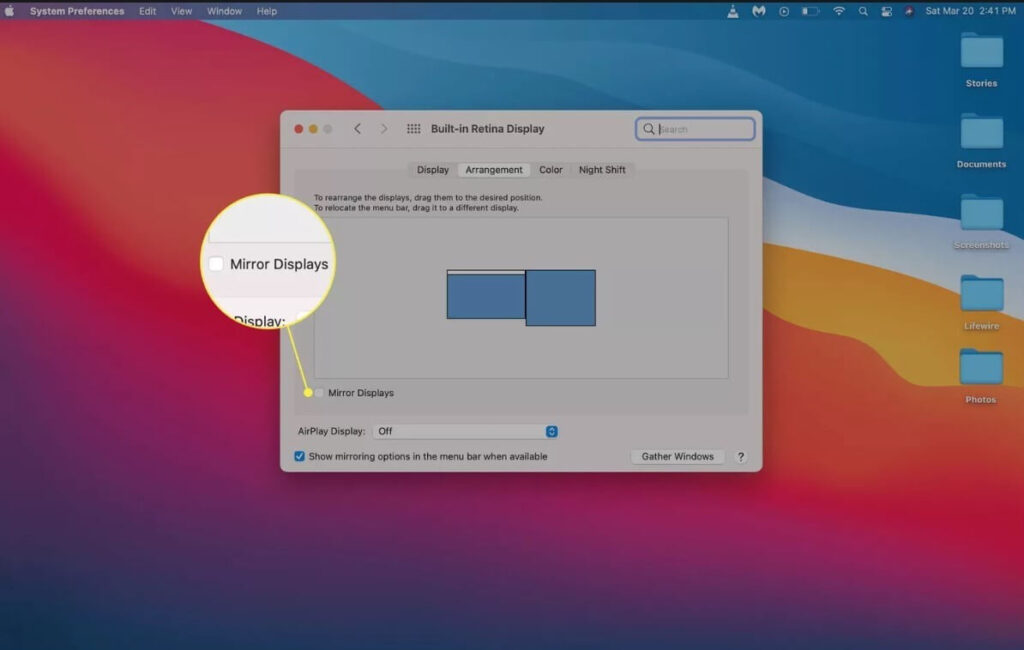
Step 5: Access the main display configurations and choose the Arrangement option.
Step 6: If the box for Mirror Displays shows the checkmark, the same image view will appear on both connected monitors. Instead, uncheck the box beside the Mirror Displays option.
Step 7: Next, you can view a visible diagram for the display positioning arrangement. In case the positioning is not well managed, find the icon for the secondary monitor.
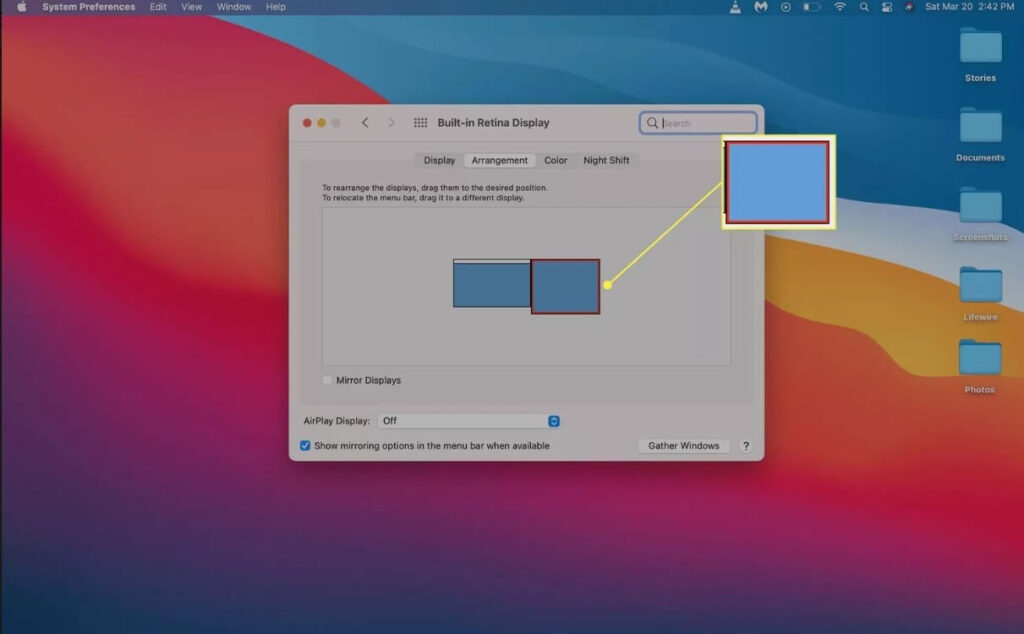
Step 8: Hold and drag the displayed secondary monitor icon to the right position you want. Release your hold on the mouse to drop it in the place you prefer.
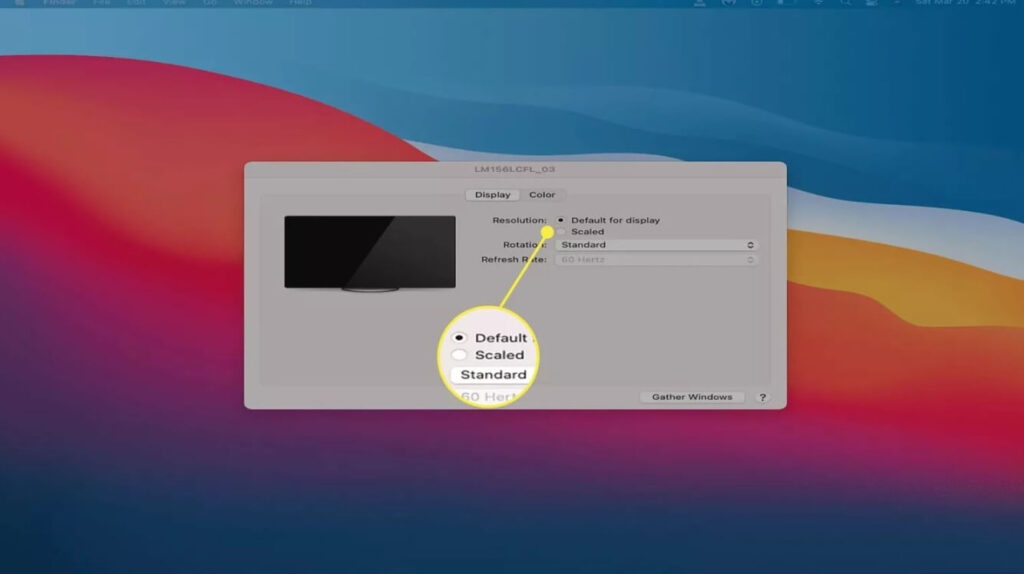
Step 9: Both the dual monitors on Mac are now active for consistent usage. However, further configurations on the secondary monitor are necessary in some cases to avoid it looking discolored or stretched out.
In case the image displayed on the second monitor is not well-placed, tap on the Scaled option.
Step 10: Next, choose the right screen resolution option, like the native preset resolution, for your Mac device to keep a consistent view. The same resolution or a lower version is suitable here.
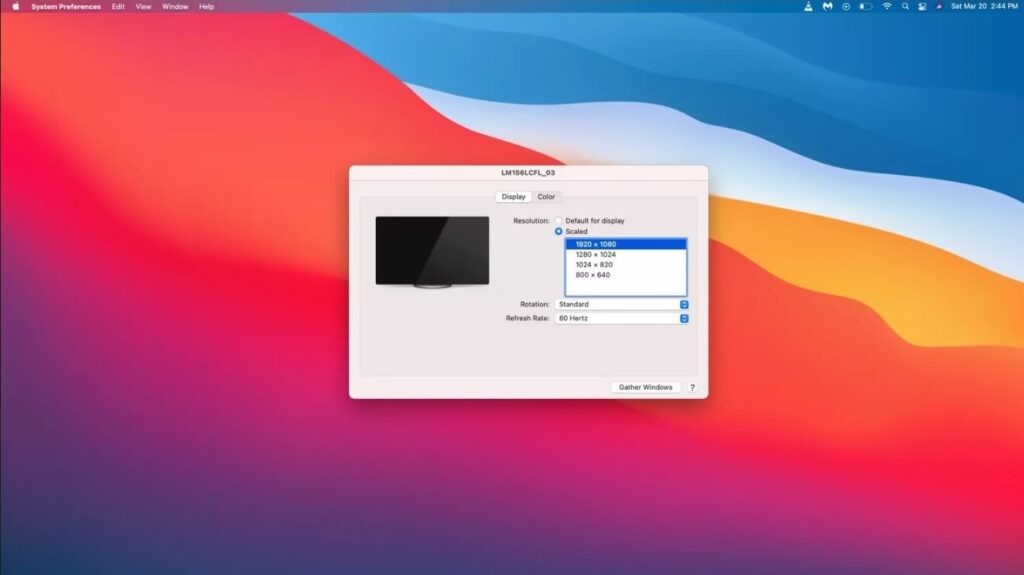
Step 11: Close the second monitor display settings if the second display appears normal. You can start working on the device next.
Conclusion
To summarise, more work demand is easier to manage if you have dual monitors on Mac to utilize for the tasks. Depending on your Mac device type (model and version specifications), you can use different methods like using cables to set up the second screen.
However, while connecting to the second monitor, you may see issues with performance overload when you perform complex tasks incompatible with the display. For this, you can use software like CCleaner.
With the app, you can check for system-based errors affecting the connection and optimize the speed, among others.
Author Bio:
Dinesh Lakhwani 

Dinesh Lakhwani, the entrepreneurial brain behind “TechCommuters,” achieved big things in the tech world. He started the company to make smart and user-friendly tech solutions. Thanks to his sharp thinking, focus on quality and the motto of never giving up, TechCommuters became a top player in the industry. His commitment to excellence has propelled the company to a leading position in the industry.
Popular Post


Recent Post

Resolving Microphone Detection Problems: Latest Guide [2026]
Microphones are important tools in daily life. People use them for office meetings, online classes, interviews, gaming, customer support, and content creation. When a system fails to detect a microphone, communication stops at once. This situation can cause stress and confusion. Many users believe the microphone is damaged. In reality, most problems are simple and […]
How To Switch To A Dark Background Theme In Windows [2026]
Most people spend many hours each day in front of a computer screen. Office work, online classes, editing, browsing, and streaming all require long screen time. A bright white background may look clean at first. However, over time, it can feel sharp and tiring. The strong contrast between white backgrounds and black text may cause […]

How to Switch From Local To Microsoft Account On Windows
Many users begin with a local account when they set up a new Windows computer. A local account works only on that single device. It stores settings, files, and preferences locally. It does not connect to online Microsoft services. For basic offline use, it works well. However, as digital needs grow, many users want better […]

How to Switch Windows 10 to a Local Account: Complete Guide
Windows 10 allows users to sign in with either a Microsoft account or a local account. When you set up a new computer, the system often suggests using a Microsoft account. This account connects your device to Microsoft services such as Outlook, OneDrive, and the Microsoft Store. It also syncs settings, themes, and passwords across […]

How To Change Default Apps For File Types In Windows
Windows is designed to make using your computer easy. One way it does this is by assigning default apps to different file types. This means when you open a file, Windows automatically opens it with a specific program. For example, photos may open with Photos, music with Groove Music, and PDFs with Edge. These default […]

How To Adjust The Mouse Pointer Speed: Complete Guide
Using a computer every day means you use the mouse a lot. The mouse pointer moves on the screen and helps you click, scroll, and select items. Many people never think about the speed of the mouse pointer. They have used the default setting for years. This can cause small problems over time. A slow […]

How to Change Mouse Scrolling Settings In Windows
A mouse is one of the most used computer tools. People use it every day. They scroll through emails. They scroll through documents. They scroll through websites and images. The movement becomes automatic. Most users do not notice it. That is why problems often go unnoticed. Scrolling problems show up slowly. At first, it feels […]

Keyboard Light Settings: Keyboard Lighting Control [Complete Guide]
Keyboards are no longer simple typing tools. Well, yes! Over time, they have evolved to include features that improve comfort, visibility, and overall experience. One of the most useful features today is keyboard lighting. It helps users work comfortably in low-light conditions. It also reduces strain when typing for long hours. Many users first notice […]

Customizing Pointer Appearance: Complete Guide
The way your mouse pointer looks on your computer may seem like a small detail. But customizing pointer appearance can make using your PC more comfortable and visually appealing. Many users do not realize that they can change the pointer size, color, and style to fit their needs. Whether you want a bigger pointer for […]

How To Choose a Computer Monitor: Monitor Buying Guide
Buying a monitor looks easy. Many people think all screens are the same. That belief causes regret later. A monitor is not just a display. It is a daily tool. You read on it. You work on it. You relax with it. Small problems become big over time. Poor brightness hurts eyes. Bad size causes […]

