How to Recover Permanently Deleted Files in Windows 10/8/7

Losing important files can feel like a disaster. Well, yes! Maybe you deleted something by accident. Maybe you emptied the Recycle Bin a little too quickly. Suddenly, that crucial document or cherished photo seems lost forever.
But take a deep breath. Windows 10 (and even 8 or 7) offers powerful ways to recover permanently deleted files.
You might be just a few steps away from getting everything back.
Is it Possible to Recover Permanently Deleted Files in Windows 10?
Yes, you can retrieve lost files in Windows 10 after permanent deletion. When you delete a file, Windows doesn’t erase it immediately. It removes the pointer to that file. The data is still on your hard drive. Just harder to find. It’s like removing a book from the library list, but the book is still on the shelf.
The success rate depends on timing. Stop using your computer right away. Every action you take might overwrite your deleted files. Installing new programs or saving files reduces your chances.
The sooner you act to get back permanently deleted files Windows 10 offers solutions for, the better your odds. Quick action is your best friend here.
How to Recover Permanently Deleted Files in Windows 10/8/7
Several methods exist to restore your lost data. Some use built-in Windows features. Others require third-party software. We’ll cover six proven methods. Each one works in different situations. Try them in order for the best results.
Method 1: Restore from the Recycle Bin
The Recycle Bin is your first stop. It holds recently deleted files. Many users forget to check here first. This method works when you delete files normally. Press the Delete key, and files go here.
They stay until you empty the bin. It’s the simplest recovery method available. You don’t need any special software. Check here before trying complex solutions.
How it helps:
- Quick and easy to use
- No software installation needed
- Works for files deleted normally
Step 1. Open the Recycle Bin icon on your desktop. Double-click to see all deleted files inside.
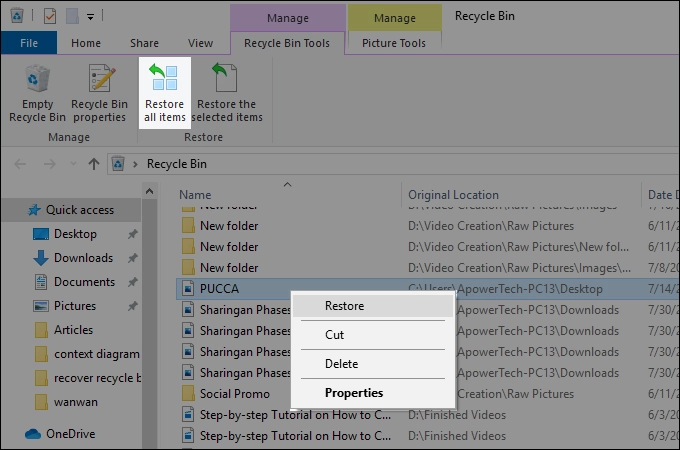
Step 2. Find your file. Right-click on it. Select “Restore” to return it to its original location.
Method 2: Use File History
File History backs up your files automatically. Windows must have this feature enabled beforehand. It creates copies of your documents, photos, and videos. This tool runs in the background. It saves versions of your files regularly.
You need to turn it on before losing files. Check your settings to see if it’s active. File History saves copies every hour by default. It keeps older versions for months. This gives you multiple recovery options.
How it helps:
- Recovers older versions of files
- Works even after permanent deletion
- Built into Windows 10
Step 1. Open Settings and go to “Update & Security.” Click on “Backup” to check if File History was enabled.
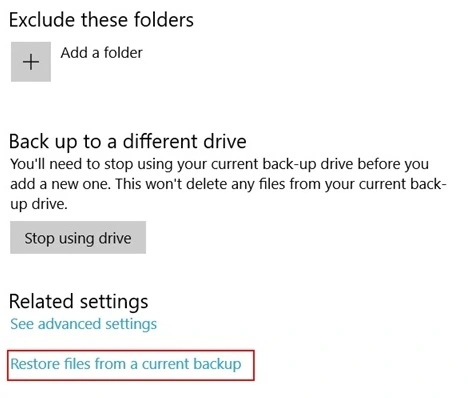
Step 2. Click “Restore files from a current backup.” Browse through dates. Select your file and click the green restore button.
Method 3: Restore Previous Versions
Windows creates restore points automatically. These snapshots include file versions. This method can restore deleted files that Windows 10 keeps in shadow copies. Your system saves these versions during updates. It also creates them when you install programs.
This happens without your input. The feature must be enabled on your drive. Most Windows 10 systems have it on by default. You can recover files from days or weeks ago. The success depends on how many restore points exist.
How it helps:
- Uses Windows restore points
- No extra software required
- Can recover entire folders
Step 1. Navigate to the folder that contains your deleted file. Right-click on the folder. Choose “Restore previous versions” from the menu.
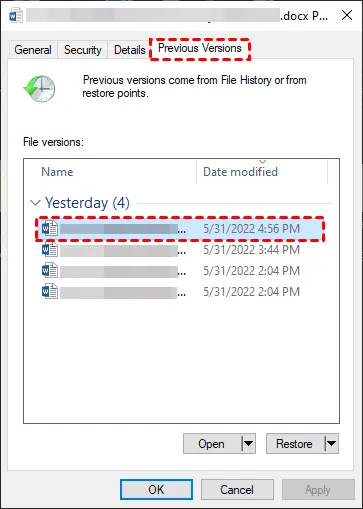
Step 2. Choose a version from before the file was deleted, then click “Restore” to get back the lost files saved in that Windows 10 snapshot.
Method 4: Use Windows File Recovery Tool
Microsoft offers a free command-line tool. It works for Windows 10 version 2004 and later. This tool can recover permanently deleted files Windows 10 systems have lost. The tool uses command prompts. Don’t worry if you’re not technical.
We’ll provide the exact commands — you just need to swap in your own details. The tool searches your drive for deleted files and is especially effective for recent ones. You can download it free from the Microsoft Store.
How it helps:
- Free Microsoft tool
- Recovers from hard drives and USB drives
- Effective for recent deletions
Step 1. Download the Windows File Recovery tool. Install and open the application on your computer.
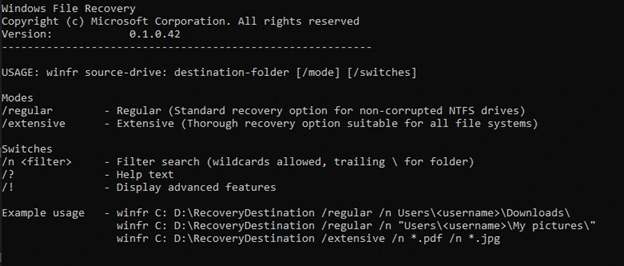
Step 2. Run the command: winfr C: D: /n \Users\username\Documents\filename.docx. Replace drive letters and file paths with your specific details. Wait for the scan to complete.
Method 5: Check OneDrive or Cloud Backup
Cloud services keep copies of your files. OneDrive integrates with Windows 10. Check your cloud storage before trying complex methods. Your files sync automatically if OneDrive is enabled. The cloud keeps deleted files for 30 days.
Even if you delete them from your computer, they remain online. This gives you extra time to recover them. Other cloud services work similarly. Google Drive and Dropbox also store deleted files. Check all your cloud accounts for missing files.
How it helps:
- Files sync automatically
- Access from any device
- Keeps previous versions
Step 1. Open OneDrive on your computer or through a web browser. Sign in with your Microsoft account credentials.
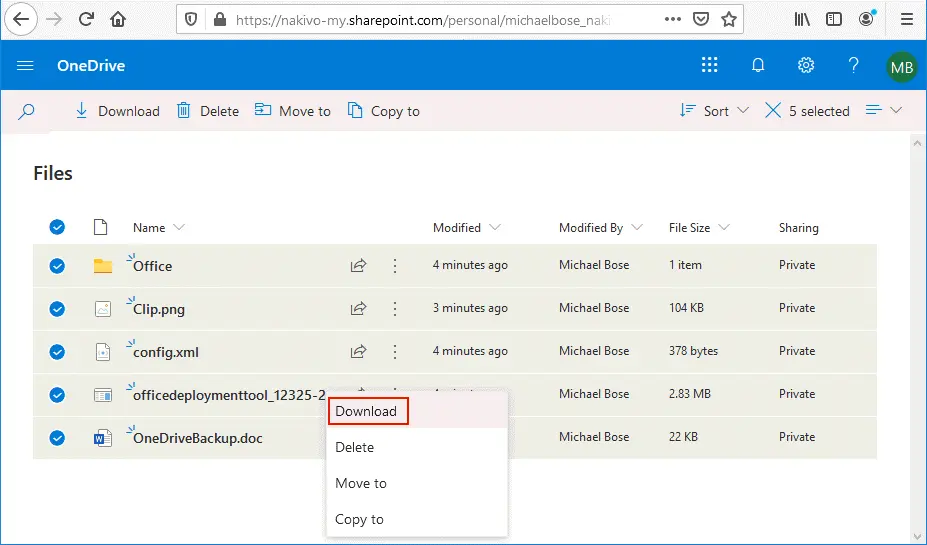
Step 2. Check the Recycle Bin in OneDrive. Items stay here for 30 days. Select your file and click “Download” to get back permanently deleted files that Windows 10 synchronized earlier.
Method 6: Use Data Recovery Software
Professional recovery software offers the highest success rate. These programs scan your drive thoroughly. They find files that Windows tools might miss.
Many options exist in the market. Some are free with limitations. Paid versions provide deeper scans. Choose reputable software with good reviews. Read user experiences before downloading.
How it helps:
- Deep scan capabilities
- User-friendly interface
- Recovers various file types
Step 1. Download reputable data recovery software like Piriform Recuva. Install it on a different drive than the one you’re recovering from. Launch the program.
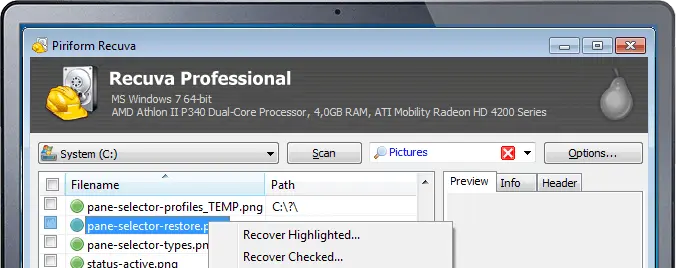
Step 2. Select the drive where your files were located. Choose “Deep Scan” for better results. Preview recoverable files. Select the ones you need. Save them to a different drive to restore deleted files that Windows 10 couldn’t recover otherwise.
Tips to Get Back Permanently Deleted Files in Windows 10
Preventing data loss is easier than recovery. Follow these tips to protect your files. They’ll increase your chances of successful recovery, too.
Key tips to remember:
- Stop using your computer immediately after realizing files are deleted.
- Don’t install recovery software on the same drive you’re recovering from
- Enable File History before disasters strike. File History is a built-in Windows feature that automatically backs up versions of your files.
- Set up automatic cloud backups regularly. Cloud services like OneDrive, Google Drive, or Dropbox offer secure, off-site storage for your important files.
- Create system restore points weekly. System Restore lets you roll back your computer’s settings and system files to a previous state.
- Keep important files in multiple locations. Store copies on your computer, an external drive, and a cloud service to ensure redundancy.
- Use external hard drives for backup copies. External drives offer fast, high-capacity backup options that are physically separate from your main system.
- Act quickly when you discover missing files. The sooner you respond, the higher the chance of successful recovery.
Author’s TIP
We’ve recovered countless files over the years. One lesson stands out above all. Prevention beats recovery every time. Set up automatic backups today. Don’t wait until disaster strikes.
Your most valuable tip is the 3-2-1 rule. Keep three copies of important files. Store them on two different media types. Keep one copy offsite or in the cloud. This simple rule has saved me from countless close calls.
Remember that time is critical. The moment you realize files are gone, stop everything. Don’t download files. Don’t install programs. Don’t browse the internet. Each action reduces your recovery chances. Start the recovery process immediately to retrieve lost files that Windows 10 still holds.
Conclusion
You now know how to recover permanently deleted files Windows 10 offers multiple ways to handle. The process isn’t as scary as it seems. Start with simple methods first. Check the Recycle Bin and File History. Move to advanced tools if needed.
Success depends on quick action. Stop using your computer right away. Choose the right recovery method. Follow the steps carefully. Most files can be recovered if you act fast enough.
Don’t let this happen again. Set up backups now. Enable File History. Use cloud storage. Create regular restore points. These simple steps ensure you can always get back permanently deleted files that Windows 10 might lose. Your future self will thank you.
FAQs
Q1: Can I recover files deleted a long time ago?
Recovery chances decrease over time. When you delete files, Windows marks that space as available. New data gradually overwrites old files. If weeks or months pass, recovery becomes difficult. However, if you rarely use that drive, older files might still exist. Try deep scan recovery software. It searches more thoroughly. Success isn’t guaranteed, but it’s worth trying. Stop using the drive immediately to prevent further overwriting.
Q2: Do free recovery tools work as well as paid ones?
Free tools work for basic recovery needs. They have limitations, though. Most free versions limit file size or number of recoveries. Paid software offers deep scanning. They recover more file types. They provide better success rates. For important files, paid tools are worth it. For simple deletions, free tools might suffice. Windows File Recovery is free and works well for recent deletions.
Q3: Why can’t I find my deleted files in the Recycle Bin?
Several reasons explain the missing Recycle Bin files. You might have used Shift+Delete. This bypasses the Recycle Bin entirely. The Recycle Bin might be full. Old files get deleted automatically. You might have emptied it already. Files deleted from external drives don’t go to the Recycle Bin. Network drives also skip the Recycle Bin. In these cases, use other recovery methods like File History or recovery software.
Author Bio:
Dinesh Lakhwani 

Dinesh Lakhwani, the entrepreneurial brain behind “TechCommuters,” achieved big things in the tech world. He started the company to make smart and user-friendly tech solutions. Thanks to his sharp thinking, focus on quality and the motto of never giving up, TechCommuters became a top player in the industry. His commitment to excellence has propelled the company to a leading position in the industry.
Popular Post


Recent Post

How To Switch To A Dark Background Theme In Windows [2026]
Most people spend many hours each day in front of a computer screen. Office work, online classes, editing, browsing, and streaming all require long screen time. A bright white background may look clean at first. However, over time, it can feel sharp and tiring. The strong contrast between white backgrounds and black text may cause […]

How to Switch From Local To Microsoft Account On Windows
Many users begin with a local account when they set up a new Windows computer. A local account works only on that single device. It stores settings, files, and preferences locally. It does not connect to online Microsoft services. For basic offline use, it works well. However, as digital needs grow, many users want better […]

How to Switch Windows 10 to a Local Account: Complete Guide
Windows 10 allows users to sign in with either a Microsoft account or a local account. When you set up a new computer, the system often suggests using a Microsoft account. This account connects your device to Microsoft services such as Outlook, OneDrive, and the Microsoft Store. It also syncs settings, themes, and passwords across […]

How To Change Default Apps For File Types In Windows
Windows is designed to make using your computer easy. One way it does this is by assigning default apps to different file types. This means when you open a file, Windows automatically opens it with a specific program. For example, photos may open with Photos, music with Groove Music, and PDFs with Edge. These default […]

How To Adjust The Mouse Pointer Speed: Complete Guide
Using a computer every day means you use the mouse a lot. The mouse pointer moves on the screen and helps you click, scroll, and select items. Many people never think about the speed of the mouse pointer. They have used the default setting for years. This can cause small problems over time. A slow […]

How to Change Mouse Scrolling Settings In Windows
A mouse is one of the most used computer tools. People use it every day. They scroll through emails. They scroll through documents. They scroll through websites and images. The movement becomes automatic. Most users do not notice it. That is why problems often go unnoticed. Scrolling problems show up slowly. At first, it feels […]

Keyboard Light Settings: Keyboard Lighting Control [Complete Guide]
Keyboards are no longer simple typing tools. Well, yes! Over time, they have evolved to include features that improve comfort, visibility, and overall experience. One of the most useful features today is keyboard lighting. It helps users work comfortably in low-light conditions. It also reduces strain when typing for long hours. Many users first notice […]

Customizing Pointer Appearance: Complete Guide
The way your mouse pointer looks on your computer may seem like a small detail. But customizing pointer appearance can make using your PC more comfortable and visually appealing. Many users do not realize that they can change the pointer size, color, and style to fit their needs. Whether you want a bigger pointer for […]

How To Choose a Computer Monitor: Monitor Buying Guide
Buying a monitor looks easy. Many people think all screens are the same. That belief causes regret later. A monitor is not just a display. It is a daily tool. You read on it. You work on it. You relax with it. Small problems become big over time. Poor brightness hurts eyes. Bad size causes […]

How To Get Help With File Explorer in Windows 11 [Complete Guide]
File Explorer is one of the most important tools in Windows 11. It is used to open folders, view files, and manage stored data. Almost every action on a Windows computer depends on it in some way. When users open documents, save downloads, or organize photos, File Explorer is always involved. Because it is used […]

