












A slow PC rarely gives a warning. One day, it simply takes longer to start. Apps open late. The fan runs loud, even when the screen is almost empty. Most people blame old hardware. Often, that is not the real reason. The real reason is hiding in plain sight. Windows keeps many apps active in […]
How to Create System Image in Windows 10 [Updated]
Why Use Windows 10 System Image Tool?
Backup is the best plan to deal with hardware failure, software issues, malware that can damage the installation, and corrupt system files. It helps safeguard crucial and system files. Now that if you want to stay protected from these attacks, use Windows 10 built-in System Image Backup tool.
This tool helps keep a copy of everything stored on your device, including Windows 10 installation, settings, apps, files, etc.
How to create a System Image in Windows 10
- To get started, press Windows + R keys. This will bring up the Run window.
- Here type control panel and press Enter.
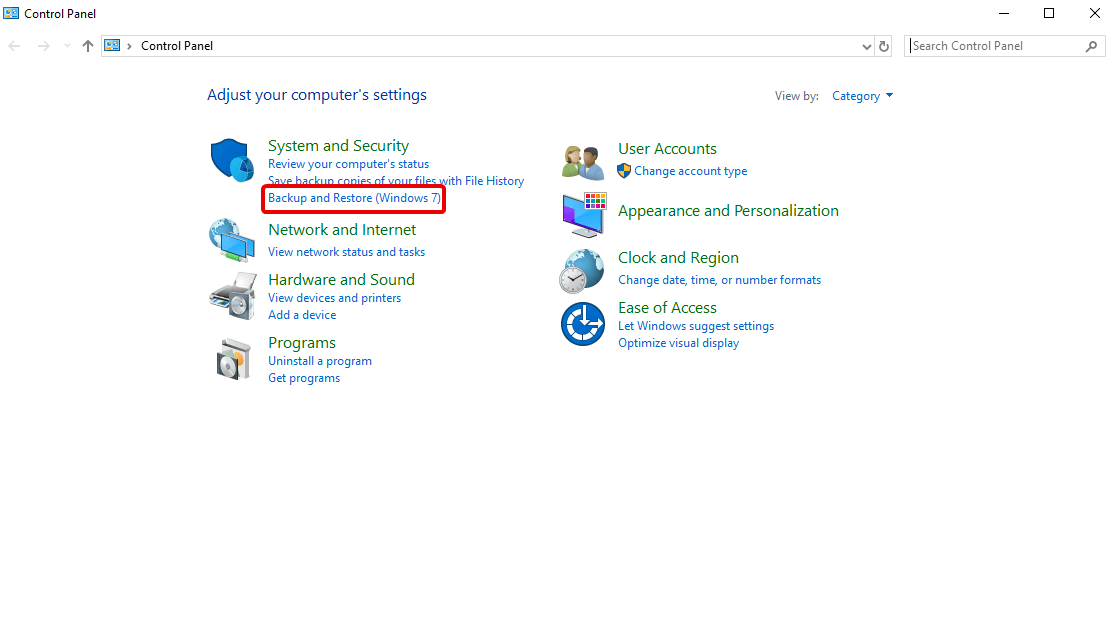
- Once you have Control Panel open, click Backup and Restore (Windows 7) under System and Security.

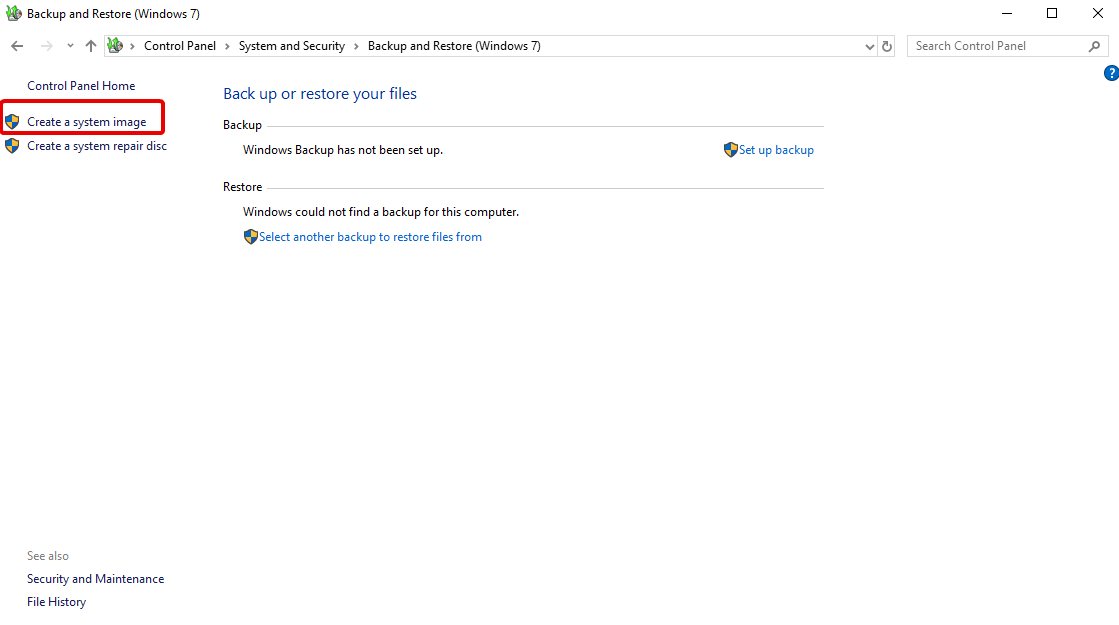
- In the new window the open click Create a system image from the left pane.

- Windows will now scan your system for backup devices and will offer different options to create system image. You can select any of the methods according to your choice.
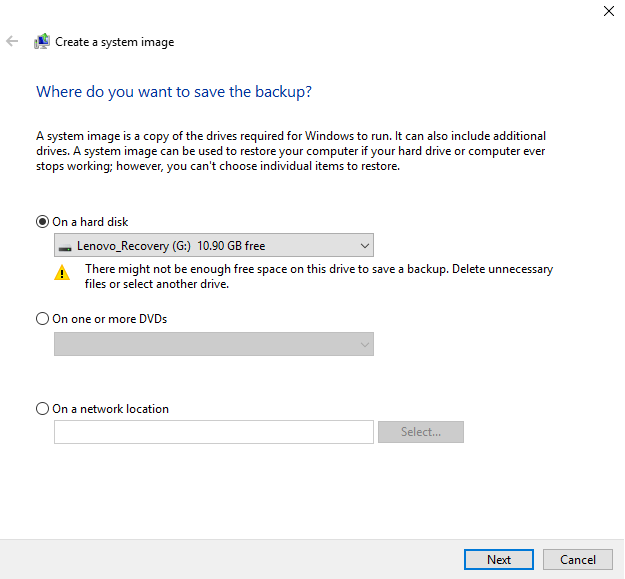

Note: If you plan to take backup on a network location remember it is for advanced users and require some expertise. However, if you are just like me and would like to use an external drive there’s nothing to worry.
- Since I am using an external drive, I made sure it is plugged it. After selecting it click Start Backup and wait for image to be created.
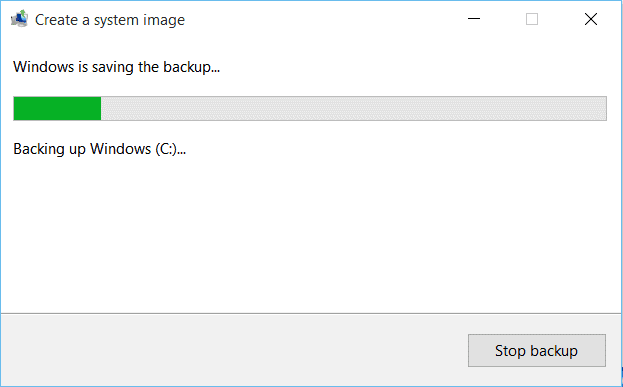
- While the backup is being saved you will see a progress screen. The amount of time it takes will depend on the amount of data and hardware.

- Once done, you’ll get the option to create USB recovery drive. (If you have not done it yet, do create one).
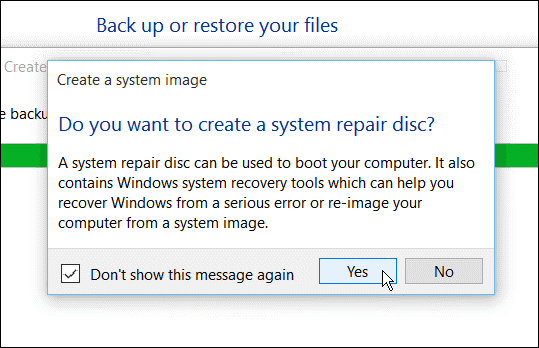

To check if the image you created was successful or not head to the drive or network location. Here look for a folder names WindowsImageBackup.
This is it, using these steps you can easily use Windows 10 built in option called System Image to create a complete replica of your installation along with partitions.
The only drawback of this tool is, it doesn’t support restoring to partition layouts that are smaller in size than the drive it’s replacing.
Through File History Settings
File History provides an alternative path to access Windows’ built-in backup tools. This method redirects you to the same backup wizard through a different interface.
- Open Settings by pressing Windows key + I. Navigate to the Update & Security section. Click on “Backup” from the left sidebar. Scroll down and click “Go to Backup and Restore (Windows 7)”
- Select “Create a system image” from the left panel. Choose your backup destination (external drive, DVDs, or network location). Select which drives to include in the backup. Review settings and click “Start backup”
Using Third-Party Software
Third-party backup solutions often provide more features and user-friendly interfaces than Windows’ built-in tools. These programs offer scheduling, compression, and cloud backup options.
- Download reputable backup software (Acronis True Image). Install the program following the setup wizard. Launch the application and create an account if required.
- Select “Backup” from the main menu. Choose your source drive (usually C: drive). Select destination drive or cloud storage location. Configure backup settings (compression, encryption, scheduling). Click “Start Backup” and monitor the progress
Essential Precautions While Creating System Image
Creating a system image requires careful planning and attention to detail. Following proper precautions ensures your backup process completes successfully. These safety measures protect both your original data and the backup itself.
- Check available storage space – Ensure your backup drive has at least 1.5 times the space of your system drive
- Close all running applications – Shut down unnecessary programs to prevent file conflicts during backup
- Connect external drives securely – Use USB 3.0 or higher connections for faster transfer speeds
- Disable antivirus temporarily – Turn off real-time scanning to avoid interference with the backup process
- Ensure stable power supply – Use a UPS or a laptop battery to prevent power interruptions during backup
- Verify drive health first – Run disk check on both source and destination drives before starting
- Create recovery media separately – Make Windows recovery USB before creating system image
- Test backup drive format – Format destination drive as NTFS for files larger than 4GB support
Expert Tips for System Image Creation
Professional administrators follow specific strategies to ensure reliable system backups. These advanced techniques improve backup success rates and recovery options. Implementing these tips saves time and prevents common backup failures.
Professional Best Practices
- Schedule regular automated backups – Set up weekly system image creation during off-peak hours
- Use an incremental backup strategy – Create a full image monthly, incremental backups weekly for efficiency
- Maintain multiple backup generations – Keep at least three different system images from different time periods
- Label backups with creation dates – Use clear naming conventions like “SystemImage_2024_MM_DD”
- Store backups in multiple locations – Keep one local copy and one offsite for disaster recovery
- Document installed software lists – Maintain a separate record of programs and license keys
- Test restore process regularly – Verify backup integrity by performing test restores quarterly
- Monitor backup logs carefully – Check Windows Event Viewer for backup errors and warnings
Conclusion
Creating system images in Windows 10 provides essential protection against data loss and system failures. The built-in backup tools offer reliable solutions for most users. Regular system imaging ensures quick recovery from hardware failures, malware attacks, or system corruption. Multiple backup methods give you flexibility in choosing the right approach for your needs.
System image backups serve as complete snapshots of your computer’s current state. They capture not just your files but also installed programs, settings, and system configurations. This comprehensive backup approach eliminates the need to reinstall everything from scratch. Recovery becomes a simple restoration process instead of hours of reconfiguration work.
Consistent backup practices protect years of accumulated data and customizations. Modern storage costs make maintaining multiple backup copies affordable and practical. Cloud storage options provide additional security through off-site backup storage. Following proper precautions and expert tips ensures your backup strategy remains reliable and effective. Taking time to create system images today saves countless hours during future emergencies.
Frequently Asked Questions
How long does creating a system image take?
The time required depends on several factors, including drive size, data amount, and connection speed. A typical 500GB system drive takes 2-4 hours to back up to an external USB 3.0 drive. Faster drives like SSDs reduce backup time significantly. Network backups to NAS devices may take longer due to bandwidth limitations. The initial backup always takes the longest, while subsequent incremental backups complete much faster. Plan for adequate time and avoid interrupting the process once started.
Can I use the computer while creating a system image?
Windows allows light computer use during system image creation, but heavy usage is not recommended. Running resource-intensive programs may slow the backup process considerably. File modifications during backup can cause inconsistencies in the final image. Background processes and automatic updates should be disabled before starting. Web browsing and document editing are generally safe during backup. For best results, start the backup before leaving your computer unattended overnight.
How much storage space do I need for a system image?
System images require storage space equal to or greater than your used disk space. A 1TB drive with 300GB of data needs at least 300GB of backup space. However, compression can reduce the final image size by 20-40 percent. Plan for 1.5 times your used space to accommodate future growth and multiple backup versions. External drives should use NTFS formatting to support large file sizes. Cloud storage options may have upload limitations that affect backup feasibility.
Author Bio:
Dinesh Lakhwani 

Dinesh Lakhwani, the entrepreneurial brain behind “TechCommuters,” achieved big things in the tech world. He started the company to make smart and user-friendly tech solutions. Thanks to his sharp thinking, focus on quality and the motto of never giving up, TechCommuters became a top player in the industry. His commitment to excellence has propelled the company to a leading position in the industry.
Popular Post
Recent Post
How to Activate Windows with a Product Key for Windows 11 & Windows 10
It always shows up at the worst time. You are halfway through a report, or about to join a video call. Then you spot it in the bottom right corner of the screen. Activate Windows. Go to Settings to activate Windows. Initially, an unactivated copy of Windows may seem like a minor inconvenience. Over time, […]

Is Easy Duplicate Finder Worth It? Honest Review
The photos folder looked normal at first glance. Then the storage warning popped up. One trip photo appeared four times. A tax PDF sat in three different folders. Two old setup files were still in Downloads, and each one was over 500 MB. Nobody plans this mess. Copies pile up slowly. A download runs twice. […]

Wise Duplicate Finder Review: Real Results from Wise Duplicate Finder
Read my honest Wise Duplicate Finder review. See features, pricing, pros and cons, and real PC test results. Find out if this free duplicate cleaner can free up your Windows storage.

How to Recover Deleted Files from Pen drive, USB Drive, SD Card
Introduction: On tech forums, you’ll often see posts like this: “I connected my pen drive to my laptop this morning, but the folder was empty. All my college project files had vanished. I don’t have a backup. Can someone help me?” Stories like this are very common. Pen drives, USB drives and SD cards are […]

How To Recover Files Deleted from the Recycle Bin [Windows 11]
Losing a file can happen in seconds. You clear your desktop, hit Delete, and empty the Recycle Bin. Then, just when you need that file again, it seems to have vanished. This guide will walk you through ways to restore files removed from the Recycle Bin. We will begin with simple fixes, then look at […]

Disk Drill Data Recovery Tool Explained: Full Review and Guide
It happens in a split second. You delete a folder by mistake. Your drive stops showing up. A photo album from your last trip just vanishes. And your stomach drops. Lost files feel personal. They are not just data. They are memories, work hours, and sometimes years of effort packed into a few gigabytes. When […]

Recover Deleted Files In Windows 11 With Software & Without
Introduction What is the first thing that goes through your mind the second an important file vanishes from a Windows 11 PC? For most people, it is a mix of panic and disbelief, followed by a frantic click through every folder that file could possibly be hiding in. It happens in a split second: one […]

EaseUS Data Recovery Wizard: Everything To Know
Data loss does not always come from a big disaster either. Most cases start small and boring. A drive gets formatted by mistake. A laptop freezes mid-save and restarts on its own. A memory card stops showing up after being pulled out too fast. None of these feel like emergencies at first, until you realize […]

Recuva Data Recovery Tool: Is it Actually Worth it?
When I first tried Recuva Data Recovery, I wanted to see if it could really bring back lost files. The tool is free, small in size, and promises quick recovery, which made me curious enough to test it on my own PC. The setup was fast, and the wizard guided me step by step. I […]

