











The photos folder looked normal at first glance. Then the storage warning popped up. One trip photo appeared four times. A tax PDF sat in three different folders. Two old setup files were still in Downloads, and each one was over 500 MB. Nobody plans this mess. Copies pile up slowly. A download runs twice. […]
How to Fix the “This pc can’t run Windows 11” Error
Introduction
This pc can’t run Windows 11 problem may result from two crucial security settings being disabled if you have attempted downloading Windows 11 or employing the Microsoft PC Health Check app after getting that warning. They are known as Secure Boot with TPM 2.0. These two options are now necessary for Windows 11-powered machines.
Despite this, you may still set up Windows 11 on your device. This article will provide you several ways to fix this pc can’t run Windows 11 and enable Windows 11 on your computer.
Several Kinds of This PC Cannot Run Windows 11
The error notice that reads ” this pc can’t run Windows 11″ frequently includes the cause of the malfunction. The following are some potential causes you could observe the problem with the interface:
- TPM 2.0 is necessary to operate Windows 11.
- A system disk of 64GB or more is required.
- Windows 11 does not support the CPU.
- Secure Boot must work on the computer.
- PC must be TPM 2.0 compatible.
- The Basic Hardware Parameters for Windows 11 Are Not Satisfied by Your PC
Knowing the cause will make it simple for you to fix the problem. Your machine needs to run UEFI using Secure Boot and have TPM 1.2 or 2.0 enabled for the latest version of Windows 11 to work with it.
If you downloaded Windows 10 using the conventional boot mode, Windows 11 would not recognize the necessary functionality since it needs a UEFI Secure Boot capable PC. Due to inadequate system demands, this can result in an error message and you then need to fix this pc can’t run windows 11.
What Components Do You Need to Install Windows 11?
Notably, the manufacturer’s Windows 11 system specifications are relatively inexpensive, and the majority of contemporary PCs ought to be able to run it right out of the box. There are some improvements from Windows 10, though.
The systems needed to set up and execute Windows 11 are as follows:
- 1GHz, 64-bit
- 4GB of RAM,
- 64 GB of space
- Firmware for the system – UEFI and Secure Boot compatible
- TPM 1.2/2.0: Trusted Platform Module.
Suppose you have a computer that meets the requirements for running Windows 11 but still receives this issue while installing the Personal Computer Health Checkup program. In that case, you may resolve it by adjusting your BIOS/UEFI configuration.
How Can You Fix the Windows 11 Cannot Run on This PC Error?
Configuring the Boot Option to UEFI and turning on Secure Boot can help you to resolve this issue. After that, make sure your machine has TPM 1.2/2.0 enabled. While the tab labels differ between manufacturers’ hardware, the manual must be universal.
Step 1: Set up Windows 10’s Secure Boot Accessible

To make Windows 10 compatible with Secure Boot, follow these procedures:
- Close every open window and store your work. Then turn off your computer.
- Press F2 to launch the BIOS setup after restarting your computer. For entering this pc can’t run Windows 11 bios, many laptop and personal computer manufacturers may utilize additional function keys like F12, F10, F8, or Esc.
- Using the keyboard shortcuts, choose the Boot option in the BIOS configuration tool. Look at the Boot Mode setting to highlight whether it is Legacy.
- Press Enter with the Boot Mode marked to change it.
- Pick UEFI from the list of alternatives. Select UEFI using the Up & Down button keys, then press Enter to choose.
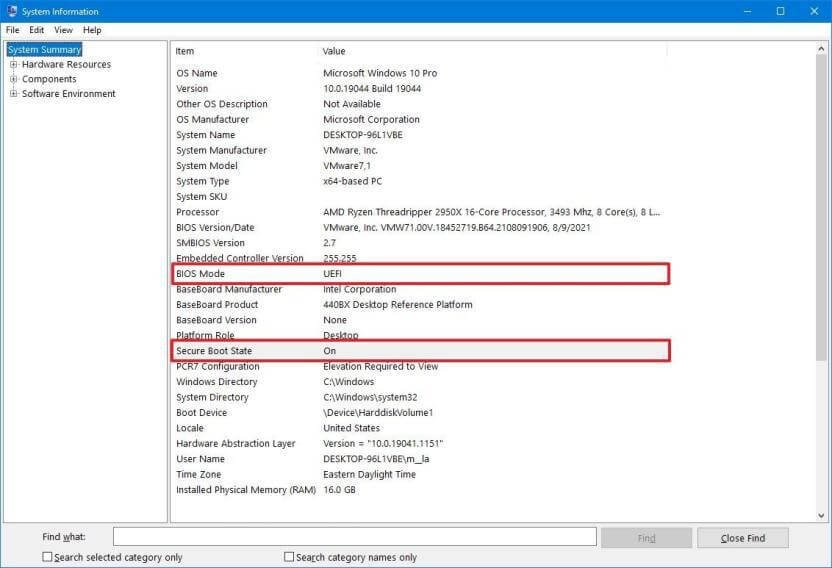
- Click the Security tab next.
- Choose the secure boot option with the arrow keys, then press Enter.
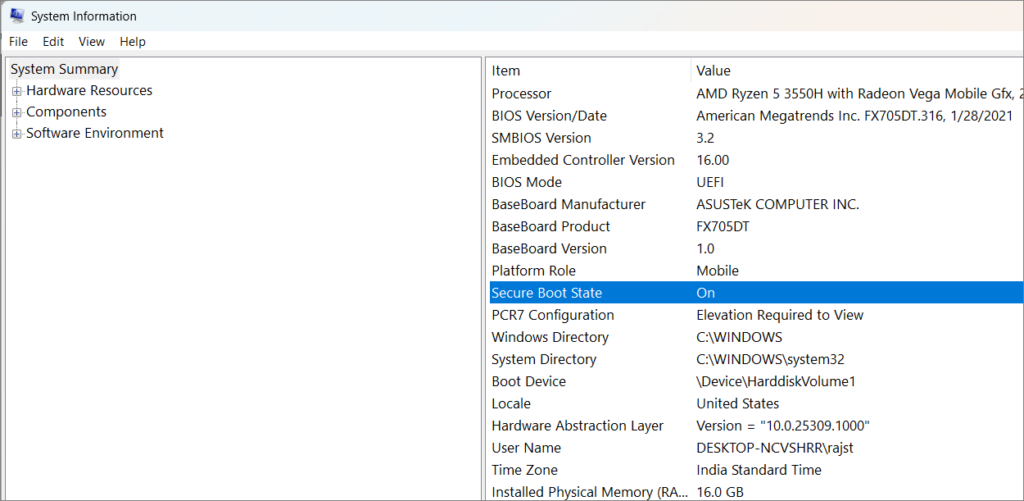
- To activate Secure Boot on the machine you are using, choose Enabled.
Ensure that TPM 1.2/2.0 has been turned on for your PC after you have encrypted Boot and UEFI activated in Boot Mode. Wait to shut the BIOS configuration panel.
Step 2: Turn on TMP 1.2 or 2.0 to resolve the “This PC Can not Install Windows 11 Error” issue.
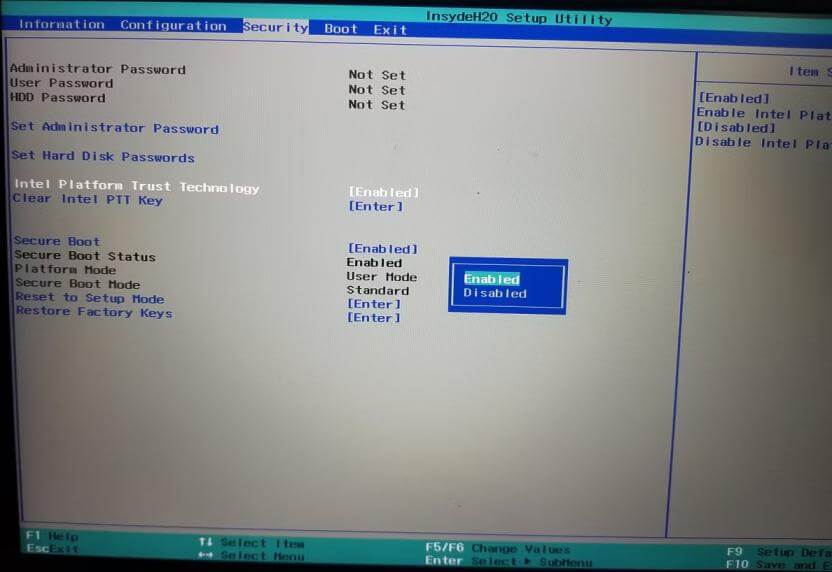
The BIOS configuration also provides access to the TMP 1.2/2.0 capability. Given below is the procedure:
- Activate the Security tab in BIOS/UEFI.
- Select the Trust Platform Technology choice by scrolling down and pressing Enter. You could notice an Intel System Trust Technology feature on Intel laptops in its place.
- Choose Enabled, then hit Enter to make your choice effective.
- Save your changes, then leave.
All done. On Windows 10, you have now successfully turned on TMP 2.0 and Secure Boot functionality. If the issue persists, restart your computer, use the PC Health Checkup utility, or install Windows 11.
Step 3: Avoid Secure Boot Requirements with TPM 2.0 Registry Editor use
You can get around the limitation by utilizing a workaround if your PC cannot use Secure Boot with TPM 2.0. We can accomplish this by changing the Windows registry entry, which will let you update without complying with Secure Boot with TPM 2.0 standards.
Note that for this solution to function, your system must support TPM 1.2 at the very least.
Please be aware that changing the Windows Registry is dangerous. Generate an operating system recovery point first, then complete the following step.
- Open Run by pressing Win + R.
- To launch Registry Editor, type regedit and press OK.
- Go to the following place in Registry Editor. For quicker navigation, you can copy and paste into the registry path:
Computer\HKEY_LOCAL_MACHINE\SYSTEM\Setup\MoSetup
- Choose New > DWORD (32-bit) number with a right-click on the MoSetup key.
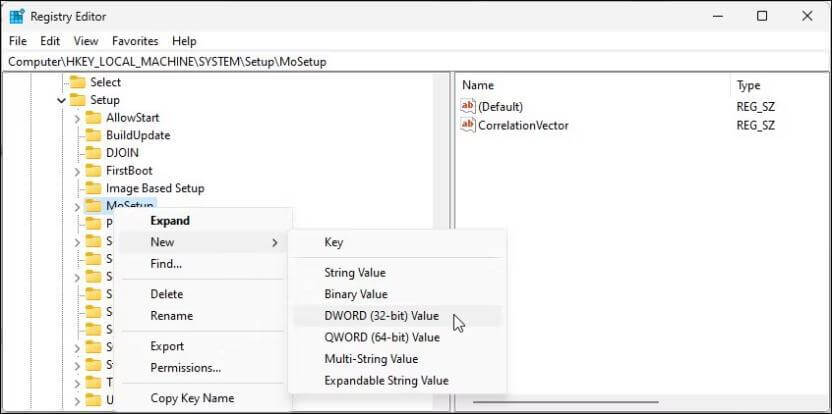
- Make AllowUpgradeWithUnsupportedTPMorCPU the value’s new name.
- Select Modify by performing a right-click upon the newly created item.
- Type “1” in the Value text field to confirm the modifications.
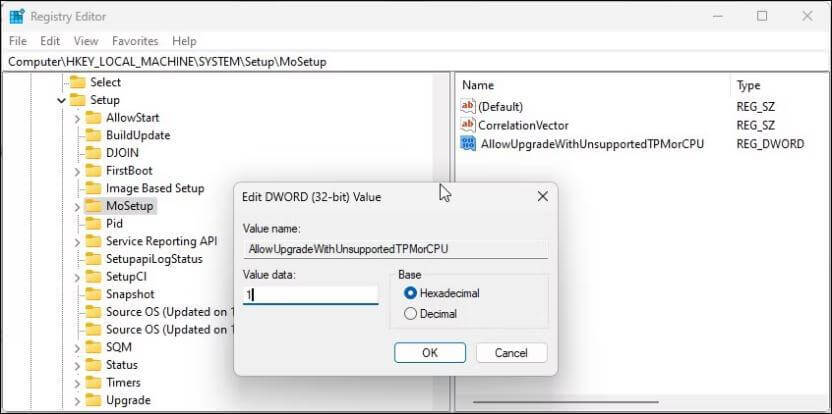
- Try installing Windows 11 with the media generation tool or ISO after quitting the Registry Editor. The modification ought should succeed without a problem.
If the problem continues, find guidelines online about installing Windows 11 with fewer prerequisites to find ways to get around the limitations and update your computer.
Error No Boot Interface Found After Switching from Legacy to UEFI
If you switch the Boot Type for a previous Windows 10 setup from Legacy to UEFI, you can get the No Boot Item Found issue. Still, by switching the Boot Mode between UEFI to Legacy once more in the BIOS settings, you may quickly boot into your current version of Windows 10.
Then, without changing or erasing any of the data stored on the disk, employ the MBR2GTP utility to switch your drive/disk configuration from the Master Boot Record (MBR) to the GUID Partition Table (GPT). You may read more about MBR2GRP use here.
After converting the disk, you may switch from Legacy to UEFI boot modes without seeing the No Boot Device Available warning. To avoid future problems, configure Windows 11 (or even Windows 10) in the UEFI version if you want to perform a fresh installation of the operating system.
After activating Secure Boot:
- Check if the bootable device appears within the Boot Manager.
- If not, make sure Rufus has prepared it using the UEFI standard.
- If not, make another bootable disc with UEFI (CMS) as the target system.
Conclusion
If your PC shows the “can’t run Windows 11” error, don’t worry. It often means some settings need to be changed. You can fix it by turning on Secure Boot and TPM in BIOS. Use the PC Health Check tool to see what’s missing.
Some older PCs may not meet the rules. In that case, you can stay on Windows 10 or try other options. Think about what works best for you. Fixing the error helps you move forward with a safer and faster system.
FAQs
1. What is TPM 2.0?
TPM 2.0 is a chip that keeps your PC safe. It helps protect passwords and files. Windows 11 needs it to work.
2. Can I install Windows 11 on an old PC?
Yes, but it’s not easy. You may need to change some files. Microsoft won’t give updates for unsupported PCs.
3. How do I turn on Secure Boot and TPM?
Restart your PC and open BIOS. Look for Secure Boot and TPM settings. Turn them on, save, and exit.
Author Bio:
Dinesh Lakhwani 

Dinesh Lakhwani, the entrepreneurial brain behind “TechCommuters,” achieved big things in the tech world. He started the company to make smart and user-friendly tech solutions. Thanks to his sharp thinking, focus on quality and the motto of never giving up, TechCommuters became a top player in the industry. His commitment to excellence has propelled the company to a leading position in the industry.
Popular Post
Recent Post

Wise Duplicate Finder Review: Real Results from Wise Duplicate Finder
Read my honest Wise Duplicate Finder review. See features, pricing, pros and cons, and real PC test results. Find out if this free duplicate cleaner can free up your Windows storage.
How to Recover Deleted Files from Pen drive, USB Drive, SD Card
Introduction: On tech forums, you’ll often see posts like this: “I connected my pen drive to my laptop this morning, but the folder was empty. All my college project files had vanished. I don’t have a backup. Can someone help me?” Stories like this are very common. Pen drives, USB drives and SD cards are […]

How To Recover Files Deleted from the Recycle Bin [Windows 11]
Losing a file can happen in seconds. You clear your desktop, hit Delete, and empty the Recycle Bin. Then, just when you need that file again, it seems to have vanished. This guide will walk you through ways to restore files removed from the Recycle Bin. We will begin with simple fixes, then look at […]

Disk Drill Data Recovery Tool Explained: Full Review and Guide
It happens in a split second. You delete a folder by mistake. Your drive stops showing up. A photo album from your last trip just vanishes. And your stomach drops. Lost files feel personal. They are not just data. They are memories, work hours, and sometimes years of effort packed into a few gigabytes. When […]
Recover Deleted Files In Windows 11 With Software & Without
Introduction What is the first thing that goes through your mind the second an important file vanishes from a Windows 11 PC? For most people, it is a mix of panic and disbelief, followed by a frantic click through every folder that file could possibly be hiding in. It happens in a split second: one […]
EaseUS Data Recovery Wizard: Everything To Know
Data loss does not always come from a big disaster either. Most cases start small and boring. A drive gets formatted by mistake. A laptop freezes mid-save and restarts on its own. A memory card stops showing up after being pulled out too fast. None of these feel like emergencies at first, until you realize […]

Recuva Data Recovery Tool: Is it Actually Worth it?
When I first tried Recuva Data Recovery, I wanted to see if it could really bring back lost files. The tool is free, small in size, and promises quick recovery, which made me curious enough to test it on my own PC. The setup was fast, and the wizard guided me step by step. I […]

GetData Recover My Files Data Recovery Tool: Honest Review
A hard drive error brings a special kind of silence. Well, yes! The screen freezes, then a message appears saying the drive can’t be found or must be formatted. In that moment, years of photos and work files feel at risk. It never happens at a good time. Coffee spills near a laptop, a memory […]
Windows File Recovery: A Complete Review [Tried & Tested]
Imagine this. You spend hours perfecting a video project. You hit save. Then your laptop freezes, reboots, and when the screen comes back. The file is gone. Your stomach sinks. It’s not just you. Lost files happen all the time. A dropped hard drive, a bad update, an accidental delete, or a corrupted partition can […]

