How to Boot a Mac in Safe Mode

Last updated on September 5th, 2023 at 4:16 pm
Introduction:
Mac users often encounter various challenges while troubleshooting their devices. Whether it’s dealing with persistent software issues, troubleshooting compatibility problems, or simply wanting to perform maintenance tasks, knowing how to boot your Mac in Safe Mode can be a valuable skill.
Safe Mode is a powerful diagnostic tool that allows your Mac to start up with only essential components, bypassing unnecessary software and configurations. By doing so, it helps isolate and identify potential sources of trouble, paving the way for effective problem-solving. In this blog post, we will guide you through the step-by-step process of how to boot a Mac in Safe Mode, equipping you with the knowledge needed to address those frustrating issues head-on.
How to Boot Mac in Safe Mode: Complete Guide
Here is a step-by-step guide on how to boot a Mac in Safe Mode:
Step 1: Restart Your Mac
If your Mac is already on, go to the Apple menu in the top left corner of the screen and choose “Restart.” If your Mac is off, press the power button to turn it on.
Step 2: Press and hold the Shift key

Well, here comes a crucial step. To Safe Boot Mac, immediately after pressing the power button, press and hold the Shift key on your keyboard. It’s important to do this as soon as possible after starting or restarting your Mac. Keep holding the Shift key until you see the Apple logo or a progress indicator on the screen.
Step 3: Wait for the Safe Mode startup
Continue holding the Shift key and wait for your Mac to boot into Safe Mode. This may take longer than a regular startup, as your Mac performs additional checks and disables unnecessary software.
During this process, you might see a progress bar or loading spinner. This indicates that Safe Mode is being initiated. Once the startup process is complete, you’ll be redirected to the login screen.
Step 4: Log in to your account
At the login screen, you’ll need to enter your username and password as you normally would. Provide the required information and click the “Log In” button to proceed.
Step 5: Use your Mac in Safe Mode
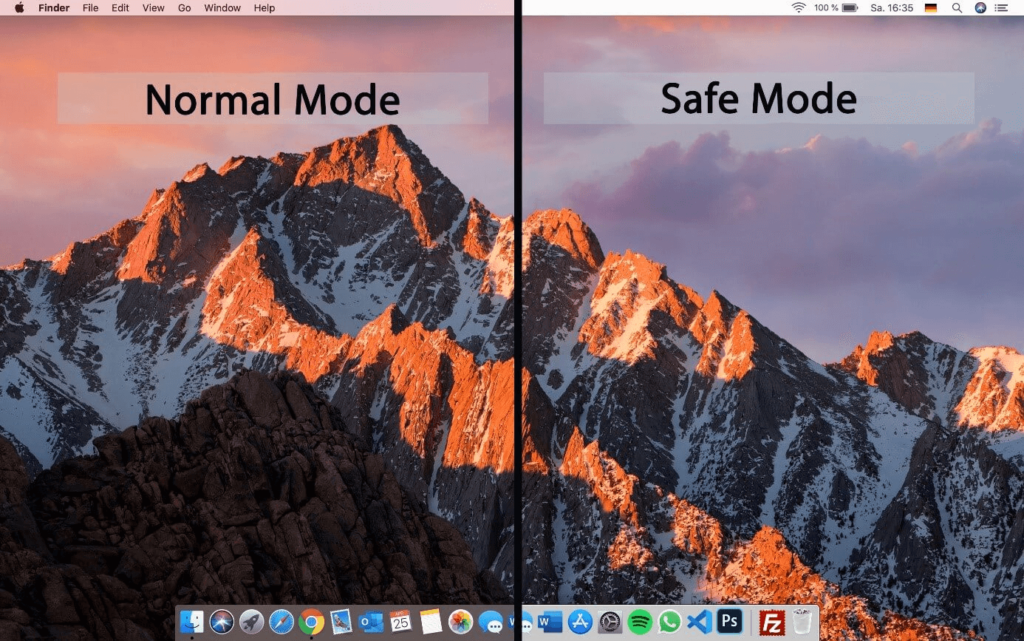
After logging in, your Mac will now be running in Safe Mode. In Safe Mode, certain features and third-party applications are disabled to help isolate potential issues. You might notice that the desktop looks slightly different and some system functionalities are limited which indicates that you have now switched to Safe Mode.
It’s important to note that your internet connection should still be active in Safe Mode, allowing you to access online resources for troubleshooting purposes.
Step 6: Troubleshoot the issue
As you now have Safe Boot Mac, you can start troubleshooting the problem you encountered. Test for the issue you were experiencing previously and observe if it persists in Safe Mode. If the problem no longer occurs, it suggests that a software conflict or incompatible extension might be the cause.
In Safe Mode, your Mac will only load essential system components and Apple-provided services. This helps identify whether the issue is related to third-party software or extensions that load during a normal startup.
NOTE: Remember, Safe Mode is designed for diagnostic purposes and should not be used as a permanent operating mode. It helps identify and resolve software-related issues, but certain features and applications may be unavailable during Safe Mode.
How to Boot a Mac in Safe Mode (Silicon-Based Macs)
Safe Mode on Apple Silicon Macs follows a slightly different process. Here’s how you can access Safe Mode on an Apple Silicon-based Mac:
- Power off your Mac: Ensure your Mac is powered off by going to the Apple menu and selecting “Shut Down.”
- Start your Mac and access startup options: Press and hold the Power button on your Mac until you see the “Loading startup options” text appear on the screen. This indicates that your Mac is in the startup options menu.

- Select the startup disk: In the startup options menu, you’ll see a list of valid startup disks connected to your Mac. Choose the disk you want to boot from by clicking on it.
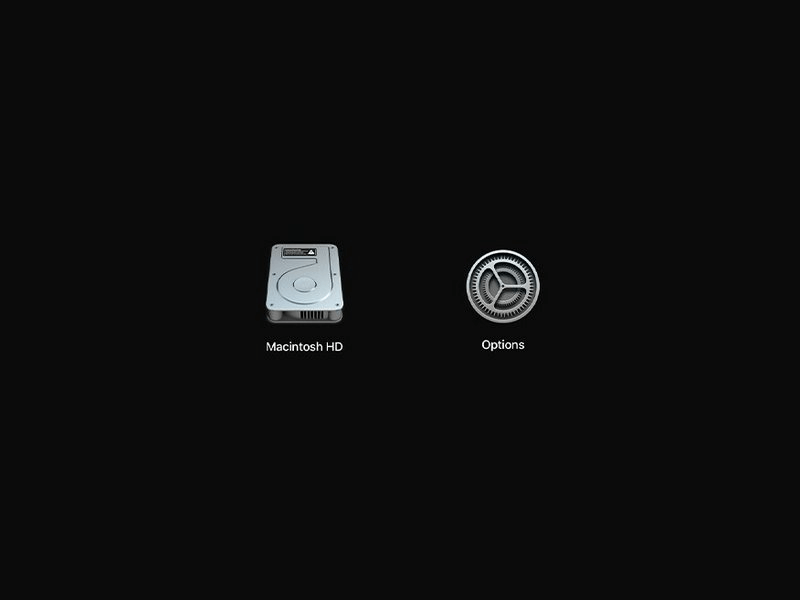
- Initiate Safe Mode: With the startup disk selected, press and hold the Shift key on your keyboard. As you do so, you’ll notice that the “Continue” button under your chosen startup drive will change to “Continue in Safe Mode.” Click on it to start your Mac in Safe Boot.
- Wait for the Mac to boot and log in: Your Mac will now start up in Safe Mode, just like on Intel-based Macs. Wait for the boot process to complete, and you’ll eventually reach the login screen. Enter your username and password, as usual, to log in.
Here is how you can boot a Mac in Safe Mode. From this point onward, the process for using Safe Mode on Apple Silicon Macs mirrors that of Intel-based Macs. You can proceed with troubleshooting your software issues or performing necessary maintenance tasks while in Safe Mode.
How to Exit Safe Mode on Mac
Exiting Safe Mode on a Mac can be done by following these brief steps:
- Go to the Apple menu in the top left corner of the screen.
- Choose “Restart” from the drop-down menu.
- During the restart process, do not press and hold any keys on your keyboard.
- Your Mac will boot up normally, exiting Safe Mode.
By simply restarting your Mac without holding any keys, you can exit Safe Mode and return to the regular operating mode with all functionalities and third-party applications available.
Conclusion
By mastering the art of booting your Mac in Safe Mode, you equip yourself with a powerful technique to overcome common challenges and ensure the smooth operation of your Mac. So, the next time you encounter a persistent issue, don’t hesitate to boot a Mac in Safe Mode and unlock its potential for effective problem-solving.
Author Bio:
Dinesh Lakhwani 

Dinesh Lakhwani, the entrepreneurial brain behind “TechCommuters,” achieved big things in the tech world. He started the company to make smart and user-friendly tech solutions. Thanks to his sharp thinking, focus on quality and the motto of never giving up, TechCommuters became a top player in the industry. His commitment to excellence has propelled the company to a leading position in the industry.
Popular Post


Recent Post

How to Troubleshoot Xbox Game Bar Windows 10: 8 Solutions
Learn how to troubleshoot and fix issues with the Xbox Game Bar not working on Windows 10. This comprehensive guide provides 8 proven solutions to resolve common problems.

How To Record A Game Clip On Your PC With Game Bar Site
Learn how to easily record smooth, high-quality game clips on Windows 11 using the built-in Xbox Game Bar. This comprehensive guide covers enabling, and recording Game Bar on PC.

Top 10 Bass Booster & Equalizer for Android in 2024
Overview If you want to enjoy high-fidelity music play with bass booster and music equalizer, then you should try best Android equalizer & bass booster apps. While a lot of these apps are available online, here we have tested and reviewed 5 best apps you should use. It will help you improve music, audio, and […]

10 Best Video Player for Windows 11/10/8/7 (Free & Paid) in 2024
The advanced video players for Windows are designed to support high quality videos while option to stream content on various sites. These powerful tools support most file formats with support to audio and video files. In this article, we have tested & reviewed some of the best videos player for Windows. 10 Best Videos Player […]

11 Best Call Recording Apps for Android in 2024
Whether you want to record an important business meeting or interview call, you can easily do that using a call recording app. Android users have multiple great options too. Due to Android’s better connectivity with third-party resources, it is easy to record and manage call recordings on an Android device. However it is always good […]

10 Best iPhone and iPad Cleaner Apps of 2024
Agree or not, our iPhones and iPads have seamlessly integrated into our lives as essential companions, safeguarding our precious memories, sensitive information, and crucial apps. However, with constant use, these devices can accumulate a substantial amount of clutter, leading to sluggish performance, dwindling storage space, and frustration. Fortunately, the app ecosystem has responded with a […]

10 Free Best Barcode Scanner for Android in 2024
In our digital world, scanning barcodes and QR codes has become second nature. Whether you’re tracking packages, accessing information, or making payments, these little codes have made our lives incredibly convenient. But with so many barcode scanner apps out there for Android, choosing the right one can be overwhelming. That’s where this guide comes in! […]

11 Best Duplicate Contacts Remover Apps for iPhone in 2024
Your search for the best duplicate contacts remover apps for iPhone ends here. Let’s review some advanced free and premium apps you should try in 2024.

How To Unsubscribe From Emails On Gmail In Bulk – Mass Unsubscribe Gmail
Need to clean up your cluttered Gmail inbox? This guide covers how to mass unsubscribe from emails in Gmail using simple built-in tools. Learn the best practices today!

7 Best Free Methods to Recover Data in Windows
Lost your data on Windows PC? Here are the 5 best methods to recover your data on a Windows Computer.

