How to Fix Cannot Verify Server Identity on iPhone or iPad?

Introduction
While carrying out any work, like sending/receiving emails, errors like the “Cannot Verify Server Identity” one in iOS devices are possible. This happens when the device cannot verify the legitimacy of the mail server’s certificate. Due to an incorrect signature, expired certificate, or mismatch of server and given domain name, the verification process deems it as inauthentic and shows the error.
With this error, users cannot exchange their emails through the account, so a quick resolution is necessary. At this time, you can use Norton’s LifeLock to protect your email account and other ID details.
How to Rectify the Cannot Verify Server Identity Issue?
To remove the error- Cannot Verify Server Identity, iPhone and iPad users take several steps on their devices. Which one will suit your needs depends on the main cause of the error on your iPhone or iPad. The following are the most common solutions to the problem.
Solution 1: Reboot the iPhone/iPad Device
One of the easiest solutions for the Cannot Verify Server Identity error is to restart the device directly. This simple troubleshooting technique will interfere with the server connection and renew the connection when it reboots again. To note, doing this step is suitable if you are unaware of the exact cause for the error and is a minor failsafe process. If the reason is more complex, the error message will appear later.
Hold the Up-volume button and the side button to switch off the iPhone/iPad device. Press and hold until the “Slide to power off” option appears. Move the given slider icon to the end: that will switch the device off. Then, press the side button and hold until the device restarts.
Solution 2: Kill the Mail app
Some iOS users keep the Mail app continuously active, and that can cause it to start lagging or show errors. So, it would help if you swipe up the iPhone screen to open the app carousel. Keep swiping right until you reach the Mail app and swipe on it up. Deactivate the app and switch it on again later.
Solution 3: Disconnect/Reconnect the Internet Connection
Some users notice the Cannot Verify Server Identity iPhone or iPad error even if the mail server and device are not affected. This can occur if the local network connection they are using is facing some error.
If your connection to an ISP is causing the problem, disconnect and reconnect with a few minutes of a gap in between. Additionally, you can turn the modem and router off if you are using them. Restart again after a minute of waiting.
Solution 4: Recheck the iOS Update
In iPhone/iPad devices, the Mail app is one of the in-built applications. So, updating the iOS or iPadOS system to a new version can change the Mail app if such software upgrades are available in the bundled iOS update. If you are using the device with an older OS and see the Cannot Verify Server Identity error, you should do an IOS update.
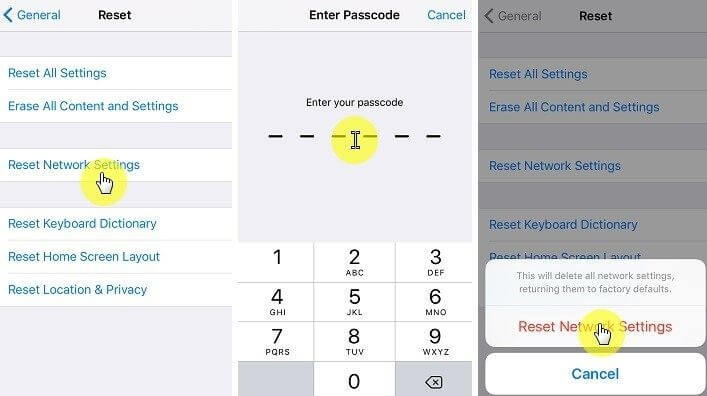
Solution 5: Reset the Network Settings
While you can disconnect and reconnect your internet connection like in Solution 3, resetting the network settings is better if the problem persists. When users reset the network settings, the process deletes all recent settings, like customizations one made. It will return to default settings and remove the issues causing the verification issue.
How to do this?
Step 1: Open your iPad or iPhone device and go to the Settings application.
Step 2: Click on General > Reset.
Step 3: Under the next options, choose the “Reset Network Settings” option.
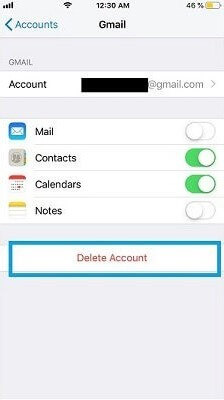
Solution 6: Delete the Mail Account and Open it Again
When you notice the Cannot Verify Server Identity problem on your device, you can delete your account completely from the app. That will remove the issue, and you can reactivate your account afterward. With software like Norton LifeLock, you can back up your account data and restore them when you re-add your mail account.
How to do this?
Step 1: Open the Settings app through your iPad or iPhone device.
Step 2: In the list, choose the “Passwords & Accounts” selection. If you are using older iOS version models, press the “Mail, Contacts, Calendars” or “Mail” option > Accounts.

Step 3: Select the email account to remove. Press the Delete Account button.
Step 4: A confirmation prompt will appear. Hit the “Delete from My iPhone/iPad” or “Delete Account” button, as per your device’s OS version.
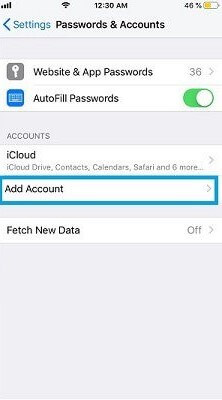
Step 5: Return to the Accounts & Passwords/Accounts page after deleting the account.
Step 6: Choose the “Add Account” selection. Tap on the preferred email service provider and insert all details as instructed to finish the email setup.
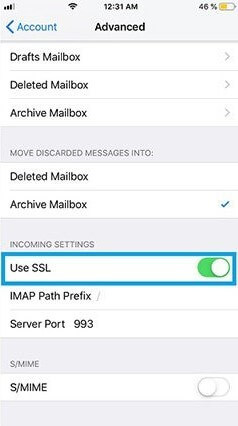
Solution 7: Disable the SSL
Another common fix to handle the Cannot Verify Server Identity issue is deactivating the active SSL certificates. These can sometimes block the verification process while trying to include a new account. So, disabling SSL might remove the problem.
How to do this?
Step 1: On your iPad or iPhone, go to Settings.
Step 2: Open the Passwords & Accounts menu.
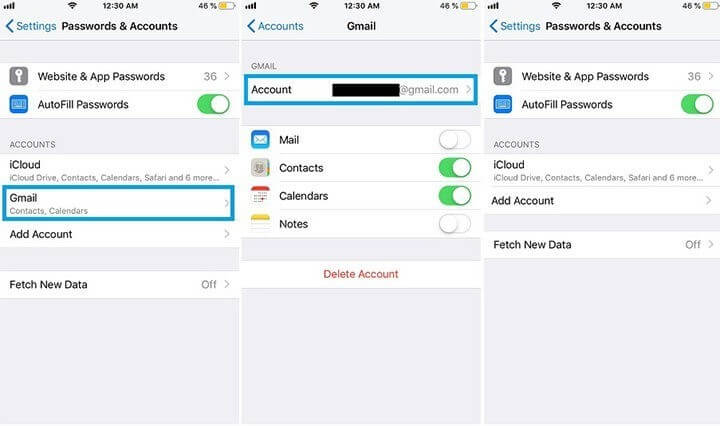
Step 3: Scroll down to find the Mail app and click on it.
Step 4: Tap on the registered account > Advanced.
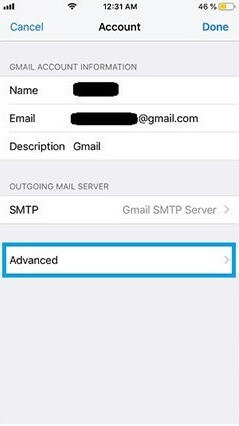
Step 5: Find the SSL choice and toggle the slider beside it to disable the SSL.
Solution 8: Change the Time and Date
If you have the wrong date and time input within your iPhone device, that can cause the Cannot Verify Server Identity prompt. You should check that your smartphone’s date/time settings are the right ones per your exact time zone. If not, change it to resolve the problem.
How to do this?
Step 1: Open your iPhone and access Settings.
Step 2: Click on General > Date & Time.
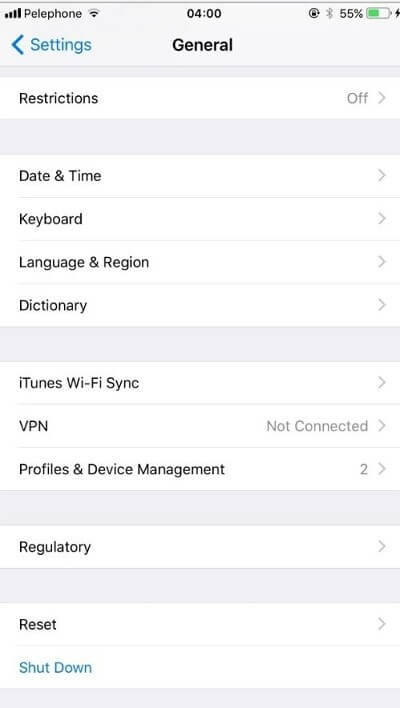
Step 3: In the next screen, toggle the slider beside the “Set Automatically” feature to enable it. Then, check if the email sending and receiving function has resumed and understand if the process worked.
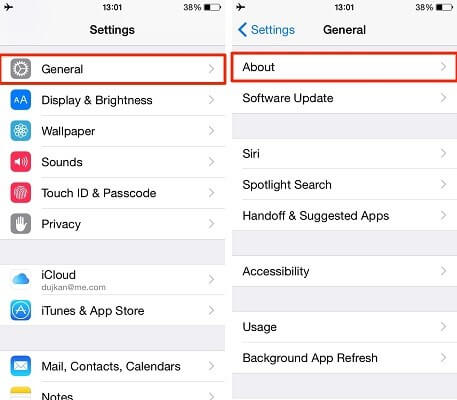
Solution 9: Update the Settings for your iOS carrier
If an iPhone is working with an outdated carrier setting, the verification problem is interrupted due to incompatibility. Plus, the out-of-date iOS carrier settings will affect accurate connectivity with your accounts. You should update these settings to eliminate the error.
How to do this?
Step 1: Open your iPad or iPhone device and access Settings.
Step 2: In the Settings menu, click on the General option.
Step 3: Press About and see the information about the carrier update available. Follow all the given instructions for installing the latest update.
Solution 10: Troubleshoot the minor issues
Multiple other situations can cause the Cannot Verify Server Identity iPhone or iPad-based error prompt. For example, if the server and domain names are not aligning, the verification process will analyze the certificate as incorrect or fake. You can carry out small troubleshooting steps to rectify the domain and server name-related inconsistencies.
- Users operating with a Shared Hosting connection can remove the problem when they adjust the mail server configurations on their iPhones.
- Changing the server name for the email as per the certificate name will work for hosting customers utilizing VPS accounts.
- The VPS users working with a self-signed certificate may see this issue since that is not considered liable. You should prepare a liable certificate from a registered source.
Conclusion
Depending on the main reason for the error, you can use different techniques like restarting the app/device, resetting connections, or deleting and adding the account. Check if the steady mail process is working again after trying out these techniques. Also, use the reliable Norton LifeLock software to protect your account data while trying out these solutions.
If you found this guide helpful, check out our other detailed posts.
Author Bio:
Dinesh Lakhwani 

Dinesh Lakhwani, the entrepreneurial brain behind “TechCommuters,” achieved big things in the tech world. He started the company to make smart and user-friendly tech solutions. Thanks to his sharp thinking, focus on quality and the motto of never giving up, TechCommuters became a top player in the industry. His commitment to excellence has propelled the company to a leading position in the industry.
Popular Post


Recent Post

How To Fix Issues Downloading from the Microsoft Store On Windows
Introduction: Downloading apps from the Microsoft Store should be a simple task. You open the Store, search for an app, and click install. In most cases, the process works without any problem. However, there are times when the download does not start. In some cases, it may stay stuck at a certain percentage. You may […]
How To Fix Windows Update Issues Easily On Windows [2026]
Introduction Windows updates play an important role in keeping a computer stable and secure. They bring new features, fix known bugs, and improve overall performance. When updates work as expected, the system runs smoothly. However, when they fail, users often face slow performance, missing features, or security risks. This is why it becomes important to […]

How To Check If Your PC Is Infected? [Complete Guide]
Computers now sit at the center of almost everything we do. Well, yes! From sending emails to watching videos, we depend on them without much thought. Because of this, even a small issue can disrupt daily tasks. One common problem is hidden malware. It does not always show clear signs at first. It can enter […]

Repair Apps And Programs: Repair Apps That Aren’t Working
Computers have become an essential part of everyday life, supporting work, study, communication, and entertainment. Most of these activities rely on apps and programs, so when one stops functioning, even simple tasks can be disrupted. Common problems include error messages, frozen screens, or apps that fail to open. On Windows systems, such issues often arise […]

Troubleshooting Microphone Privacy Settings: Complete Guide
Sound is a basic part of how we use computers today. People attend meetings, record audio, speak to others, and use voice tools almost every day. A working microphone makes all these tasks easy. When the microphone fails, even simple work becomes difficult. Many users first think the device is broken. In reality, the issue […]
Windows Sound Settings – Sound Control Panel: Complete Guide
Sound plays an important role in how we use a computer every day. It supports both work and leisure. You need it for meetings, videos, music, and alerts. When audio fails, even simple tasks become difficult. Many users feel stuck when sound issues appear. This usually happens because they are not familiar with Windows Sound […]

Run a Troubleshooter For PC Issues Windows: Complete Guide
A computer plays an important role in everyday life. People use it for work, study, communication, and entertainment. When a problem appears, it can interrupt everything. Even a small issue can waste time and create frustration. Many users feel unsure about how to fix such problems. They often think they need expert help. In reality, […]
![Adjusting Audio Output Settings Complete Guide [2026]](https://www.techcommuters.com/wp-content/uploads/2026/03/Adjusting-Audio-Output-Settings-Complete-Guide.webp)
Adjusting Audio Output Settings: Complete Guide [2026]
Sound is part of almost everything we do on a computer. It lets you watch videos, join calls, play music, and hear alerts. When the audio stops working the right way, it can interrupt both work and daily use. That is why adjusting audio output settings matters for every user. Many people get unsure when […]

Artificial Intelligence Explained: Concepts, Terminology, Benefits, and Future Trends
Artificial Intelligence, or AI, is basically computers doing things that usually need a human brain. We’re talking about stuff like learning from experience, figuring out problems, understanding language, and making decisions. It’s not magic, just a lot of data, pattern-spotting, and math behind the scenes. Now, AI doesn’t actually think or feel like we do. […]

Resolving Microphone Detection Problems: Latest Guide [2026]
Microphones are important tools in daily life. People use them for office meetings, online classes, interviews, gaming, customer support, and content creation. When a system fails to detect a microphone, communication stops at once. This situation can cause stress and confusion. Many users believe the microphone is damaged. In reality, most problems are simple and […]

