











So, search for a pair of shoes once online. Close the tab. By evening, those same shoes are sitting on your news site, your video app, and even your recipe blog. Nobody placed them there by chance. A cookie did. Well, yes! Cookies are small files that websites place on your device while you browse. […]
How To Add Or Remove Programs On Windows 11: 4 Quick Methods to Try.
Introduction:
Managing software on your computer is something every Windows user should know. Whether you want to install a useful new app or remove programs you no longer need, understanding how to add remove programs can help your PC stay clean, organized, and fast. It also helps free up storage space, reduce clutter, and improve overall system performance over time.
Windows 11 makes the entire process much easier than older versions of Windows. You do not need advanced technical knowledge to manage your apps and programs. From installing software through the Microsoft Store to uninstalling unwanted applications using Settings or Control Panel, Windows gives you several simple methods to choose from.
This guide will walk you through every method step by step in a clear and beginner-friendly way. By the end, you will know exactly how to add, remove, and manage programs on Windows 11 without any confusion.
What is the Meaning of “Add or Remove Program” on Windows?
“Add or Remove Programs” is a built-in feature in Windows that helps you manage the software installed on your computer. In Windows 11, it is usually found under “Installed apps” or “Apps & features” in Settings. It gives you an easy way to view all the programs currently installed on your PC in one place.
Using this feature, you can uninstall apps you no longer use, repair programs that are not working properly, or make changes to existing software installations. It also helps free up storage space, improve system performance, and keep your computer more organized and clutter-free.
In older versions, it was a dedicated option in the Control Panel. In Windows 11, this feature is available in multiple places, including Settings and the Control Panel.
When you add a program, you are installing new software on your computer. When you remove a program, you are uninstalling it to free up storage and system resources. The add and remove programs feature gives you full control over what runs on your machine. It helps you keep your system clean, fast, and efficient.
Complete Guide: Easy Methods to Add or Remove Programs on Windows 11
Windows 11 offers several ways to manage your apps. You can use the Settings app, Control Panel, File Explorer, or even the Microsoft Store. Each method works well depending on your preference.
Before you begin, make sure you are logged in as an administrator. Some actions require admin rights. Also, close the program you want to uninstall before removing it. This prevents errors during the process.
Method 1: Add/Remove Programs Using the Windows 11 Settings App
The Settings app is the most modern and user-friendly way to add or remove programs on Windows 11. It gives you a clean list of all installed apps. You can sort, search, and manage them from one place.
This method is great for everyday users. It does not require any technical knowledge. Everything is laid out clearly with simple options. You can uninstall apps in just a few clicks without digging through menus.
This is also the fastest way to remove apps you rarely use. The Settings app shows app sizes too. That helps you decide which ones to uninstall to free up space.
Step 1: Press the Windows key and click on Settings. Go to Apps and then click on Installed Apps. You will see a list of all programs on your computer.
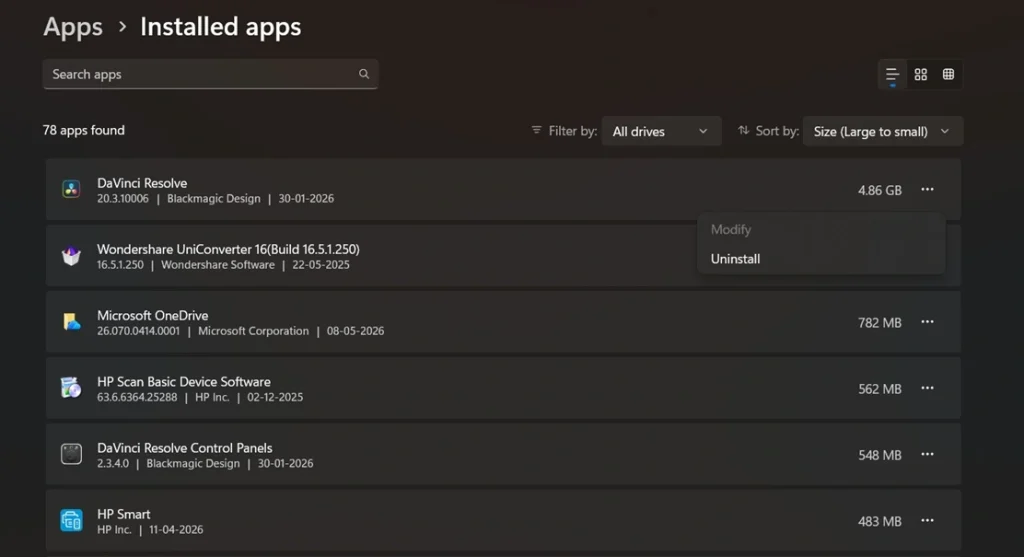
Step 2: Locate the application you want to delete from the list of installed apps. Click the three dots beside the app name, then choose Uninstall. After that, follow the instructions shown on your screen to finish removing the program.
Method 2: Using the Control Panel
The Control Panel is the classic way to add remove programs on Windows. It has been around for decades and still works perfectly in Windows 11. Many users prefer it because they are already familiar with it.
This method gives you a detailed view of all installed software. You can see the program size, version, and installation date. It also lets you change or repair programs, not just remove them.
The Control Panel is especially useful for older software. Some legacy programs may not appear in the Settings app. In those cases, the Control Panel is your best option.
Step 1: Click the Start menu and type Control Panel. Open it and click on Programs, then select Programs and Features.
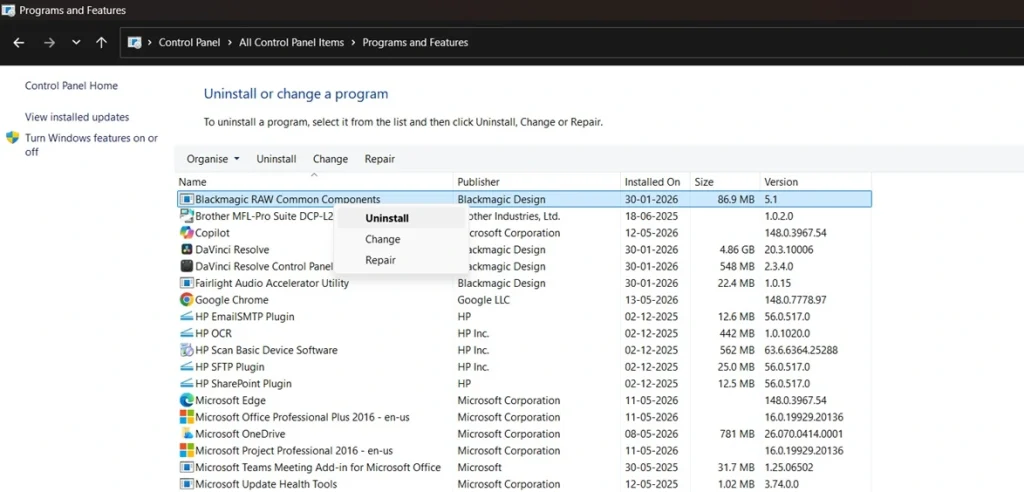
Step 2: Right-click on the program you want to remove and select Uninstall. Follow the prompts. Finish the process.
Method 3: Using the Microsoft Store
The Microsoft Store is the best place to add and remove programs that were downloaded from Microsoft’s platform. It is built into Windows 11 and is very safe to use. All apps in the Store are verified and regularly updated.
If you downloaded an app from the Microsoft Store, you should also remove it from there. This ensures the uninstall is clean and complete. It also removes any associated files and licenses linked to your account.
The Store also makes it easy to reinstall apps later. Once you buy or download a free app, it stays linked to your Microsoft account. You can get it back anytime without paying again.
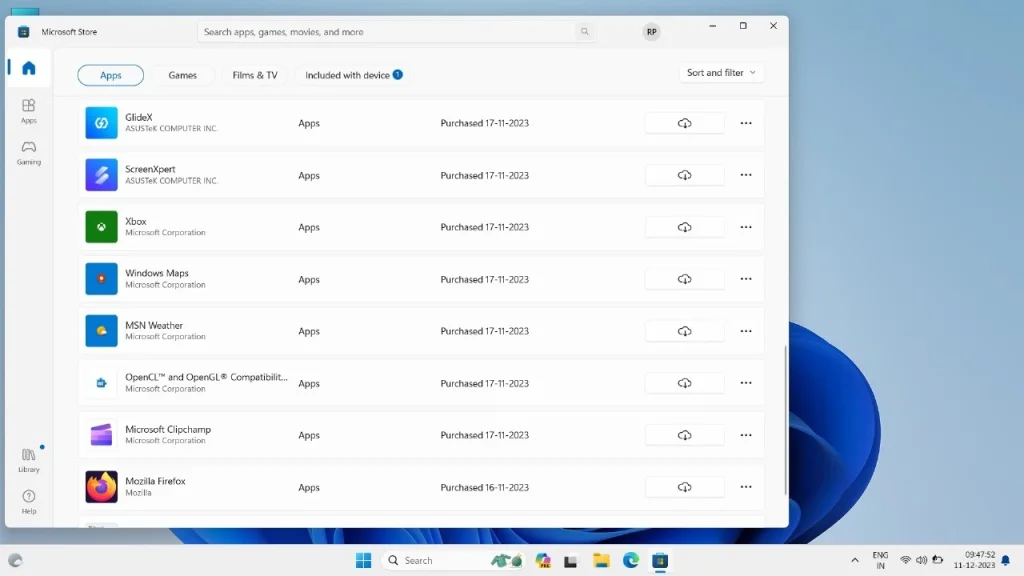
Step 1: Open the Microsoft Store from the Start menu. Click on your profile icon at the top right and select Library.
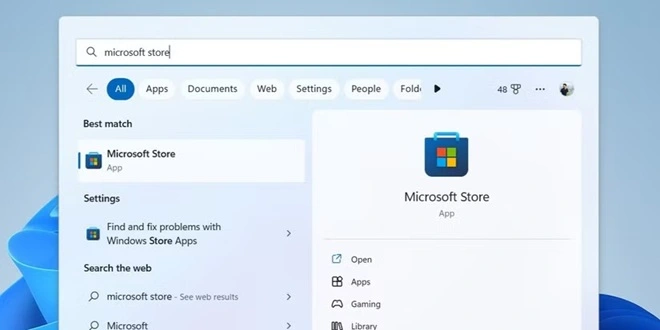
Step 2: Look for the app you want to uninstall. Either right-click the app or open the three-dot menu beside it, then select Uninstall. Windows will then remove the app from your computer.
Method 4: Using File Explorer or the Start Menu
Sometimes you can uninstall apps directly without opening any special tool. Windows 11 allows you to add remove programs right from the Start menu or File Explorer. This is the quickest way if you know exactly which app you want to remove.
This method works for most apps installed on Windows 11. It skips all the extra steps and takes you straight to the uninstall option. It is ideal when you are in a hurry or want to remove apps one by one quickly.
Keep in mind that this method may not work for all programs. Some apps, especially older ones, may not show the uninstall option in the Start menu. In that case, use the Control Panel or Settings app instead.
Step 1: Click the Start menu and find the app you want to remove. Right-click on the app icon and select Uninstall from the menu.
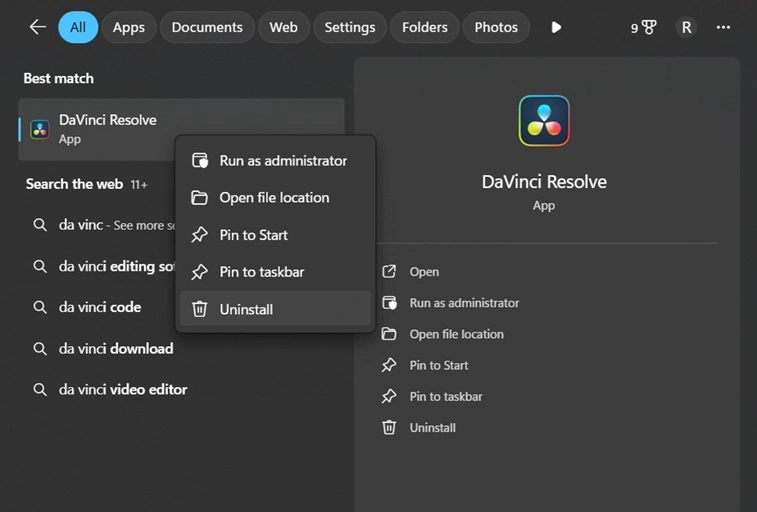
Step 2: A confirmation window will appear. Click Yes or Uninstall to confirm. The program will be removed from your system immediately.
Common Problems and Solutions When Managing Apps on Windows 11
Troubleshooting App Installation and Removal Issues
Sometimes things do not go as planned. You may run into errors when trying to add or remove programs on your PC. These issues are common but easy to fix.
Here are eight common problems and their solutions:
- The Uninstall button is greyed out: This happens when the program is still running in the background. Open Task Manager, find the app process, and end it. Then try uninstalling again.
- You get an “Access Denied” error: This usually means you do not have admin rights. Right-click the uninstaller and choose “Run as Administrator” to fix this.
- The program does not appear in the installed apps list: Some apps hide from standard lists. Open the Control Panel and check Programs and Features. The app may be listed there instead.
- The installation fails midway: This can happen due to a corrupted download. Delete the installer file and download it again from the official website. Make sure your internet connection is stable.
- Windows says the app is already installed: Try repairing or reinstalling the program through the Settings app. Go to Installed Apps, click the three-dot menu, and select Modify or Repair.
- The uninstall process freezes: Restart your PC and try again. If it still freezes, use a trusted third-party uninstaller tool to force remove the program.
- An app keeps coming back after removal: Some apps are set to reinstall automatically. Check your Microsoft Store settings or disable app restore options in your account settings.
- You cannot find the uninstaller for an older program: Go to the app’s installation folder in File Explorer. Look for a file named “uninstall.exe” or “setup.exe” and run it to remove the program manually.
Author’s Tip
Always keep your installed apps list clean and reviewed. Over time, you may forget about programs you installed long ago. Go through your apps every few months and remove what you no longer need. This keeps your PC fast and your storage free.
When you add and remove programs regularly, you also improve your system’s security. Old or unused software can become a vulnerability. Outdated apps may have unpatched bugs that hackers can exploit. Removing them reduces that risk.
One more thing. Always download software from trusted sources. The Microsoft Store and official websites are your safest options. Avoid random download links from unknown websites. They may include malware or unwanted programs that are hard to remove later.
Conclusion
Managing software on Windows 11 is not complicated. You have four easy ways to add remove programs on your PC. Whether you use Settings, Control Panel, the Microsoft Store, or the Start menu, each method gets the job done quickly.
Knowing how to add or remove programs helps you stay in control of your computer. You can free up space, improve performance, and keep your system secure. It takes only a few minutes but makes a big difference in the long run.
Now that you know all the methods, you can confidently manage any app on your Windows 11 PC. Bookmark this guide for future reference. And remember to review your installed apps regularly to keep your computer running at its best.
FAQs
1. How do I find the add or remove programs option in Windows 11?
You can find it in two places. Open Settings and go to Apps, then Installed Apps. Or open Control Panel, click Programs, and then Programs and Features. Both options let you view and manage all software installed on your PC. The Settings app is more modern, while the Control Panel is more detailed.
2. Is it safe to use the add and remove programs feature to uninstall system apps?
You should be careful when removing system apps. Some built-in Windows apps are needed for the operating system to work properly. Removing them can cause errors or system instability. Stick to removing third-party apps that you installed yourself. If you are unsure, search the app name online before uninstalling it.
3. Why does a program not fully uninstall even after I remove it?
Some programs leave behind leftover files, folders, or registry entries even after uninstalling. These are called residual files. They take up space but are usually harmless. To remove them completely, you can use a trusted PC cleaning tool. It will scan and delete all leftover data associated with the uninstalled program.
Author Bio:
Dinesh Lakhwani 

Dinesh Lakhwani, the entrepreneurial brain behind “TechCommuters,” achieved big things in the tech world. He started the company to make smart and user-friendly tech solutions. Thanks to his sharp thinking, focus on quality and the motto of never giving up, TechCommuters became a top player in the industry. His commitment to excellence has propelled the company to a leading position in the industry.
Popular Post
Recent Post
How To Disable Background Apps In Windows: 4 Quick Methods
A slow PC rarely gives a warning. One day, it simply takes longer to start. Apps open late. The fan runs loud, even when the screen is almost empty. Most people blame old hardware. Often, that is not the real reason. The real reason is hiding in plain sight. Windows keeps many apps active in […]
How to Activate Windows with a Product Key for Windows 11 & Windows 10
It always shows up at the worst time. You are halfway through a report, or about to join a video call. Then you spot it in the bottom right corner of the screen. Activate Windows. Go to Settings to activate Windows. Initially, an unactivated copy of Windows may seem like a minor inconvenience. Over time, […]

Is Easy Duplicate Finder Worth It? Honest Review
The photos folder looked normal at first glance. Then the storage warning popped up. One trip photo appeared four times. A tax PDF sat in three different folders. Two old setup files were still in Downloads, and each one was over 500 MB. Nobody plans this mess. Copies pile up slowly. A download runs twice. […]

Wise Duplicate Finder Review: Real Results from Wise Duplicate Finder
Read my honest Wise Duplicate Finder review. See features, pricing, pros and cons, and real PC test results. Find out if this free duplicate cleaner can free up your Windows storage.

How to Recover Deleted Files from Pen drive, USB Drive, SD Card
Introduction: On tech forums, you’ll often see posts like this: “I connected my pen drive to my laptop this morning, but the folder was empty. All my college project files had vanished. I don’t have a backup. Can someone help me?” Stories like this are very common. Pen drives, USB drives and SD cards are […]

How To Recover Files Deleted from the Recycle Bin [Windows 11]
Losing a file can happen in seconds. You clear your desktop, hit Delete, and empty the Recycle Bin. Then, just when you need that file again, it seems to have vanished. This guide will walk you through ways to restore files removed from the Recycle Bin. We will begin with simple fixes, then look at […]

Disk Drill Data Recovery Tool Explained: Full Review and Guide
It happens in a split second. You delete a folder by mistake. Your drive stops showing up. A photo album from your last trip just vanishes. And your stomach drops. Lost files feel personal. They are not just data. They are memories, work hours, and sometimes years of effort packed into a few gigabytes. When […]
Recover Deleted Files In Windows 11 With Software & Without
Introduction What is the first thing that goes through your mind the second an important file vanishes from a Windows 11 PC? For most people, it is a mix of panic and disbelief, followed by a frantic click through every folder that file could possibly be hiding in. It happens in a split second: one […]

EaseUS Data Recovery Wizard: Everything To Know
Data loss does not always come from a big disaster either. Most cases start small and boring. A drive gets formatted by mistake. A laptop freezes mid-save and restarts on its own. A memory card stops showing up after being pulled out too fast. None of these feel like emergencies at first, until you realize […]

